Good morning Mark. Awesome! I am surprised to see how large the nails on the deck and hull are. I also see the nails on the butt joint of the deck are not square. Interesting. Contrary to my belief and current thinking. Cheers GrantOur trip to Sydney this past long Easter weekend was a finely balanced affair of equity and fairness. In exchange for attending a musical on Saturday evening, I was allowed to escort the Admiral to Darling Harbour during the day to inspect the handful of marine craft they have moored there. These included replicas of the Endeavour of 1764 and Duyfken of 1595, and the restored James Craig of 1874. I have posted a small collection of photos below
View attachment 368513View attachment 368514View attachment 368515View attachment 368516View attachment 368517View attachment 368518View attachment 368519View attachment 368520View attachment 368521View attachment 368522View attachment 368523View attachment 368524View attachment 368525View attachment 368526View attachment 368527View attachment 368528View attachment 368529
-

Win a Free Custom Engraved Brass Coin!!!
As a way to introduce our brass coins to the community, we will raffle off a free coin during the month of August. Follow link ABOVE for instructions for entering.
-

PRE-ORDER SHIPS IN SCALE TODAY!
The beloved Ships in Scale Magazine is back and charting a new course for 2026!
Discover new skills, new techniques, and new inspirations in every issue.
NOTE THAT OUR FIRST ISSUE WILL BE JAN/FEB 2026
You are using an out of date browser. It may not display this or other websites correctly.
You should upgrade or use an alternative browser.
You should upgrade or use an alternative browser.
Great photo’s Mark , thanks for sharing , actually I should go as well as a Sydney residentOur trip to Sydney this past long Easter weekend was a finely balanced affair of equity and fairness. In exchange for attending a musical on Saturday evening, I was allowed to escort the Admiral to Darling Harbour during the day to inspect the handful of marine craft they have moored there. These included replicas of the Endeavour of 1764 and Duyfken of 1595, and the restored James Craig of 1874. I have posted a small collection of photos below
View attachment 368513View attachment 368514View attachment 368515View attachment 368516View attachment 368517View attachment 368518View attachment 368519View attachment 368520View attachment 368521View attachment 368522View attachment 368523View attachment 368524View attachment 368525View attachment 368526View attachment 368527View attachment 368528View attachment 368529
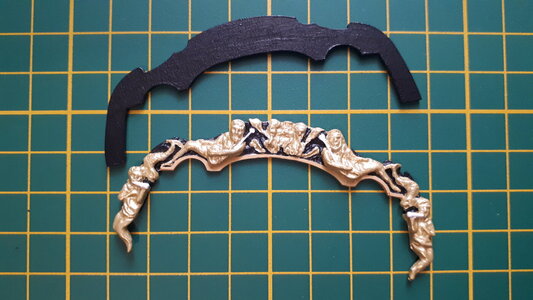
Building the Fly's stern fascia was like a renovation project for a discerning Lilliputian who enjoys natural light and got the notion to add more windows to the hallway of his tiny house. It started by painting the cast-metal tafferal decoration in gold, black and yellow ochre, and overlaying it on the tafferal piece which is itself painted black to blend in as a backdrop.
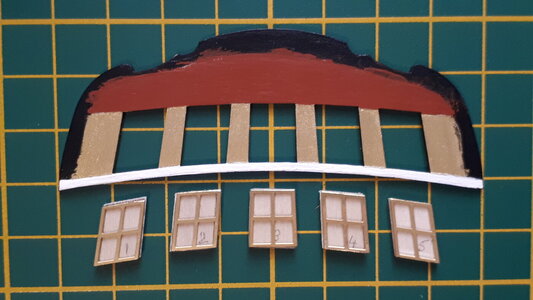
The fascia is painted carefully in background colours that will be visible when the tafferal is in place. Black on the outer perimeter to match the tafferal border, red ochre for the decoration archways, gold as a background for the mullions, and white for the window sill below.
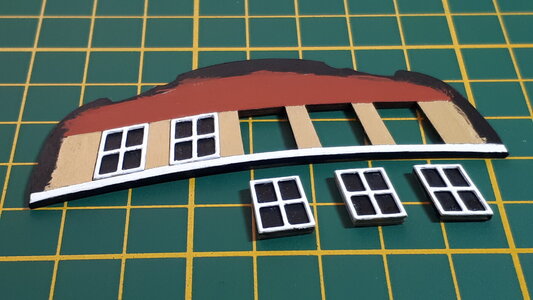
Plywood cut-outs served as a backing for each window and painted black to continue the 'lights out' theme that started with the quarter galleries. The cut-outs are depressed a smidgeon below the level of the each frame opening to allow for the white-painted window frames to fit flush with the fascia's surface.
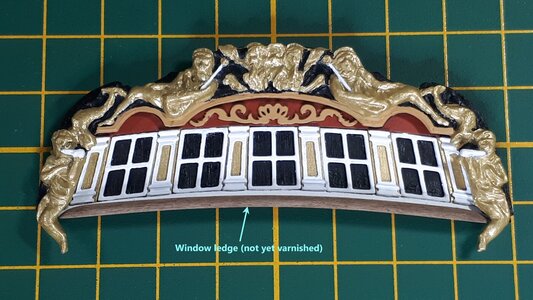
The fascia is quite a colourful affair when all is done and dusted. The only deviation from the kit was a window ledge fashioned from a strip of walnut (yet to be varnished) and steam-bent to follow the curvature of the window sill.
The stern fascia is fitted temporarily to the hull to help align the brass-etched FLY lettering in the upper counter area. It took me quite a while to get just three letters in the right place, but happy that my ship now has a name! The lettering was coated in yellow ochre which will be the modus operandi for all of the friezeworks on the ship.

The fascia is painted carefully in background colours that will be visible when the tafferal is in place. Black on the outer perimeter to match the tafferal border, red ochre for the decoration archways, gold as a background for the mullions, and white for the window sill below.

Plywood cut-outs served as a backing for each window and painted black to continue the 'lights out' theme that started with the quarter galleries. The cut-outs are depressed a smidgeon below the level of the each frame opening to allow for the white-painted window frames to fit flush with the fascia's surface.

The fascia is quite a colourful affair when all is done and dusted. The only deviation from the kit was a window ledge fashioned from a strip of walnut (yet to be varnished) and steam-bent to follow the curvature of the window sill.

The stern fascia is fitted temporarily to the hull to help align the brass-etched FLY lettering in the upper counter area. It took me quite a while to get just three letters in the right place, but happy that my ship now has a name! The lettering was coated in yellow ochre which will be the modus operandi for all of the friezeworks on the ship.

Stunning Mark , really looking fabulousBuilding the Fly's stern fascia was like a renovation project for a discerning Lilliputian who enjoys natural light and got the notion to add more windows to the hallway of his tiny house. It started by painting the cast-metal tafferal decoration in gold, black and yellow ochre, and overlaying it on the tafferal piece which is itself painted black to blend in as a backdrop.
View attachment 368849
The fascia is painted carefully in background colours that will be visible when the tafferal is in place. Black on the outer perimeter to match the tafferal border, red ochre for the decoration archways, gold as a background for the mullions, and white for the window sill below.
View attachment 368850
Plywood cut-outs served as a backing for each window and painted black to continue the 'lights out' theme that started with the quarter galleries. The cut-outs are depressed a smidgeon below the level of the each frame opening to allow for the white-painted window frames to fit flush with the fascia's surface.
View attachment 368851
The fascia is quite a colourful affair when all is done and dusted. The only deviation from the kit was a window ledge fashioned from a strip of walnut (yet to be varnished) and steam-bent to follow the curvature of the window sill.
View attachment 368852
The stern fascia is fitted temporarily to the hull to help align the brass-etched FLY lettering in the upper counter area. It took me quite a while to get just three letters in the right place, but happy that my ship now has a name! The lettering was coated in yellow ochre which will be the modus operandi for all of the friezeworks on the ship.
View attachment 368853
Wonderful Mark!
Mark, the extra time and patients you took on the facia is sure worth it. Looks fantastic!
Looks great Mark! Well done sir! 
Good morning. Stunning Mark. That is a good kit. So nice to see a kit that provides decent decorations. The windows and pillars made to perfection. Really good work. Cheers GrantBuilding the Fly's stern fascia was like a renovation project for a discerning Lilliputian who enjoys natural light and got the notion to add more windows to the hallway of his tiny house. It started by painting the cast-metal tafferal decoration in gold, black and yellow ochre, and overlaying it on the tafferal piece which is itself painted black to blend in as a backdrop.
View attachment 368849
The fascia is painted carefully in background colours that will be visible when the tafferal is in place. Black on the outer perimeter to match the tafferal border, red ochre for the decoration archways, gold as a background for the mullions, and white for the window sill below.
View attachment 368850
Plywood cut-outs served as a backing for each window and painted black to continue the 'lights out' theme that started with the quarter galleries. The cut-outs are depressed a smidgeon below the level of the each frame opening to allow for the white-painted window frames to fit flush with the fascia's surface.
View attachment 368851
The fascia is quite a colourful affair when all is done and dusted. The only deviation from the kit was a window ledge fashioned from a strip of walnut (yet to be varnished) and steam-bent to follow the curvature of the window sill.
View attachment 368852
The stern fascia is fitted temporarily to the hull to help align the brass-etched FLY lettering in the upper counter area. It took me quite a while to get just three letters in the right place, but happy that my ship now has a name! The lettering was coated in yellow ochre which will be the modus operandi for all of the friezeworks on the ship.
View attachment 368853
Hi Mark, That stern is looking very nice. A beautiful combination of colors.Building the Fly's stern fascia was like a renovation project for a discerning Lilliputian who enjoys natural light and got the notion to add more windows to the hallway of his tiny house. It started by painting the cast-metal tafferal decoration in gold, black and yellow ochre, and overlaying it on the tafferal piece which is itself painted black to blend in as a backdrop.
View attachment 368849
The fascia is painted carefully in background colours that will be visible when the tafferal is in place. Black on the outer perimeter to match the tafferal border, red ochre for the decoration archways, gold as a background for the mullions, and white for the window sill below.
View attachment 368850
Plywood cut-outs served as a backing for each window and painted black to continue the 'lights out' theme that started with the quarter galleries. The cut-outs are depressed a smidgeon below the level of the each frame opening to allow for the white-painted window frames to fit flush with the fascia's surface.
View attachment 368851
The fascia is quite a colourful affair when all is done and dusted. The only deviation from the kit was a window ledge fashioned from a strip of walnut (yet to be varnished) and steam-bent to follow the curvature of the window sill.
View attachment 368852
The stern fascia is fitted temporarily to the hull to help align the brass-etched FLY lettering in the upper counter area. It took me quite a while to get just three letters in the right place, but happy that my ship now has a name! The lettering was coated in yellow ochre which will be the modus operandi for all of the friezeworks on the ship.
View attachment 368853
Regard, Peter
- Joined
- Sep 3, 2021
- Messages
- 5,191
- Points
- 738

That stern looks pretty good. I especially like it that the windows and their ornaments appear to be quite symmetrical.Building the Fly's stern fascia was like a renovation project for a discerning Lilliputian who enjoys natural light and got the notion to add more windows to the hallway of his tiny house. It started by painting the cast-metal tafferal decoration in gold, black and yellow ochre, and overlaying it on the tafferal piece which is itself painted black to blend in as a backdrop.
View attachment 368849
The fascia is painted carefully in background colours that will be visible when the tafferal is in place. Black on the outer perimeter to match the tafferal border, red ochre for the decoration archways, gold as a background for the mullions, and white for the window sill below.
View attachment 368850
Plywood cut-outs served as a backing for each window and painted black to continue the 'lights out' theme that started with the quarter galleries. The cut-outs are depressed a smidgeon below the level of the each frame opening to allow for the white-painted window frames to fit flush with the fascia's surface.
View attachment 368851
The fascia is quite a colourful affair when all is done and dusted. The only deviation from the kit was a window ledge fashioned from a strip of walnut (yet to be varnished) and steam-bent to follow the curvature of the window sill.
View attachment 368852
The stern fascia is fitted temporarily to the hull to help align the brass-etched FLY lettering in the upper counter area. It took me quite a while to get just three letters in the right place, but happy that my ship now has a name! The lettering was coated in yellow ochre which will be the modus operandi for all of the friezeworks on the ship.
View attachment 368853
Stunning Mark , really looking fabulous
Wonderful Mark!
Mark, the extra time and patients you took on the facia is sure worth it. Looks fantastic!
Looks great Mark! Well done sir!
Good morning. Stunning Mark. That is a good kit. So nice to see a kit that provides decent decorations. The windows and pillars made to perfection. Really good work. Cheers Grant
Hi Mark, That stern is looking very nice. A beautiful combination of colors.
Regard, Peter
Thank you all for the good wishes and all-round good vibes, much appreciated. I'm sure I used to work a lot harder at my schoolwork and only ever remember getting a clip on the ear for it, certainly no complimentsThat stern looks pretty good. I especially like it that the windows and their ornaments appear to be quite symmetrical.

On another note, can I ask if anyone else covers the brass and metal work on their ships with a coat of clear varnish? Does it really keep the rust at bay? What if the metal works are painted, is the varnish still necessary or even a good thing? Thanks!

Thanks Heinrich! And good to know you are still about and kickingHi Mark. As per usual, I had a lot of catching up to do. Man, those stern decorations look awesome as does the rest of the build. You are creating a very special Fly here. Carry on with the good work!
Your transom looks fantastic, very cleanly worked and a great choice of colors, very harmonious.
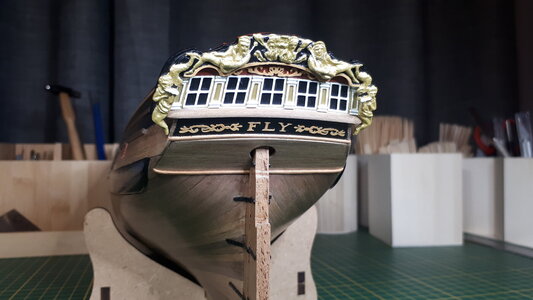
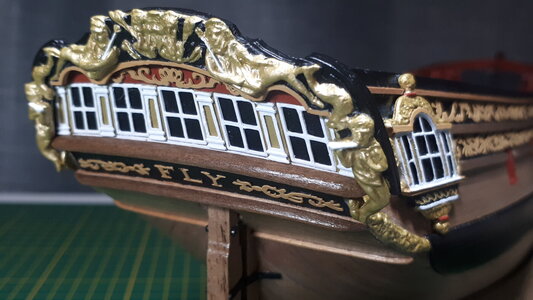
The stern fascia and most of the friezeworks and decorations are now installed on my Fly's hull, all adopting the same colour scheme that somehow emerged as this build progressed - black, gold, ochre red, ochre yellow and white.
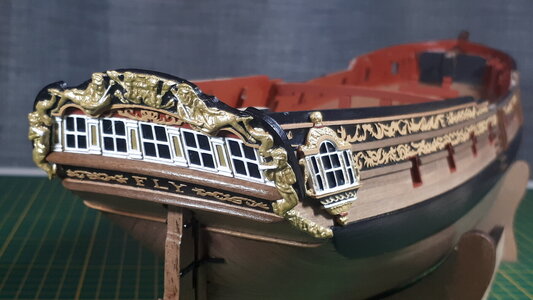
I added two mouldings that border the ship's name above and below on the upper stern counter. These were not part of the kit but rather an idea that I borrowed, with no intention of returning, from other Fly and Pegasus builds
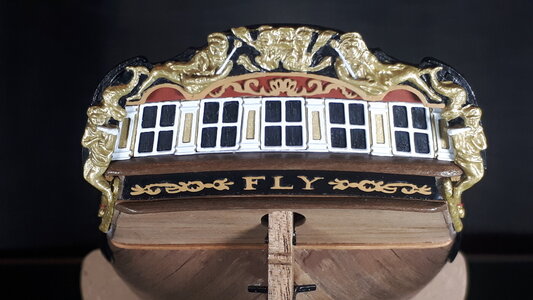
The brass decorations were coated in yellow ochre, twice, to remove the glare and reflection off them. The lower stern metal castings that flow from the fascia to the wale planks required a fair deal of filing to get them to fit snugly along the edge of the stern planking.
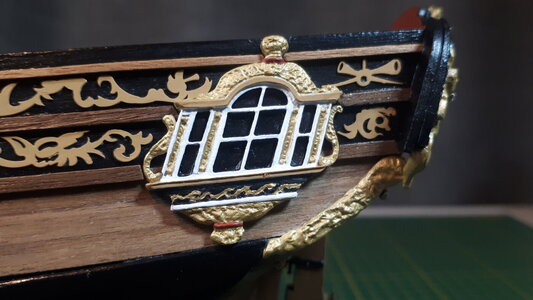
As always, precision is the name of the game in placing the decorations evenly between the rails. It works a treat if you position the lower waist rail correctly to start with and then add the rows of decorations and rails progressively upwards, ending with the drift rail at the top.
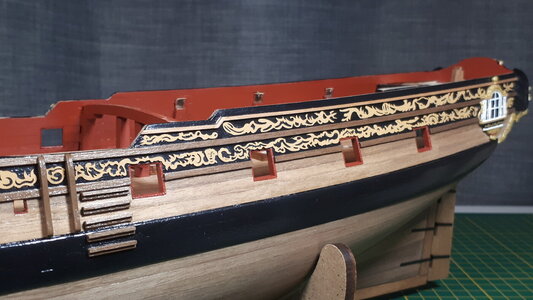
The black window panes are a permanent feature on my Fly, which means anyone who tries to sail her will be in a perpetual state of darkness
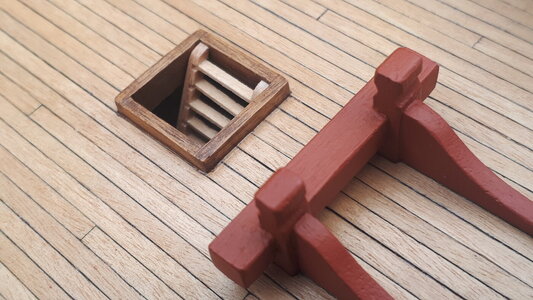
As always, when you get to the end of one task you immediately begin to wonder what might be next. In this instance it seems it might be the rigging of the cannons, at least those that will be positioned fore and aft on the gun deck and inaccessible once the forecastle and quarterdeck are in place. In the meantime I added a few of the deck fittings that would not hamper the cannon-rigging process too much, including a ladder down the aft hatch to the lower deck.

I added two mouldings that border the ship's name above and below on the upper stern counter. These were not part of the kit but rather an idea that I borrowed, with no intention of returning, from other Fly and Pegasus builds

The brass decorations were coated in yellow ochre, twice, to remove the glare and reflection off them. The lower stern metal castings that flow from the fascia to the wale planks required a fair deal of filing to get them to fit snugly along the edge of the stern planking.

As always, precision is the name of the game in placing the decorations evenly between the rails. It works a treat if you position the lower waist rail correctly to start with and then add the rows of decorations and rails progressively upwards, ending with the drift rail at the top.

The black window panes are a permanent feature on my Fly, which means anyone who tries to sail her will be in a perpetual state of darkness


As always, when you get to the end of one task you immediately begin to wonder what might be next. In this instance it seems it might be the rigging of the cannons, at least those that will be positioned fore and aft on the gun deck and inaccessible once the forecastle and quarterdeck are in place. In the meantime I added a few of the deck fittings that would not hamper the cannon-rigging process too much, including a ladder down the aft hatch to the lower deck.

Last edited:
Thank you TobiasYour transom looks fantastic, very cleanly worked and a great choice of colors, very harmonious.
Absolutely beautiful work Mark!
I agree with Daniel. This is really fine work. I appreciate your keen attention to the details.
Absolutely beautiful work Mark!
Thank you Daniel and Paul, I learn a lot from those who go before meI agree with Daniel. This is really fine work. I appreciate your keen attention to the details.


