Yes sir, right away sir! Message understood ... no perpetual black-out, soft glow candlelights, romantic ambience, full re-fit. I'll get onto it yesterday, Captain!Very nice work. I am disappointed though about the state of perpetual black-out on your Fly, honestly, I expected beautifully crafted windows with the soft glow of some candlelights shining through.
A retrofit is in order...
-

Win a Free Custom Engraved Brass Coin!!!
As a way to introduce our brass coins to the community, we will raffle off a free coin during the month of August. Follow link ABOVE for instructions for entering.
-

PRE-ORDER SHIPS IN SCALE TODAY!
The beloved Ships in Scale Magazine is back and charting a new course for 2026!
Discover new skills, new techniques, and new inspirations in every issue.
NOTE THAT OUR FIRST ISSUE WILL BE JAN/FEB 2026
You are using an out of date browser. It may not display this or other websites correctly.
You should upgrade or use an alternative browser.
You should upgrade or use an alternative browser.
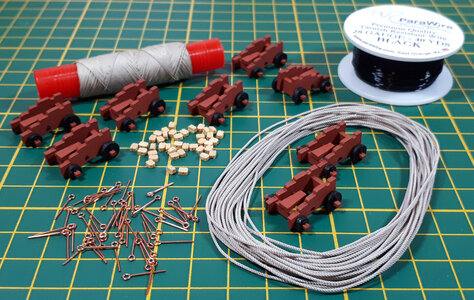
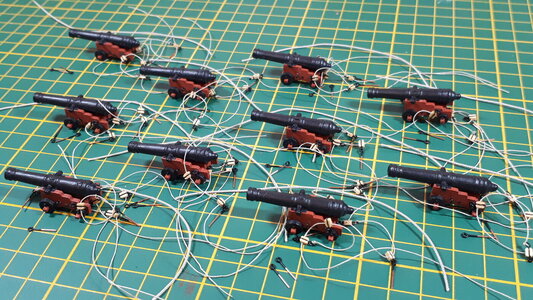
I have discovered that rigging tiny little gun carriages is not a job for the faint-hearted, or certainly not the impatient, and I question now my wisdom in opting for the Fly 'upgrade' kit and all its gun carriage parts instead of simply using the original kit's all-in-one cast metal pieces. Oh well, in for a penny, in for a pound. The wooden carriages had at least been assembled earlier on in the build, and now require the hardware necessary to rig them to the gun deck. 28-gauge black wire is used to strop the tiny 2mm blocks, six of which are required for each carriage. Later on, the .25mm rope will be used for the in- and out-haul tackle and the thicker .7mm beige rope will be used for the breeching lines.
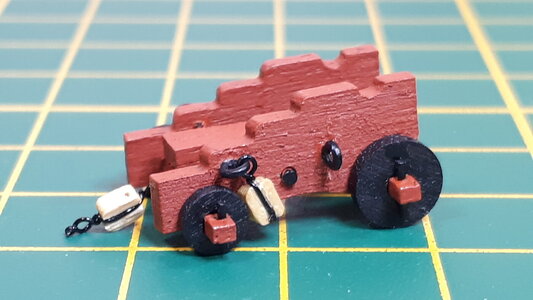
The copper eyebolts have an inner diameter of 1mm which helps to keep the scale of the tiny gun carriages in perspective, and are painted black to match the colour of the strops and general colour scheme of the carriage. Ten eyebolts are required per gun and care was taken to position each one appropriately in readiness for the rigging ropes later on.
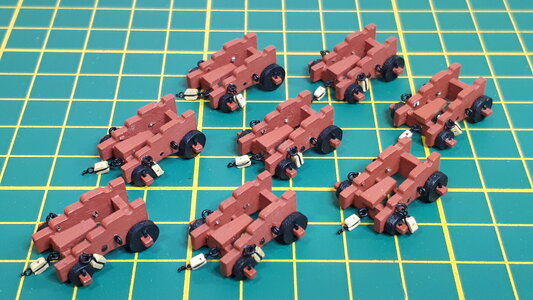
Eight carriages down, eight to go. It took hours to get this far, and I am very tempted to rig only those guns that will ultimately be visible on the gun deck. Not sure you would have got away with that in the Royal Navy back in the day, so I might just go full monty and rig the whole lot.
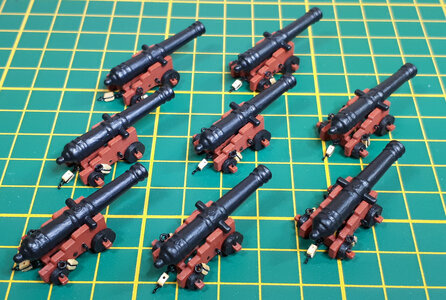
The cannons are placed loosely on the carriages for now. They will be one of the final items of the gun ensemble to be fixed in place, by fitting impossibly small capsquares over the trunnions, once the carriages and all their attendant rigging is ready to go.

The copper eyebolts have an inner diameter of 1mm which helps to keep the scale of the tiny gun carriages in perspective, and are painted black to match the colour of the strops and general colour scheme of the carriage. Ten eyebolts are required per gun and care was taken to position each one appropriately in readiness for the rigging ropes later on.

Eight carriages down, eight to go. It took hours to get this far, and I am very tempted to rig only those guns that will ultimately be visible on the gun deck. Not sure you would have got away with that in the Royal Navy back in the day, so I might just go full monty and rig the whole lot.

The cannons are placed loosely on the carriages for now. They will be one of the final items of the gun ensemble to be fixed in place, by fitting impossibly small capsquares over the trunnions, once the carriages and all their attendant rigging is ready to go.

Last edited:
Good morning Mark. Looking spot on. Placing the capsquires for the trunnions are always a mission for myself so good luck. Very nice detail. A question. are you going to cut/file down the length of the trunnions to lie flush with the carriages. If so, I would do this before placing the capsquires or the painting will be mission. You are making a brilliant HMS Fly Mark. Cheers GrantI have discovered that rigging tiny little gun carriages is not a job for the faint-hearted, or certainly not the impatient, and I question now my wisdom in opting for the Fly 'upgrade' kit and all its gun carriage parts instead of simply using the original kit's all-in-one cast metal pieces. Oh well, in for a penny, in for a pound. The wooden carriages had at least been assembled earlier on in the build, and now require the hardware necessary to rig them to the gun deck. 28-gauge black wire is used to strop the tiny 2mm blocks, six of which are required for each carriage. Later on, the .25mm rope will be used for the in- and out-haul tackle and the thicker .7mm beige rope will be used for the breeching lines.
View attachment 372724
The copper eyebolts have an inner diameter of 1mm which helps to keep the scale of the tiny gun carriages in perspective, and are painted black to match the colour of the strops and general colour scheme of the carriage. Ten eyebolts are required per gun and care was taken to position each one appropriately in readiness for the rigging ropes later on.
View attachment 372725
Eight carriages down, eight to go. It took hours to get this far, and I am very tempted to rig only those guns that will ultimately be visible on the gun deck. Not sure you would have got away with that in the Royal Navy back in the day, so I might just go full monty and rig the whole lot.
View attachment 372726
The cannons are placed loosely on the carriages for now. They will be one of the final items of the gun ensemble to be fixed in place, by fitting impossibly small capsquares over the trunnions, once the carriages and all their attendant rigging is ready to go.
View attachment 372727
Looking good Mark! These will be a massive improvement over the cast metal variety.
Thanks Grant. I never really thought about filing the trunnions to be honest, didn't know it was a thing. Will look further into that, thanks for the heads-up. Of course, any modification has to be multiplied by sixteen every time. How many guns did you have on Victory? I can't even begin to imagine rigging all the guns on a ship of the lineGood morning Mark. Looking spot on. Placing the capsquires for the trunnions are always a mission for myself so good luck. Very nice detail. A question. are you going to cut/file down the length of the trunnions to lie flush with the carriages. If so, I would do this before placing the capsquires or the painting will be mission. You are making a brilliant HMS Fly Mark. Cheers Grant

Good morning Mark. Luckily most of my guns were dummy guns. I only had 22 to make but I did not add too much detail as only 8 are visible and rigged. I remember Sasha and Jim (I think) showed me that the trunnions must lie flush with the carriage. It does finish the cannons off nicely. Cheers GrantThanks Grant. I never really thought about filing the trunnions to be honest, didn't know it was a thing. Will look further into that, thanks for the heads-up. Of course, any modification has to be multiplied by sixteen every time. How many guns did you have on Victory? I can't even begin to imagine rigging all the guns on a ship of the line
Great work thus far Mark! She is looking better all the time! 
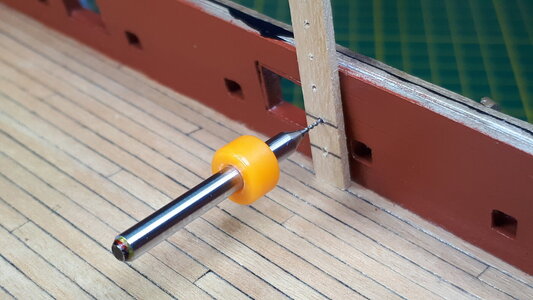
Four ringbolts are required to attach a single gun ensemble to the hull, two on either side of each gunport opening. A template helps to keep each hole equidistant in relation to the deck and consistent with all the other gunports across the length of the ship.
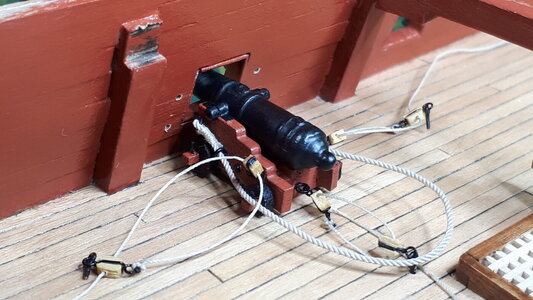
The inhaul and outhaul tackle lines are rigged with 2mm blocks and demanded a bit more of my wandering attention-span to ensure that they were all rigged identically.
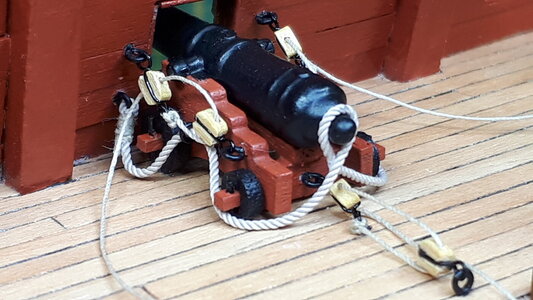
The length of the breeching line is imperative - about three times the length of the gun bore - to flow seamlessly around the gun carriage and loop over the cascabel. The tackle ropes are yet to be laid off in neat little coils on deck.
Tiny things, these little gun carriage assemblies. I highly recommend a good magnifying glass lamp when doing this type of work for the sake of your eyesight and ongoing sanity
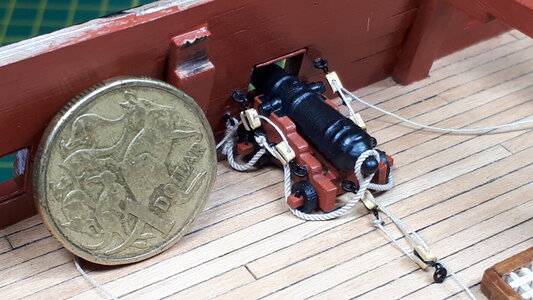
One gun down, just a few more to go. Luckily the Fly only has sixteen of them. I am still haunted by the words that Paul (@dockattner) posted on this blog a little while ago...
Thanks for checking in

The inhaul and outhaul tackle lines are rigged with 2mm blocks and demanded a bit more of my wandering attention-span to ensure that they were all rigged identically.

The length of the breeching line is imperative - about three times the length of the gun bore - to flow seamlessly around the gun carriage and loop over the cascabel. The tackle ropes are yet to be laid off in neat little coils on deck.

Tiny things, these little gun carriage assemblies. I highly recommend a good magnifying glass lamp when doing this type of work for the sake of your eyesight and ongoing sanity

One gun down, just a few more to go. Luckily the Fly only has sixteen of them. I am still haunted by the words that Paul (@dockattner) posted on this blog a little while ago...
For some reason I found rigging the guns with blocks/hooks to be marvelously frustrating and it took all the patience I could muster just to do 16. Kurt (@DARIVS ARCHITECTVS) is my hero as he is attempting EVERY gun fully rigged on his Sovereign. If I tried that they would need to clean the carpets to get all the scattered brain matter out of it...

Thanks for checking in
Good morning Mark. Wow- excellent. Good to see you playing with your Fly again…(sounds weirdFour ringbolts are required to attach a single gun ensemble to the hull, two on either side of each gunport opening. A template helps to keep each hole equidistant in relation to the deck and consistent with all the other gunports across the length of the ship.
View attachment 376925
The inhaul and outhaul tackle lines are rigged with 2mm blocks and demanded a bit more of my wandering attention-span to ensure that they were all rigged identically.
View attachment 376926
The length of the breeching line is imperative - about three times the length of the gun bore - to flow seamlessly around the gun carriage and loop over the cascabel. The tackle ropes are yet to be laid off in neat little coils on deck.
View attachment 376927
Tiny things, these little gun carriage assemblies. I highly recommend a good magnifying glass lamp when doing this type of work for the sake of your eyesight and ongoing sanity
View attachment 376928
One gun down, just a few more to go. Luckily the Fly only has sixteen of them. I am still haunted by the words that Paul (@dockattner) posted on this blog a little while ago...
View attachment 376929
Thanks for checking in
 ). Awesome tip to create a stencil. I will use this from now on. Cheers Grant
Very weel build and completely correct Rigged -uk rig.Four ringbolts are required to attach a single gun ensemble to the hull, two on either side of each gunport opening. A template helps to keep each hole equidistant in relation to the deck and consistent with all the other gunports across the length of the ship.
View attachment 376925
The inhaul and outhaul tackle lines are rigged with 2mm blocks and demanded a bit more of my wandering attention-span to ensure that they were all rigged identically.
View attachment 376926
The length of the breeching line is imperative - about three times the length of the gun bore - to flow seamlessly around the gun carriage and loop over the cascabel. The tackle ropes are yet to be laid off in neat little coils on deck.
View attachment 376927
Tiny things, these little gun carriage assemblies. I highly recommend a good magnifying glass lamp when doing this type of work for the sake of your eyesight and ongoing sanity
View attachment 376928
One gun down, just a few more to go. Luckily the Fly only has sixteen of them. I am still haunted by the words that Paul (@dockattner) posted on this blog a little while ago...
View attachment 376929
Thanks for checking in
Great work Mark, love the ringbolt template and canon rigging.
Yup. I just broke out in hives looking at your photo of rigged guns...Four ringbolts are required to attach a single gun ensemble to the hull, two on either side of each gunport opening. A template helps to keep each hole equidistant in relation to the deck and consistent with all the other gunports across the length of the ship.
View attachment 376925
The inhaul and outhaul tackle lines are rigged with 2mm blocks and demanded a bit more of my wandering attention-span to ensure that they were all rigged identically.
View attachment 376926
The length of the breeching line is imperative - about three times the length of the gun bore - to flow seamlessly around the gun carriage and loop over the cascabel. The tackle ropes are yet to be laid off in neat little coils on deck.
View attachment 376927
Tiny things, these little gun carriage assemblies. I highly recommend a good magnifying glass lamp when doing this type of work for the sake of your eyesight and ongoing sanity
View attachment 376928
One gun down, just a few more to go. Luckily the Fly only has sixteen of them. I am still haunted by the words that Paul (@dockattner) posted on this blog a little while ago...
View attachment 376929
Thanks for checking in
Nice and fine detailed rigging on the cannons, Mark.Four ringbolts are required to attach a single gun ensemble to the hull, two on either side of each gunport opening. A template helps to keep each hole equidistant in relation to the deck and consistent with all the other gunports across the length of the ship.
View attachment 376925
The inhaul and outhaul tackle lines are rigged with 2mm blocks and demanded a bit more of my wandering attention-span to ensure that they were all rigged identically.
View attachment 376926
The length of the breeching line is imperative - about three times the length of the gun bore - to flow seamlessly around the gun carriage and loop over the cascabel. The tackle ropes are yet to be laid off in neat little coils on deck.
View attachment 376927
Tiny things, these little gun carriage assemblies. I highly recommend a good magnifying glass lamp when doing this type of work for the sake of your eyesight and ongoing sanity
View attachment 376928
One gun down, just a few more to go. Luckily the Fly only has sixteen of them. I am still haunted by the words that Paul (@dockattner) posted on this blog a little while ago...
View attachment 376929
Thanks for checking in
Cheers Grant. I've made a note to stop playing with my fly, at least not in publicGood morning Mark. Wow- excellent. Good to see you playing with your Fly again…(sounds weird). Awesome tip to create a stencil. I will use this from now on. Cheers Grant

Last edited:
Thanks El Capi, appreciated. There are a few shortcomings however, such as the axles not rounded off and the trunnions not entirely flush with the carriage cheeks. But I'm happy enough with this first attempt and quite enjoyed the process, my main aim being to get the rigging right and consistent across all of the guns. In future builds I may consider better quality cannons and additional work to the carriage hardwareVery weel build and completely correct Rigged -uk rig.
Thanks Daniel. I think you completed your entire Vasa in the time it took me to rig these little suckersGreat work Mark, love the ringbolt template and canon rigging.
Hives, scattered brain matter ... and here I am trying to convince the Admiral that model ship building is good for the soul, a healthy and wholesome pursuitYup. I just broke out in hives looking at your photo of rigged guns...

Thanks Peter, trying desperately hard to keep up with the high standards set on this ship modelling forum!Nice and fine detailed rigging on the cannons, Mark.
do not try to be perfect with the first one, what to do after then. I have more than 50 years on my back, long before laser cuts, drawing programs, computers etc. have built in my time more than 30 ships. below the ship i felt in love with. between the pics 40 yearsThanks El Capi, appreciated. There are a few shortcomings however, such as the axles not rounded off and the trunnions not entirely flush with the carriage cheeks. But I'm happy enough with this first attempt and quite enjoyed the process, my main aim being to get the rigging right and consistent across all of the guns. In future builds I may consider better quality cannons and additional work to the carriage hardware
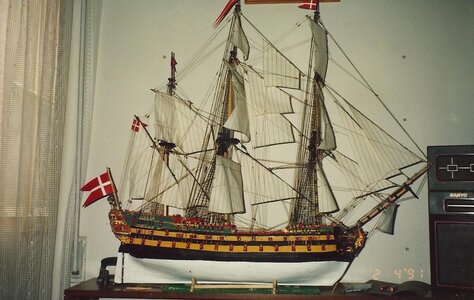
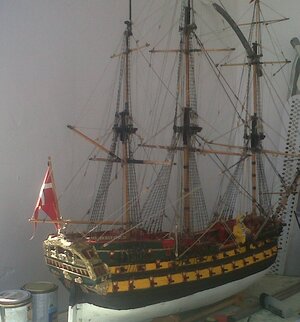
N01 1991-1TH LASER GUT FROM BILLING BOATdo not try to be perfect with the first one, what to do after then. I have more than 50 years on my back, long before laser cuts, drawing programs, computers etc. have built in my time more than 30 ships. below the ship i felt in love with. between the pics 40 years
View attachment 377118
View attachment 377119
-SECOND 1921- RESTORRING. THE ORIGINAL WAS FROM 1973


