DittoThanks Peter, trying desperately hard to keep up with the high standards set on this ship modelling forum!
-

Win a Free Custom Engraved Brass Coin!!!
As a way to introduce our brass coins to the community, we will raffle off a free coin during the month of August. Follow link ABOVE for instructions for entering.
-

PRE-ORDER SHIPS IN SCALE TODAY!
The beloved Ships in Scale Magazine is back and charting a new course for 2026!
Discover new skills, new techniques, and new inspirations in every issue.
NOTE THAT OUR FIRST ISSUE WILL BE JAN/FEB 2026
You are using an out of date browser. It may not display this or other websites correctly.
You should upgrade or use an alternative browser.
You should upgrade or use an alternative browser.
N01 1991-1TH LASER GUT FROM BILLING BOAT
-SECOND 1921-
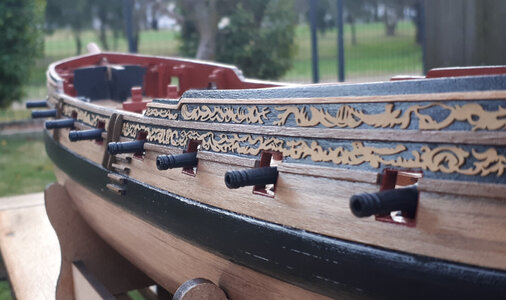
This was the final push to get the Fly's weaponry over the line. Each gun carriage was super-glued to the deck after careful measuring to centre and extend each barrel through its porthole consistent with all the other barrels along each side of the ship.
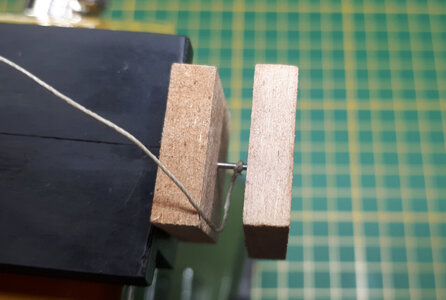
Each carriage requires a single breeching rope, a training (inhaul) tackle line and two sets of gun (outhaul) tackle lines. The tackle lines terminate in a coil on the deck, each about 5mm in diameter and manufactured using an illustrious jig of two scrapwood blocks and an axle to wind the rope into a coil.
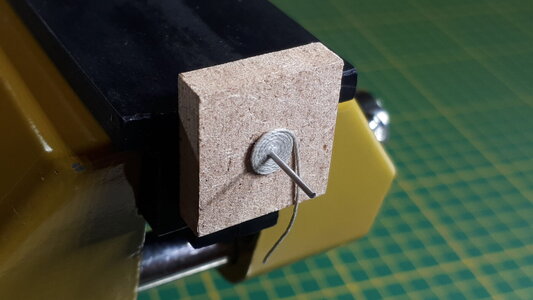
Dragging the rope through a block of beeswax several times helped the strands maintain their circular shape.
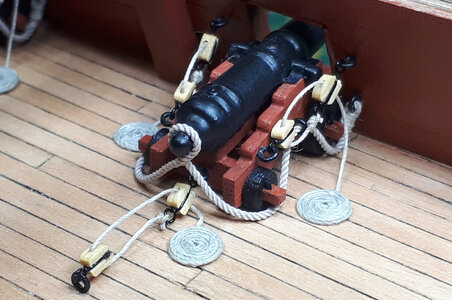
The length of the breeching line needs to be spot on so that it can drape correctly around the circumference of the carriage. If the gun carriages and in particular the cascobel are all equidistant from the bulwarks, then the length of breeching line required will be identical for all of the guns.
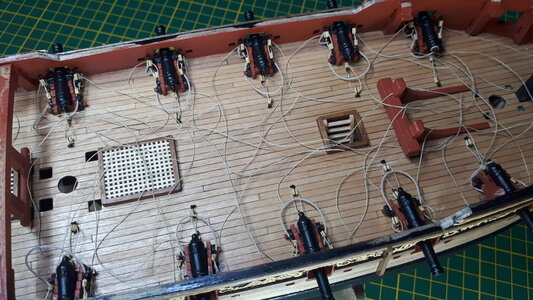
I thought I was home and dry when all I had left was to glue the coils of rope to the deck, but even here I had to be careful to lay them all just so, spaced correctly to create the same pattern for each carriage individually and for the entire array of gun carriages as a whole.
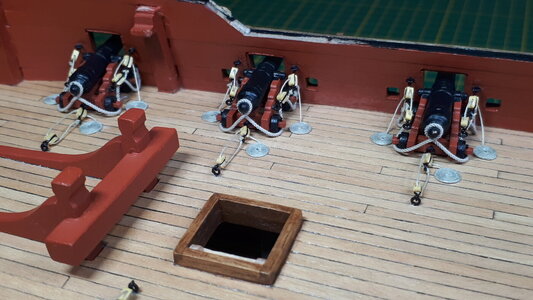
Like most things, order is easier to observe from above.
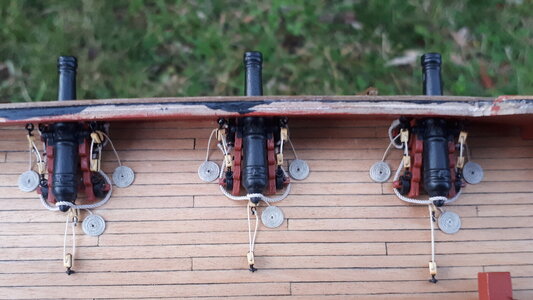
And even higher, to see the bigger picture.
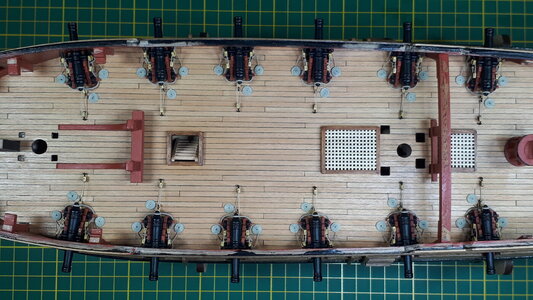
Done! It took me quite a while to rig and install each gun on the gun deck. There are flaws for sure, but even the flaws are consistent. I only hope there wasn't some other task I needed to perform before cementing them all in place.
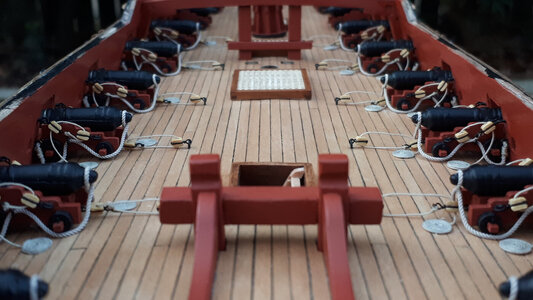
With the Fly pierced with all its cannons there are now sixteen new opportunities to snag your hand or arm or shirt sleeve on a gun barrel and upend your ship
Thanks for checking in

Each carriage requires a single breeching rope, a training (inhaul) tackle line and two sets of gun (outhaul) tackle lines. The tackle lines terminate in a coil on the deck, each about 5mm in diameter and manufactured using an illustrious jig of two scrapwood blocks and an axle to wind the rope into a coil.

Dragging the rope through a block of beeswax several times helped the strands maintain their circular shape.

The length of the breeching line needs to be spot on so that it can drape correctly around the circumference of the carriage. If the gun carriages and in particular the cascobel are all equidistant from the bulwarks, then the length of breeching line required will be identical for all of the guns.

I thought I was home and dry when all I had left was to glue the coils of rope to the deck, but even here I had to be careful to lay them all just so, spaced correctly to create the same pattern for each carriage individually and for the entire array of gun carriages as a whole.

Like most things, order is easier to observe from above.

And even higher, to see the bigger picture.

Done! It took me quite a while to rig and install each gun on the gun deck. There are flaws for sure, but even the flaws are consistent. I only hope there wasn't some other task I needed to perform before cementing them all in place.

With the Fly pierced with all its cannons there are now sixteen new opportunities to snag your hand or arm or shirt sleeve on a gun barrel and upend your ship

Thanks for checking in
Last edited:
Good morning Mark. Way to go my friend! Cheers GrantThis was the final push to get the Fly's weaponry over the line. Each gun carriage was super-glued to the deck after careful measuring to centre and extend each barrel through its porthole consistent with all the other barrels along each side of the ship.
View attachment 379556
Each carriage requires a single breeching rope, a training (inhaul) tackle line and two sets of gun (outhaul) tackle lines. The tackle lines terminate in a coil on the deck, each about 5mm in diameter and manufactured using an illustrious jig of two scrapwood blocks and an axle to wind the rope into a coil.
View attachment 379557
Dragging the rope through a block of beeswax several times helped the strands maintain their circular shape.
View attachment 379558
The length of the breeching line needs to be spot on so that it can drape correctly around the circumference of the carriage. If the gun carriages and in particular the cascobel are all equidistant from the bulwarks, then the length of breeching line required will be identical for all of the guns.
View attachment 379559
I thought I was home and dry when all I had left was to glue the coils of rope to the deck, but even here I had to be careful to lay them all just so, spaced correctly to create the same pattern for each carriage individually and for the entire array of gun carriages as a whole.
View attachment 379560
Like most things, order is easier to observe from above.
View attachment 379561
And even higher, to see the big picture.
View attachment 379562
Done! It took me quite a while to rig and install each gun on the gun deck. There are flaws for sure, but even the flaws are consistent. I only hope there wasn't some other task I needed to perform before cementing them all in place.
View attachment 379563
With the Fly pierced with all its cannons there are now sixteen new opportunities to snag your hand or arm or shirt sleeve on a gun barrel and upend your ship
View attachment 379564
Thanks for checking in
A nice rigging of all the cannons, Mark.This was the final push to get the Fly's weaponry over the line. Each gun carriage was super-glued to the deck after careful measuring to centre and extend each barrel through its porthole consistent with all the other barrels along each side of the ship.
View attachment 379556
Each carriage requires a single breeching rope, a training (inhaul) tackle line and two sets of gun (outhaul) tackle lines. The tackle lines terminate in a coil on the deck, each about 5mm in diameter and manufactured using an illustrious jig of two scrapwood blocks and an axle to wind the rope into a coil.
View attachment 379557
Dragging the rope through a block of beeswax several times helped the strands maintain their circular shape.
View attachment 379558
The length of the breeching line needs to be spot on so that it can drape correctly around the circumference of the carriage. If the gun carriages and in particular the cascobel are all equidistant from the bulwarks, then the length of breeching line required will be identical for all of the guns.
View attachment 379559
I thought I was home and dry when all I had left was to glue the coils of rope to the deck, but even here I had to be careful to lay them all just so, spaced correctly to create the same pattern for each carriage individually and for the entire array of gun carriages as a whole.
View attachment 379560
Like most things, order is easier to observe from above.
View attachment 379561
And even higher, to see the big picture.
View attachment 379562
Done! It took me quite a while to rig and install each gun on the gun deck. There are flaws for sure, but even the flaws are consistent. I only hope there wasn't some other task I needed to perform before cementing them all in place.
View attachment 379563
With the Fly pierced with all its cannons there are now sixteen new opportunities to snag your hand or arm or shirt sleeve on a gun barrel and upend your ship
View attachment 379564
Thanks for checking in
Regards, Peter
I'll try that explanation with my wife: "honey, at least my flaws are consistent..." Will report back...There are flaws for sure, but even the flaws are consistent.
This is fantastic Mark! Your canon presentation is among the best I have seen. However, the quality of your work deserves some aftermarket pearwood blocking. Your rope coil method just went into my bookmarks. Thank you.This was the final push to get the Fly's weaponry over the line. Each gun carriage was super-glued to the deck after careful measuring to centre and extend each barrel through its porthole consistent with all the other barrels along each side of the ship.
View attachment 379556
Each carriage requires a single breeching rope, a training (inhaul) tackle line and two sets of gun (outhaul) tackle lines. The tackle lines terminate in a coil on the deck, each about 5mm in diameter and manufactured using an illustrious jig of two scrapwood blocks and an axle to wind the rope into a coil.
View attachment 379557
Dragging the rope through a block of beeswax several times helped the strands maintain their circular shape.
View attachment 379558
The length of the breeching line needs to be spot on so that it can drape correctly around the circumference of the carriage. If the gun carriages and in particular the cascobel are all equidistant from the bulwarks, then the length of breeching line required will be identical for all of the guns.
View attachment 379559
I thought I was home and dry when all I had left was to glue the coils of rope to the deck, but even here I had to be careful to lay them all just so, spaced correctly to create the same pattern for each carriage individually and for the entire array of gun carriages as a whole.
View attachment 379560
Like most things, order is easier to observe from above.
View attachment 379561
And even higher, to see the big picture.
View attachment 379562
Done! It took me quite a while to rig and install each gun on the gun deck. There are flaws for sure, but even the flaws are consistent. I only hope there wasn't some other task I needed to perform before cementing them all in place.
View attachment 379563
With the Fly pierced with all its cannons there are now sixteen new opportunities to snag your hand or arm or shirt sleeve on a gun barrel and upend your ship
View attachment 379564
Thanks for checking in
I like the way used to perform the circular rope pattern. I will retain it. Good job on your ship. I cannont wait so easily to begin my own Fly when I saw your's.
Consistent...persistent...previsible ? Sound's like poesy... and boring couple relationship LOL!I'll try that explanation with my wife: "honey, at least my flaws are consistent..." Will report back...
Looks great Mark! 
Thanks GrantGood morning Mark. Way to go my friend! Cheers Grant
Thank you PeterA nice rigging of all the cannons, Mark.
Regards, Peter

If you don't report back within the next day or two Paul, well ... we'll know what happenedI'll try that explanation with my wife: "honey, at least my flaws are consistent..." Will report back...
Thanks Daniel, appreciated. Totally agree about the blocks. The 2mm blocks I used came with Amati's upgrade kit. I have managed to secure some very nice pearwood blocks from Dry-Dock Models & Parts for the remainder of the build but was unable to find any 2mm sized blocks at the time unfortunately.This is fantastic Mark! Your canon presentation is among the best I have seen. However, the quality of your work deserves some aftermarket pearwood blocking. Your rope coil method just went into my bookmarks. Thank you.
Thank you! I look forward to watching the progress of your Fly when you get goingI like the way used to perform the circular rope pattern. I will retain it. Good job on your ship. I cannont wait so easily to begin my own Fly when I saw your's.
Thanks DeanLooks great Mark!

WELL, DONE SAILOR. Absolutely perfect (maybe a little too perfect ) if you look it at a ship at sea.This was the final push to get the Fly's weaponry over the line. Each gun carriage was super-glued to the deck after careful measuring to centre and extend each barrel through its porthole consistent with all the other barrels along each side of the ship.
View attachment 379556
Each carriage requires a single breeching rope, a training (inhaul) tackle line and two sets of gun (outhaul) tackle lines. The tackle lines terminate in a coil on the deck, each about 5mm in diameter and manufactured using an illustrious jig of two scrapwood blocks and an axle to wind the rope into a coil.
View attachment 379557
Dragging the rope through a block of beeswax several times helped the strands maintain their circular shape.
View attachment 379558
The length of the breeching line needs to be spot on so that it can drape correctly around the circumference of the carriage. If the gun carriages and in particular the cascobel are all equidistant from the bulwarks, then the length of breeching line required will be identical for all of the guns.
View attachment 379559
I thought I was home and dry when all I had left was to glue the coils of rope to the deck, but even here I had to be careful to lay them all just so, spaced correctly to create the same pattern for each carriage individually and for the entire array of gun carriages as a whole.
View attachment 379560
Like most things, order is easier to observe from above.
View attachment 379561
And even higher, to see the bigger picture.
View attachment 379562
Done! It took me quite a while to rig and install each gun on the gun deck. There are flaws for sure, but even the flaws are consistent. I only hope there wasn't some other task I needed to perform before cementing them all in place.
View attachment 379563
With the Fly pierced with all its cannons there are now sixteen new opportunities to snag your hand or arm or shirt sleeve on a gun barrel and upend your ship
View attachment 379564
Thanks for checking in
Thank you Sir!WELL, DONE SAILOR. Absolutely perfect (maybe a little too perfect ) if you look it at a ship at sea.
Mark, happy birthday  . Good health and prosperity. More beautiful models


 . Good health and prosperity. More beautiful models


