Thanks, Brian! This kit is really nice!This is a most impressive looking model. Well done so far.
-

Win a Free Custom Engraved Brass Coin!!!
As a way to introduce our brass coins to the community, we will raffle off a free coin during the month of August. Follow link ABOVE for instructions for entering.
-

PRE-ORDER SHIPS IN SCALE TODAY!
The beloved Ships in Scale Magazine is back and charting a new course for 2026!
Discover new skills, new techniques, and new inspirations in every issue.
NOTE THAT OUR FIRST ISSUE WILL BE JAN/FEB 2026
You are using an out of date browser. It may not display this or other websites correctly.
You should upgrade or use an alternative browser.
You should upgrade or use an alternative browser.
Ingermanland 1715 (2014) * Shi Cheng * 1:50 Scale
- Thread starter Viktor98
- Start date
- Watchers 21
-
- Tags
- ingermanland
I'll be sure to keep the progress logged here on SOS as I move along, Uwe. And yes, you can never have enough clampsVery interesting log.....do not stop showing us your progress
PS: once more certified: you can never have enough clamps !
Thanks, ADC!Looks like a very high quality model and great work.
This is my first wooden ship, so I don't really have anything to compare it to, but I will say that I'm impressed with the way that it goes together. There are a few little snags here and there, and I wish that it had more structured instructions (it has none, really), but nothing to get in a fuss over, and nothing that can't be corrected relatively easily. Every time I come to something that I think will be difficult, I actually seem to glide right through it with a nice ending...so far
But I must add...
Getting help from all of you has truly helped me out tremendously!
Last edited:
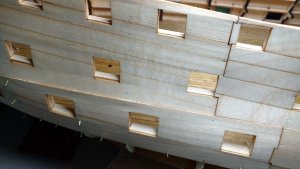
 , today I installed the last of the false bulwarks and I'm pretty happy with the way it turned out, although there are some areas that need to be addressed once she sits overnight to dry. And I'm going to need a little advice on the matter at hand.
As you can see in the photo, there are some areas that don't line up perfectly. In hindsight, I guess I should have used super glue to attach the edges and wood glue to secure the pieces to the ribs...but that's hindsight...with no foresight
So, my question is...
Could I use super glue now, and align the edges while applying the glue?
Also, there are areas where I have small gaps and uneven joints. Is Wood Filler acceptable for these areas?!

Hi there,
wonderful progress. Don't worry too much about yor first layer of planking. As long as is glued down firmly thats all that matters.
You can sandpaper and use filler smooth out gaps and imperfections before you start the second planking.
wonderful progress. Don't worry too much about yor first layer of planking. As long as is glued down firmly thats all that matters.
You can sandpaper and use filler smooth out gaps and imperfections before you start the second planking.
Hi there,
wonderful progress. Don't worry too much about yor first layer of planking. As long as is glued down firmly thats all that matters.
You can sandpaper and use filler smooth out gaps and imperfections before you start the second planking.
Thanks, Brian, that makes me feel better
That leaves the edges to deal with now. I guess I'm going to attempt to seam them together with super glue. I'm afraid that if I don't seam them together it will cause problems during the planking stage.
That will be tomorrows task
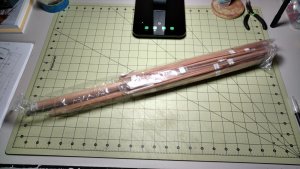
Today I had a surprise waiting for me at the door...the mast sets!!!! 


I ordered the kit from the same people that sold the Ingermanland kit, and as always, it was service with a smile! It was $165 for this set and it took only six days to arrive from China! It's a little early for them, but I know where they'll be when I'm ready for them

I ordered the kit from the same people that sold the Ingermanland kit, and as always, it was service with a smile! It was $165 for this set and it took only six days to arrive from China! It's a little early for them, but I know where they'll be when I'm ready for them

Currently I've been trying to figure out a way to build Ingermanland in a different direction than that set fourth by manufacturers instructions, and there are times that I feel like it's an unwinnable battle...
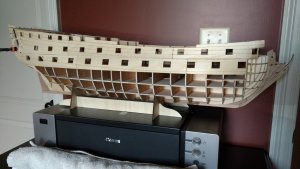
As I've mentioned before, I want to build up the hull, fully planked and outfitted with hardware, and then install the decks and cannons, etc. This direction goes completely against the instruction booklet, and I also feel it during the build. From here on out, it's a thinkers build that will lead me into uncharted waters, needing a little modifying to pieces and parts to make this ship go together the way that I want it to. I'm to the point where the thinking and planing will take longer than the actual building. Probably, this is a common among wooden ship builders, and I must add that I'm going to hurdle each and every obstacle that comes my way
As I build, I use the photos from the internet to help me along the way, as the manual jumps around and doesn't really lay down a nice clear path from start to end. The manual (along with the internet photos of the build) show the decks being installed before the hull is planked. This causes a problem for me because I am wanting to have the cannons poking out of their ports once the ship is complete, and if I install all of the decks and cannons before planking the hull then the cannons; I'm guessing, will be tumbled around so much, while planking the hull, that they will finally break free and just wonder around on the deck and there will be no way to re-position them once the hull is complete. And because of this, I'm currently looking for ways to make the deck sections fit into the hull and I see that there will be some modifying going on when I come to the actual deck installation process.
Believe it or not...
I actually like the challenge
Hi John,
Always thinking 10 steps ahead is part of model ship building. I never look at a manual supplied with the kit, only for determining to use the correct part in the correct place. And yes sometimes you will face an issue but there is always a solution on the road ahead to fix it. I think your approuch of planking first is the correct one which enables you afterwards to build in the fully detailed deck. As we have a saying in Dutch: there are many ways that lead to Rome. Just choose the one you think its best.
Always thinking 10 steps ahead is part of model ship building. I never look at a manual supplied with the kit, only for determining to use the correct part in the correct place. And yes sometimes you will face an issue but there is always a solution on the road ahead to fix it. I think your approuch of planking first is the correct one which enables you afterwards to build in the fully detailed deck. As we have a saying in Dutch: there are many ways that lead to Rome. Just choose the one you think its best.
Hi John,
Always thinking 10 steps ahead is part of model ship building. I never look at a manual supplied with the kit, only for determining to use the correct part in the correct place. And yes sometimes you will face an issue but there is always a solution on the road ahead to fix it. I think your approuch of planking first is the correct one which enables you afterwards to build in the fully detailed deck. As we have a saying in Dutch: there are many ways that lead to Rome. Just choose the one you think its best.
I like the saying, Maarten! Truer words never spoken
Zoltan said the same thing about thinking ten steps ahead, but I think he said 5. lol My problem is...I have no idea what 5 to 10 steps ahead should be
- Joined
- Dec 31, 2017
- Messages
- 292
- Points
- 158

You can also use a thin layer of molding paste (don’t know what it’s called outside the US) over the first layer of planking to cover the cracks in the planking as well as to strengthen the hull. Once dry, you sand it down to produce a smooth even layer to place the second layer of planking on.
John
What is keeping you from first do the outside. It is mainly about fitting wales and planks and the tree nailing. All the rest of outside detailing can be done in upright position of the ship. Once the canons are installed it is not easy anymore to put the hull on its side. If the strength of the hul structure is an issue you can decide to put a temporary enforcement into the hull where normally the decks are fitted.
What is keeping you from first do the outside. It is mainly about fitting wales and planks and the tree nailing. All the rest of outside detailing can be done in upright position of the ship. Once the canons are installed it is not easy anymore to put the hull on its side. If the strength of the hul structure is an issue you can decide to put a temporary enforcement into the hull where normally the decks are fitted.
John
What is keeping you from first do the outside. It is mainly about fitting wales and planks and the tree nailing. All the rest of outside detailing can be done in upright position of the ship. Once the canons are installed it is not easy anymore to put the hull on its side. If the strength of the hul structure is an issue you can decide to put a temporary enforcement into the hull where normally the decks are fitted.
My plan is to plank the hull first, but it is not the way this kit is designed. The kit is designed to go together by first installing the decks and then planking the hull. I know this because it is very difficult to test fit the next two layers of decks now that I've installed the false bulwarks and other items needed for planking. I had to temporarily install the forward upper bulkhead just to fit the false bulwark properly, but I can't permanently install said bulkhead because the second deck must be installed first, as it goes beneath the bulkhead to the stem. There are many findings like this, and I can see where I will need to cut pieces so they'll fit, and then glue the removed piece back on to complete the area.
It's funny that you mentioned the temporary supports because I was thinking about that last night as well.
If we're talking about the same thing, we call it Wood Filler. And I will be using itYou can also use a thin layer of molding paste (don’t know what it’s called outside the US) over the first layer of planking to cover the cracks in the planking as well as to strengthen the hull. Once dry, you sand it down to produce a smooth even layer to place the second layer of planking on.
- Joined
- Dec 31, 2017
- Messages
- 292
- Points
- 158

No wood filler us something else. Molding paste is a medium that artists use. It has a white cream texture and it dries like a plaster. It goes on much smoother than wood filler.
No wood filler us something else. Molding paste is a medium that artists use. It has a white cream texture and it dries like a plaster. It goes on much smoother than wood filler.
Like this?
https://www.amazon.ca/Liquitex-Flex...=en-CA&tag=googcana-20&ref=pd_sl_75jeckcewb_e
- Joined
- Dec 31, 2017
- Messages
- 292
- Points
- 158

Yes, that’s it. I’ve used it on several models with success.
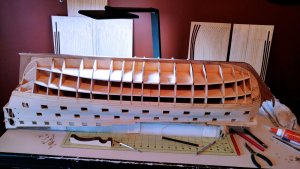
This week I started to install the first layer of planks. I'm enjoying the laser cut planks that came with the kit. All I need do is trim the plank to the nearest bulkhead and lay it down. The only down side to it is my hand and fingers begin to ache after driving all of the nails which causes me to limit the amount of work I can do. Big hands and small pliers equals ouch! lol
I do have a nail driver, but the inside diameter is larger than the diameter of the nail so driving the nail in the direction that I want is virtually impossible. Therefore, I use a small pair of angled pliers which enables me to direct the nail with better accuracy...and causes pain in the palm of my hand You can see these pliers in the bottom R/H corner of the photo.
Behind the Ingermanland are the laser cut planks. This is where the illustrated instructions shine, as each plank is numbered and the illustration shows their placement. I'm not sure what type of wood they are, but after soaking a plank in water for about five minutes I can bend it by hand to make the curve of the bow, and twist the aft plank to conform to the sterns twist. I have used my planking iron a couple of times, and I've noticed that I can shape each plank to the point where I almost don't even need to use the nails. lol But I will
And I need more glue

I do have a nail driver, but the inside diameter is larger than the diameter of the nail so driving the nail in the direction that I want is virtually impossible. Therefore, I use a small pair of angled pliers which enables me to direct the nail with better accuracy...and causes pain in the palm of my hand
Behind the Ingermanland are the laser cut planks. This is where the illustrated instructions shine, as each plank is numbered and the illustration shows their placement. I'm not sure what type of wood they are, but after soaking a plank in water for about five minutes I can bend it by hand to make the curve of the bow, and twist the aft plank to conform to the sterns twist. I have used my planking iron a couple of times, and I've noticed that I can shape each plank to the point where I almost don't even need to use the nails. lol But I will
And I need more glue

Hi John,
Nice and simple with these pre fabricated planks.
Are the two layers of planks and is the second layer also pre fabricated?
Nice and simple with these pre fabricated planks.
Are the two layers of planks and is the second layer also pre fabricated?


