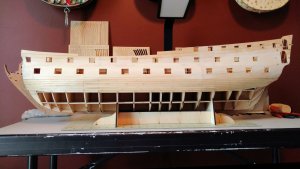
Ingermanland 1715 (2014) * Shi Cheng * 1:50 Scale

Hi John,

Nice and simple with these pre fabricated planks.
Are the two layers of planks and is the second layer also pre fabricated?

Hey there, Maarten! Yes, there are two layers of planking, but the second layer is not laser cut. The planks that I'm laying right now are 2 mm's thick, which will give me a lot of room for correcting and shaping in preparation for the final planking...I hope. lol
 
Very interesting with the laser cut planks.....first time, that I haven seen this was the kit from Master Korabel.....
I am a little bit surprised, that the first planking is laser cut and the second one not - as manufacturer I would have done it visaversa.......Thanks for sharing.
If you have time, please post several steps during the planking - It is very interesting to see some more details of these laser-planks
I'll be sure to post more photos and difficulties arise, or differences in planking comes about, Uwek ;)
 
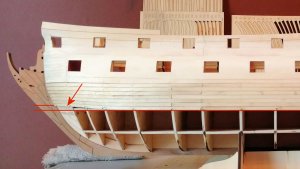
Okay, I'm currently on plank line No. 7, and I've been moving along in the directions noted in the illustrations booklet and I've finally noticed something that doesn't look right to me. The bow planking seems to have a bit of a riser to it. I will add that it follows the false bulwark, so...

...is this normal? Is this just how the planks lay to the curve of the bow?

Do I keep going, or do I need to correct this now? :confused:

IMG_20180722_120126470.jpg

IMG_20180722_120126470_2.jpg
 
Hi John,

This seems normal to me, also it is a first layer of planks for which the most important is that it correctly creates the shape of the hull, the plank connections and flow are of lesser importance.
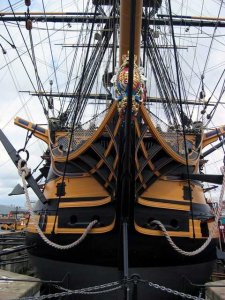
However what you see in a lot of kits is that the wales when looking straight forward at the bow are creating an upside down V shape whereas these should create nearly a straight line.
See below the victory
vvv1.jpg
And the Vasa
20180510_111519.jpg

Hope it helps.
 
G'day John
If you haven't done the starboard side yet. DO IT NOW.

You must do the port and starboard side at the same time, each plank row on both sides.

As this is only the first planking, you don't have to do this, but its good practice when you do the final planking.
It is up to you if you follow these instructions.
On the final planking you must follow this.

Now the next plank that you have to lay us the plank next to the keel. This is very important that this plank is straight and is lying flush.
Then you should place two planks equally distance between the last plank that you have played and the keel plank. These two planks are just a guide, so don't glue them, just pinned them in place.
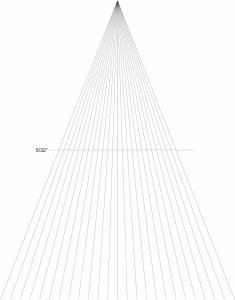
plankingfan.jpg
Download this template and print it 3 times.
The following step is important.
Find the longest distance between each planks. This is generally in the
Midship area.
Then divide that distance to the width of your planks. Do this on the top section between the the last plank that you have played and the pinned plank.

This is going to be an example only what to do, so do not follow these measurements.
The plank are 6mm wide and the distance between are 22mm. So you need 4 planks.
Now using one of the the template guide that you have printed out, find the 22mm between 4 planks and draw a vertical line. And write down the bulkhead number below it.
NOW ONLY USE THESE 4 LINES FROM THE TEMPLATE.
The next step is to measure the distance between each bulkheads and draw a vertical lines on the template guide and named the bulkhead's number.
When it is is all done. On all 3 planks draw a line that represents each bulkheads.
On two of these planks, measure the distance between each bulkhead line. I use a divider for this or a compass. Transpose each distance of each bulkhead on the corresponding line on the plank. Measure from the base of each plank so you only have to trim the planks at the top. Now cut away the excess planking material and place and glue the new plank on top of the of the pinned plank. Now, adjust the distance between the final plank in this section so that it fits in neatly.
remove the pinned plank, and you are ready to do the next section.
Do the same as previous, but
instead of 3 planks do 4. Measure the distance of the the longest bulkhead and using another template guide mark down the distance on 4 planks. Repeat this process until the all the planks are laid down.
Good luck and it's not that difficult as it might sounds.
Any more information that you need, just ask.
havagooday and happymodeling
Greg
 
Hi John,

This seems normal to me, also it is a first layer of planks for which the most important is that it correctly creates the shape of the hull, the plank connections and flow are of lesser importance.
However what you see in a lot of kits is that the wales when looking straight forward at the bow are creating an upside down V shape whereas these should create nearly a straight line.
Hope it helps.

That does help, Maarten, thank you! I can see it very clear in this photo of the Ingermanland build; the "V" shape ;)

ͷ.jpg

So, now I will continue moving forward with the planking. I'm enjoying the planking iron. lol It really helps shape these planks for a better fit :D
 
Good luck and it's not that difficult as it might sounds.
Any more information that you need, just ask.
havagooday and happymodeling
Greg

Thanks for the information, Greg! I downloaded your template and will happily use it when the time come.

I am planking both sides at the same time (Left, Right, Left, Right) and working my way to the keel. The template won't do me any good right now, I don't think, because the planks that I'm installing are laser cut, but I'm most certain that it will help when it comes to laying the final planking which are NOT laser cut...which I find very unfortunate for me...the new guy...

:D
 
That the planks are making a V-shape is, I think normal....like the others mentioned already. For me a little bit strange is the fact, that between the first bulkhead and the stem at the bow, it is looking a little bit, that the planks are going slightly downwards. If this is the case, please check......
This could be, if the first bulkhead is a little bit too much faired, or the planks are slightly too long, so the contact of plank against the stem is too much in the front.
But from photos it is hardly to see....you have to „feel“ it if the planks follow smoothly the form of the hull. Maybe you can check also the form of these last planks with I look from top down, if the planks are following here one curve......
 
That the planks are making a V-shape is, I think normal....like the others mentioned already. For me a little bit strange is the fact, that between the first bulkhead and the stem at the bow, it is looking a little bit, that the planks are going slightly downwards. If this is the case, please check......
.
All of the planks feel, and look good as for taking the correct shape of the hull, therefore the only real concern that I have is how the final laser cut planks will fit in, as it's sort of like a puzzle. But I guess that really won't even matter in the end. I'll simply fill the gaps as needed to obtain the correct shape for the hull, and keep moving forward ;)
 
That does help, Maarten, thank you! I can see it very clear in this photo of the Ingermanland build; the "V" shape ;)

View attachment 47204

So, now I will continue moving forward with the planking. I'm enjoying the planking iron. lol It really helps shape these planks for a better fit :D
Hi John,

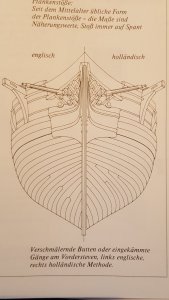
The V shape in the planks below the wale is normal and the wales in the ingermanland above looks also fine. The only remark I have is that all the planks are ending into the wale.
See below a schematic for fitting these according the Dutch and english methode. For Russian vessels you can choose ine of both I guess, this as Peter the Great in those days visited Holland as well as English shipyards to gather the knowledge to build these ships.
20180723_075847.jpg
 
Hi John,

The V shape in the planks below the wale is normal and the wales in the ingermanland above looks also fine. The only remark I have is that all the planks are ending into the wale.
See below a schematic for fitting these according the Dutch and english methode. For Russian vessels you can choose ine of both I guess, this as Peter the Great in those days visited Holland as well as English shipyards to gather the knowledge to build these ships.
View attachment 47217
Is this an excerpt from Mondfeld?
 
Hey there, Maarten! Yes, there are two layers of planking, but the second layer is not laser cut. The planks that I'm laying right now are 2 mm's thick, which will give me a lot of room for correcting and shaping in preparation for the final planking...I hope. lol


G'day Victor, are you sure you are to double plank below the wales, I thought I had read somewhere that it is only single planked below the wales that is why the laser planks are 2mm thick, and that you double plank with the veneer strips above the wales, just a thought,

be4st regards John.
 
I have checked the Chinese buildlog and seems like below the wales no second planking,if that the case I would suggest a second planking with 0.5 mm thick timbers,If you don’t like the first layer.
 
Back
Top