• LUCZORAMA SHIPWRECK SCAVENGER HUNT GIVEAWAY. 4 Weeks of Fun • 1 Legendary Prize ((OcCre’s Fram Ship)) • Global Crew Welcome!
    **VIEW THREAD HERE**

HMS Alert [1777] 1:48 POF by serikoff. (Two hulls: skeleton and fully rigged)

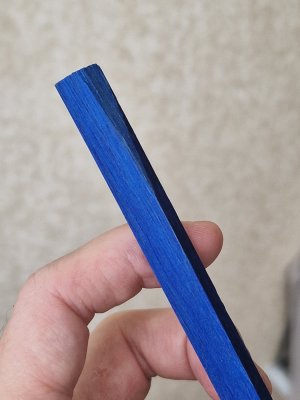
Thank you for your high rating. The answer to your question: yes, it is painted hornbeam wood. Black and blue hornbeam (or any other) is paint that is vacuum-painted through the wood. That is, wherever you cut it, it is the same color everywhere. This is very cool, since it looks like it is not painted, but the color can be any, even unnatural. And you can cut blanks of any shape.


By the way, I am surprised that only you paid attention to this color. I really liked it, and especially my wife.:p I was sure that there would be a lot of talk about this color, but no:oops::D


Yes, of course, I understand. There is not a single image of Alert here. These photos are more on the topic of just sailing equipment and that I am already looking forward to working on the rigging. And I posted a separate thread on the Alert rigging and wrote and posted photos of rigging diagrams here. But anyway, thank you;)

By the way, this illustration clearly shows how two sloops were installed on the deck. This is not something you see often.
View attachment 529266

Hello Sergey,

I have seen wood in the colours yellow, red and blue (dyed maple). You are right, there are colours that do not look natural. This is not the case with your colour. The blue doesn't look artificial. I would like to use such veneers for my Athena. However, this requires absolutely precise processing. In other words, there must be no glue leaks and, of course, the planks must be lined up correctly without large gaps in between. I haven't dared to do that yet ... But maybe I need a little more time.

Your construction method is very accurate and impressive. I am a fan.:DThumbsup

Best regards

Günther Ship-1
I recommend you make more samples and preferably refuse veneer, and use only solid wood cutting it into boards. Veneer is very easy to use, but very capricious when gluing and coating with oil. I try to make a small gap (bevel) between the boards, this gives a head start for ideal jealousy, since the gaps compensate for this, but you need to master the skills of working with this technique, and for this they make samples. With glue, I can advise one thing - you do not need much of it. Better less than necessary than more. Since excess is bad, and if the element is not a power element, then glue is usually always enough, even a little. Nothing has come off in 15 years))) And the blue hornbeam is like this and it is not veneer, but you can cut boards of any shape from it. Everything is going well for you, I looked at your work.
20250701_140744.jpg
 
Last edited:
Hello Sergey,

Thank you very much for your reply and for stopping by. I was very pleased.
Thank you for the description of the wood. It really is very beautiful. I have one question for you; would it also have been possible to fill the holes in the planks with wax instead of toothpicks and seal them?

Best regards
Günther Ship-1
Hello, Günther. You need to try different options, but I chose toothpicks because then I leave the tips for texture. I don't use wax. It can affect adhesives and coating oils.
 
Hey Sergey,

Thanks for the reply. I understand. The only way to get a very good result is by trial and error, and experience makes perfect.

Best regards
Günther Ship-1
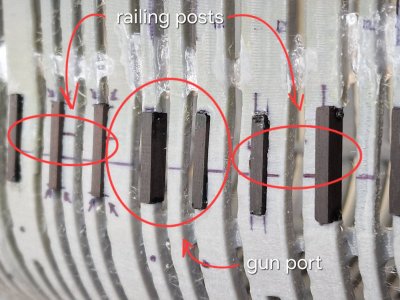
 
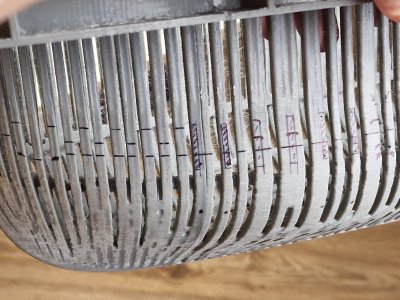
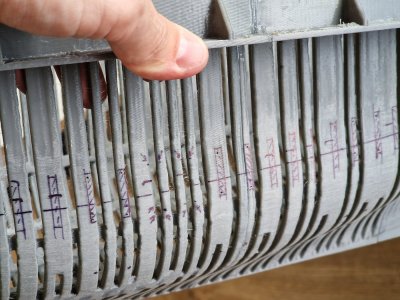
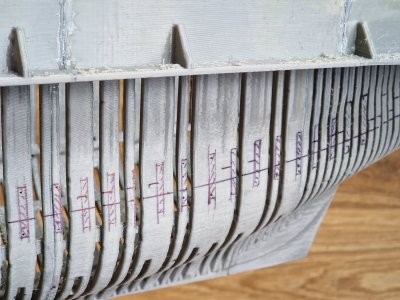
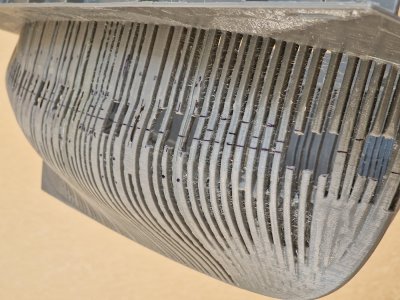
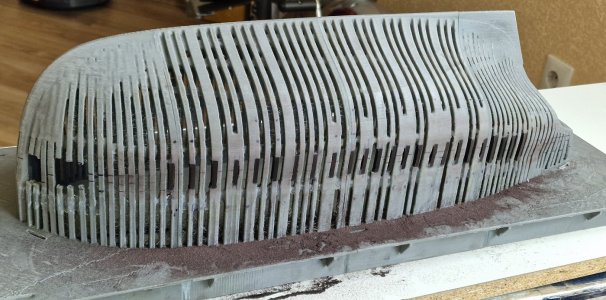
5.4 Racks (creating and pasting port racks and railings into plastic hull).

Small changes. I thought this process would be quick, but no.

Alert 996.jpg

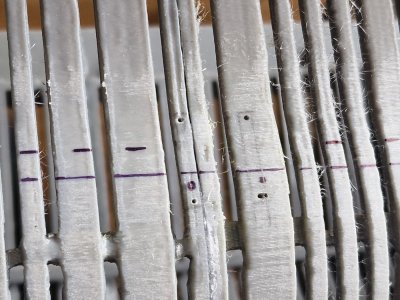
A lot of time was spent on marking ports and railing racks.

Alert 997.jpg

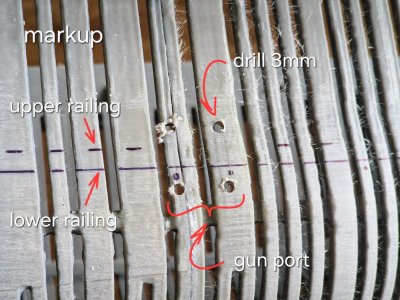
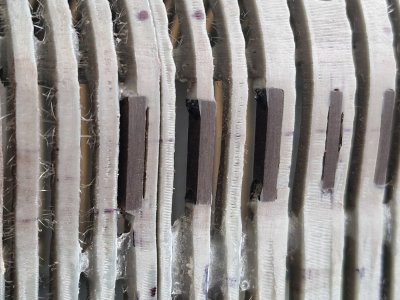
I made one port for the test. I drilled the edges of the port with a 3 mm drill and then made holes along the port slope pillar and connected the holes in one line and polished them a little with a file.

Alert 998.jpg

When I saw that everything was working, I made all the markup.

Alert 999.jpg

Alert 1000.jpg

Alert 1001.jpg

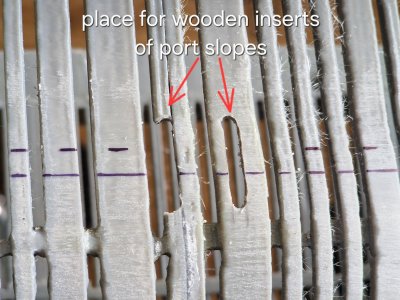
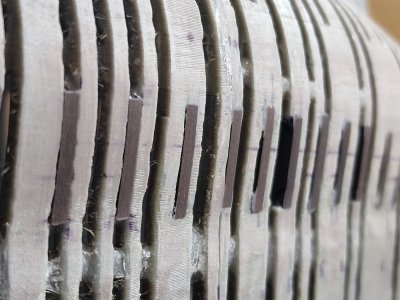
Then cut slots for all railing posts and ports on one side.

Alert 1002.jpg

It turned out to be not so easy. Plastic is durable and viscous. When drilling, it melted and adhered to the drill.

Alert 1003.jpg

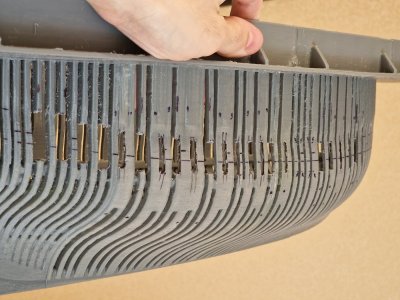
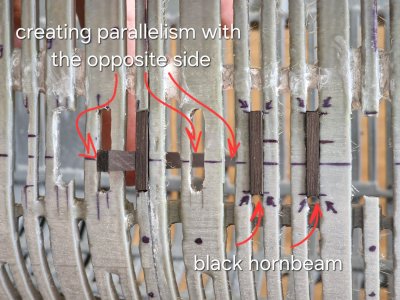
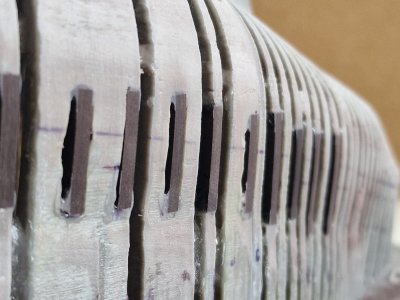
Then I cut 3x5x20 blanks from black hornbeam and pasted them into the grooves. At the same time, I checked the parallelism with the opposite side with a rail. That is, 3 mm will be the racks of railings and ports, this is their width, and in front and behind I will grind flush with the body.

Alert 1004.jpg

By the way, many racks according to the set plan did not correspond to the drawings in anatomy. On this case, I corrected this so that the distance between the racks was almost equal, and not so that the racks were at different distances from each other (in inter-port spaces).

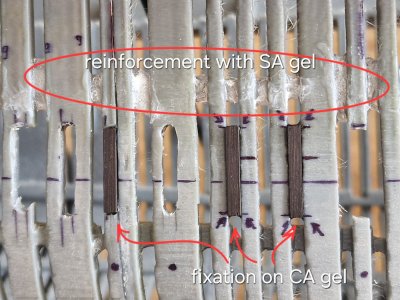
Glued everything to the CA gel, they also reinforced the free-standing plastic frames from above.

Alert 1005.jpg

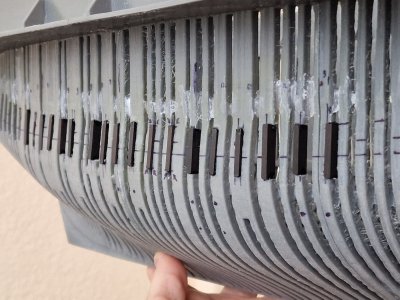
Pasted all the racks of black hornbeam. (then there will be pear inserts on the front).

Alert 1006.jpg

Alert 1007.jpg

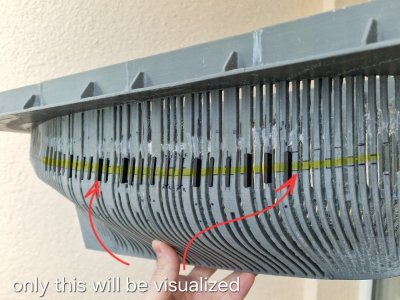
Although the workpiece that ports that posts the railing 2 cm visible will be only 5-6 mm, this is the distance between the upper and lower railings. And therefore, it will be seen from this entire case only this line.

Alert 1008.jpg

The final chord was the grinding on the outside and inside of these inserts.

Alert 1009.jpg

At first I was worried that the hornbeam would be difficult to grind and the plastic would grind faster, but no! The plastic turned out to be much stronger and the wood was easily polished along the contour of the case.

Alert 1010.jpg

Just as simply, he was grinding from the inside. There is no photo, but even there everything is on a par with the body, which was very pleased, so you can safely do the same from the other side.

Alert 1011.jpg

And plastic did not clog the texture of the tree, rather, on the contrary, black dust from hornbeam was everywhere...

Alert 1012.jpg

In a word, I am very pleased with the result and you do not pay attention to the texture of the plastic, its leaks, irregularities (and in general, the case is dirty from printing costs), but I repeat... that only a few dozen wooden inserts will be visible from the entire case, and the plastic itself will be all inside under the skin!

So, a start has been made... let's go further!
 
Hey Sergey,

That looks really good. I can't wait to see what it will look like when it's finished. Plastic is very tough to work with, I know that. Especially in that thickness.
Big praise.

Best regards
Günther Ship-1
 
The problem... there is a possibility that I have ruined the model with oil. At first I like the effect, but after a week I see that after the oil the ship's hull is very dark. Or rather darker than I expected, especially inside... but in theory I can visually hide it by the contrast of the deck, which will be lighter. But here's the problem, that from the tung oil coating in places where it was difficult to remove the excess a glossy film appeared. I tried to heat it with a hair dryer, then the oil comes out a little on the surface and remove the excess with a napkin, but it did not help completely. I don't know what to do. A week has passed and at least another 2-3 have to wait, and although the surface seems dry, it stinks wildly of oil. There is an idea - after 2-3 weeks wipe the surface with Danish oil strongly diluted 1:3 with solvent and wipe with a rag to try to even out the shine, making it more uniform, but I'm worried about making it even worse. And the current shine is clearly visible at certain angles and gives off a blue tint. I don't know what to do... I didn't expect such a result, at least because everything was more or less satisfactory on the samples.

20250625_144248.jpg
 
That is really too bad, especially after your tests showed that diluted tung didn't leave a gloss with only one coat.

Have you tried dabbing the glossy areas with a cotton swab saturated with pure solvent? That might dissolve the oil enough to soak some up into the swab.
 
The problem... there is a possibility that I have ruined the model with oil. At first I like the effect, but after a week I see that after the oil the ship's hull is very dark. Or rather darker than I expected, especially inside... but in theory I can visually hide it by the contrast of the deck, which will be lighter. But here's the problem, that from the tung oil coating in places where it was difficult to remove the excess a glossy film appeared. I tried to heat it with a hair dryer, then the oil comes out a little on the surface and remove the excess with a napkin, but it did not help completely. I don't know what to do. A week has passed and at least another 2-3 have to wait, and although the surface seems dry, it stinks wildly of oil. There is an idea - after 2-3 weeks wipe the surface with Danish oil strongly diluted 1:3 with solvent and wipe with a rag to try to even out the shine, making it more uniform, but I'm worried about making it even worse. And the current shine is clearly visible at certain angles and gives off a blue tint. I don't know what to do... I didn't expect such a result, at least because everything was more or less satisfactory on the samples.

View attachment 529770
Try using White Spirit liberally with a heavy brush (like a paintbrush), soak those spots, and wipe immediately.
 
Oh no! I never use Tung oil because it takes forever to set and has a lasting impact on adhesion so I don't have any tips to offer...
That is really too bad, especially after your tests showed that diluted tung didn't leave a gloss with only one coat.

Have you tried dabbing the glossy areas with a cotton swab saturated with pure solvent? That might dissolve the oil enough to soak some up into the swab.
Try using White Spirit liberally with a heavy brush (like a paintbrush), soak those spots, and wipe immediately.
OUTDOORS PLEASE!!!!
Non diluted danish oil, wait around 15 min and then remove. That's how it works for me.

But... I don't think you ruined the model, absolute no, these little "flaws" give character to the ship!

Dirk
Friends, thank you for your support. I understood that Tung oil dries for a long time and I counted on a month of downtime and started making the second hull of the ship. The only question is about the smell. My wife especially does not like it))) I tried wiping these areas with solvent and rubbing them in different ways, but it did not help. Only heating with a hair dryer helped partly and when the oil came out, I wiped it. The question with Danish oil is open. I think I will try to conjure a couple more times with a hair dryer and wipe as much as possible and in a couple of weeks I will try to wipe the inside, where it is less visible, with very strongly diluted Danish oil to even out the shine.

Well, how do you like the appearance of such a dark shade? Because I began to worry that it is very dark and everything merges together?

And if I don't remove the spotted shine, maybe then I'll make the model in a museum version - with a semi-shine.... this can be achieved with Danish oil. It's scary to try, but what if it looks more impressive?
 
The key to successful oiling, especially with Tung oil, which is naturally thicker if not blended, is to wipe off all excess after about 15 minutes. Depending on how porous the wood is, it may only absorb a small amount of oil at a time. That’s why it’s essential to remove any remaining oil completely and allow the surface to dry fully, at least 24 to 48 hours, with good airflow, before another coat is applied. This ensures a smooth, even finish without tackiness or botching.

My Favorite Blend (for small models): Mix 50% pure tung oil with 50% citrus solvent (or mineral spirits if scent isn’t a concern). This thinned oil penetrates better, dries faster, and brings out lovely depth, especially on boxwood, cherry, or walnut.
 
he question with Danish oil is open.
... so while Danish oil contains natural oils, it is a formulated finish, a hybrid between an oil and a varnish. What does this mean in practice?
  • It's easier to apply than pure tung oil and dries faster.
  • Leaves a slightly more durable and glossy finish (be careful with that!!!!), depending on the brand.
  • Because of the synthetic additives, it’s not truly "natural" in the way that pure tung or raw linseed oil is.
 
The key to successful oiling, especially with Tung oil, which is naturally thicker if not blended, is to wipe off all excess after about 15 minutes. Depending on how porous the wood is, it may only absorb a small amount of oil at a time. That’s why it’s essential to remove any remaining oil completely and allow the surface to dry fully, at least 24 to 48 hours, with good airflow, before another coat is applied. This ensures a smooth, even finish without tackiness or botching.

My Favorite Blend (for small models): Mix 50% pure tung oil with 50% citrus solvent (or mineral spirits if scent isn’t a concern). This thinned oil penetrates better, dries faster, and brings out lovely depth, especially on boxwood, cherry, or walnut.
I completely agree. And I diluted the tung oil, but 2:1, maybe it was worth 1:1. And I wiped it as much as possible, but it was not possible everywhere due to the design features and therefore it was in these places that the film formed, but not everywhere. And this makes it even worse because this spottiness is a little annoying. I will still try to heat it and remove the excess, and then I will decide whether to cover it with Danish or not. Or rather, not cover it, but wipe it.
 
... so while Danish oil contains natural oils, it is a formulated finish, a hybrid between an oil and a varnish. What does this mean in practice?
  • It's easier to apply than pure tung oil and dries faster.
  • Leaves a slightly more durable and glossy finish (be careful with that!!!!), depending on the brand.
  • Because of the synthetic additives, it’s not truly "natural" in the way that pure tung or raw linseed oil is.
I fully understand this. I tried how this oil behaves. And I will check first on a sample, whether there will be a conflict between them. Thanks for the tips.
 
I don't know how easy these are to get in Ukraine, but they come in really handy for those tight places.

View attachment 529776
Well, of course, there is such a product in Ukraine ;) :p I even tried to wipe them with solvent, but without result. But what I did today helped quite a lot. Let me remind you, I heated the surface with a hair dryer and immediately wiped off the oil that came out.


It calmed me down a little that there were already much fewer stains (I think I still need to heat and wipe with a hair dryer) and they are only inside and are exclusively visible only at such angles, at which the model will not look good since it will stand horizontally, and not on its side. So my emotional swings continue. Now I just have to figure out... whether I like the model in such dark tones or not, and wait until this smell goes away.

Friends, thank you for your support!
 
Back
Top