• LUCZORAMA SHIPWRECK SCAVENGER HUNT GIVEAWAY. 4 Weeks of Fun • 1 Legendary Prize ((OcCre’s Fram Ship)) • Global Crew Welcome!
    **VIEW THREAD HERE**

BALDER, Vlaardingen Herring Lugger from 1912, scratch build scale 1:50 Plate-On-Frame

One of the reasons I love visiting the logs of the masters is the feeling of seeing something magical and otherworldly. It's like a trip to the worlds best museum, the collection is wonderous AND there is always something new and even more wonderous just in the next gallery. Thank you, Peter, I am, as always, awestruck and inspired.

Blessings. Peace. Gratitude.
Chuck
Thanks for this very very nice words and compliments, Chuck. You made me almost speechless ......... Speechless
Regards, Peter
 
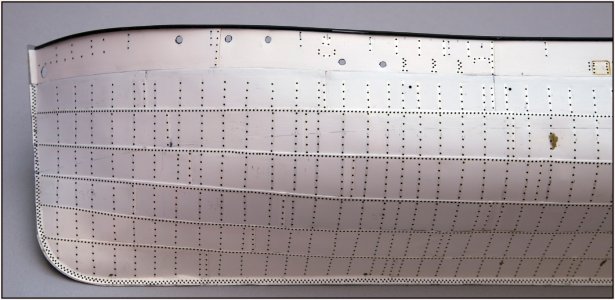
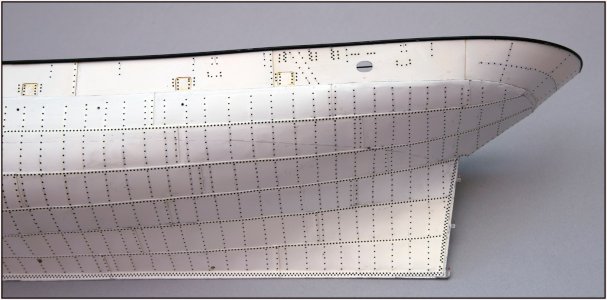
The hull provided with all the rivets:
0733 Rivets.jpg
I have removed the horizontal row under the bulwark plates that I had previously applied. Progressive insight, see later in the post.
Because there are 2 rows running there:
0734 Rivets.jpg
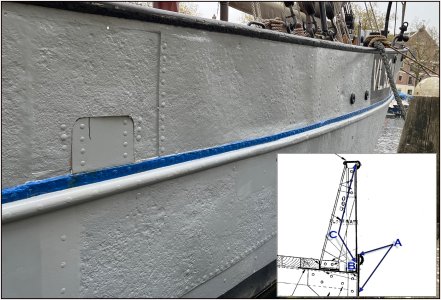
As an insert the drawing that I posted earlier. There is the semi-circular profile on the end of the plate (A) and the 2nd row with the connection to the waterway underneath. With the Balder that is applied the other way around. It shows again that that old drawing is a general drawing that does not apply to everything for the Balder.

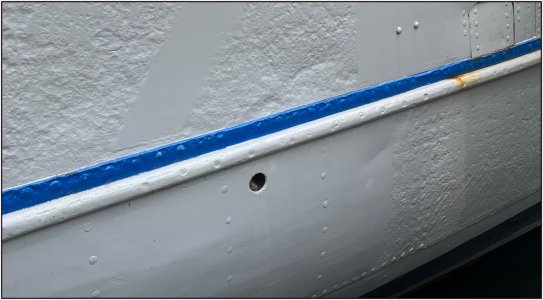
The plates themselves have a blue band with rivets as a connection.
Below that the connection with the angle iron of the waterway that consists of the semi-circular profile.
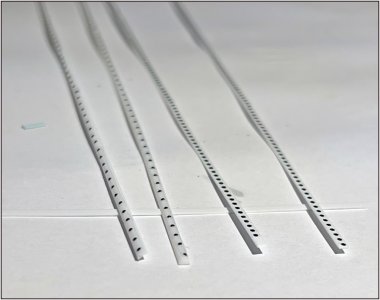
For the blue band I have taken Evergreen strip of 0.25 x 1.5 mm on which I have placed the row of rivets. I paint them separately blue and then stick them on the hull.
0735 Rivets.jpg
For the profile I took Evergreen 1.5 mm half round and also applied a row of rivets to it. I apply these first to the hull. It has the same colour as the hull above the waterline and can therefore be included in the primer and light grey-blue paint.
That is that progressive insight. I should have applied it earlier ......... ;)
Applying the 2 strips will still be a challenge ........ :rolleyes:

PS: When looking at some pictures of the original Balder I realized that I forgot ‘some’ rivets on the bulwark plate: for the chainplates, bitts and other small stuff. So, the riveting goes on ……
Regards, Peter
 
Last edited:
The last time I bother you with placing rivets. I came across more and more things in the photos that they have attached to and on the bulwark:
0736 Rivets.jpg
0737 Rivets.jpg
I think I'm done with riveting now. When I'm working on the parts I'll show you what applies to what.

Still a problem or again new insights.......
If you stick 1 mm wide cut rivet decal strips on a piece of semi-circular Evergreen of 1.5 mm, then that's asking for trouble. The adhesion must take the curve well, but the adhesive strength is not resistant to further processing. It comes loose ........
And the rivets should not be ON it:
0738 Rivets.jpg
Here you can clearly see that they are countersunk.
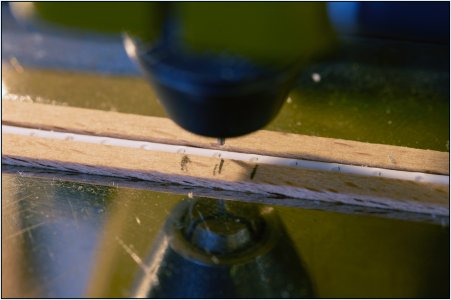
That's why I made a template in which the profile fits:
0739 Rivets.jpg
Now I can make impressions every 3 mm with the back of a 0.65 mm drill. Just practice a bit to get the same depth every time. Maybe also painting the test piece to see if anything is visible.
We plod along ........
Regards, Peter
 
Last edited:
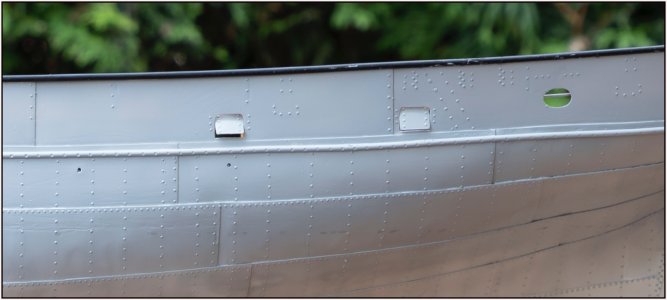
After the layer of primer, first apply the gray-blue color above the waterline:
0740 Paint.jpg
For the image, I made the photo below the waterline darker.

This is how the rivets appear:
0741 Rivets.jpg
Then all the energy put into it has not been in vain. And the sunken rivets in the semi-circular profile also come out nicely.
The thin pencil lines are the newly applied waterline.

Then this layer of paint can dry for 24 hours. Then mask off from the waterline upwards and apply the matt black.
Regards, Peter
 
After the layer of primer, first apply the gray-blue color above the waterline:
View attachment 529806
For the image, I made the photo below the waterline darker.

This is how the rivets appear:
View attachment 529807
Then all the energy put into it has not been in vain. And the sunken rivets in the semi-circular profile also come out nicely.
The thin pencil lines are the newly applied waterline.

Then this layer of paint can dry for 24 hours. Then mask off from the waterline upwards and apply the matt black.
Regards, Peter
This isn’t just coming along beautifully; it’s a lesson in how it's done. Bravo, mon ami!
 
This isn’t just coming along beautifully; it’s a lesson in how it's done. Bravo, mon ami!
Wow! Absolute perfection!
So true, but you forget to mentioning; skills!
Thanks for this response, mates!
It's all those steps that were needed to get to this result. I still have to wait for the black part before I can express my satisfaction.
The layer of paint has not been able to hide several scratches. I should have worked a bit 'neater'.
But it has also been mentioned in other logs that we strive for a perfect result, but the original examples are not either. The Balder is a ship built with old techniques. Then this comes pretty close.
I still have to wait a bit ..... but would show you this step.
Regards, Peter
 
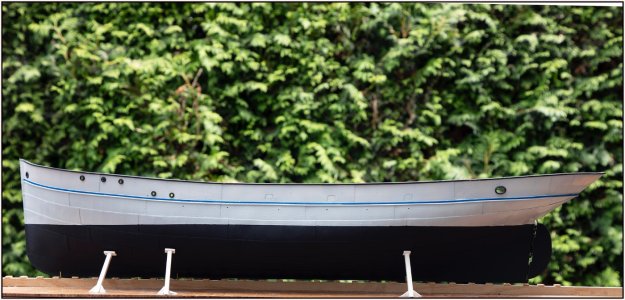
And then the moment of truth. Masking, black paint on it and remove all the tape again:
0742 Paint.jpg
The camera should have been a bit higher to show a flat waterline. Now a bit of curvature of the front and back

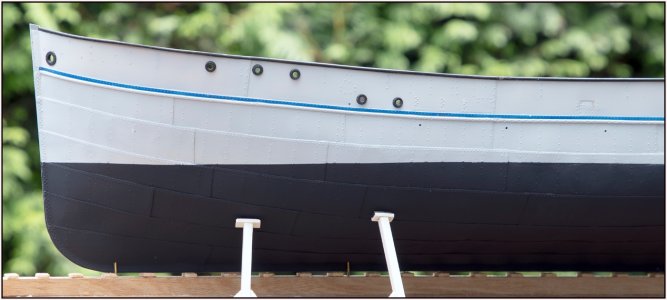
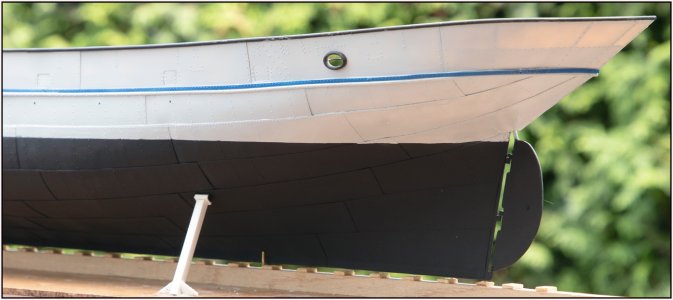
Also the edges around the cable holes and other openings applied:
0743 Paint.jpg
0744 Paint.jpg
With the blue strip with rivets. The rudder was also made black on one side.

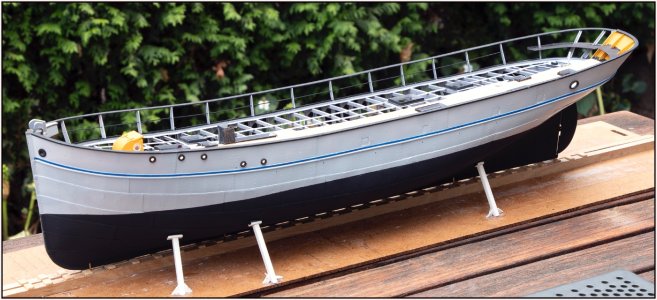
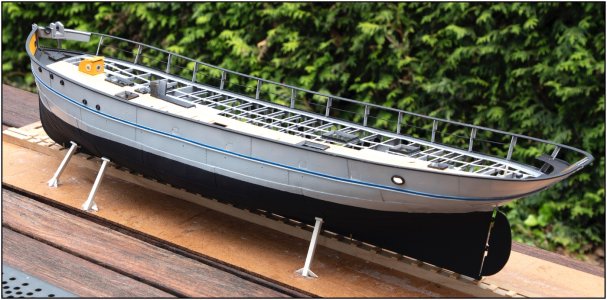
Then immediately the two joined parts in view:
0745 Double.jpg
0746 Double.jpg
0747 Double.jpg
0748 Double.jpg
A satisfied builder :) can now continue with the further construction and decoration. Reinforcement block on the inside of the bow, bollards/bitts, chain plates etc etc. I can still go on for another year ..........
Regards, Peter
 
Last edited:
And then the moment of truth. Masking, black paint on it and remove all the tape again:
View attachment 529970
The camera should have been a bit higher to show a flat waterline. Now a bit of curvature of the front and back

Also the edges around the cable holes and other openings applied:
View attachment 529971
View attachment 529972
With the blue strip with rivets. The rudder was also made black on one side.

Then immediately the two joined parts in the photo:
View attachment 529973
View attachment 529974
View attachment 529975
View attachment 529976
A satisfied builder :) can now continue with the further construction and decoration. Reinforcement block on the inside of the bow, bollards/bitts, chain plates etc etc. I can still go on for another year ..........
Regards, Peter
Good evening Peter. An extraordinary model truely remarkable. Cheers Grant
 
A positively elegant rendition of the most prosaic of humble craft, made unarguably poetic and graceful in your capable and sympathetic interpretation.
A masterpiece. Endlessly rewarding, a privilege to behold and explore with the eyes.
Well done! This is what an artist does! Thumbsup Thumbsup :D

Pete
 
Good evening Peter. An extraordinary model truely remarkable. Cheers Grant
Thanks, Grant. I can’t deny that ……. ;)
Congratulations with this milestone. Good work!
Thanks, Marco. The paint job was one of the chapter which I was a bit apprehensive about :rolleyes: but which went well and was concluded well.
How satisfying!
That’s for sure, Paul. Thanks for that.:)
Wow. What a great achievement you have accomplished.
Thanks, Herman.:)
A positively elegant rendition of the most prosaic of humble craft, made unarguably poetic and graceful in your capable and sympathetic interpretation.
A masterpiece. Endlessly rewarding, a privilege to behold and explore with the eyes.
Well done! This is what an artist does! Thumbsup Thumbsup :D

Pete
What a beautiful poetic statement, Pete. Thanks! :):rolleyes:

And also thanks to all the visitors, all the likes and all the support and advices during this challenge. I really appreciate that!
Regards, Peter
 
Last edited:
And then the moment of truth. Masking, black paint on it and remove all the tape again:
View attachment 529970
The camera should have been a bit higher to show a flat waterline. Now a bit of curvature of the front and back

Also the edges around the cable holes and other openings applied:
View attachment 529971
View attachment 529972
With the blue strip with rivets. The rudder was also made black on one side.

Then immediately the two joined parts in view:
View attachment 529973
View attachment 529974
View attachment 529975
View attachment 529976
A satisfied builder :) can now continue with the further construction and decoration. Reinforcement block on the inside of the bow, bollards/bitts, chain plates etc etc. I can still go on for another year ..........
Regards, Peter
Dear Peter
it's looks beautiful model, you are doing incredible work my friend
 
View attachment 529976
A satisfied builder :) can now continue with the further construction and decoration. Reinforcement block on the inside of the bow, bollards/bitts, chain plates etc etc. I can still go on for another year ..........
Regards, Peter
I can fully understand you. She is an absolute masterpiece. I hope you show us the model tomorrow.
 
Back
Top