• LUCZORAMA SHIPWRECK SCAVENGER HUNT GIVEAWAY. 4 Weeks of Fun • 1 Legendary Prize ((OcCre’s Fram Ship)) • Global Crew Welcome!
    **VIEW THREAD HERE**

L'Orenoque Mamoli 1:100 scale

What ho, shipmates!

All of the waterways are aboard - pics of that later. More pressing is the external colour scheme.

This is the real L'Orenoque btw. Yellow arrows are rub rails and I have marked their locations on the hull:D:D:D:D:D in preparation for attaching them

Green arrows - I'm going with the same size windows as I used in the poop deck façade - Hey! I gave them 3/16" extra headroom so why not bigger windows!

Orange - that is where the black paint goes - including the rub rail
Blue - that is going to be "wood" colored - can't wait to see it!
Now the tricky part - Red - I'm thinking about painting those two bands red

So from top down - black, red, wood, red, black, and some nice shiny copper below the waterline!!!!

Thoughts?

View attachment 532299
I have been looking at my L'Orenoque plans and comparing them to the kit plans, in this instance - was the real ship rigged with rigging screws of some kind? rather than the deadeyes the kit shows? And some one please look at the attachments for the mizzen lower shrouds - looks like chain plates attached to the hull with no channel to me. You?

View attachment 532302View attachment 532301
Welcom to the world of different plans and different interpretations, Church. I had the same with my Bluenose. You have to choose the outcome that you like the best, according to the design of the kit and it’s parts.
Otherwise, you'll have to adjust the design and make material choices.
I didn't consider that a big problem, and actually quite a challenge. I already see above some directional ideas from you passing by with the input of others. That's one of the advantages of a build-log.
Regards, Peter
 
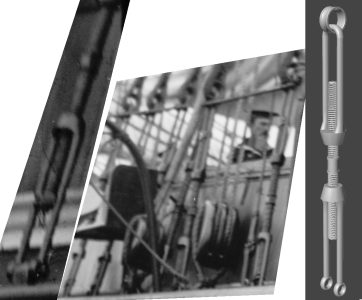
On Constellation, I constantly looked at the portraits of her thinking that the artist was just lazy when it came to painting the dead-eyes and lanyards; but in every portrait? In photos starting in 1879, no dead-eyes and lanyards. Obviously I couldn't claim the photographer was just lazy. Then, looking at her 1856 portrait trying to determine the where and how many of rub-rails she had on her hull got me to looking at photos for a better view and I realized the ship had rigging screws from the beginning up to about 1900 when she got deadeyes and lanyards. On the right of the pic is the 3D model I developed of it.
turnbuckles.png

I found one reference to the things on page 608 of a manual, though (I forget which one)
pg608.jpg
I looked into having them made (lost-resin casting) but the 60-or-so I need in brass, bronze, or even aluminum would cost over $1k. So I 3D printed them
con20231018ba.png
As you've learned Chuck, you often find what you're looking for on another boat, and looking at Civil War period photos, where any part of them can be seen, you find rigging screws, such as this image of Farragut on the Hartford
Farragut_Hartford_riggingscrews.png


Rigging screw in French is vis de gréement
 
Welcom to the world of different plans and different interpretations, Church. I had the same with my Bluenose. You have to choose the outcome that you like the best, according to the design of the kit and it’s parts.
Otherwise, you'll have to adjust the design and make material choices.
I didn't consider that a big problem, and actually quite a challenge. I already see above some directional ideas from you passing by with the input of others. That's one of the advantages of a build-log.
Regards, Peter
Peter! Thank you for sharing your experience! Yes! Without this log, and those of others, I'd have built the fictional L'Orenoque like the floating hotel the designer imagined. The collaboration that happen on this forum is the perfect expression of the saying "a problem shared is a problem halved!"


Blessings.
Chuck
 
I have mid 1830's for screw shackles along with wire rope, so it's probably correct for your 1840's build ,Sphinx runs deadeyes in 1829 whereas L'Aigle runs shackles although that is much later. So , are you going to build a dancefloor on the Orenoque ?
Martin! Rigging shackles it is! Of course my L'Orenoque will have a dance floor!!! Why do you think I went to all the trouble to close that gaping hole in the deck, plank her like I was laying a parquet floor, and abandon the idea of building an apartment block smack in the middle of it all? ROTF ROTF ROTF

Blessings.
Chuck
 
On Constellation, I constantly looked at the portraits of her thinking that the artist was just lazy when it came to painting the dead-eyes and lanyards; but in every portrait? In photos starting in 1879, no dead-eyes and lanyards. Obviously I couldn't claim the photographer was just lazy. Then, looking at her 1856 portrait trying to determine the where and how many of rub-rails she had on her hull got me to looking at photos for a better view and I realized the ship had rigging screws from the beginning up to about 1900 when she got deadeyes and lanyards. On the right of the pic is the 3D model I developed of it.
View attachment 532341

I found one reference to the things on page 608 of a manual, though (I forget which one)
View attachment 532340
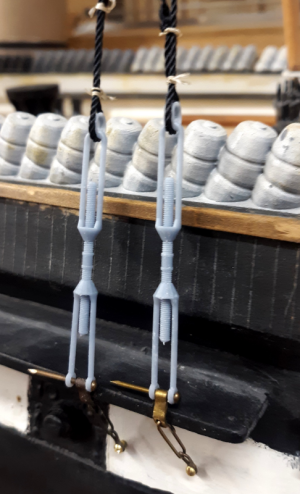
I looked into having them made (lost-resin casting) but the 60-or-so I need in brass, bronze, or even aluminum would cost over $1k. So I 3D printed them
View attachment 532342
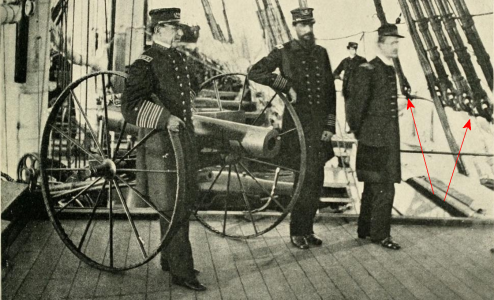
As you've learned Chuck, you often find what you're looking for on another boat, and looking at Civil War period photos, where any part of them can be seen, you find rigging screws, such as this image of Farragut on the Hartford
View attachment 532344


Rigging screw in French is vis de gréement
Jerry! Up to your old tricks, I seeROTF As usual, your expertise is amazing! Thank you for the photos! They will come in very handy as I try to make something to indicate a rigging screw. At 1:100 scale, I won't be able to show much detail, but I hope to end up at a place where someone looking at the model will see a rigging screw.

Blessings.
Chuck
 
What ho, shipmates!

I had some other thoughts to share about the things I plan to put on her decks, other than the dance floor. Right now my mind is on the poop deck. The plans have the helm dead aft. I really wonder whether it was like that. Did the helmsman really need to see where he was going? Didn't anyone think about the fact that if the helm was dead aft, raised up nice and high, it would be a great target if it came to a fight? I'd like to hear from you on these questions.

I am thinking to put the helm on the main deck aft of the main mast closer to the poop deck than the main mast. I am thinking of using the deck space on the poop deck for a skylight or two. I'm thinking the officers would appreciate it.

What do you think?

Blessings. Peace. Gratitude.
Chuck
Chuck,
Not only would the officers appreciate it, but the sailors holystoning the deck and wanting to eavesdrop. I loved the skylight on Lovely Renee and thinking of incorporating one into my Fair American. I’d say go for it.
 
Chuck,
Not only would the officers appreciate it, but the sailors holystoning the deck and wanting to eavesdrop. I loved the skylight on Lovely Renee and thinking of incorporating one into my Fair American. I’d say go for it.
Right! That way everyone wins ROTF As to the skylight on FA, I saw that a number of builders of the kit decided that her dancefloor on the poop deck could use something to break up all of that empty space. There are some really well done examples out there. I did what I could with what I had by way of skill and materials at the time. Also - the idea of the sliding companion came from the same sources - at scale the door is way too short.

Blessings.
Chuck
I am going to try for clear windows because I am also doing Bob Hunt’s mod for detailing the great cabin. But I won’t be making any holes in the poopdeck dance floor until I’m happy with the skylight (which may mean never!)
 
What ho, shipmates!

I had some other thoughts to share about the things I plan to put on her decks, other than the dance floor. Right now my mind is on the poop deck. The plans have the helm dead aft. I really wonder whether it was like that. Did the helmsman really need to see where he was going? Didn't anyone think about the fact that if the helm was dead aft, raised up nice and high, it would be a great target if it came to a fight? I'd like to hear from you on these questions.

I am thinking to put the helm on the main deck aft of the main mast closer to the poop deck than the main mast. I am thinking of using the deck space on the poop deck for a skylight or two. I'm thinking the officers would appreciate it.

What do you think?

Blessings. Peace. Gratitude.
Chuck
The Descartes plan shows that disposition for the helm, so why not ? Not sure yet how you are planning on disposing your armement, or where the tiller fits in all that. I think this is too early for a screw and lever style steering box, anyways .
 
I am going to try for clear windows because I am also doing Bob Hunt’s mod for detailing the great cabin. But I won’t be making any holes in the poopdeck dance floor until I’m happy with the skylight (which may mean never!)
Namabiiru! I was just at your log and I probably should have posted there: Love the skylight you've made - personally, I begin to doubt your comments about your skill levelROTF

What is your plan for the glass? I have heard of builders using the glass covers for specimin slides. I actually got some thinking I would use them on this build. I am having a terrible time "cutting" the glass. There is a breif thread on SoS about this. I haven't used the method describe there of sandwiching the glass between two pieced of wood and, looks like, grinding it to size. I wish there was a tutorial on this - there probably is, I just have to look for it.

Blessings.
Chuck
 
The Descartes plan shows that disposition for the helm, so why not ? Not sure yet how you are planning on disposing your armement, or where the tiller fits in all that. I think this is too early for a screw and lever style steering box, anyways .
Martin! Thank's for the Descartes reference! I'll pull out that plan and take a look. I don't think tiller placement will be an issue for me. I'm not showing anything below decks. I imagine that the ropes and pulleys would be in the ceilings running aft to the tiller?

Blessings.
Chuck
 
Namabiiru! I was just at your log and I probably should have posted there: Love the skylight you've made - personally, I begin to doubt your comments about your skill levelROTF

What is your plan for the glass? I have heard of builders using the glass covers for specimin slides. I actually got some thinking I would use them on this build. I am having a terrible time "cutting" the glass. There is a breif thread on SoS about this. I haven't used the method describe there of sandwiching the glass between two pieced of wood and, looks like, grinding it to size. I wish there was a tutorial on this - there probably is, I just have to look for it.

Blessings.
Chuck
I’m going to experiment with Testors clear parts glue which I have used for gluing clear parts, but I have also read can be used to form full window panes. The other option is clear acetate. The tricky bit is that I need four individual panes per frame; otherwise they all reflect at exactly the same angle and look fake.
 
I’m going to experiment with Testors clear parts glue which I have used for gluing clear parts, but I have also read can be used to form full window panes. The other option is clear acetate. The tricky bit is that I need four individual panes per frame; otherwise they all reflect at exactly the same angle and look fake.
There is a plastic modeling product used for creating clear "glass" called Krystal Clear" or maybe "Krystal Klear". You guys might look into it.
 
There is a plastic modeling product used for creating clear "glass" called Krystal Clear" or maybe "Krystal Klear". You guys might look into it.
Jeff! Thank you! I'll check it out. All I'm looking to do on this build is give the impression of glass. There's noting to see behind the glass except for a bunch of wood and glue ROTF

Blessings.
Chuck
 
What ho, shipmates!

Well, despite my impulsive desire to oil all of the wood and get on with the painting and plating of the hull, I found as I was working outboard that the better part of valor is to finish the outboard work before I oil, pain or plank anything. You knew I'd get thereROTF

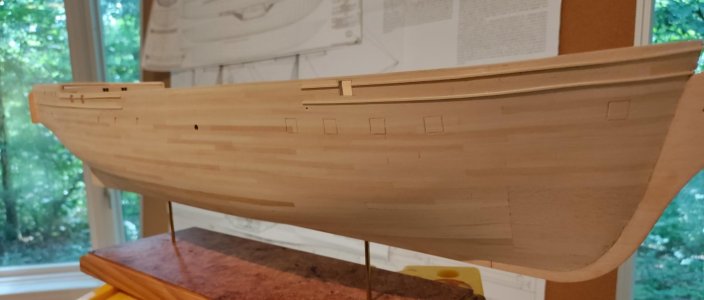
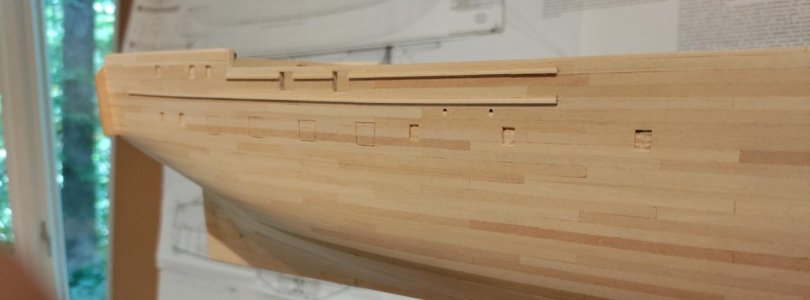
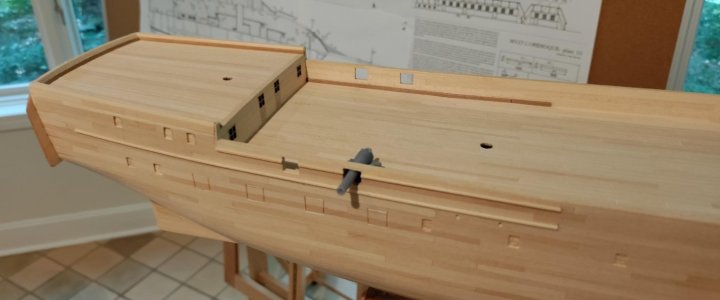
So, at this point the main deck gun ports are cut out, the windows are carved in and the lower deck gun ports are indicated. I used indicated on purpose.

Here's what the kit plan calls for (other than a floating bordello :eek:). You see below the number of windows and the really prominent gun ports. Also, yuk! Note that the most forward gun port is not as far forward as it should be according to the actual plans for the ship.

LO outboard starboard kit plan.jpg

Initially, I thought to carve out the spaces and add gunports. While I was carving the spaces for the windows, I thought - that's dumb. Just indicate the ports by outline. Once that potion is oiled to bring out the wood color, paint the ports black and add the hinges. So no need to go to the labor of carving away the wood at the risk of really screwing up!

Here she is with the expeirmental placement of the larger windows - I thought they were too large and went with the smaller ones - Good choice, Chuck!ROTF
The red arrows show the lay of the shrouds for the mizzen mast. On that note, according to my measurements, a channel is required so that the shrouds pass outboard of the railing on the poop deck. See posts #234-236 above.

LO outboard windows aft.jpg

Now several views port and starboard. Red arrows indicate the windows based on the 1847 plans. Blue arrows the lowr deck gun ports.

LO outboard windows gunports starboard.jpg

Port side - the money maker!

LO outboard port.jpg

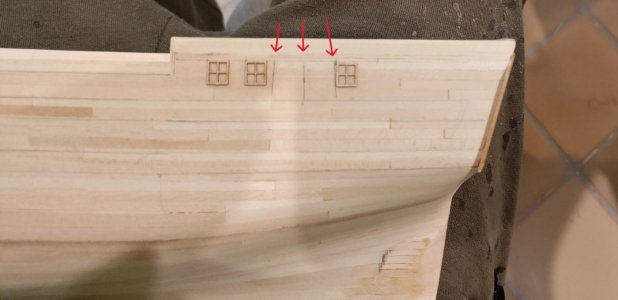
And below, some close-ups. I added scuppers, but based on the rulles of scupper placement, there are darn few places for them. I also have the rub-rails aboard. I'm not sure, but they seem quite pronounced. I may sand them down quite a bit until they look right.

LO outboard starboard closeup.jpg

LO outboard starboard detail.jpg
 
What about the guns on the main deck? We'll know soon enough my dears ROTF

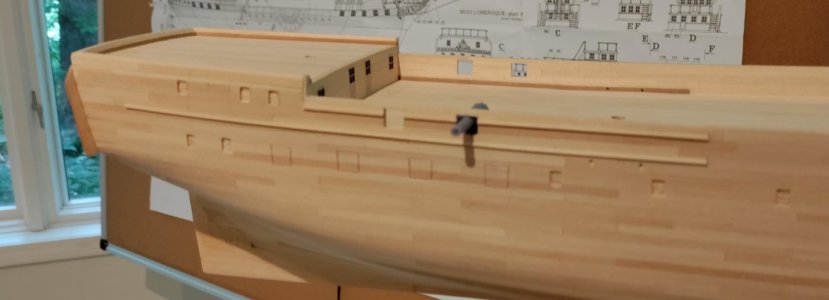
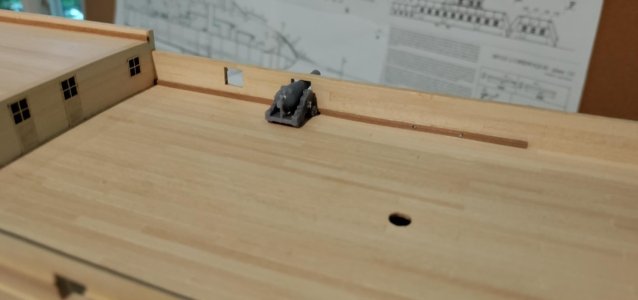
I was a bit concerned about cutting the main deck gun ports. I did it figuring that the guns, courtesy of Todd's Small 3d Print Cannon Foundary, would probably fit as per plan. And since I hadn't oiled or painted anything, I could add back any necessary wood to make things look right. Never the less, I put the Dahlgren in place to confirm my beliefs. I think everything will work out just dandy! Notice that the Dahlgren seems even more overscale.

LO outboard gun 1.jpgLO outboard gun 2.jpgLO outboard gun 3.jpg

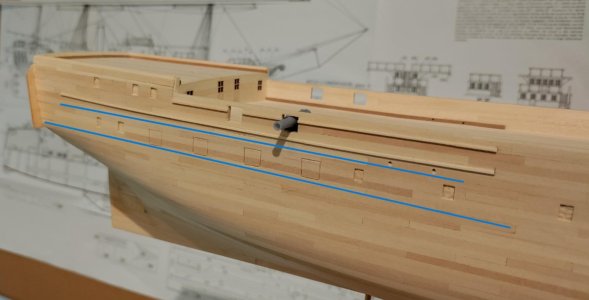
Between the blue lines is the line for the "wood" colored strip that I am using to replace the white that should be painted there. Of course the wood strip will folow the curves better than the computer generated lines.

LO outboard starboard detail gun.jpg
 
So, shipmates, having decided to make almost all of the outboard parts before any of the fun begins (yes, my idea of fun involves oil and paint ROTF), I am going to work on the head next.

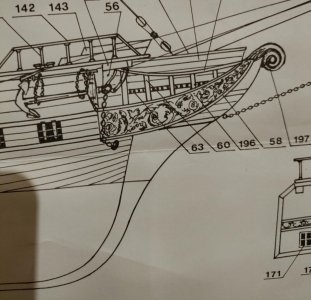
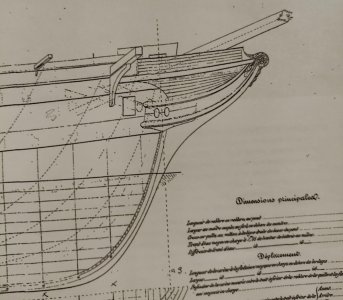
First pic is what the kit plans describe. Second pic is L'Orenoque as planned in 1847. I wish I knew how to display them side by side, but I'm sure you see all of the ornamentation from the kit - thus my earlier remark about floating bordello (I'm also talking about the large hotel that was meant to populate the main deck). Also, seems to me that the kit has a variety of objects lower than they should be, like the hawse pipe (one when there should be two btw). Note also that the kit omits the rub rails. For me, in addition to being indicated on the original plans, they add visual interest and help properly locate things like the cat head and the boomkin. So, making the head look like the plan rather than the kit is my next mini project!

Blessings. Peace. Gratitude.
Chuck

LO head kit plan.jpgLO head plan.jpg
 
Back
Top