• LUCZORAMA SHIPWRECK SCAVENGER HUNT GIVEAWAY. 4 Weeks of Fun • 1 Legendary Prize ((OcCre’s Fram Ship)) • Global Crew Welcome!
    **VIEW THREAD HERE**

Corsair H.M.S. Enterprize Build Log

"Just as the old saying goes: Give me six hours to chop down a tree and I will spend the first four sharpening the axe. So rest easy, focus on your recovery, and everything will work out.":)
Yes Preparation Prepaeration Preperation
 
Well in point of fact, I asked for a suggestion, not a tutorial.
Let’s remember, in this case it’s more about protection/ preservation, Pear, for all of it’s benefits is not really a striking material.
As examples, I include a couple pieces I enhanced/ refreshed myself using now, unavailable, Arrow wood finish, but requiring multiple rubbing/polishing sessions, largely impractical for this type of project, also have used Purdy system oil finish on fine walnut….lots of elbow grease.
Thus the proven result( from some pro admiralty builds) from what I’ve seen using the wipe on poly.

Not the best photos but I think you’d agree, some examples of very fine walnut.

Admins: if posting rifle pics here violates anything , please remove. Only post them as examples of nice wood/wood finishes.

View attachment 526274

View attachment 526275
My only comment here is that the original builder used very primitive tools and Adze marks would have been on the Frames Not Highly polished
BUT!
 
Construction of the frames continues. :) I'm just beginning to start frame #30 out of the 37 straight frames. Then I start all the cant frames. :)
I still need to work out what I'm going to do for spacers between the frames too.
Pictures, Jeff! We're starting to think you aren't really building this ship model ROTF.
 
Pictures, Jeff! We're starting to think you aren't really building this ship model ROTF.
LOL ok.. its just more frames that are going onto the keel. It pretty much looks the same. They are not glued to the keel yet, just a convenient place to store them all. :) I'll get a picture on here of it aftter I finish sanding the inside of the current batch of frames I'm working on. :)
 
Looking good. Coming together really well Jeff. I shall be starting work on the stern deadwood and keel parts tomorrow, bearing in mind your comments about the misnumbering of the parts. Although a very minor issue and easily worked out, I've found this is a very common occurrence with these PoF kits. It's been no problem . . . yet :D
What are KERFS please Jeff
Construction of the frames continues. :) I'm just beginning to start frame #30 out of the 37 straight frames. Then I start all the cant frames. :)
I still need to work out what I'm going to do for spacers between the frames too.
Construction of the frames continues. :) I'm just beginning to start frame #30 out of the 37 straight frames. Then I start all the cant frames. :)
I still need to work out what I'm going to do for spacers between the frames too.
found a picture of frame fillers Will Post (FRom another Member)

Fillers on Frames.png
 
What are KERFS please Jeff


found a picture of frame fillers Will Post (FRom another Member)

View attachment 535979
Thanks Richard.. I meant I need to figure out what wood to use since I don't have spare other than from the current kit. :)
A kerf is the slit that is made from a saw blade. If there is a ship nomenclature for it, I can't think of it off hand.
 
Thanks Richard.. I meant I need to figure out what wood to use since I don't have spare other than from the current kit. :)
A kerf is the slit that is made from a saw blade. If there is a ship nomenclature for it, I can't think of it off hand.
wondered if it was a typo Kerf "Keef" but thanks
Just some 1mm Strips But Victor says its in the kit 1 and 2mm strips
 
photo
Does this help

Victor Zhang
From:modelshipdockyard@gmail.com
To:Richard Simmons

Fri, 25 Jul at 04:48


Hi Richard,

The fillers should be 1mm and 2mm strips from the laser cut sheets. You can cut them to appropriate length and place them between the frames. They are not like the fully filled type that we had on Blandford.

Kind regards,
Victor
yeah, I saw that. I don't know if that means that is what the strips in the kit are for, or if they can be made from the scrap from around where the other parts are. :)
 
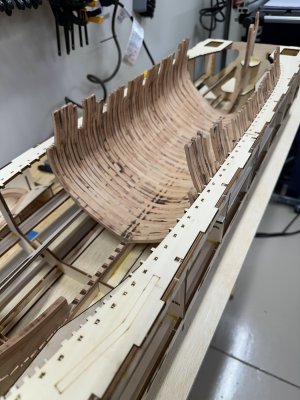
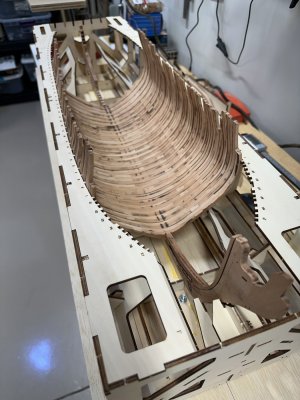
So, Paul (@dockattner ) asked for pictures, and I don't blame him. Here are a few pics of the construction jig with frames 1 through 29 resting on the keel. They are not glued yet and I have not put in any of the spacers between the frames.

IMG_1638.jpegIMG_1640.jpeg

I hope you enjoyed the pics. :) I still have 8 more straight frames to build, then I start on the cant frames. I've also been messing around with the hawse pieces some, trying to get a handle on how best to build them .
 
So, Paul (@dockattner ) asked for pictures, and I don't blame him. Here are a few pics of the construction jig with frames 1 through 29 resting on the keel. They are not glued yet and I have not put in any of the spacers between the frames.

View attachment 536072View attachment 536073

I hope you enjoyed the pics. :) I still have 8 more straight frames to build, then I start on the cant frames. I've also been messing around with the hawse pieces some, trying to get a handle on how best to build them .
That is looking very good, Jeff. It’s time consuming but you have a steady pace.
Regards, Peter
 
Back
Top