-

Win a Free Custom Engraved Brass Coin!!!
As a way to introduce our brass coins to the community, we will raffle off a free coin during the month of August. Follow link ABOVE for instructions for entering.
-

PRE-ORDER SHIPS IN SCALE TODAY!
The beloved Ships in Scale Magazine is back and charting a new course for 2026!
Discover new skills, new techniques, and new inspirations in every issue.
NOTE THAT OUR FIRST ISSUE WILL BE JAN/FEB 2026
You are using an out of date browser. It may not display this or other websites correctly.
You should upgrade or use an alternative browser.
You should upgrade or use an alternative browser.
Le Saint Philippe 1693 after Jean-Claude Lemineur (Ancre) in scale 1:48
- Thread starter dockattner
- Start date
- Watchers 80
-
- Tags
- 1:48 ancre saint philippe
Very helpful, Mirek. My thanks!Witaj
Pawle do szelaku można przyklejać klejem patex i cjanoakrylem na który jesteś uczulony . Pozdrawiam Mirek
Hi Paul,
I use schellac politoer, which is premixed with alcohol and therefore easy to use.
If you use multiple layer it will give a shiny surface as at dockyard models. With a single layer it will mainly absorb into the wood and creates a matt-satin finish. To create a fully mat surface you can lightly sand it with some steelwool after the treatment.
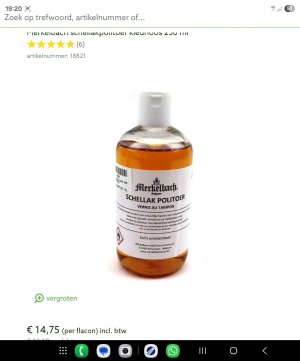
You even have different colors of shellac.

I use schellac politoer, which is premixed with alcohol and therefore easy to use.
If you use multiple layer it will give a shiny surface as at dockyard models. With a single layer it will mainly absorb into the wood and creates a matt-satin finish. To create a fully mat surface you can lightly sand it with some steelwool after the treatment.

You even have different colors of shellac.

Hi Paul,
I use schellac politoer, which is premixed with alcohol and therefore easy to use.
If you use multiple layer it will give a shiny surface as at dockyard models. With a single layer it will mainly absorb into the wood and creates a matt-satin finish. To create a fully mat surface you can lightly sand it with some steelwool after the treatment.
View attachment 550816
You even have different colors of shellac.
View attachment 550817
Thank you, gentlemen. I have a small pouch of blonde shellac arriving tomorrow.Shellac is also available in dry form on Aliexpress

Thanks, Chris. I was thinking of the shellac as a top-coat but I do see your point.Paul I am not sure why you would want to apply Shellac over an Oil Finish. Each of them are a finish - why complicate things ? Choose based on each advantage and disadvantage. If you want a top coat apply a finish wax to either after fully dry.
That is a very concerning part of the puzzle, Peter. Once I have everything in place it will no longer be possible to apply a finish. On the Kingfisher I was using wipe-on-poly because I was not interested in highlighting the minimal wood grain in my casello boxwood. The WOP did weaken the bond strength but not enough to matter. I share your concern when using oil which is what I think I should be using to make the most of the pear.But be sure everything is already glued.
Regards, Peter
I do manage to turn every step into a major ordeal, don't I?
Any consideration to a spray-on finish using an air brush?That is a very concerning part of the puzzle, Peter. Once I have everything in place it will no longer be possible to apply a finish. On the Kingfisher I was using wipe-on-poly because I was not interested in highlighting the minimal wood grain in my casello boxwood. The WOP did weaken the bond strength but not enough to matter. I share your concern when using oil which is what I think I should be using to make the most of the pear.
I do manage to turn every step into a major ordeal, don't I?
Not really. I don't even have an air brush much less the experience to pull it off. Do you think an air brush could work for a POF model? What would I spray?Any consideration to a spray-on finish using an air brush?
That’s the million dollar question, isn’t it? Would have to be some thing you can apply in thin coats and would not require wiping down.Not really. I don't even have an air brush much less the experience to pull it off. Do you think an air brush could work for a POF model? What would I spray?
I only suggest an airbrush for its ability to cover evenly and reach tight places, although I myself have only used it to apply paint or clear acrylic over paint. I’ve yet to build a ship that stand to go around unclothed. I need better skills and better materials.
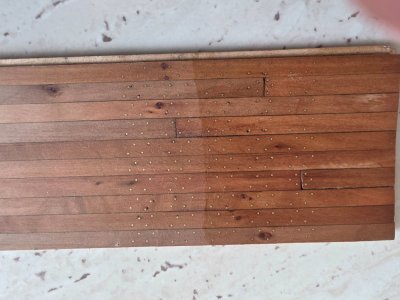
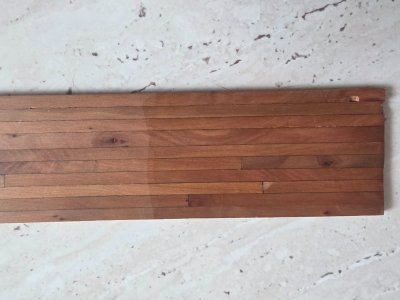
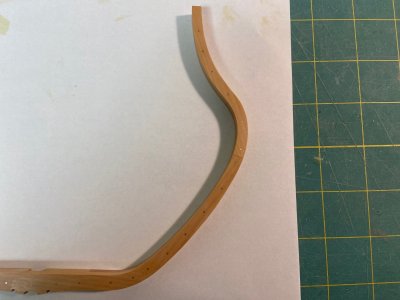
I ran a test the new amber shellac flakes than arrived recently on one of the reject frames (there are many) for Fame. Here are the results.
First pic - one coat of 1lb cut - almost looks unfinished - very flat and the wood is sealed.
Third pic - three coats 1lb cut - has a nice luster. Each additional coat will add more gloss and deepen the finish as desired. In this test I also applied a thin coat of wax as a top coat.
Thin coats dry superfast - less than 30 minutes - and its sands easily to ensure future adhesion (one of the major reasons I will be using it as I will be applying finish to hard to reach areas as I continue to add assemblies onto the model). Also its easy to repair scratches - just add a little more shellac to the area and they vanish.


Last edited:
That's the color/tone I'm looking for, Chris.
My blonde shellac came in, and I have to say I was not impressed - especially compared to what was happening to the pear under Danish oil (polymerized linseed with some additives to accelerate curing). But this amber shellac is now worth exploring.
It was my original plan to spend our northern hemisphere winter building out the interior (beams, knees, carlings...) before doing the wales and outer planking. I am now rethinking the wisdom of that. If I change directions and do the outer planking this winter that would also postpone making a final decision on finish allowing more time for experimentation.
I do appreciate how you (Chris) and others have shared your thoughts so generously with me (thanks, also to @RussF who has been sharing his experience with me via PM). You are a fine bunch, and it is such a joy to be a part of this forum.
Let's see, shellac in all its color options, cellulose sanding sealer, varnish, poly, linseed oil, tung oil, traditional stains, bitumen, cuts with turpentine and isopropyl alcohol - no wonder I can't make a decision...

Yup I tried blonde shellac and was not a fan of it either on pear. However I will use it on the black hornbeam wales and possibly decking where I do not want any tint/warm tone.
You might want to try Garnet Shellac if you want a deeper shade - I found that interesting as well.
Also if it helps your build sequence - my plan with Fame is to finish installing the frames, complete the stern framing, cut the cross beams over the frames and fair the interior. I will then add the interior floor planks and keys between the frames before removing from the jig. Now that the frame is solid, Ill final fair the exterior and proceed with wales and exterior planking.
Then I will attack the interior, its decks and support structure etc. From my research that's how most builders proceed with this sort of construction.
Last edited:
- Joined
- Jan 25, 2023
- Messages
- 543
- Points
- 308

Link to the shellac you're using?I ran a test the new amber shellac flakes than arrived recently on one of the reject frames (there are many) for Fame. Here are the results.
First pic - one coat of 1lb cut - almost looks unfinished - very flat and the wood is sealed.
Third pic - three coats 1lb cut - has a nice luster. Each additional coat will add more gloss and deepen the finish as desired. In this test I also applied a thin coat of wax as a top coat.
Thin coats dry superfast - less than 30 minutes - and its sands easily to ensure future adhesion (one of the major reasons I will be using it as I will be applying finish to hard to reach areas as I continue to add assemblies onto the model). Also its easy to repair scratches - just add a little more shellac to the area and they vanish.
View attachment 550969
View attachment 550970
De-Waxed Orange Shellac Flakes 1 lb. (16 oz.) - Amazon.com
De-Waxed Orange Shellac Flakes 1 lb. (16 oz.) - Amazon.com
www.amazon.com
Perfect, Mirek! My thanks!
Hello Friends,
As I continue to explore wood finishing options (translation: throwing good money after bad) work continues on the Saint Philippe stern section model.
I have now emotionally committed to working on the exterior hull planking as my next major effort (translation: kicking the can down the road on the wood finishing decision). But I had already begun work on the rider frames and flat crotches so I thought it would be best to wrap those up before starting something new (translation: if I don't finish these now, I'll forget how to do what I am doing).
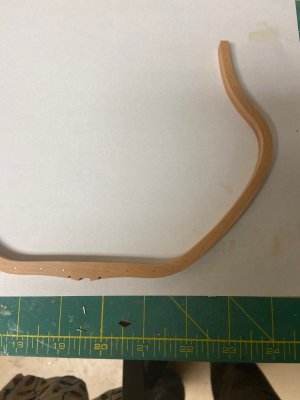
Here is where I am at the conclusion of the weekend:
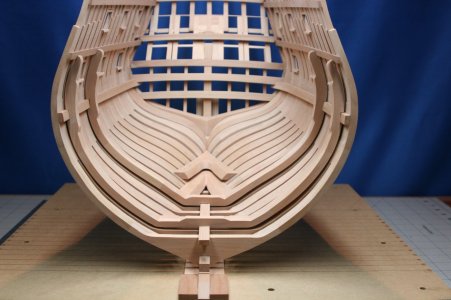
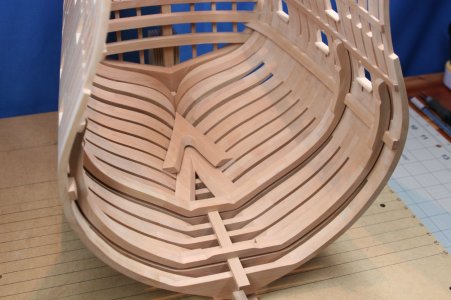
I'm sure you noticed the gap between the rider frames and hull framing. This is intentional. The rider frames actually sit on the ceiling strakes - but I'm not installing ceiling strakes - thus the gap.
I had hoped to show you one more rider frame (actually, two half rider frames) that sit on the upper flat crotch. Unfortunately, while working on these half frames, I cut the fairing bevel in the wrong direction. Double unfortunately, I have now used up the pearwood panels needed for the frames (6.2 mm thick) so I am back to being a woodworker instead of a modeler. Not a major set-back, but still frustrating.
Thanks for stopping by!
As I continue to explore wood finishing options (translation: throwing good money after bad) work continues on the Saint Philippe stern section model.
I have now emotionally committed to working on the exterior hull planking as my next major effort (translation: kicking the can down the road on the wood finishing decision). But I had already begun work on the rider frames and flat crotches so I thought it would be best to wrap those up before starting something new (translation: if I don't finish these now, I'll forget how to do what I am doing).
Here is where I am at the conclusion of the weekend:


I'm sure you noticed the gap between the rider frames and hull framing. This is intentional. The rider frames actually sit on the ceiling strakes - but I'm not installing ceiling strakes - thus the gap.
I had hoped to show you one more rider frame (actually, two half rider frames) that sit on the upper flat crotch. Unfortunately, while working on these half frames, I cut the fairing bevel in the wrong direction. Double unfortunately, I have now used up the pearwood panels needed for the frames (6.2 mm thick) so I am back to being a woodworker instead of a modeler. Not a major set-back, but still frustrating.
Thanks for stopping by!
Ha! I can completely relate to your “translation mode,” Paul — I think we’ve all been there. It sounds like you’re handling the Saint Philippe project with both patience and humor, which is half the battle with these complex POF builds.Hello Friends,
As I continue to explore wood finishing options (translation: throwing good money after bad) work continues on the Saint Philippe stern section model.
I have now emotionally committed to working on the exterior hull planking as my next major effort (translation: kicking the can down the road on the wood finishing decision). But I had already begun work on the rider frames and flat crotches so I thought it would be best to wrap those up before starting something new (translation: if I don't finish these now, I'll forget how to do what I am doing).
Here is where I am at the conclusion of the weekend:
View attachment 551451
View attachment 551452
I'm sure you noticed the gap between the rider frames and hull framing. This is intentional. The rider frames actually sit on the ceiling strakes - but I'm not installing ceiling strakes - thus the gap.
I had hoped to show you one more rider frame (actually, two half rider frames) that sit on the upper flat crotch. Unfortunately, while working on these half frames, I cut the fairing bevel in the wrong direction. Double unfortunately, I have now used up the pearwood panels needed for the frames (6.2 mm thick) so I am back to being a woodworker instead of a modeler. Not a major set-back, but still frustrating.
Thanks for stopping by!
As for the fairing bevel mishap, that’s the kind of “character-building exercise” every woodworker knows too well (translation: muttering under your breath while pretending it’s part of the plan). The rider frames and crotches are looking great, though — even with the missing ceiling strakes, your approach makes perfect sense.
Looking forward to seeing how the exterior planking unfolds once you’ve recovered from your woodworking detour!
- Joined
- Jun 17, 2021
- Messages
- 3,200
- Points
- 588

Is finishing really necessary? Your wood surfaces look so well finished au naturel that they could be allowed to patinize naturally over time with exceedingly satisfying results. No need to gild the lily. Your joinery and wood surfaces speak for themselves.


