• Win a Free Custom Engraved Brass Coin!!!
    As a way to introduce our brass coins to the community, we will raffle off a free coin during the month of August. Follow link ABOVE for instructions for entering.

Le Saint Philippe 1693 after Jean-Claude Lemineur (Ancre) in scale 1:48

A small construction update as I continue researching what sort of finish I want to put on the hull framing (the leader in the clubhouse is nothing more than linseed oil)...

I'm back to making frames - but this time around: rider frames. There are only a few of these needed in the stern section. If I would have known I would have progressed to this point successfully I could have (should have) completed the rider frames at the same time I was doing all the other frames. But I lacked that level of confidence...

I really had to scrape together remnants and off-cuts to come up with enough dimensional stock to cut out these pieces:
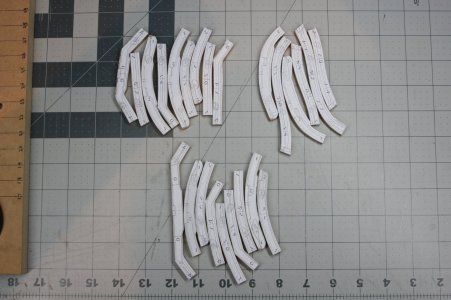
IMG_1510.JPG

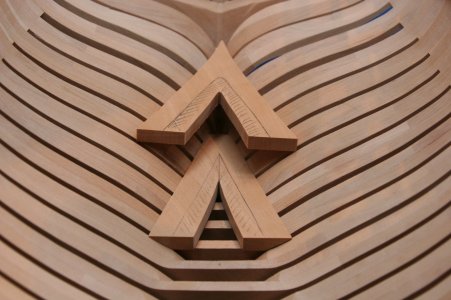
And as long as I had to work out in the garage, I began fabricating these things (they are called "flat crotches" which doesn't strike me as a very flattering thing to say about a crotch, but that's their name - at least when it is translated from French to English).
IMG_1509.JPG

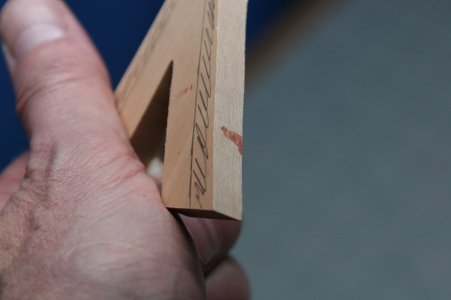
These guys are a PIA to fit in place. That explains this:
IMG_1511.JPG

If you're not bleeding - you're not trying...
 
A small construction update as I continue researching what sort of finish I want to put on the hull framing (the leader in the clubhouse is nothing more than linseed oil)...
Don’t look further, a good choice ….. INHO.
I'm back to making frames - but this time around: rider frames. There are only a few of these needed in the stern section. If I would have known I would have progressed to this point successfully I could have (should have) completed the rider frames at the same time I was doing all the other frames. But I lacked that level of confidence...

I really had to scrape together remnants and off-cuts to come up with enough dimensional stock to cut out these pieces:

View attachment 550514

And as long as I had to work out in the garage, I began fabricating these things (they are called "flat crotches" which doesn't strike me as a very flattering thing to say about a crotch, but that's their name - at least when it is translated from French to English).

View attachment 550513
Labor-intensive multi-angled parts. But you are going to fit them all.
These guys are a PIA to fit in place. That explains this:

View attachment 550515

If you're not bleeding - you're not trying...
That’s the true modelmakers mark, Paul.
Regards, Peter
 
A small construction update as I continue researching what sort of finish I want to put on the hull framing (the leader in the clubhouse is nothing more than linseed oil)...

I'm back to making frames - but this time around: rider frames. There are only a few of these needed in the stern section. If I would have known I would have progressed to this point successfully I could have (should have) completed the rider frames at the same time I was doing all the other frames. But I lacked that level of confidence...

I really had to scrape together remnants and off-cuts to come up with enough dimensional stock to cut out these pieces:

View attachment 550514

And as long as I had to work out in the garage, I began fabricating these things (they are called "flat crotches" which doesn't strike me as a very flattering thing to say about a crotch, but that's their name - at least when it is translated from French to English).

View attachment 550513

These guys are a PIA to fit in place. That explains this:

View attachment 550515

If you're not bleeding - you're not trying...
Good morning Paul. Every time I see your woodwork I am awed by the finish you achieve.
If you're not bleeding - you're not trying...
...so little.....you clearly not trying hard enough ROTF .

Cheer Grant
 
Hey Paul,

I would avoid an oil finish on a fully framed model.

I am a fan of oil finishes - as you can see by my Confederacy - finished with pure tung oil - cut 50 percent on first coat and 100 percent pure on the second. Oil finishes need to be buffed to make sure to avoid tackiness that has a habit of sticking in any joint areas (like on a framed build) and it will not dry. On a plank on bulkhead model or one that is fully planked its not a problem. I buffed this hull many times during the drying process - to avoid seepage common in oil finishes and avoid wet spots. Confederacy was built with swiss pear which does seep an oil finish. Oil finishes are beautiful as the do patina over time - this finish was applied over a decade ago.

Also you will deal with an adhesion problem later - which if you sand a part before glueing - it will not be an issue - just a pain.

I recommend sanding sealer - which in fact is just very diluted shellac. Its dries super fast when applied in light thin coats and you can build up a finish depending on how many coats you use and control your sheen level. If you buy sanding sealer out of the can make sure to dilute it at 50 percent and make sure the can is relatively new and not sitting on the shelf of the retailer.

Or better yet - but your own shellac flakes and mix your own. The advantage is you can mix as much as you need and its good for six months. Many modelers often use shellac as a base to mix other finishes such as bitumen to age the appearance. You can buy any shade of shellac - from super blonde which is colorless to garnet to darken the finish. Buy the dewaxed kind if you go the shellac route which gives you more options to apply a finish wax or any other top coat later if desired.

Give it a try

IMG_1722 (1).jpg
 
Hey Paul,

I would avoid an oil finish on a fully framed model.

I am a fan of oil finishes - as you can see by my Confederacy - finished with pure tung oil - cut 50 percent on first coat and 100 percent pure on the second. Oil finishes need to be buffed to make sure to avoid tackiness that has a habit of sticking in any joint areas (like on a framed build) and it will not dry. On a plank on bulkhead model or one that is fully planked its not a problem. I buffed this hull many times during the drying process - to avoid seepage common in oil finishes and avoid wet spots. Confederacy was built with swiss pear which does seep an oil finish. Oil finishes are beautiful as the do patina over time - this finish was applied over a decade ago.

Also you will deal with an adhesion problem later - which if you sand a part before glueing - it will not be an issue - just a pain.

I recommend sanding sealer - which in fact is just very diluted shellac. Its dries super fast when applied in light thin coats and you can build up a finish depending on how many coats you use and control your sheen level. If you buy sanding sealer out of the can make sure to dilute it at 50 percent and make sure the can is relatively new and not sitting on the shelf of the retailer.

Or better yet - but your own shellac flakes and mix your own. The advantage is you can mix as much as you need and its good for six months. Many modelers often use shellac as a base to mix other finishes such as bitumen to age the appearance. You can buy any shade of shellac - from super blonde which is colorless to garnet to darken the finish. Buy the dewaxed kind if you go the shellac route which gives you more options to apply a finish wax or any other top coat later if desired.

Give it a try

View attachment 550613
Hmm. I always thought shellac created a glossy finish. Looks like I need to look into it again. Are you cutting with isopropyl alcohol?

I had not thought about the difficulty of managing linseed oil on a POF model. Something magic happens to pear wood under oil - it would be a shame to miss out on that.

Can I put shellac over oil to solve the adhesion problem?

Argh...so much to learn in this hobby!
 
Hmm. Zawsze myślałem, że szelak nadaje połysk. Chyba muszę to jeszcze raz sprawdzić. Czy rozcieńczasz alkoholem izopropylowym?

Nie pomyślałem o trudnościach w zarządzaniu olejem lnianym w modelu POF. Coś magicznego dzieje się z drewnem gruszy pod wpływem oleju – szkoda byłoby to przegapić.

Czy mogę nałożyć szelak na olej, aby rozwiązać problem przyczepności?

Ach...tyle można się nauczyć w tym hobby!
Witaj
Szelak może dawać połysk ale też nie zawsze moja la bella pouela jest malowana szelakiem i się nie błyszczy armata też szelakiem i jest matowa. Pozdrawiam Mirek

20250612_160736.jpg

20250612_162103.jpg
 
A small construction update as I continue researching what sort of finish I want to put on the hull framing (the leader in the clubhouse is nothing more than linseed oil)...

I'm back to making frames - but this time around: rider frames. There are only a few of these needed in the stern section. If I would have known I would have progressed to this point successfully I could have (should have) completed the rider frames at the same time I was doing all the other frames. But I lacked that level of confidence...

I really had to scrape together remnants and off-cuts to come up with enough dimensional stock to cut out these pieces:

View attachment 550514

And as long as I had to work out in the garage, I began fabricating these things (they are called "flat crotches" which doesn't strike me as a very flattering thing to say about a crotch, but that's their name - at least when it is translated from French to English).

View attachment 550513

These guys are a PIA to fit in place. That explains this:

View attachment 550515

If you're not bleeding - you're not trying...
OMG, I was recently introduced to this. Good health to you, my friend. Regarding oil, try Danish or tung oil on a sample. Linseed oil darkens the wood significantly over time. And it stinks)) but I've said that a hundred times already. Tung oil also smells and takes a long time to dry, but it doesn't darken the wood as much. Danish oil has a gentle tint and doesn't change color over time, and a huge plus is that it dries very quickly. I coated the legs of a display case this morning and by late afternoon I had them installed and in the room, and everything is fine. This wouldn't have happened with any other oil. ;)
 
Hmm. I always thought shellac created a glossy finish. Looks like I need to look into it again. Are you cutting with isopropyl alcohol?

I had not thought about the difficulty of managing linseed oil on a POF model. Something magic happens to pear wood under oil - it would be a shame to miss out on that.

Can I put shellac over oil to solve the adhesion problem?

Argh...so much to learn in this hobby!
Paul look up using shellac on some woodworking sites it will help you learn more about its uses and applications. You do not want to use Oil over shellac - it will not work as Oil is a penetrating finish hence it seeps from the wood fibers vs Shellac which a creates a surface finish. With subsequent coats of shellac each one melts into the previous which allows you to control the amount of gloss. Again the beauty of thin coats - it dries superfast - less than an hour for subsequent coats unlike oil finishes which can take forever to fully dry and can remain sticky in joint lines and other areas hard to access to buff out.

I cut Shellac with denatured alcohol. A 1lb cut is a good starting point for modeling work.
 
I had not thought about the difficulty of managing linseed oil on a POF model. Something magic happens to pear wood under oil - it would be a shame to miss out on that.
Look at the open frames of pear wood of my PoF Bluenose: linseed oil everywhere. But be sure everything is already glued.
Regards, Peter
 
Paul look up using shellac on some woodworking sites it will help you learn more about its uses and applications. You do not want to use Oil over shellac - it will not work as Oil is a penetrating finish hence it seeps from the wood fibers vs Shellac which a creates a surface finish. With subsequent coats of shellac each one melts into the previous which allows you to control the amount of gloss. Again the beauty of thin coats - it dries superfast - less than an hour for subsequent coats unlike oil finishes which can take forever to fully dry and can remain sticky in joint lines and other areas hard to access to buff out.

I cut Shellac with denatured alcohol. A 1lb cut is a good starting point for modeling work.
Thanks, Chris. I have been doing just as you suggested (researching shellac).
My question wasn't about using oil over shellac - I was wondering if shellac will adhere to an oiled surface. My research seems to suggest it will...
 
Polymerized linseed oil will dry faster, but still slow. Although I have NO experience applying it to scale wooden models, I have to agree that the ability to thin shellac makes it an ideal finish. It won’t over-accumulate. It sands easily. It easily re-activates with solvent.
Thanks, Marc! If I might press into your experience... can I safely apply shellac over linseed/tung oil? And does shellac give me at least a bit of hope for future bond strength if I have to glue something to a shellac covered surface?
 
Paul I am not sure why you would want to apply Shellac over an Oil Finish. Each of them are a finish - why complicate things ? Choose based on each advantage and disadvantage. If you want a top coat apply a finish wax to either after fully dry.
 
Back
Top