-

Win a Free Custom Engraved Brass Coin!!!
As a way to introduce our brass coins to the community, we will raffle off a free coin during the month of August. Follow link ABOVE for instructions for entering.
-

PRE-ORDER SHIPS IN SCALE TODAY!
The beloved Ships in Scale Magazine is back and charting a new course for 2026!
Discover new skills, new techniques, and new inspirations in every issue.
NOTE THAT OUR FIRST ISSUE WILL BE JAN/FEB 2026
You are using an out of date browser. It may not display this or other websites correctly.
You should upgrade or use an alternative browser.
You should upgrade or use an alternative browser.
Le Saint Philippe 1693 after Jean-Claude Lemineur (Ancre) in scale 1:48
- Thread starter dockattner
- Start date
- Watchers 80
-
- Tags
- 1:48 ancre saint philippe
I’m in awe of the workmanship. Clean !
- Joined
- Jan 21, 2022
- Messages
- 884
- Points
- 403

Couldn't agree morePaul - the joints look fine. Believe me I get obsessed with small gaps and imperfections. These are glaring to you right now but will fade from memory once you move on with your build. As you've said you are planking anyway - nice work on a difficult frame.
I’m in awe of the workmanship. Clean !
Thank you, friends!Couldn't agree more
- Joined
- Jun 17, 2021
- Messages
- 3,199
- Points
- 588

Don't let the perfect be the enemy of the good. No future observer will be drawn to the minor flaws. Only to the overall beauty and superb craftsmanship. Time and the variables of temperature and moisture are going to make their own adjustments to your (splendid) miniature joinery anyway.
Any effort to further fill or perfect these insignificant gaps will only serve to draw the eye to what are (if left undisturbed) virtually invisible.
I had a drawing instructor advise the class "If you don't like a line, you can't fix it by going over and over it". In short. Declare victory and move on.
Gorgeous by the way. It is a privilege to get to see all the work in progress before some of it gets covered up.


I could not have put this better so Ditto.You are too hard on yourself Paul. Your work has always been a progression of very skillful modelling that many of us can only wish to attain. As I look at your photos today I can only mutter to myself “I wish I could do as well”. Truly great work my friend.
Gaps Paul what gaps ?

Cheers Grant
True storySerious? You are ruining this hobby for us. We don't dare to share our results anymore. Pff Mediocre.


A nice post, Rebus. My thanks. Oh, and I like your work as well!Have enjoyed looking at this build because someday I hope that I can do work as well as this.
Good words, Peter.Don't let the perfect be the enemy of the good. No future observer will be drawn to the minor flaws. Only to the overall beauty and superb craftsmanship. Time and the variables of temperature and moisture are going to make their own adjustments to your (splendid) miniature joinery anyway.
Any effort to further fill or perfect these insignificant gaps will only serve to draw the eye to what are (if left undisturbed) virtually invisible.
I had a drawing instructor advise the class "If you don't like a line, you can't fix it by going over and over it". In short. Declare victory and move on.
Gorgeous by the way. It is a privilege to get to see all the work in progress before some of it gets covered up.
Thanks, Grant.I could not have put this better so Ditto.
Gaps Paul what gaps ?
Cheers Grant
Most of us are too old to see stuff that small anyway, so just don’t hand out optivisors to your guests when they come to visit.
Very clean work Paul. Just a couple of observations , sorry but I know you do appreciate it when I point these things out in hopefully the constructive manner I intend them to be.
The bottom cills of the lided ports should penetrate the hull planking and lie flush with the finished surface
These bottom cills have raised ends where they fit into the frames, creating a visible ledge either side at the bottom of the finished lining. These raised ends finish flush with the framing creating a stop for the lid.
I fully respect your choice if you made a decision not to include these details to simplify the build, but I know you would be glad someone did highlight it if you missed it in the confusing monograph
Kind Regards
Nigel
Greetings, Nigel. I absolutely want to know when I am making mistakes! In looking back now at the monograph I see exactly what you are describing. Indeed, the monograph is quite clear. That I managed to get it right on the inside and wrong on the outside is frustrating. But I do know how it happened - I followed after Michel:Very clean work Paul. Just a couple of observations , sorry but I know you do appreciate it when I point these things out in hopefully the constructive manner I intend them to be.
The bottom cills of the lided ports should penetrate the hull planking and lie flush with the finished surface
These bottom cills have raised ends where they fit into the frames, creating a visible ledge either side at the bottom of the finished lining. These raised ends finish flush with the framing creating a stop for the lid.
I fully respect your choice if you made a decision not to include these details to simplify the build, but I know you would be glad someone did highlight it if you missed it in the confusing monograph
Kind Regards
Nigel

I'll sleep on it, but an attempted repair may be difficult. I'm using soluble glue, but those sills are in there pretty solidly.
Last edited:
Hi Paul
Yes I see. It is possible Michel could be adding another separate strip to the outside as he is painting with wood as that was my intention albeit I plan on using veneer just to face the very outside edge
I also note Michel has also made the bottom cill completely flat, which is incorrect
Kind Regards
Nigel
I also note Michel has also made the bottom cill completely flat, which is incorrect
On the model I was going to simply add a small strip of wood to simulate this stop. You think it was integral to the lower sill itself?These bottom cills have raised ends where they fit into the frames, creating a visible ledge either side at the bottom of the finished lining. These raised ends finish flush with the framing creating a stop for the lid.
- Joined
- Oct 9, 2020
- Messages
- 2,229
- Points
- 488

looking good. congratulationsHello Friends,
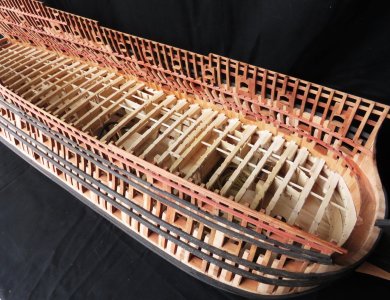
Today I wrapped up the gunport and window (light) upper and lower sills.
Under macro imaging the joinery is mediocre at best, but keep in mind that the entire outer surface of the hull will be planked. Since the inner surface of the hull will not be planked I tried to get those joints more closed - but at this stage in my development as a modeler this was the best I could do (I need to figure out a way to standardize the cutouts in the framing).
I'm not a huge fan of using sawdust/sanding dust to fill gaps but if my eye keeps being drawn to certain gaps, I may have to resort to that.
View attachment 549565
View attachment 549566
View attachment 549567
View attachment 549568
View attachment 549569
View attachment 549570
View attachment 549571
View attachment 549572
View attachment 549573
I believe this leaves the 'skin' of the ship mission accomplie. Time to do some trials and figure out how best to 'finish' the pearwood before starting to add things that will make sealing and protecting what you see here impossible.
As always, I am grateful that you would take time away from your own models to see what I have been doing.
Thanks, Cap'n Sparrow!looking good. congratulations
Hi PaulOn the model I was going to simply add a small strip of wood to simulate this stop. You think it was integral to the lower sill itself?
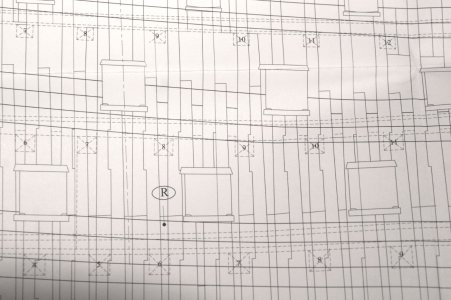
On sheet 15? Framing plan, the ends are deeper and this runs the full depth of the frame notch.Had it been a separate strip it would butt against the frame and not continue into the notch.
It is quite clear on my drawings, a big however, they are 1/36 not 1/48 so I am unsure how well this detail is shown in your plans.
Yes. Plate 15:Hi Paul
On sheet 15? Framing plan, the ends are deeper and this runs the full depth of the frame notch.Had it been a separate strip it would butt against the frame and not continue into the notch.
It is quite clear on my drawings, a big however, they are 1/36 not 1/48 so I am unsure how well this detail is shown in your plans.

I suspect we are talking about different things. My knowledge of ship architecture begins and ends with my training in organic chemistry
 .
.

