• Ships of Scale has incorportated an extra level of security when you log In. Please follow on-screen prompts to acknowledge that you are not a robot via a "Check Box" or a "Pictorial Check Box Puzzle". This is needed due to higher level of AI Activity Security.
  • SUBSCRIBE TO SHIPS IN SCALE TODAY!

    The beloved Ships in Scale Magazine is back and charting a new course for 2026!
    Discover new skills, new techniques, and new inspirations in every issue.

    NOTE THAT OUR NEXT ISSUE WILL BE July/August 2026
  • Win a Free Custom Engraved Brass Coin!!!
    As a way to introduce our brass coins to the community, we will raffle off a free coin during the month of August. Follow link ABOVE for instructions for entering.

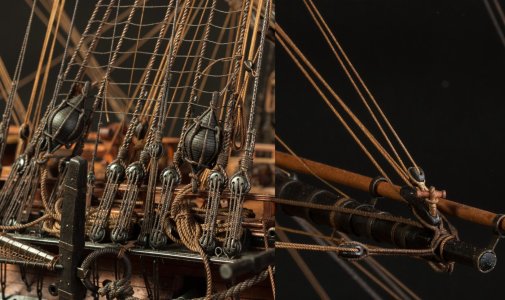
HMS Alert [1777] 1:48 POF by serikoff. (Two hulls: skeleton and fully rigged)

As always my friend ! Marvelous, world class work !
Plus a wonderful description of the work done !
Thank you, friend, I'm very glad you liked it.

Hallo Sergey, sehr schlüssig das Ganze. Präzise und sauber ausgeführt. Schön die Erklärung der Arbeitsschritte. Auch der Kompromiss um das Thema Leiter herum. Man muss dabei im Hinterkopf behalten, dass die Basis ein gegebener Bausatz ist. Der Alleinstehende hat schon so viele Kompromisse ( Fehler ) in sich. Für mich ist es eine absolute Meisterleistung, was DU aus dem Bausatz heraus holst und ihn zu einem erstklassigen Modell machst. Deine Oberflächenbearbeitung sucht seine Gleichen. Ich kenne nur noch einen weiteren Modellbauer der das so fantastisch umsetzt (Dubz) Ich ziehe den Hut. Es motiviert ungemein deinen Baubericht mit all den kleinen Anleitungen zu studieren. Jeder der beabsichtigt die Alert zu bauen, hat mit deinem Bericht die Möglichkeit aus dem nicht ganz günstigen Bausatz ein absolutes Spitzenmodell zu bauen! Ich stelle mir gerade das Ergebnis vor, wenn Du das Modell eigenständig ( ohne Bausatzbasis ) bauen würdest. Danke fürs Zeigen.
Ich freue mich schon auf volle Spannung auf die nächsten Schritte.
Vielen Dank für Ihre freundlichen Worte, Sie sind mein treuester Fan. Obwohl ich Ihre Arbeit kenne und sie sehr gut ist, freut es mich umso mehr, dies von Ihnen zu hören.

Hey Sergey,

As always, it’s incredible to see how much love you’re putting into building the ship. I’m learning so much from you … Thank you!! :D Thumbsup
Thank you very much, I'm glad you don't forget to come by.;)

He's got a rare talent at this stuff, no doubt!
Thank you, that's high praise. It's difficult here without him, considering I don't have a workshop, and I do all this on my knee.:p

It gives a nice, not to dark, warm color, Sergey.
Looking very nice!
Regards, Peter
Thank you. I really liked the result this time too. I always think something's wrong at first and want something else, but testing and experimenting yield results.

Ein wunderbares Farbenspiel. Die Maserung kommt durch das Öl wunderschön zum Vorschein, hat einen fantastischen Farbton. Sehr schön. Erlaube mir eine Frage dazu. Wenn das Öl eingezogen und abgetrocknet ist, wie fühlt es sich an? Trocken ?..leicht ölig? Oder behält es eine gewisse „Restfeuchte“?
Vielen Dank. Nach ein paar Tagen wirkt Dänischlack fast vollständig trocken, fühlt sich aber noch leicht seidig an. Tung braucht deutlich länger. Er trocknet sehr langsam und kann daher wochen- oder sogar monatelang halten. Dänischlack trocknet täglich etwas mehr, während Tunglack viel länger braucht. Er ist aber weder klebrig noch nass, sondern eher seidig. Es ist schwer zu beschreiben. Sie müssen ihn aber gründlich abwischen, um alle klebrigen Rückstände zu entfernen. Falls welche zurückbleiben, wischen Sie sie mit ölhaltigem Verdünner ab.

Thank you very much. After a few days, Danish lacquer appears almost completely dry, but still feels slightly silky. Tung lacquer takes significantly longer. It dries very slowly and can therefore last for weeks or even months. Danish lacquer dries a little more each day, while tung lacquer takes much longer. It's neither sticky nor wet, but rather silky. It's difficult to describe. You must wipe it thoroughly to remove any sticky residue. If there is anything left, wipe it off with oil paint thinner.
 
Thank you, that's high praise. It's difficult here without him, considering I don't have a workshop, and I do all this on my knee.:p
As do I, but I'd never guess it judgng by that tricky matter of electrolysis or by the absolute perfection of any details in your models.
 
And now, as a bonus for everyone who reads this, I'll share a few important points about oils. Some may seem logical and straightforward, but others will be quite counterintuitive, so here they are:

My observations and conclusions about oils from all the experience I've had for several years...

1. Samples are the most important thing! Never coat anything without testing and experimenting. NEVER!

2. Samples. When you prepare the material after sawing, arrange all the planks in the exact order and position you sawed them! Unless you want extreme color contrast and a multicolored traffic light, don't turn the planks upside down or (especially) 180 degrees. Any wood has layers and grain, and when you turn the planks, the same piece of wood will look completely different (unless, of course, you want that exact effect).

3. Preliminary experiments. Take a piece of wood exactly like the one you'll be using (the one you've already cut into planks from) and apply different oils to it. Either pure or diluted with solvent.

Try several oils. Most importantly, place them in different locations! (Each piece should have both a dry area and an oiled area.)

Place one piece in a completely dark place; another in the shade, out of direct sunlight; and the third in full sun, where it will almost always be exposed to sunlight (on a windowsill). Leave the samples for as long as possible, ideally 3-6 months. You'll see how they differ.
Light-colored woods will darken or yellow in the sun, and oils will only enhance this effect, depending on the type. In the shade, these processes also occur, but much more slowly or at a lower rate. So, sometimes, if you want to achieve the desired color, you can apply a specific oil and place the piece in the sun... or, conversely, do it in the shade and then cover the display case with a museum film with a UV filter to prevent color change. Another option is to first let the wood oxidize and fade in the shade or sun (depending on your preference) and only then apply oil. Sometimes, different combinations produce dramatically different colors.

Dark woods change color less in the sun, but the effect still remains and is enhanced by different oils.

Reminder: Linseed oil has the strongest effect on color! Light woods yellow significantly over time (to a straw color), while dark woods develop a warmer hue. This oil has a long-lasting odor, so I stopped using it.

Tung oil also has a very strong effect on color, especially over time. It also smells and takes a long time to dry. But! In my opinion, this oil creates a very pleasant color for dark wood. It brings out the wood's color to the fullest, but sometimes too much. Its matte finish is a huge plus. One coat is 100% matte. Two coats produce a soft satin (semi-matte, but closer to matte).

Danish oil has less of an effect on the wood's color. Light woods don't yellow as much over time, and dark woods don't darken too much. It dries the fastest and doesn't have a long-lasting scent, although I like its scent the most. Unlike the first two (which bond perfectly with glue after it's completely dry), this oil has difficulty bonding with glue, so keep that in mind. This oil isn't completely matte. It's initially satin (semi-matte, although closer to matte). A gloss develops with repeated coats. Therefore, you need to coat the entire section in one go, otherwise you'll get shiny spots.
Teak oil has almost no effect on the wood's color. It has a pleasant scent, takes a little longer to dry and dry than Danish oil, but has a glossier finish right away. A thin application and immediate wiping can achieve a satin finish, but this semi-matte finish is closer to a glossy finish. However, it sometimes behaves differently on different wood species, and a lot depends on the degree of polish. The smoother the surface, the glossier the finish. When thinned with solvent, it almost always produces micro-spots in the form of stipples. Like linseed oil, I almost never use this oil, but sometimes it produces the desired result.

My choice for this particular project leans toward this option: Rustins Tung Oil for the dark grate frames, ladders, and other individual elements on the deck, and, of course, the exterior hull planking. And Rustins Danish Oil for the decks, and, of course, the exterior planking. I haven't made a final decision on this one yet. I can't decide which I prefer.

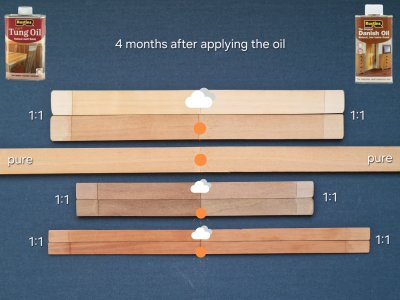
And to confirm my words, here are samples that are four months old. It's a shame I thought I'd dilute the oils 1:1 with solvent, but for now I'm leaning toward using pure oil. This factor also affects color. Diluted oil penetrates deeper, causing greater color changes, which can sometimes be unnecessary.

Alert 2774с.jpg

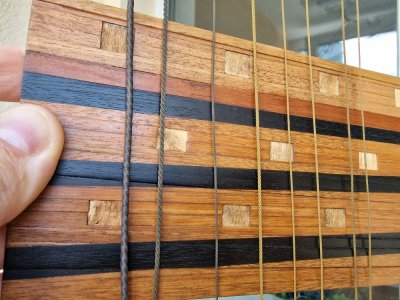
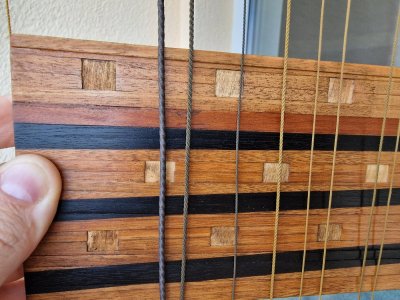
The photo shows that the wood darkened significantly more depending on its exposure to sunlight: both in the oiled and dry areas. The areas in the shade (cloud) are significantly lighter. The light pear wood (the top three planks) differs even depending on the oil concentration. And the difference is more visible in them. However, in the dark and pink pear wood, the difference is only due to the type of oil and slightly to the lighting, but it's still there. So... experiment—it will save you from mistakes.

Addendum: 1. Teak oil, like Danish oil, creates a film, and if the surface is polished and very smooth, it will be more difficult for the glue to adhere to it. Therefore, the glue joint will be weaker and will need to be reinforced either with pins or by lightly sanding the area. 2. Another observation: I've had teak oil for a long time and its properties haven't changed, but Danish oil has thickened over time to a gelatinous consistency with flakes at the bottom. Belinka tung oil has also thickened, but Rustins hasn't yet. And before that, over a long period of time, linseed oil developed a very strong smell of fuel oil... so here's the conclusion: If you don't need a lot, buy a minimal amount, on tap or sample it, and use it immediately before use.
 
Last edited:
Well done and described so anyone can understand it.
Although, you didn't mention how the glue acts with pieces that are coated with Teak oil. :)
Thank you for your time of putting all this onto the forums for us !
 
And now, as a bonus for everyone who reads this, I'll share a few important points about oils. Some may seem logical and straightforward, but others will be quite counterintuitive, so here they are:

My observations and conclusions about oils from all the experience I've had for several years...

1. Samples are the most important thing! Never coat anything without testing and experimenting. NEVER!

2. Samples. When you prepare the material after sawing, arrange all the planks in the exact order and position you sawed them! Unless you want extreme color contrast and a multicolored traffic light, don't turn the planks upside down or (especially) 180 degrees. Any wood has layers and grain, and when you turn the planks, the same piece of wood will look completely different (unless, of course, you want that exact effect).

3. Preliminary experiments. Take a piece of wood exactly like the one you'll be using (the one you've already cut into planks from) and apply different oils to it. Either pure or diluted with solvent.

Try several oils. Most importantly, place them in different locations! (Each piece should have both a dry area and an oiled area.)

Place one piece in a completely dark place; another in the shade, out of direct sunlight; and the third in full sun, where it will almost always be exposed to sunlight (on a windowsill). Leave the samples for as long as possible, ideally 3-6 months. You'll see how they differ.

Light-colored woods will darken or yellow in the sun, and oils will only enhance this effect, depending on the type. In the shade, these processes also occur, but much more slowly or at a lower rate. So, sometimes, if you want to achieve the desired color, you can apply a specific oil and place the piece in the sun... or, conversely, do it in the shade and then cover the display case with a museum film with a UV filter to prevent color change. Another option is to first let the wood oxidize and fade in the shade or sun (depending on your preference) and only then apply oil. Sometimes, different combinations produce dramatically different colors.

Dark woods change color less in the sun, but the effect still remains and is enhanced by different oils.

Reminder: Linseed oil has the strongest effect on color! Light woods yellow significantly over time (to a straw color), while dark woods develop a warmer hue. This oil has a long-lasting odor, so I stopped using it.

Tung oil also has a very strong effect on color, especially over time. It also smells and takes a long time to dry. But! In my opinion, this oil creates a very pleasant color for dark wood. It brings out the wood's color to the fullest, but sometimes too much. Its matte finish is a huge plus. One coat is 100% matte. Two coats produce a soft satin (semi-matte, but closer to matte).

Dänisches Öl hat einen geringeren Einfluss auf die Holzfarbe. Helle Hölzer vergilben mit der Zeit weniger, und dunkle Hölzer dunkeln nicht so stark nach. Es trocknet am schnellsten und hat keinen lang anhaltenden Duft, obwohl mir der Duft am besten gefällt. Im Gegensatz zu den ersten beiden Ölen (die nach vollständiger Trocknung perfekt mit Klebstoff haften), haftet dieses Öl schlechter mit Klebstoff, also beachten Sie das bitte. Dieses Öl ist nicht komplett matt. Es ist anfangs seidenmatt (halbmatt, aber eher matt). Mit mehreren Schichten entwickelt sich ein Glanz. Daher müssen Sie die gesamte Fläche in einem Arbeitsgang streichen, sonst entstehen glänzende Stellen.

Teaköl hat kaum Einfluss auf die Holzfarbe. Es duftet angenehm, trocknet etwas langsamer als dänisches Öl, erzeugt aber sofort ein glänzenderes Finish. Mit einem dünnen Auftrag und sofortigem Abwischen lässt sich ein seidenmattes Finish erzielen, dieses seidenmatte Finish kommt einem Hochglanzfinish jedoch näher. Allerdings verhält es sich auf verschiedenen Holzarten unterschiedlich, und viel hängt vom Poliergrad ab. Je glatter die Oberfläche, desto glänzender das Finish. Verdünnt mit Lösungsmitteln entstehen fast immer mikroskopisch kleine, punktförmige Flecken. Wie Leinöl verwende ich dieses Öl fast nie, aber manchmal liefert es das gewünschte Ergebnis.

Für dieses Projekt tendiere ich zu folgender Option: Rustins Tungöl für die dunklen Rostrahmen, Leitern und andere Einzelteile an Deck sowie natürlich die Außenbeplankung. Und Rustins Dänisches Öl für die Decks und ebenfalls die Außenbeplankung. Ich habe mich hier aber noch nicht endgültig entschieden. Ich kann mich nicht entscheiden, welche Variante ich bevorzuge.

Und um meine Aussage zu untermauern, hier sind Proben, die vier Monate alt sind. Schade, dass ich dachte, ich könnte die Öle 1:1 mit Lösungsmittel verdünnen, aber im Moment tendiere ich dazu, reines Öl zu verwenden. Dieser Faktor beeinflusst auch die Farbe. Verdünntes Öl dringt tiefer ein und verursacht stärkere Farbveränderungen, die manchmal unnötig sind.

View attachment 624554

Das Foto zeigt, dass das Holz je nach Sonneneinstrahlung deutlich stärker nachdunkelt, sowohl in den geölten als auch in den trockenen Bereichen. Die schattigen Bereiche (Wolken) sind deutlich heller. Das helle Birnbaumholz (die drei oberen Bretter) zeigt sogar je nach Ölkonzentration unterschiedliche Verfärbungen. Bei ihnen ist der Unterschied besonders deutlich. Beim dunklen und rosafarbenen Birnbaumholz hingegen liegt der Unterschied lediglich an der Ölsorte und in geringem Maße an der Beleuchtung, ist aber dennoch vorhanden. Daher gilt: Probieren Sie es aus – so vermeiden Sie Fehler.
Vielen Dank Sergey. Das ist ein ganz wichtiger Bericht zum erreichen einer perfekten Oberfläche. Die Versuche und Beschreibungen sind für das gelingen der Optik unbezahlbar. Danke für die detaillierte Beschreibung. Du bist eine Bereicherung für den gesamten Modellbau.
 
Well done and described so anyone can understand it.
Although, you didn't mention how the glue acts with pieces that are coated with Teak oil. :)
Thank you for your time of putting all this onto the forums for us !
Thank you. ;) I've added a few words to the text above and answered your question.

Vielen Dank Sergey. Das ist ein ganz wichtiger Bericht zum erreichen einer perfekten Oberfläche. Die Versuche und Beschreibungen sind für das gelingen der Optik unbezahlbar. Danke für die detaillierte Beschreibung. Du bist eine Bereicherung für den gesamten Modellbau.
Vielen Dank. Es freut mich, dass die Informationen hilfreich waren. Studien sind die Grundlage für gute Ergebnisse.
 
Very nice article Sergey. As is often the case, you do all the hard work and we reap the benefits ... and for that I thank you.

I would like to point out for those who are unaware that while linseed and tung are very specific oils, there is no standard specific formulation for Danish Oil and its composition can vary widely between manufacturers. The results you achieve with Rustins may or may not be duplicated by Watco or another brand. As you stated, everyone should do their own testing.
 
Very nice article Sergey. As is often the case, you do all the hard work and we reap the benefits ... and for that I thank you.

I would like to point out for those who are unaware that while linseed and tung are very specific oils, there is no standard specific formulation for Danish Oil and its composition can vary widely between manufacturers. The results you achieve with Rustins may or may not be duplicated by Watco or another brand. As you stated, everyone should do their own testing.
That's right. My post is not aimed at showing the exact results, but rather at showing that there is a difference in oil coatings and drying conditions, and it is significant, and it needs to be taken into account, and experiments and a lot of testing must be done to achieve your desired result.
 
Das ist richtig. Mein Beitrag zielt nicht darauf ab, die exakten Ergebnisse aufzuzeigen, sondern vielmehr darauf, dass es einen signifikanten Unterschied bei Ölbeschichtungen und Trocknungsbedingungen gibt, der berücksichtigt werden muss. Um das gewünschte Ergebnis zu erzielen, sind Experimente und umfangreiche Tests erforderlich.
Und genau diese Proben / Experimente sind sehr wertvoll und zeigen die verschiedenen Ergebnisse mit dem Weg dorthin sehr gut auf. Ebenfalls ergibt sich dadurch auch die Handhabung /Auswirkungen der verschiedenen Produkte Jeder hat einen anderen Geschmack, Farbe, Oberfläche usw. angeht. Durch die gezeigten Ergebnisse kann sich jeder seinen Stil der Oberflächen für sich auswählen und entsprechend umsetzen. Auch „erspart“ mann sich unter Umständen viele Misserfolge und auch Einbuße der eigenen Motivation. Ich finde deine Vorgehensweise sehr motivierend und hilfreich. Danke dafür
 
Chapter 22. Rigging tests.​

1/3

We're still a long way from rigging, but we already need to plan some of the knots that will come into contact with the cables and ropes. I did these calculations for Victory, but since I no longer plan to rig her, I'm transferring all that information to this thread. This chapter will be updated as more testing and experimentation progresses.

First, a little theory.

Alert Rigging 01.JPG

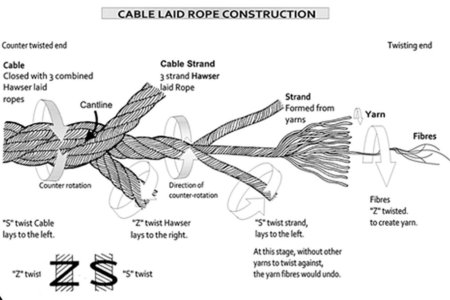
In simple terms, running rigging is twisted in one direction from three bundles of threads. Standing rigging, on the other hand, is twisted in the opposite direction, but from three prefabricated running rigging threads. This is why they have different textures. The photo below shows the difference between beige and black ropes.

Alert Rigging 02.jpg

There's a lot about this topic online, so you can learn more. For now, I'll show you how I made it from scrap materials...


Cable-Rope Machine.

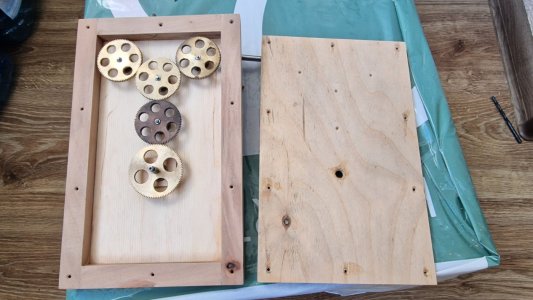
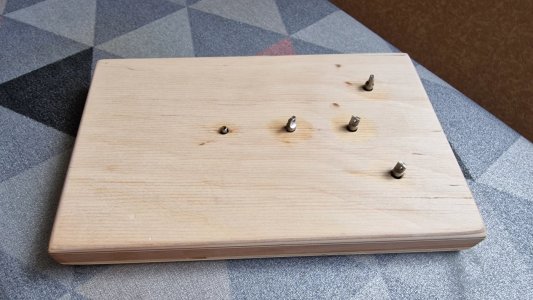
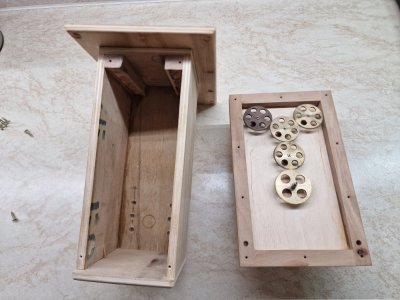
There are two types: a horizontal one and the vertical one I have. The principle is very simple. The main thing is to have three identical gears for the winding hooks and one central gear that connects them. Movement can be directed either toward this central gear or toward any other point. The main thing is that one central gear connects three identical gears for the hooks.

There are many construction options online, and I'm showing my own, fully working version, to help you understand the principle. Maybe it will help someone make something similar.

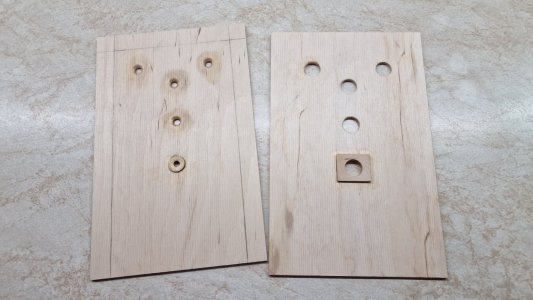
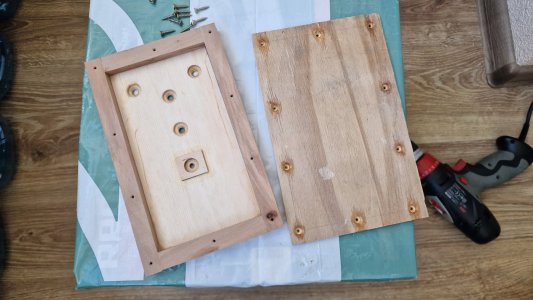
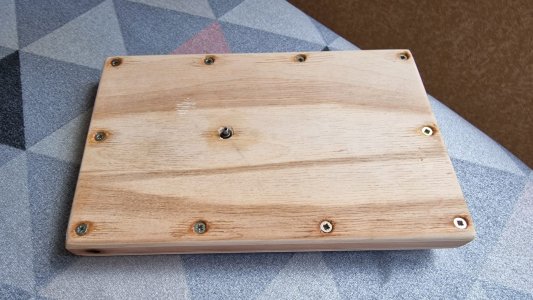
So. First, you need to secure the gears between two plates. The gears and plates can be made of anything, as long as the three gears are identical (but I've already discussed that).

Alert Rigging 03.jpg

Alert Rigging 04.jpg

Alert Rigging 05.jpg

For smooth running, it is better to use bearings and lubricate them with oil.

Alert Rigging 06.jpg

Alert Rigging 07.jpg

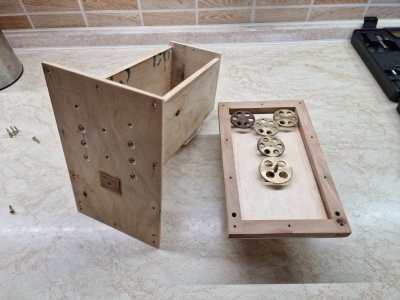
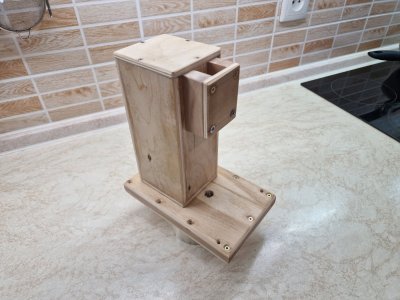
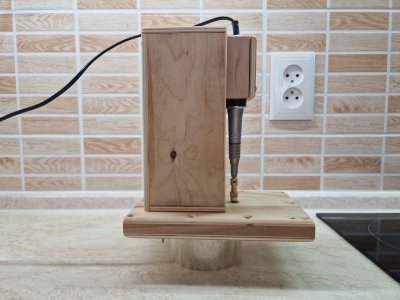
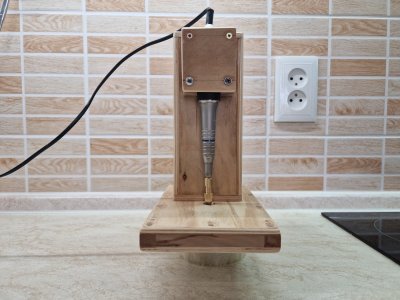
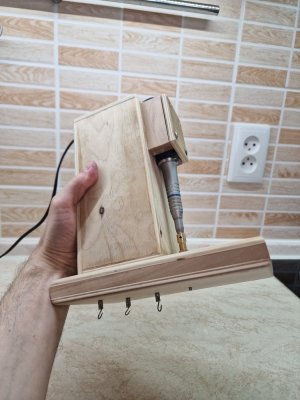
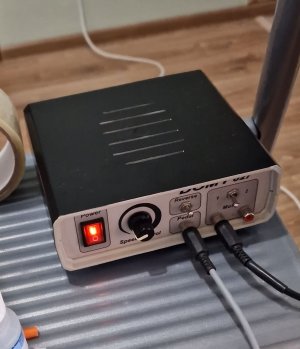
I used a portable drill as a motor. I made a special holder for it. You can use anything that can rotate gears, as long as it has speed control and a reverse function!

Alert Rigging 08.jpg

Alert Rigging 09.jpg

Alert Rigging 10.jpg

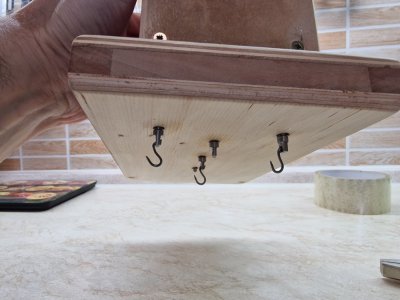
I fixed hooks on the 3 working axes (gears).

Alert Rigging 11.jpg

And through a special adapter, I connected the drive gear axis to the motor axis, which is fixed to the holder box.

Alert Rigging 12.jpg

Alert Rigging 13.jpg

Alert Rigging 14.jpg

This motor is controlled by a foot pedal, which is convenient because you can stop and restart the process at any time. And the variable speed reverse is crucial!

Alert Rigging 15.JPG

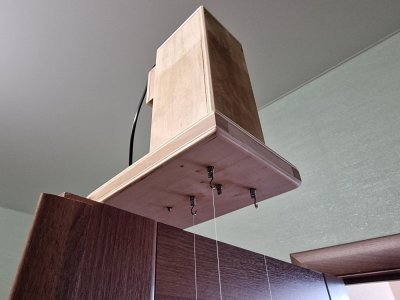
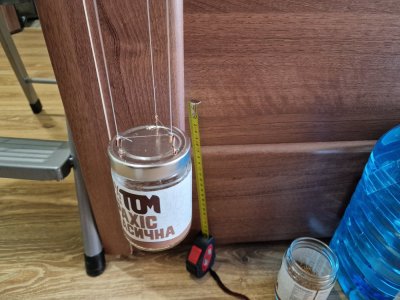
The cable release is fixed to a regular door with two screws screwed into its end.

Alert Rigging 16.jpg

Alert Rigging 16s.jpg

I attach the threads to the jar from below using hooks. This is convenient for thin threads because you can adjust the weight by filling the jar with weight.

It's important that all the threads are equally taut! Otherwise, sagging threads can cause knots, which will result in a defective finished rope.

The degree of twist is also important. If the twist is too loose, the thread will be loose and have an irregular pattern. If the twist is too tight, knots may form or the thread may simply break.

Twisting reduces the length of the thread. You want it to decrease by 10-15%. However, testing is necessary. This percentage may vary slightly for different thicknesses and other factors, but this is a guideline.

The more threads, the more weight you need, otherwise the rope will begin to form loops when twisted. Weight selection should be done empirically. There are no universal weights; everything is learned through testing and trial and error.


Now, about the threads.

I don't use already dyed threads. I buy only milky color (not completely white, namely milkweed, the main thing is that the color does not turn blue). Why white and not the color of the rigging?...

Even if you choose the perfect color that suits you, threads made of 100% polyester have a shine and this does not look natural on the model (in my opinion). You can, of course, use cotton, but it has lint, and that’s just taboo for me! Getting rid of it is completely impossible and very time-consuming. That’s why I use only 100% high-quality polyester and dye the threads myself. I have already decided on the color scheme. I like Dmitry Shevelev's version and his second 75-gun the most. So I will paint these colors, but more on that below.

I use two thread options:

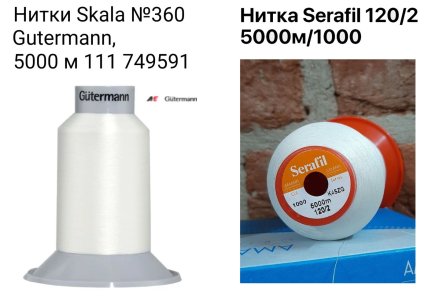
Alert Rigging 17.jpg

Gutermann Scala 320, color 111 milky, and

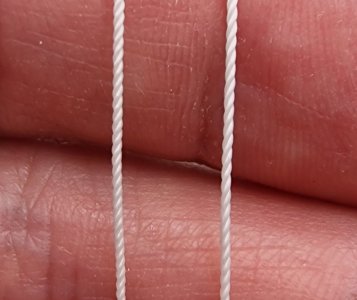
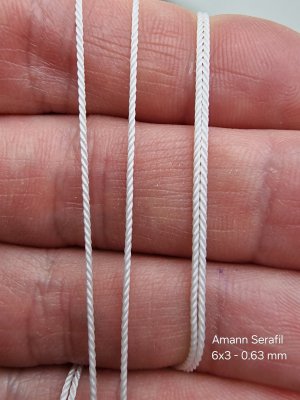
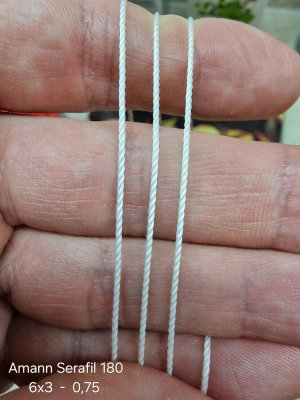
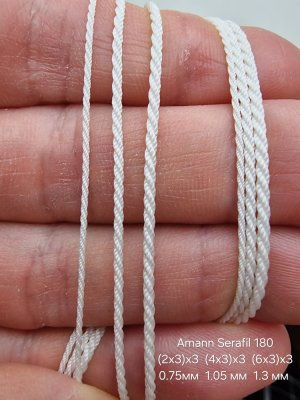
Amann Serafil 120/2 180tex 16, color 1000 milky.

I use Scala for very fine threads or fine checkering.

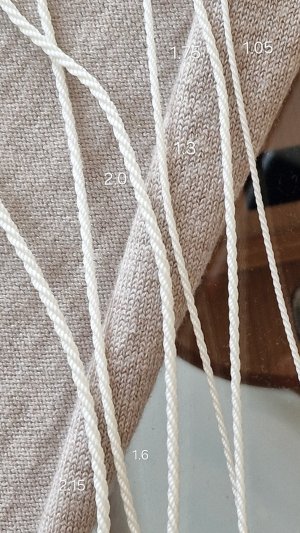
Thread thickness up to 0.1 mm. A twist of two = 0.15 mm. A twist of three (1x3) = 0.17 mm. A twist of two by three (2x3) = 0.25 mm.

But the most effective thread has proven to be Amann Serafil 120/2.

I also use it for checkering and can also make 0.25 mm, but anything up to 0.2 mm is Scala.

Amann Serafil 120/2 (I was told this thread is 180tex 16, but the label said 120/2, so both values will be listed in the description).


I'll start with some unsuccessful attempts and recommendations on what not to do.

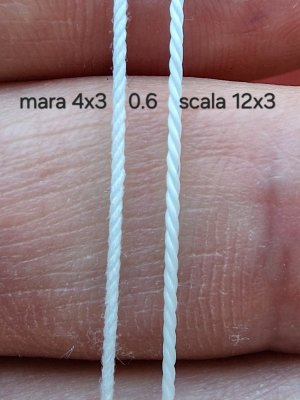
1. Why I abandoned the Gutermann Mara was because of the lint. Why I didn't use the Gutermann Scala 360 for thick ropes and cables (only thin ones) was because, firstly, it wastes a lot of thread, and secondly, it's not always possible to twist it tightly without creating knots. That's why I only used the Gutermann Scala 360 for up to 0.2 mm.

Alert Rigging 20.jpg

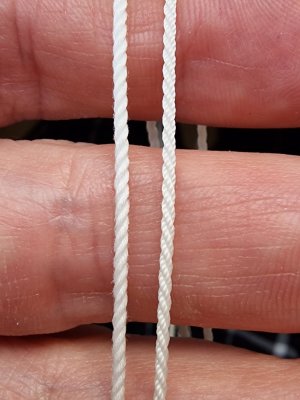
2. Why shouldn't you twist ropes for standing rigging the same way as for running rigging (we're talking about ropes thicker than 0.6 mm)? Firstly, it's wrong and it just doesn't look good.

A proper rope (bottom right), and a "smoker" rope on the left. What's wrong with the one on the left? Firstly, the pile; secondly, it's a twist of individual strands, not pre-twisted strands (running rigging).

Alert Rigging 21.jpg

3. Below is a cable of good (tight) and weak winding.

Alert Rigging 22.jpg
 
Chapter 22. Rigging tests.

2/3


Now, let me show you some successful experiments!
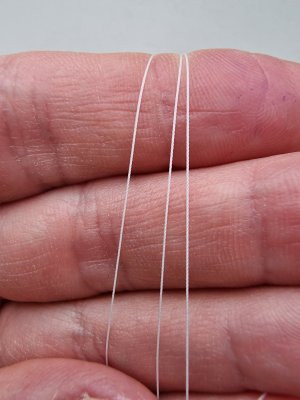
Photo below. Gutermann Scala 360, 0.25mm thick.

Alert Rigging 23.jpg

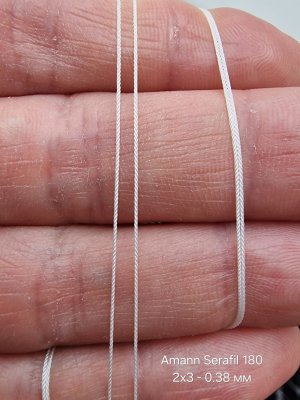
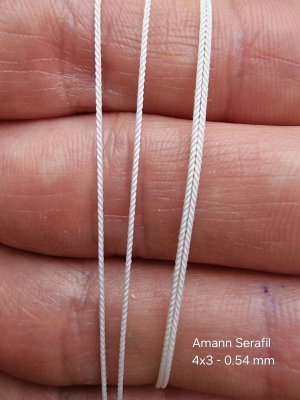
Below where Serafil 180 is indicated, remember that there is Amann Serafil 120\2.

Alert Rigging 24.jpg

Alert Rigging 25.jpg

Alert Rigging 26.jpg

Alert Rigging 27.jpg

And below are the ropes for standing rigging, made of 3 pre-braided cables (running rigging).

Alert Rigging 28.jpg

Alert Rigging 29.jpg

Also, don't forget that scale is scale, but for better perception you can increase the threads by 10-15%, but at the same time check how it will look with the surrounding details.

Alert Rigging 30.jpg

Alert Rigging 31.jpg

One piece of advice: make samples and try out different sizes and combinations before making the original.
...
 
Chapter 22. Rigging tests.

3/3


Rigging paint.

I'll describe two options. One is in the color scheme shown in the photo below; perhaps some will prefer it:

Alert Rigging 32.jpg

Black rigging (standing) didn't exist in nature. This color was dark, but not black. Closer to a very dark brown. I do this color the same way in both versions. But the running rigging here will be reddish. It's not exactly like it was in real life, but it looks good with the museum style next to the bitumen.

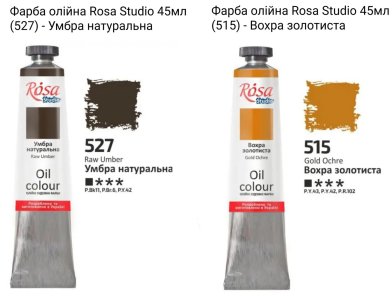
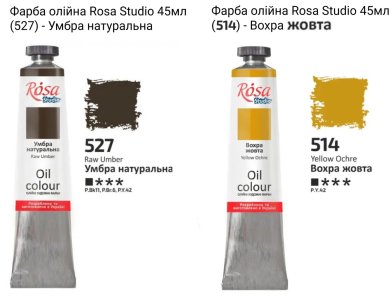
To achieve this color, we need two oil paints. (Note: Keep an eye on the expiration dates on the paints, as they may not produce the desired result after they expire!!!)

Alert Rigging 33.jpg

To achieve a dark brown color (for standing rigging), I made a sample with the following proportions:

5 ml linseed oil + 5 ml thinner + natural umber (4 brush lengths).

Note! Odorless thinner, available at art stores, is used to thin oil paints, as white spirit is simply a stinking poison. Four brush lengths equals four stripes of paint squeezed out the entire length of the brush, or 12 mm, four times. To make a larger solution, increase all ingredients proportionally.

To achieve an orange-brick color (for running rigging), you will need:

5 ml linseed oil + 5 ml thinner + golden ochre (4 brush lengths) + natural umber (1/5 brush lengths, no more).

Note! If you add more umber, you'll get a completely different color, and it'll be very difficult to create the desired color from that. Therefore, it's best to add umber in very small doses.

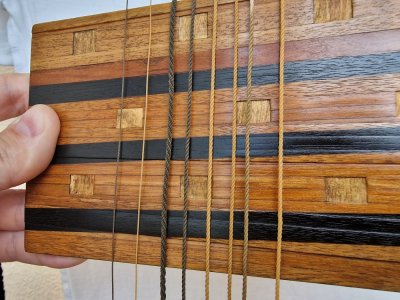
And this is the result. By the way, the photo shows a color where I added more than 1/5 of the umber (it's the second color from the right). But maybe someone will like this exact color, so you need to experiment.

Alert Rigging 34.jpg

Alert Rigging 35.jpg


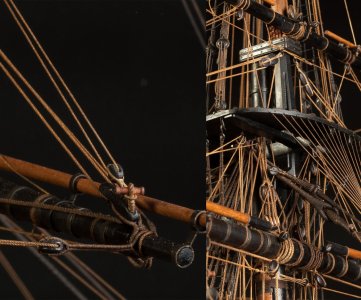
But I liked the second option even more, as in Dmitry Shevelev’s 2nd 75-gun version.

Alert Rigging 36.jpg

Alert Rigging 36с.jpg

To create this palette, you'll need:

For the standing rigging, dark brown, similarly:

5 ml linseed oil + 5 ml thinner + natural umber (4 brush lengths).

(Note: Odorless thinner, sold at art supply stores, is for thinning oil paints, as white spirit is simply poisonous. 4 brush lengths equals 4 strips of paint squeezed out the full length of the brush, or 12 mm, four times. To make a larger solution, increase all ingredients proportionally. Same as in the first option.)

And for the running rigging, you need a different ochre, yellow!

Alert Rigging 37.jpg

And these are the proportions:

5 ml linseed oil + 5 ml solvent + Yellow Ochre (3 brush lengths) + Natural Umber (1/4 - 1/2 brush length, no more).

Note! If you add more umber (3/4 or more), the color will be different. But here, unlike with the golden color, you can correct this by adding oil, solvent, and ochre, while reducing the umber ratio.

And I like this result (pictured below) better! I'll probably settle on this one, but! These photos were taken against a Victory background. So, in the future, I'll try dyed threads against an Alert background, and then I'll make a final decision.

Alert Rigging 38.jpg

Alert Rigging 39.jpg

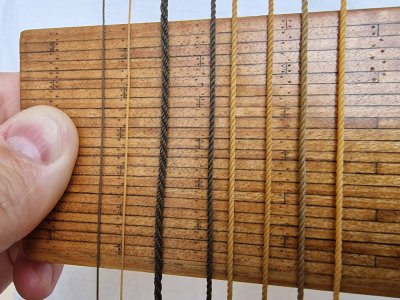
In the two photos above, in order: on the left is standing rigging (umber); in the center are three yellow ochre + umber 1/4 tassels; the two on the right are 1/2 tassels (hence the slightly darker color). This is a good place to play around. And where there are multiple strands of running rigging, some are 1/4 tassels and others 1/2 tassels, as an option.

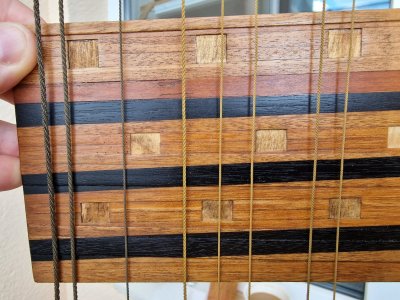
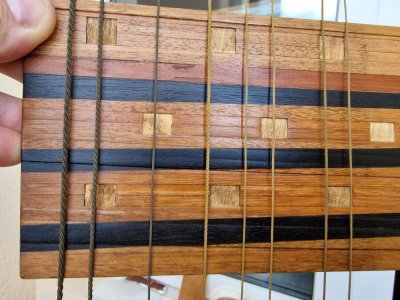
The photo below shows the leftmost rope with checkering. I did it like Shevelev. First, the rope is dyed umber, then impregnated with cyanoacrylate for rigidity during checkering. Then comes the checkering itself, and then the entire finished rope is painted. I used Amann Serafil 60 for the checkering, so the color is slightly different after painting, as the thread is not milky, but whiter. I'll experiment with this further. Plus, I did a trial run of the knitting, which required weaving in thin threads, and I'll talk about that later.

Alert Rigging 40.jpg

Alert Rigging 41.jpg

Ultimately, I liked the samples, and although I still have a lot of tweaking to do, the intended result is clear and I'm tentatively happy with it. The final choice will be made against the finished Alert body, coated with oil and bitumen... then it will be clear which color is preferable.
 
Kapitel 22. Manipulation von Tests.

3/3


Rigging-Farbe.

Ich werde zwei Optionen beschreiben. Die eine entspricht dem Farbschema auf dem untenstehenden Foto; Vielleicht gefällt Ihnen einiges besser:

View attachment 626266

Schwarzes Takelwerk (stehend) gab es in der Natur nicht. Die Farbe war dunkel, aber nicht schwarz, eher ein sehr dunkles Braun. Ich verwende diese Farbe in beiden Versionen gleich. Das laufende Takelwerk hingegen wird rötlich sein. Es entspricht nicht exakt der Realität, passt aber gut zum Museumsstil neben dem Bitumen.

Um diesen Farbton zu erzielen, benötigen wir zwei Ölfarben. ( Hinweis : Achten Sie unbedingt auf das Verfallsdatum der Farben, da sie nach Ablauf des Verfalldatums möglicherweise nicht mehr das gewünschte Ergebnis liefern!)

View attachment 626267

Um eine dunkelbraune Farbe (für stehendes Gut) zu erzielen, habe ich ein Muster mit folgenden Proportionen angefertigt:

5 ml Leinöl + 5 ml Verdünner + natürliche Umbra (4 Pinsellängen).

Hinweis! Geruchloser Verdünner, erhältlich im Künstlerbedarf, wird zum Verdünnen von Ölfarben verwendet, da Terpentinersatz ein stark riechendes Geschenk ist. Vier Pinsellängen ergeben vier Farbstreifen, die jeweils über die gesamte Länge des Pinsels (12 mm) aufgetragen werden. Um eine größere Menge Farbe herzustellen, erhöhen Sie die Mengen aller Zutaten entsprechend.

Um eine orange-ziegelrote Farbe (für laufendes Gut) zu erzielen, benötigen Sie:

5 ml Leinöl + 5 ml Verdünner + Goldocker (4 Pinsellängen) + natürliche Umbra (1/5 Pinsellängen, nicht mehr).

Achtung! Wenn Sie mehr Umbra hinzufügen, erhalten Sie eine völlig andere Farbe, und es wird sehr schwierig sein, daraus den gewünschten Farbton zu erzielen. Daher ist es am besten, Umbra nur in sehr kleinen Mengen zu verwenden.

Und das ist das Ergebnis. Übrigens zeigt das Foto eine Farbe, der ich mehr als ein Fünftel Umbra beigemischt habe (es ist die zweite Farbe von rechts). Aber vielleicht gefällt jemandem genau diese Farbe, also probieren Sie es einfach aus.

View attachment 626268

View attachment 626269


Mir gefiel die zweite Variante aber noch besser, nämlich die zweite Version mit 75 Geschützen von Dmitri Schewelew.

View attachment 626270

View attachment 626271

Um diese Farbpalette zu erstellen, benötigen Sie:

Für das stehende Gut, dunkelbraun , ebenfalls:

5 ml Leinöl + 5 ml Verdünner + natürliche Umbra (4 Pinsellängen).

(Hinweis: Geruchloser Verdünner, erhältlich im Künstlerbedarf, dient zum Verdünnen von Ölfarben, da Testbenzin giftig ist. Vier Pinsellängen entsprechen vier Farbstreifen, die viermal über die gesamte Pinsellänge (12 mm) aufgetragen werden. Für eine größere Lösung werden alle Zutaten proportional erhöht. Gleiches gilt wie bei der ersten Option.)

Und für das laufende Gut benötigen Sie einen anderen Ockerton, nämlich Gelb!

View attachment 626272

Und das sind die Proportionen:

5 ml Leinöl + 5 ml Lösungsmittel + Gelber Ocker (3 Pinsellängen) + Natürliche Umbra (1/4 - 1/2 Pinsellänge, nicht mehr).

Achtung! Bei Zugabe von mehr Umbra (3/4 oder mehr) ändert sich die Farbe. Im Gegensatz zur Goldfärbung lässt sich dies hier jedoch durch Zugabe von Öl, Lösungsmittel und Ocker bei gleichzeitiger Reduzierung des Umbra-Anteils korrigieren.

Mir gefällt dieses Ergebnis (siehe unten) besser! Wahrscheinlich werde ich mich dafür entscheiden, aber: Diese Fotos wurden vor einem Victory-Hintergrund aufgenommen. Daher werde ich in Zukunft gefärbte Fäden vor einem Alert-Hintergrund ausprobieren und dann eine endgültige Entscheidung treffen.

View attachment 626273

View attachment 626274

Auf den beiden obigen Fotos ist Folgendes zu sehen: Links stehendes Gut (umbrafarben); in der Mitte drei Viertelquasten in Gelbocker und Umbra; Die beiden rechten sind Halbquasten (daher die etwas dunklere Farbe). Hier können Sie gut experimentieren. Bei mehreren Strängen des laufenden Guts können Sie alternativ Viertel- und Halbquasten verwenden.

Das Foto unten zeigt das linke Seil mit dem Schachbrettmuster. Ich bin nach Shevelev vorgegangen. Zuerst wird das Seil umbra gefärbt und dann mit Cyanacrylat imprägniert, um es beim Schachbrettmuster zu versteifen. Anschließend wird das Schachbrettmuster angebracht und das fertige Seil anschließend bemalt. Ich habe Amann Serafil 60 für das Schachbrettmuster verwendet, daher ist die Farbe nach dem Bemalen etwas anders, da der Faden nicht milchig, sondern weißer ist. Ich werde damit noch weiter experimentieren. Außerdem habe ich einen Probelauf mit dem Stricken gemacht, wofür dünne Fäden eingewebt werden mussten. Darüber werde ich später berichten.

View attachment 626275

View attachment 626276

Letztendlich gefielen mir die Muster, und obwohl ich noch einiges optimieren muss, ist das angestrebte Ergebnis klar und ich bin vorläufig zufrieden damit. Die endgültige Entscheidung wird anhand des fertigen, mit Öl und Bitumen beschichteten Alert-Gehäuses getroffen… dann wird sich zeigen, welche Farbe am besten passt.
Sehr schön beschrieben mit einem schlüssigen Ergebniss. Hervorragende Arbeit.Danke fürs Zeigen.
Eine Frage. Wie lang werden die geschlagenen Taue ( hängend an der Türe )? Länger als die Türe ?
 
Last edited:
As always, amazing work my friend !!!
And a wonderful description on how you accomplished it !!!
Thank you for your comment. Glad it was helpful.

Most interesting thread, thank you!
Thank you for your interest and feedback.

Sehr schön beschrieben mit einem schlüssigen Ergebniss. Hervorragende Arbeit.Danke fürs Zeigen.
Thank you for the kind words. And to answer your question right away: the rope length is approximately the length of a standard door, minus 15% for twisting and loss from gluing the ends to prevent unraveling.
 
Blackening.

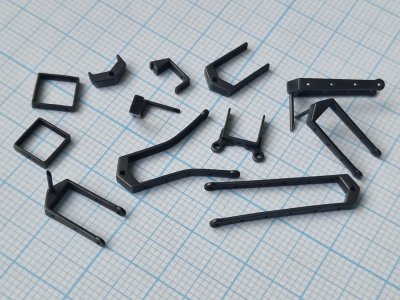
I did a lot of blackening tests, and I liked this option the most, specifically to see how wrought iron looks (I'll show you how it looks with cast iron when I make guns).

So, I don't recommend dipping metal (copper or brass) in pure BB, as it's difficult to control the result, and a completely black color isn't suitable for conveying the tone of wrought iron. The color should be a very dark graphite gray, not black. Firstly, it's authentic, and secondly, in photographs and in real life, black will lack detail and the image will look flat and poor.

To achieve this color, I do the following:

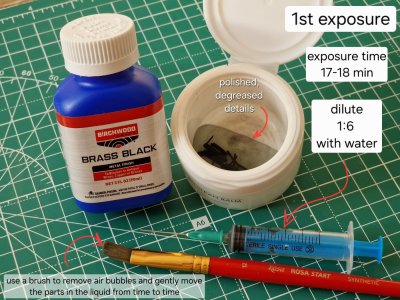
First exposure: 17-18 minutes in a diluted BB solution with water in a 1:6 ratio. This is the first base coat. During the process, you need to stir the parts in the solution and remove air bubbles from the holes. I recommend doing this with a brush to avoid damaging the blackening layer.

Alert 2793.jpg

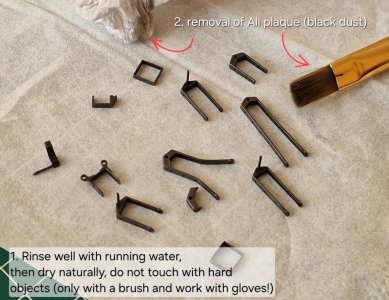
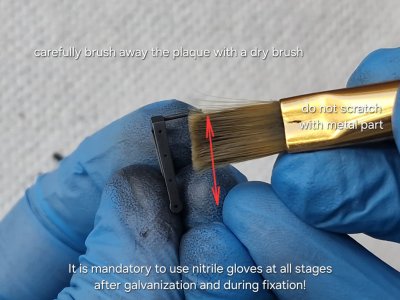
Next, rinse under running water and let dry naturally. Then, remove any remaining residue with a cloth and a dry brush.

Alert 2794.jpg

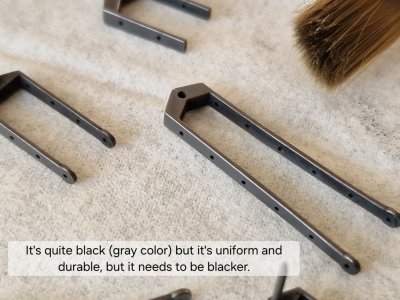
As a result, I get a fairly light shade of gray, but uniform and stable.

Alert 2795.jpg

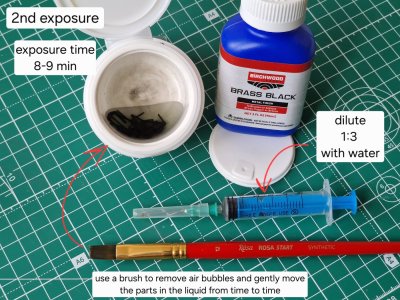
Then I do a second exposure for 8-9 minutes in a BB solution diluted in water in a ratio of 1:3.

Alert 2796.jpg

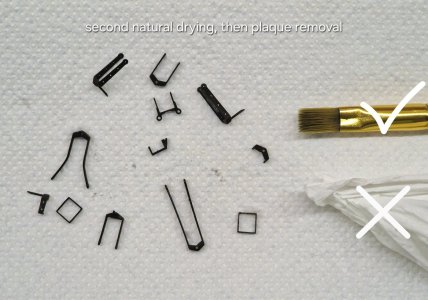
Then, rinse and dry again, and remove the residue, but this time only with a brush!

By the way, diluting also significantly saves BB, which is also a plus.

Alert 2797.jpg

Alert 2798.jpg

I wear gloves when handling everything from galvanizing to fixing. Care must be taken with the surface, as any contact with a hard object will scratch the blackening.

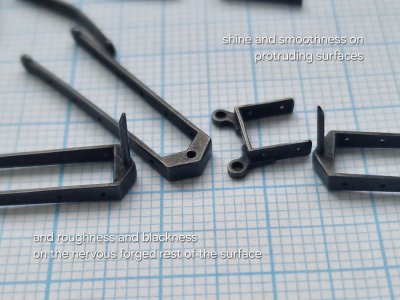
The final result is a very dark gray (graphite) color. Naturally, in real life, iron near water rusts, but! On ships, all metal (especially underwater metal) was coated with protective agents. These were based on various materials, but their purpose was to prevent water and air from interacting with the pure metal. This made the metal darker in spots and more shiny. This slight sheen will be added by coating the entire surface with Bitumen. But that will come later, for now, here's the intermediate result before installation:

Alert 2798с.jpg

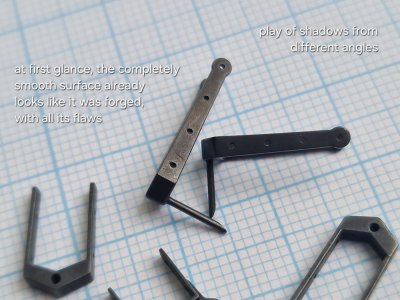
Unfortunately, the photos don't convey the true color (I'll try to do so against a wood background). But in real life, this color is absolutely similar to wrought iron.

Alert 2799.jpg

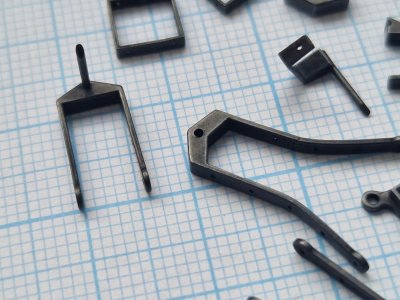
All the irregularities are visible only at maximum magnification and are practically invisible in wide shots, which is true to life at this scale. Let me remind you that this is wrought iron, not to mention cast iron, but even that wasn't smooth and even. It was already that way right out of the forge, and you can imagine what happened to it over the course of its life.

Alert 2800.jpg

Alert 2801.jpg

Alert 2802.jpg

Alert 2803.jpg

Alert 2804.jpg

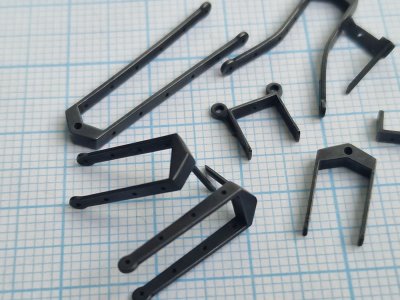
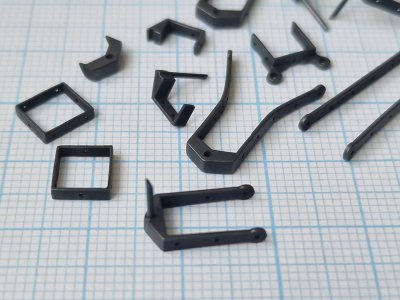
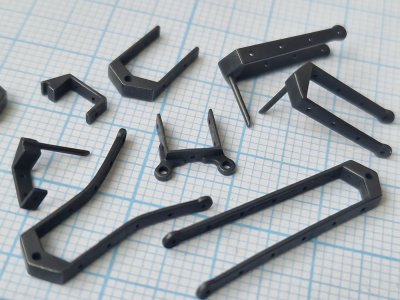
Let me remind you that all of these parts were modeled and 3D printed, then copper-plated and blackened. I can't even imagine how long it would have taken to make them using conventional methods.

P.S. A very important note! I used regular water for dilution. I wore gloves to avoid contaminating the surface with grease, so I didn't degrease the metal with alcohol! And the blackening was done on metal that wasn't too heavily oxidized. That means not much time had passed since the final polishing. All the factors I listed can change the result, including their combination.

Let me explain again why I don't use pure BB. Blackening happens very quickly and uncontrollably. If air bubbles or debris get on the metal, areas may not be blackened and will be visible. And additional blackening can blacken the part too much, leaving it solid black. In real life and in photographs, too much black is unreadable and looks like a single black spot. If you want to show relief and detail, you should use a very dark graphite color instead of black. This is my opinion, but you may feel differently, and that's okay.

P.S.2. For my second experiment, I tried degreasing the copper steering wheel hinges in alcohol before blackening them, and then diluted the BB with distilled water. I'm not sure what exactly caused this effect, whether it was just one or both, but with the same dilutions and two exposures, I got a different color. It had a blue tint and was lighter. I then performed another exposure at a 1:3 ratio with regular water (not distilled like the first two times) and ended up with absolutely the same shade and color as the first kit with two exposures. It's unclear whether the distilled water or the degreasing with alcohol caused this error. But I did notice that the copper darkened slightly when dipped in alcohol (very slightly, but still), so here's my experiment...
 
Last edited:
Das „Metall“ hat einen sehr schönen Farbton. Der ganze Prozeß vom 3D-Druck, über die Beschichtung bis hin zum Schwärzen usw ist sehr spannend . Etwas ungewöhnlich und sehr aufwendig. Das Ergebnis überzeugt allerdings zu 100 %. Klasse Ergebnis. Interessant wäre ein direkter Vergleich einem mit deiner Methode erzieltem Ergebnis und ein Teil, das „ nur „ mit BB geschwärztem Teil. Denke dann würde der positive, optische Eindruck noch stärker verdeutlicht werden.
 
Last edited:
I've run out of superlatives Sergey........ Your wood work on your rope maker is better than my ship ROTF. Cheers Grant
Hahaha. You're too hard on yourself. You have excellent skills and results.;)

Das „Metall“ hat einen sehr schönen Farbton. Der ganze Prozeß vom 3D-Druck, über die Beschichtung bis hin zum Schwärzen usw ist sehr spannend . Etwas ungewöhnlich und sehr aufwendig. Das Ergebnis überzeugt allerdings zu 100 %. Klasse Ergebnis. Interessant wäre ein direkter Vergleich einem mit deiner Methode erzieltem Ergebnis und ein Teil, das „ nur „ mit BB geschwärztem Teil. Denke dann würde der positive, optische Eindruck noch stärker verdeutlicht werden.
Vielen Dank für Ihr Feedback. Ich habe darüber nachgedacht, aber leider geben Fotos die tatsächliche Farbe nicht wieder. Der Unterschied auf Fotos ist minimal. Man kann es so fotografieren, dass es aus bestimmten Winkeln sehr ähnlich aussieht, aber in Wirklichkeit ist das Ergebnis ganz anders. Man müsste die gleichen Teile unterschiedlich gestalten und nebeneinanderlegen; nur dann wird der Unterschied sichtbar. Ich möchte die Oberfläche dafür nicht beschädigen, aber ich habe darüber nachgedacht und werde versuchen, etwas Ähnliches zu machen, um den Unterschied zu verdeutlichen.

ENG. Thanks for your feedback. I thought about it, but unfortunately, photos don't show the true color. And the difference in photos is minimal. You can photograph it so that from certain angles it looks very similar, but in real life the result is very different. You have to do the same parts differently and place them side by side; only then will you be able to see the difference. I don't want to ruin the finish for that, but I've thought about it and will try to do something similar to show the difference.
 
Back
Top