
AGAIN YOUR WORK IS AMAZING, JUST WONDERFUL. Don

-

SUBSCRIBE TO SHIPS IN SCALE TODAY!
The beloved Ships in Scale Magazine is back and charting a new course for 2026!
Discover new skills, new techniques, and new inspirations in every issue.
NOTE THAT OUR NEXT ISSUE WILL BE July/August 2026 -

Win a Free Custom Engraved Brass Coin!!!
As a way to introduce our brass coins to the community, we will raffle off a free coin during the month of August. Follow link ABOVE for instructions for entering.
You are using an out of date browser. It may not display this or other websites correctly.
You should upgrade or use an alternative browser.
You should upgrade or use an alternative browser.
HMS Royal Caroline kit ZHL 1/30
- Thread starter Maarten
- Start date
- Watchers 113
-
- Tags
- royal caroline zhl


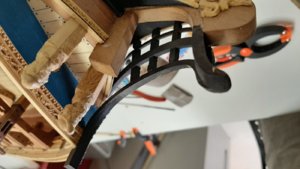
After the top rail I prepared the bottom rail and made a start with the pillars.
Al these parts are cnc carved from boxwood and I shaped, steamed and bend them into shape followed by dye them with black ecoline.
The bottom rail was again scraped to create a boxwood line in the middle before finally beewax and polish them.


The pillars is the next step. To fit the I removed parts of the lower rail and in the rear of the pillars to create a robust connection between the two.
Dry fitting below

These will be colored black with ink also, except for the carvings.
Now it is time for the middle rail which is most difficult as it needs to be bended and twisted to create a perfect fit. But that is next time.
As all rails are fitted I will add extra boxwood pillars on the inside to enclosed the rail, this as the kit provided pillars are to thin and fragile.
Al these parts are cnc carved from boxwood and I shaped, steamed and bend them into shape followed by dye them with black ecoline.
The bottom rail was again scraped to create a boxwood line in the middle before finally beewax and polish them.
The pillars is the next step. To fit the I removed parts of the lower rail and in the rear of the pillars to create a robust connection between the two.
Dry fitting below
These will be colored black with ink also, except for the carvings.
Now it is time for the middle rail which is most difficult as it needs to be bended and twisted to create a perfect fit. But that is next time.
As all rails are fitted I will add extra boxwood pillars on the inside to enclosed the rail, this as the kit provided pillars are to thin and fragile.
AMAZING WORK, THE MODEL SPEAKS FOR ITSELF A TRUE WORK OF ART BY A MASTER, BRAVO. Don

Now that is going to look very tasty indeed Maarten  Excellent work.Does the kit include any framing that goes behind the vertical carvings?I ask because Panart's offering has the whole lot levitating
Kind Regards
Nigel
Excellent work.Does the kit include any framing that goes behind the vertical carvings?I ask because Panart's offering has the whole lot levitatingKind Regards
Nigel
Hi Nigel, Don, thx for your comments.Now that is going to look very tasty indeed Maarten
Kind Regards
Nigel
No in the kit there is no frame work provided, I will make this myself from boxwood to support the inside of the carvings and the rails.
- Joined
- Jul 9, 2018
- Messages
- 136
- Points
- 133

wow...i just discovered this......gonna have a lot of catching up to do ....like everyone else...absolutely amazing....was thinking of doing this one...but but but....sheesh!

Absolutely wonderful Maarten, I think that I am going to sell mine now as I cannot compare with your gorgeous work,
Best regards John,
Best regards John,
Thx for the comments it is really a great kit and with some additional work it makes a fantastic model. I can only recommend to build her.
- Joined
- Jul 9, 2018
- Messages
- 136
- Points
- 133
i've yet to go through your log, but in a nutshell, i'm probably nuts, but the reason i tended to avoid the caroline, was intuitively i felt that the back half of the ship should have been a bit higher...should have had a bit more shear moving up towards the stern compared to the bow section.....that is, when i looked at photos of the two available kits online....didn't feel balanced.....sorry if this sounds like nonsense.....cheers to you.........
I changed it in my model actually, I raised the stern with approximately 1 cm to give is slightly more shear then the standard kit had and it worked fine for me. For these I used the drawings from the Anatomy of the the ship book on royal caroline. It is mentioned in my blog too.
This evening I finally had the change of finishing my 1st putty carving. As the family is watching The Voice I am joining them with my portible carving workshop on my lab in the livingroom.
Below I combined all pictures of working to the end result as they are spread by now over the last 4 or 5 pages of my blog.
1st starting with a piece of boxwood in proper size and draw the outlines. (Sorry Jim, pictures I will turn later when not working from my phone") )
)

Then saw the rough outlines.


The start with a course rotary milling bit to setup the proper shapes.


The cutting with surgical blades the reduce the size, you start with a shape larger the the end result as you can only remove material and not add.


Then the fine diamond bits can be used in combination with surgical blades to bring details into the carving.

The most difficult is a human face. Because the correct proportions are planted in our brains, one mistake and you notice it. The carving is ok if your phone camera recognizes a face in it and focusses on it. Starting the face and hair.

As the face is only a few milimeters working on it I only do with the tip of a surgical blade.
Cutting the face contours.

After lots of fine tuning of the face


And the final result after a lot of trimming etc etc etc and a layer of beewax.


And this is how he will finally fit on the bow holding the crown of the queen. Alone? Nooooooo i have to cut another one for the SB side.


Hope you get an idea and start your own carvings it enriches your kit model and it is easier then you think.
Below I combined all pictures of working to the end result as they are spread by now over the last 4 or 5 pages of my blog.
1st starting with a piece of boxwood in proper size and draw the outlines. (Sorry Jim, pictures I will turn later when not working from my phone
)Then saw the rough outlines.
The start with a course rotary milling bit to setup the proper shapes.
The cutting with surgical blades the reduce the size, you start with a shape larger the the end result as you can only remove material and not add.
Then the fine diamond bits can be used in combination with surgical blades to bring details into the carving.
The most difficult is a human face. Because the correct proportions are planted in our brains, one mistake and you notice it. The carving is ok if your phone camera recognizes a face in it and focusses on it. Starting the face and hair.
As the face is only a few milimeters working on it I only do with the tip of a surgical blade.
Cutting the face contours.
After lots of fine tuning of the face
And the final result after a lot of trimming etc etc etc and a layer of beewax.
And this is how he will finally fit on the bow holding the crown of the queen. Alone? Nooooooo i have to cut another one for the SB side.
Hope you get an idea and start your own carvings it enriches your kit model and it is easier then you think.
- Joined
- Jul 9, 2018
- Messages
- 136
- Points
- 133
wonderful job maarten!!....yer getting my juices going again.....you have no idea how much your raised stern has resolved something that has bothered me in the back of my mind for many many years......and now, that kit is a consideration if i think i'll live long enough haha....will have to check with the doctor first........
oh....and your photography and documentation is superb...never saw anything like it.........cheers........
....oh....and your photography and documentation is superb...never saw anything like it.........cheers........
That is a very nice piece of carving Maarten.One thing I found very useful when it comes to carving Heads/Faces is reading online articles regarding portrait painting.There is a standard proportional relationship between all the human features which once you grasp does help quite a lot.Your carving's face though does look spot on 
Kind Regards
Nigel
Kind Regards
Nigel
Hi Nigel,
I used this methode to setup the first contours of a face, simple but efficient.
I used this methode to setup the first contours of a face, simple but efficient.

This is absolutely stunning. I gave up carving long time ago. Just can't do it. But what you've done here is unbelievable. Thanks.This evening I finally had the change of finishing my 1st putty carving. As the family is watching The Voice I am joining them with my portible carving workshop on my lab in the livingroom.
Below I combined all pictures of working to the end result as they are spread by now over the last 4 or 5 pages of my blog.
1st starting with a piece of boxwood in proper size and draw the outlines. (Sorry Jim, pictures I will turn later when not working from my phone
View attachment 120633
Then saw the rough outlines.
View attachment 120637
View attachment 120638
The start with a course rotary milling bit to setup the proper shapes.
View attachment 120640
View attachment 120642
The cutting with surgical blades the reduce the size, you start with a shape larger the the end result as you can only remove material and not add.
View attachment 120645
View attachment 120647
Then the fine diamond bits can be used in combination with surgical blades to bring details into the carving.
View attachment 120648
The most difficult is a human face. Because the correct proportions are planted in our brains, one mistake and you notice it. The carving is ok if your phone camera recognizes a face in it and focusses on it. Starting the face and hair.
View attachment 120649
As the face is only a few milimeters working on it I only do with the tip of a surgical blade.
Cutting the face contours.
View attachment 120651
After lots of fine tuning of the face
View attachment 120652
View attachment 120653
And the final result after a lot of trimming etc etc etc and a layer of beewax.
View attachment 120654
View attachment 120655
View attachment 120656
View attachment 120657
And this is how he will finally fit on the bow holding the crown of the queen. Alone? Nooooooo i have to cut another one for the SB side.
View attachment 120663
View attachment 120664
Hope you get an idea and start your own carvings it enriches your kit model and it is easier then you think.
Finally the work on the ps side railings are finished. All are colored with ecoline and finished with oil.


The vertical carvings I resized on the rear side with pear strips to create the proper dimensions.

The SB side will be much more simple as it will be mainly a mirror image copy paste.
The vertical carvings I resized on the rear side with pear strips to create the proper dimensions.
The SB side will be much more simple as it will be mainly a mirror image copy paste.
Attachments
Very nice work Maarten, the black makes a real nice contrast with the box wood,
best regards John,
best regards John,
This is one of my favourite build logs. Excellent work.
Time for the last figure head carving. This is a larger angel which is helding the crown together with the previous carved putty. The angel is wrapped in a cloth over his lap which is swirling around his body.
As a basis for t he carving I used the kit provided 2D which I doubled with boxwood to make it a full 3D statue.
First the basis the right side is added boxwood to create the angel on the left side of the queen.

The original kit provided side.

Setting the outlines


Shaping his belly and face, a full six pack.

Shaping a wing and the cloth.

The rough shapes are set, fine tuning begins mainly with a very fine surgical blade.
The haircut and ear.

Finishing the kit side, which is fully reshaped.

Going to the hairdresser, a decent roman haircut.

Giving the guy his muscles in his legs, for this I look at classical roman statues as a good example. His left leg will be partly as this fits into the dress of the queen behind which he stands.
His right arm I will add, with this in place I was not able to cut the face. Compared to my hand you get an idea of size.


The hand, arm and legs and foot are still under construction. Hopefully before years end I will finish it.
Then it will be polished and beewaxed.
For all to you around the globe who celi
brate Christmas, have a wonderfull Christmas and an even better 2020.
As a basis for t he carving I used the kit provided 2D which I doubled with boxwood to make it a full 3D statue.
First the basis the right side is added boxwood to create the angel on the left side of the queen.
The original kit provided side.
Setting the outlines
Shaping his belly and face, a full six pack
.Shaping a wing and the cloth.
The rough shapes are set, fine tuning begins mainly with a very fine surgical blade.
The haircut and ear.
Finishing the kit side, which is fully reshaped.
Going to the hairdresser, a decent roman haircut.
Giving the guy his muscles in his legs, for this I look at classical roman statues as a good example. His left leg will be partly as this fits into the dress of the queen behind which he stands.
His right arm I will add, with this in place I was not able to cut the face. Compared to my hand you get an idea of size.
The hand, arm and legs and foot are still under construction. Hopefully before years end I will finish it.
Then it will be polished and beewaxed.
For all to you around the globe who celi
brate Christmas, have a wonderfull Christmas and an even better 2020.