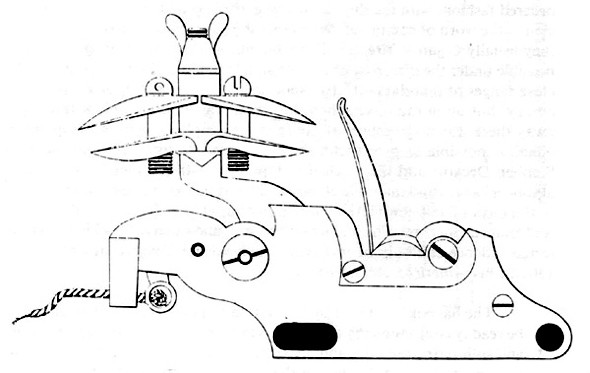
Capsquares, oh capsquares, where for out thou? Ah, the saga of a person of limited abilities and experience trying to make decent looking parts for ship models. We've all been there at one time or another. While in the past I've gotten away with simulating capsquares with as little as black paint, somehow I felt that wouldn't suffice for a 1:20 model. For any of you who might not know or remember what capsquares are, they're the metal pieces that hold barrels in place on naval guns, while allowing the barrels to be quickly replaced:
View attachment 345929
On the Constitution's 24-pounders a detail of the capsquares look like this:
View attachment 345933
I liked the idea of making them from brass; in fact, I considered making all hardware of brass, and keeping it shiney and natural. It's a model for desktop decoration, after all, not a diorama, and carriages were never left natural wood, so I reasoned that polished brass and natural wood would look great. And it would, but with a variety of hardware used previously in the models, it became difficult. And even blackening was uneven and impossible with some materials. Still, brass would be the go-to material for capsquares. Heck, I even used brass on my 1:98 scale Victory cross section gun's capsquares.
So, I started raiding my accumulation of 50 years of brass pieces. Now, mind you, this is not a constant accumulation. There's been 30+ years gone by with no modeling, and no parts acquisition of any kind. But on the other hand, I'd never throw away any brass pieces either. Like most of you, I have a large assortment of rods, tubes, angles, channels, strips and some sheet. Not surprisingly, none of it the right thickness for the capsquares I wanted to make. So my first purchase was at Hobby Lobby for some 1/32" x 1/4" and 1/2" strips that would be fairly close. $12.82 spent. They turned out to be nice pieces of brass, but too wide for my purpose (even the 1/4"), even though the thickness was close. I tried cutting the pieces to narrower strips with a carbide saw, and that was a real bust. So I figured I'd file/sand it to width; it's brass, after all, right? Within seconds, I couldn't hold the piece. So held in pliers, I sanded and sanded and basically did nothing. I needed differing size pieces for a total of 6 capsquares of 3 sizes for these models, plus similar widths for the fore axletree braces, so that wasn't going to work.
After a thorough search of the Internet for correct width and thickness brass, I finally found what I wanted at
Eileens Emporium, in England. They have an excellent selection of metric brass strips (12" or so long), reasonably priced (2-3 GBP each), so I got two sizes. With shipping that came to $17.39 (total $30.21 so far). I received the pieces a week or two later, and got to work, first softening the hardened brass by heating with a torch and allowing to slowly cool. I then made a "bending jig:
View attachment 345931
I took two pieces of hardwood, sapele I think, and drilled holes of the proper size for the trunnions and also the outside diameter of the capsquares, to use in combination to bend the brass strips. I drilled some right on the center between the two pieces, and some slightly off-center, as the Constitution's trunnions are actually centered 3/8" below the top of the carriage brackets.
Separating the pieces, I used a piece of solid brass rod, and a made-up piece of a brass rod and 2 pieces or styrene tubing to represent the trunnions prior to bending the capsquares:
View attachment 345934
Placing the appropriate trunnion rod in place between the two bored "patterns" and placing the brass strip in place, I used a small vise to bend the capsquares:
View attachment 345935
For the Constitution's guns, the capsquares are perpendicular to the trunnion, but for the Victory's guns, they are parallel to the side brackets, so I had to approximate the ~3 degree angle by keeping the strip at that angle. It's so easy to get confused and make two rights, and no left, I've found. During bending the strip begins to approximate the capsquares:
View attachment 345937
Despite multiple bending attempts, the results were okay, but not great:
View attachment 345939
Yeah, that would look fine on a small scale model (1:48 or smaller), but not great for this scale. I then tried a different bending method:
View attachment 345940
This made for a better fit around the "trunnion", then I'd just have to bend a right angle at the midway point to shape it properly. Well, that's easier said than done, as it's tough to get the bend sharp, and tougher yet to get it at exactly the mid-point that I needed. After a lot of playing around, and a lot of distortion of the wood pattern, this was the best I could do:
View attachment 345945
I'm sure it would have been better if my "pattern" were steel instead of wood, but I just couldn't see getting and machining steel to do this. And now I had to drill and slot hoes in the brass, tiny ones, and reasoned drilling would be a problem as well. I felt I needed to do better.
My next thought was to use pieces of brass tubing, split in half, along with pieces of brass strip and brass rod to construct the capsquares, soldered together. But I felt that would become a real mess, and the capsquare eye would have to be in place when soldering it. In addition, I'd still have to drill tiny holes in brass. A recipe for disaster, IMHO. So I decided to try using styrene, cemented together, instead of brass. When assembled and finished, I reasoned it would be indistinguishable from brass. I figured I'd make each capsquare out of 5 pieces:
View attachment 345946
The blue piece would be made from tubing split in half, the red of styrene strip or sheet, and the green of styrene rod. Over those same 50 years or so, I've also accumulated quite a few pieces of Evergreen styrene. Luckily, had the large tubing that I could split, but no strips wide enough or sheets of the right thickness for the red pieces. And of course no rods of the right diameter. For the 3 sizes of capsquares, I needed two different diameters of tubing, 2 different diameters of rod, and two different thickness of sheet. I decided to get everything I would ever need by ordering two assortments: the Evergreen Rod & Tube Assortment ($7.87) and the Evergreen Sheet Odds & Ends assortment ($12.67). Total cost so far $50.75. After everything was delivered, I selected the closest size of each for my capsquares, and began construction.
As the capsquares for the Victory's guns are parallel to the brackets, and therefore not at right angles to the trunnions, my cuts for each piece would be theoretically about 3 degrees from perpendicular. I calculated the tangent of the correct angle, and used my ruler to set the angle before cutting each piece:
View attachment 345950
Sounds precise, but in fact the result was not. Close enough for government work, though, I hoped.
Here's a half tube fitted on the trunnion, sanded until it fit well and touched the brackets. Left oversize width-wise to allow adjustment during assembly:
View attachment 345951
I then laid out the straight pieces of the capsquares on a strip cut from sheet:
View attachment 345952
Prior to cutting them apart, I drilled the holes for the eyes and bolts, holding the strip in a vise on my Proxxon drill press, and using the X-Y adjustable slide to keep the holes in line and consistent. Then the strip is cut them to length, attempting to get the right angle:
View attachment 345953
The 3 pieces are then glued together:
View attachment 345954
The rod at one end is attached, with the eye in place, as I felt it would be impossible to add later:
View attachment 345955
The groove in the piece of scrap lets the eye protrude lower, while keeping the styrene rod at the correct height. Even though I used Tamiya Plastic Cement, which I think just dissolves mating pieces to "weld" them together, to glue the pieces together, it was difficult to keep the eye moving freely and not bending the softened styrene at the rod. Took a couple tries, but eventually got them put together. I then sanded the sides of the tubing even with the strips which were properly sized:
View attachment 345957
This made me realize I could really use a
Micro-Mark Sand-It, so have asked for it for Christmas. It should also be a much better way to create small, accurate angles, rather than try to cut it initially to the correct angle.
The pattern I made for bending actually worked well to hold the assemblies in place during sanding, as they are quite fragile:
View attachment 345958
This next picture shows the capsquare in place with the rod left long for handling and the opposite end rod in place. The center tape of course keeps the dummy trunnion in place. The side tape was positioned to indicate the proper hold location for the eyebolt.
View attachment 345956
Both completed capsquares are now in place, along with the eyebolts. Different carriage designs use different eyebolt or keeper configurations, and I'm trying to make them all different and accurate.
Both capsquares are now completed and painted, and work exactly like the original, so allow me to mount and then dismount the barrel:
View attachment 345959View attachment 345960
This particular carriage will use a metal rod to secure the front of the capsquare (others use wedge-shaped flat bar). They will be secured by chain, so when changing the barrel, the rods/wedges don't get lost. Of course, that means I need small chain, I figure around 27 links per inch. And of course my 50 years, plus my wife's 30 years of jewelry-making, has not provided chain the right size. It's on order now, at a cost of $7.51 (new total $58.26). Oh, and I forgot, the rod and tube assortment included rods too small and too big for the round ends of the 24- and 32-pounder guns, but not the right size. So another $4.27 for the right diameter rod at Hobby Town (new total $62.53).
I'm happy with the way this first capsquare set has worked out, and being the smallest of the three, expect the others to be as good or better. But I struggle with the over $60 cost to produce them. Yeah, I know, I'll have all those extra materials to use on future projects, but every project seems to find new missing materials and additional purchases. Of course, during this project, I've drawn the capsquares in Autodesk Fusion 360:
View attachment 345961
and it appears I could have them printed in resin with a 3D printer for a cost of around $5 each (maybe less if connected together), for a total cost of $30 plus shipping. Probably even include the eyebolts and connectors and such with them. Would that be cheating? I don't know. I made the drawings, after all. Yet somehow that seems like too much of a shortcut. Still, if I had a 3D printer, or if my son had his set up and was willing, I think I'd do them in 3D. Maybe even try them anyhow. But I probably won't, as I'm kind of proud of the assembly I did make in this thread, and after all, don't want to waste that $62.53!


 calibremag.com

 www.rmcnauticalantiques.com


")


