3d printing

I am a big fan of resin products but...I cannot paint.

i think there are different colors available so cannons can be printed in black. i know there is a huge variety of colors available in filament not sure with resin printing. So you do not have to paint them
 
@Model Monkey on your printed gun barrels, I belive they should have more reinforcement rings at the cascabel, but it may well depend on the year and pattern used in the design.

Hi Jim, you may be thinking of 1760-ish Armstrong-Frederick-pattern guns which had very complex cascabels. The number of rings of actual cannons and their dimensions did indeed vary by pattern and year. Our models represent 1780-1792 Blomefield-pattern weapons. Blomefield guns replaced the preceding 1760 Armstrong-pattern weapons which did have more rings, generally. Unlike Armstrong guns, Blomefield guns have a simpler cascabel and a breech recoil rope ring. Ships like HMS Victory at Trafalgar were equipped with Blomefield weapons. American guns of the War of 1812, such as those fit to USS Constitution, are thought to have been close copies of Blomefields. French and Spanish weapons were very different.

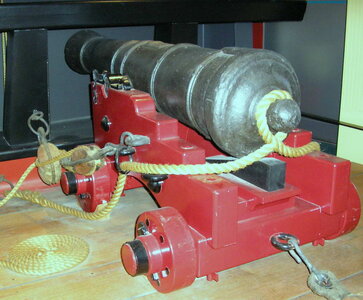
Armstrong-Frederick-pattern gun:
cannon Armstrong-pattern Cooks-4pdr.jpg

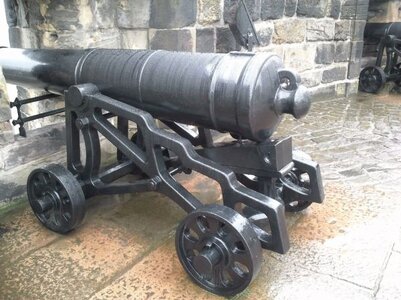
The breech recoil rope was looped around the short shaft leading to the "button" on earlier Armstrong weapons. On Blomefield weapons, the breech rope was passed through the ring. The ring allowed faster training of the gun from side-to-side, improving firing rate in battle.

Blomefield-pattern gun:
cannon 18_prd_bloemfield_cannons_at_edinburgh_castle_1.jpg

Blomefield reproduction on HMS Victory today:
cannon 12-pounder medium trip1461615b.jpg

The number of reinforcement rings and lengths between rings and diameters of cannon sections of our models are based on measurements taken from real weapons, as recorded in tables published in "British Smooth-bore Artillery: a Technological Study to Support Identification, Acquisition, Restoration, Reproduction, and Interpretation of Artillery at National Historic Parks in Canada" by David McConnell. Our models' details, such as the King George monogram, match those of surviving cannon.

Here is one of the tables showing dimension of British weapons circa 1780-1792, as recorded by McConnell adapted from RAI Walton. The table records measurements taken from actual surviving weapons. Our models were designed from this table and others by McConnell for maximum accuracy.

Cannon - British Iron Gun Dimension Table 1780.jpg
 
Last edited:
i do not have a resin printer and the filament printer will not print the cannons with quality detail. i searched on line for a printing service and got quotes for the 3 cannons the swivel 21mm the 4 pounder 35mm and the 6 pounder 37mm the quotes ranges from $1.20 for the swivel to $19.00 that is quite a difference. The other 2 cannons range from $3.00 to $23.00 WOW even in the short run it is cheaper to buy a printer and do it myself.
 
I am a big fan of resin products but...I cannot paint.

i think there are different colors available so cannons can be printed in black. i know there is a huge variety of colors available in filament not sure with resin printing. So you do not have to paint them
I agree with some intent, but the naval gun has its special color, and also the shades, without adding those the printed barrels will look flat.
 
Hi Jim, you may be thinking of 1760-ish Armstrong-Frederick-pattern guns which had very complex cascabels. The number of rings of actual cannons and their dimensions did indeed vary by pattern and year. Our models represent 1780-1792 Blomefield-pattern weapons. Blomefield guns replaced the preceding 1760 Armstrong-pattern weapons which did have more rings, generally. Unlike Armstrong guns, Blomefield guns have a simpler cascabel and a breech recoil rope ring. Ships like HMS Victory at Trafalgar were equipped with Blomefields weapons. American guns of the War of 1812, such as those fit to USS Constitution, are thought to have been close copies of Blomefields. French and Spanish weapons were very different.
Yeah... thanks for the info, This is exactly my point: just a matter of modifying the file, or maybe even having a collection of files, it is just a matter of printing. I am comparing this convenient and somewhat simpler and flexible technique with other barrel production techniques like CNC turning from brass (lack of some details like emblem, vent holes, muzzles), another one is casting casting you would need to make molds for every type of barrel you want to make.
 
i do not have a resin printer and the filament printer will not print the cannons with quality detail. i searched on line for a printing service and got quotes for the 3 cannons the swivel 21mm the 4 pounder 35mm and the 6 pounder 37mm the quotes ranges from $1.20 for the swivel to $19.00 that is quite a difference. The other 2 cannons range from $3.00 to $23.00 WOW even in the short run it is cheaper to buy a printer and do it myself.
It depends... and if you have the budget for a good 3D printer, it is the way to go! You are not printing just the gun barrels, you can also print the entire gun assembly (or from different parts), and you can virtually print anything you want, including the hull, assuming of cause, you can 3D design. We have seen many possibilities for 3D parts...
 
It depends... and if you have the budget for a good 3D printer, it is the way to go! You are not printing just the gun barrels, you can also print the entire gun assembly (or from different parts), and you can virtually print anything you want, including the hull, assuming of cause, you can 3D design. We have seen many possibilities for 3D parts...

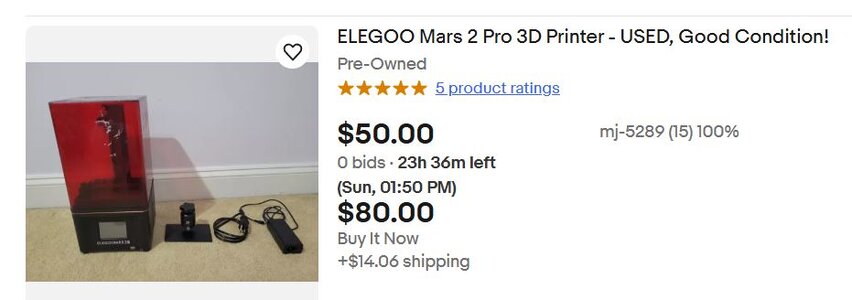
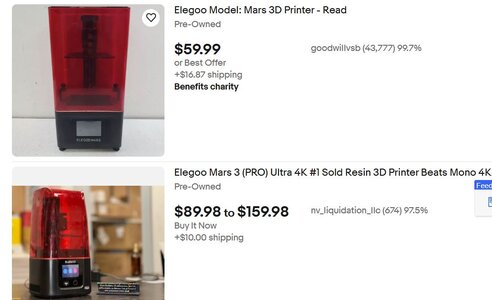
i am seeing used 3D resin printers on Ebay for as low as $50.00
you right i can also print stern windows, figureheads, stern carvings, moldings and all kinds of stuff. So where is the line from a wooden ship model to a plastic ship model? 50/50

We're having good success with 12k resin hobby printers by Phrozen and Elegoo. They use LCD screens to harden liquid resin in a vat. They aren't expensive (~$300 USD) and detail reproduction is superb.

the cheaper ones are 9K and i am not sure how well they will print small detail
 
assuming of cause, you can 3D design

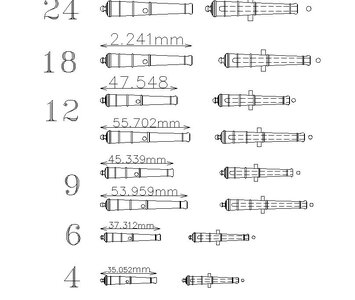
i have been shopping around and if you have a 2D cad drawing of a cannon the going rate to create a 3D print file from your 2d drawing is from $15.00 to $18.00 which isn't to bad a deal.

cannons.JPG

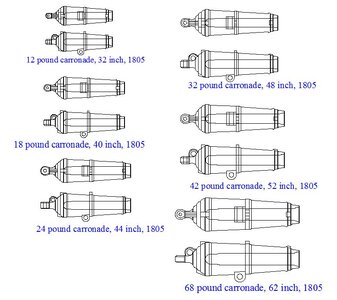
carrinades.JPG
 
Last edited:
Our models represent 1780-1792 Blomefield-pattern weapons.
Steve,

Thomas Blomefield became Inspector of Artillery, in 1780 but the so called Blomefield pattern were first cast in 1787 and did not come into common use until about 1792 rather than 1780.

I have had quite a few dozen cannon in Commonwealth pattern and Artmstrong Frederick pattern in 1:64 scale made in black resin for about US$0.75 each including freight. I emailed the STL drawings to the printer and had the guns in hand in a week or two.

A year or two ago I worked with another gentleman and produced 2D drawings for him and he then used these to produce 3D drawings. To date I have collected upwards of a hundred 3D drawings from Brown pattern to Blomefields as well as early and later 18th century Spanish patterns in various lengths and calibers. I have been told that there is also bronze colored resin for those that need bronze cannon for earlier period ships.

Allan
 
Last edited:
here is a DXF file for the cannons which fit all the models by Harold Hahn.

you do not even need CAD or 3D skills it is a matter of a tool which all 3D drawing programs have in Sketchup it is the follow me tool. Go to your Tube and watch a demo

there are a lot of free CAD programs that have the tool to extrude a 2D profile

the 3D community has a vast library of files DXF. STL OBJ anything you could imagine for free, trade, sell and buy what does not exist is a specialized library for the hobby of model ship building. yet!

3D printers are getting cheaper and cheaper so if you had a 3D print market place dedicated to model ship building that might be where the hobby is going. Print your own pieces and parts
 

Attachments

i am seeing used 3D resin printers on Ebay for as low as $50.00
you right i can also print stern windows, figureheads, stern carvings, moldings and all kinds of stuff. So where is the line from a wooden ship model to a plastic ship model? 50/50
... is there a reason to draw a line between the wooden and plastic? Both types of scale modeling incorporate PE parts for a long, also the CNC-turned brass parts not to mention the plastic kits use the wooden deck... The fiberglass is used to build hulls for RC models. Is there a necessity for the lines? As an example, when you build models from wood, you still want to use brass or 3D printer barrels, correct? Of course, you have a choice to turn 100+ barrels out of wood, otherwise, you would turn the 'master model' and cast with thin alloys (still not wood).

I guess, today, we have a broad range of materials and technology on our side for the scale modelers. How to build, and what materials to use is a personal preference. What important is: the ability to work with those materials! At the end of the day, the final appearance is what is most important!
There is no way you can tell if the hull is made from wood or 3D print resin under the multiple layers of paint, IMHO But you can definitely see the smile if the hull looks nice, the way you wanted! ;)
 
here are some printers and i see some go down to 4K

so i am not sure what to look for.
Great question.

Bottom line up front, shoot for an affordable 4K or 8K printer and good resin from a reputable maker.

The long answer:

The "4K", "8K", "12K", etc., refers to the resolution of the LCD screen on the printer. The way it works is that the printer has an LCD screen, like the one in your smart phone. The LCD screen emits a single color intended to harden liquid resin layer by layer.

In theory, the greater the resolution (the higher the number), the finer the detail the printer can produce in the X-Y plane (horizontal plane). So, theoretically, a 4K printer can produce finer detail than a 2K printer. An 8K printer can produce finer detail than a 4K printer, and so forth. Obviously, higher resolution printers tend to cost more.

Most current resin 3D printers' Z-plane resolution is determined by a setting in the slicer, measured in microns. The smaller the number in microns, the thinner the layer, and the more detail it can produce in the vertical plane. With good anti-aliasing settings (the setting that reduces or eliminates "pixelated" surfaces), 50 microns is usually sufficient for most modeling purposes. For super fine detail, you might drop that down to 40 or 30 microns. Any lower than that is generally overkill, with no visible improvement over the higher number.

We have both 8K and 12K printers. In our experience, 8K does an amazing job and is more than sufficient for very highly detailed models. The detail achieved with our 12K printer is not noticeably better than our 8K printer. Having said that, the industry is constantly moving towards higher resolutions so expect to see 12K printers become more common and 16K soon.

Note, too, that resin manufacturers produce resins specifically for use on high resolution printers like 8K and 12K. Whether or not this is just a marketing trick, I cannot say. I can say that we use resins made specifically for our printers. We've had very good experience with resins made by Elegoo and by Siraya Tech.

In theory, an LCD screen printer is faster than a printer that uses a laser. This is because the LCD screen lights the entire layer at once. The laser has to trace the entire layer, which can take longer. The advantage of lasers is that a laser can create smoother surfaces. This is because as the laser light moves across the layer, the light is "smeared".

Most modern LCD printers compensate for the pixelated appearance of surfaces and features with software to create very smooth surfaces. The correct term for the pixelated appearance is "aliasing". Most slicer software now comes with an anti-aliasing function that can be set to reduce any pixelation.

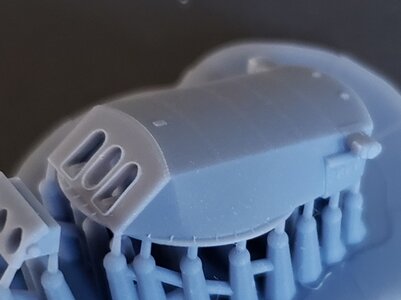
The photo below is of a 1/700 scale USS Arizona turret printed on our Phrozen "Mighty 8K" printer at 50 microns using Siraya Tech Fast Navy Gray resin. Notice the very smooth surfaces, fine rim around the cannon openings, and tiny rooftop rivets. This model is about the size of a 25-cent US quarter or 1 euro coin.
1-700 Arizona BB-39 Turrets with separate trunnions c.jpg
 
Last edited:
thank you model monkey
another question

i see some printers say "monochrome" ? good bad or does not matter
 
... is there a reason to draw a line between the wooden and plastic?

nope not at all within the hobby, but way back a group of elitist's tried to make it an issue but that quickly was kicked to the curb.
Materials only make a difference to art gallery dealers and clients. The difference in cost between a model with plastic guns and guns cast in sterling silver.
 
thank you model monkey
another question

i see some printers say "monochrome" ? good bad or does not matter

Another great question. "Monochrome" means that the printer's LCD screen emits only the one color that will harden the resin.

Some older LCD screen printers used smart phone LCD screens that emitted the full spectrum of colors. This was seen as very inefficient from an energy perspective since the resin only needs light of a certain frequency, commonly ultraviolet (UV) light at about 405 nm, to harden. Newer printers use an LCD screen that only emits light at 405 nm, just the one color, hence the term "monochromatic". So for 3D printing purposes, a monochromatic LCD screen is a good thing.

When choosing a resin, look for resins that are photosensitive at 405 nm to match your printer's 405 nm LCD screen. This ensures that your printer is emitting light at the correct frequency to cure the resin you chose. In other words, if your printer is 405 nm, your resin needs to be 405 nm, too.

Models made with resin printers normally need additional curing after printing, which is just some more exposure to UV light. This is called "post curing". Post curing is normally done by placing the model in the sun or in a UV light booth for several minutes up to a half hour. The exact time depends on the resin you choose. The resin manufacturer will state how long to post cure. You don't need to buy a UV light booth if you live in a sunny area. The sun also emits UV light at 405 nm so the sun will easily cure the resin. If you choose to buy an inexpensive UV light booth, look for one that emits UV light at 405 nm to match your resin.

Post curing is needed because resin 3D printers deliberately under-cure the resin during printing. Under-curing during printing is necessary to leave enough uncured resin present so that the layers can be bound to each other. If each layer was fully cured during printing, the model would delaminate and fall apart like a deck of cards. So after the model is removed from the printer and cleaned, place it in a UV light booth or in the sun to fully cure all the resin.

Companies like Elegoo and Phrozen and others offer inexpensive UV light booths and mechanical wash stations sized to match their printers.

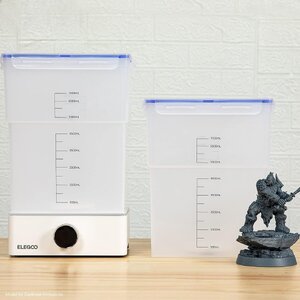
When the models come our of the printer, they're soaked with liquid resin which has to be cleaned from the models. I highly recommend getting a mechanical wash station. It is simply a plastic tank with a motorized impeller at the bottom to stir the cleaning solvent. The solvent dissolves any liquid resin present. A few minutes in the tank and the models are clean. Below is a photo of one made by Elegoo. Others are very similar.

71cOTP0zN6L._AC_SL1500_.jpg
 
Last edited:
lets talk slicer software no doubt the one i am using for my Ender FDM printer will not work for resin printing. So are there resin printing software that is free to use? does software come with the printer?
Are resin slicing software open ended so it can be used with different printers?
 
Lychee and Chitubox slicers are popular. There are free versions. These slicers support many different printers and resins and their settings can (and should) be adjusted for specific resins.

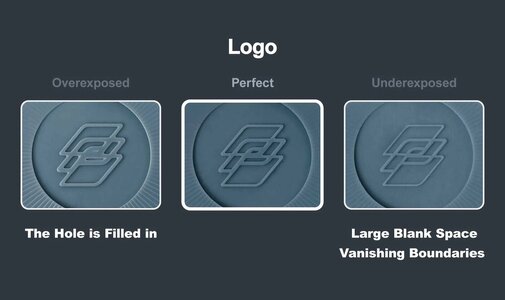
Resin manufacturers will have recommended slicer settings for their resins. One fancy name for slicer settings is "Exposure and Parameter settings" (XP settings.) Print results and resin behavior can be affected by various conditions such as workshop temperature and humidity. In other words, your machine in your workshop my be operating perfectly under your conditions, or may be underexposing models or overexposing them, printing too fast or too slow.

Keep in mind that the recommended manufacturer XP settings were determined in the manufacturer's lab under controlled conditions. Your printing conditions may be different enough to affect print quality. You may need to adjust the XP settings in your slicer for best results on your machine in your workshop. So start with the recommended settings and adjust as needed. Normally, several test prints will be needed to fine tune slicer XP print settings. But don't worry, it's not hard to do and there is much help available online.

Test prints are normally done using a special model from the printer's manufacturer. It is usually already in the printer's memory, or comes on a thumb drive with the printer in the form of an *.stl file.

For example, Phrozen has a test model they call their "XP Finder". The XP Finder model has different physical features created specifically to identify any XP setting problems. How the printer produces those features will will help you identify whether or not any settings need adjusting. Here's Phrozen's XP Finder test model.

Blog_XP-Finder__2.jpg

Manufacturers typically have a website that shows you how to analyze the test print model. Images of test prints of that model where features did not form as intended, with comments identifying the problem and recommended changes to print settings to correct the problem are displayed on that webpage. Compare your test print with their images. Click here to see Phrozen's test print analysis website. Here's an example of the analysis of one feature on the XP Finder test print model:

Blog_XP-Finder__8.jpg

If your model matches the underexposed image, increase the exposure time in your slicer and re-test. If your model matches the overexposed image, decrease the exposure time in your slicer and re-test.

Formlabs printers use a proprietary slicer called PreForm, which is free. Their printers and resins are well-tested and matched and no XP adjustments will be needed. Generally, Formlabs printers arrive ready to print. Simply run one test print to confirm the machine is operating and away you go. But ready-to-print machines like that can be very pricey.
 
@Dave Stevens (Lumberyard) Thanks for starting this, and I am sorry I've been away from this site for a while. Will have to keep checking in here and start posting again.

I am seriously considering getting into the 3D printing game as well. Building modern lake freighters...there are basically no fittings available and at 1/192 or 1/200 scale, parts can get quite small. I have built up a small collection of blueprints, so have lots of models to choose from. When it comes to modern mooring winches as an example, and any of the radars and other parts, I really think 3D printing could be a good direction to go.

I am getting to know a guy here in Windsor who has a 3D printing business that is apparently quite known and used by people around the world - he contracts out most of the design work, but has 40+ printers that he prints the parts locally. I will have to pick his brain a bit and what type of printer/software would be best for what I want to do.

My one source for 3D printed parts that I used (Shapeways) has gone out of business, so not sure what is going to happen with the stuff offered on there - I did hear a European company bought them and will try to basically get it back going on their own. Time will tell.

Also....Fort Malden is about a 30 minute drive along the Detroit River from my house. Been there countless times - what a nice little site they have there. It is a local gem a lot of Windsorites take for granted.
 
Back
Top