Amati Bismarck 1:200 [COMPLETED BUILD]

Joined
Oct 9, 2020
Messages
1,821
Points
488

Well here we go, my first build log. This is going to be a multiyear project as I am very slow at these things.
I will not put together an unboxing video as there is already one on Youtube:

I was thinking I would show a couple of pictures to start with. The first pic shows a sample of the manual part 1. There are 2 manuals for this build. Behind the manual are a set of plans that show all the part numbers. If you are familiar with Amati's Titanic build then you will recognize the process for building the Bismarck. First, you identify the part that you need for the assembly. You have to label all the laser cut parts on their respective sheets using the plans. Next, you cut the parts out that you need, based on the manuals, and then you must deburr all the parts.

For this part of the build it is all wood, so I just use basic carpenter's glue to assemble the frame. Picture 2 shows the length of the beast. It is about 50 inches long.

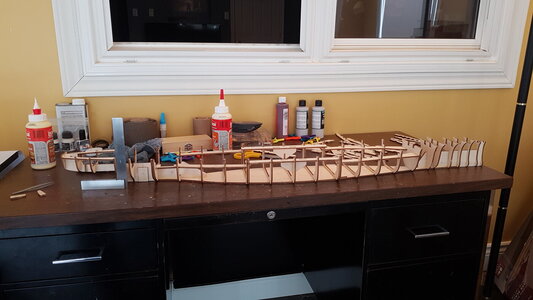
20220209_114027.jpg20220209_125224_004.jpg
 
Ahh… this is going to be an awesome, long build, I have considered this kit, I think it is a bad Azz looking battleship! Just watched the unbox video, there is still quite a bit of plastic in the kit as well, that surprised me- but it beats trying to carve radomes and curvy stuff! Are you painting with airbrush or rattle cans?
 
Last edited:
Ahh… this is going to be an awesome, long build, I have considered this kit, I think it is a bad Azz looking battleship! Just watched the unbox video, there is still quite a bit of plastic in the kit as well, that surprised me- but it beats trying to carve radomes and curvy stuff! Are you painting with airbrush or rattle cans?
Airbrush. Never used one before so will have to practice on piece of wood before doing model.
 
Last edited by a moderator:
Ahh… this is going to be an awesome, long build, I have considered this kit, I think it is a bad Azz looking battleship! Just watched the unbox video, there is still quite a bit of plastic in the kit as well, that surprised me- but it beats trying to carve radomes and curvy stuff! Are you painting with airbrush or rattle cans?
There is a lot of plastic, but most of it will be embellished with photo etched parts, then painted so I think it will look amazing.
 
When installing the bulkheads, make sure they all line up at the top in one plane so that there are no bumps when you put the deck on. I had to remove one of the glued bulkheads and put it back because it was too high relative to the others. Fortunately nothing broke.
 
It will take you a year or so to finish it. Its a huge undertaking but very satisfying.
Hi, quick question for you. Did you paint the PE parts before gluing them in place, or did you glue them in place and then painted the assemblies?
 
If I can bring my grain of salt, for my self, Ipaint before gluing. I tried brush painting, but better result are with airbrush for me. It is easier to mask the PE if required before gluing.
 
Hi, quick question for you. Did you paint the PE parts before gluing them in place, or did you glue them in place and then painted the assemblies?
Hi Jack,
I cleaned and etch primed the parts before gluing into place. Then I built sub assemblies of the superstructure and painted them before fixing in position.
I do not have a airbrush, so I used Tamiya hobby paint in rattle cans.
 
Hi Jack,
I cleaned and etch primed the parts before gluing into place. Then I built sub assemblies of the superstructure and painted them before fixing in position.
I do not have a airbrush, so I used Tamiya hobby paint in rattle cans.
Thank you sir. Appreciate your feedback.
 
If I can bring my grain of salt, for my self, Ipaint before gluing. I tried brush painting, but better result are with airbrush for me. It is easier to mask the PE if required before gluing.
Thank you. I think I may have to buy an airbrush. GIven that I plan on doing this hobby for years, it's probably worth the investment.
 
Back
Top