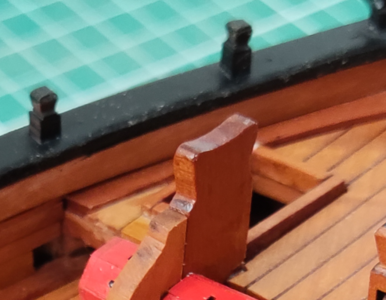
Hello Tom first of all I would like to say that you have done a great job so far. So now to the problems you have. It's my personal opinion! I am still firmly convinced that things can always be solved diplomatically if you are willing to do so. I've already read a lot of logs and can only say that the model builder will always encounter errors, regardless of whether they are hiding in the plan or whether the parts are not precisely manufactured. In your case it might be both, but you have been offered a solution to replace the faulty parts. I believe that we are a community, kit makers and model makers and we benefit from each other. Nobody is perfect, we can find very strong anomalies even in very expensive monographs of well-known authors, nevertheless model makers managed to create wonderful models. What I mean is we are creative and can fix these bugs even talk to the authors and makers and find solutions. As far as your comparison with the electrical item is concerned, this is very far-fetched, sorry, if you buy an item and it shows defects, the manufacturer always has the right to repair it up to three times before replacing it. So what I want to say is we all learn from each other and should respect each other and find solutions.
-

Win a Free Custom Engraved Brass Coin!!!
As a way to introduce our brass coins to the community, we will raffle off a free coin during the month of August. Follow link ABOVE for instructions for entering.
-

PRE-ORDER SHIPS IN SCALE TODAY!
The beloved Ships in Scale Magazine is back and charting a new course for 2026!
Discover new skills, new techniques, and new inspirations in every issue.
NOTE THAT OUR FIRST ISSUE WILL BE JAN/FEB 2026
You are using an out of date browser. It may not display this or other websites correctly.
You should upgrade or use an alternative browser.
You should upgrade or use an alternative browser.
Another Hayling 1760 build
- Thread starter Tom of all trades
- Start date
- Watchers 29
- Joined
- Oct 14, 2020
- Messages
- 294
- Points
- 323

Because our pilot model was being tested before the completion of the instructions (as you can imagine that if we didn’t do the pilot model, we would not be able to do the instructions), so there might be some numbering errors. We have tried our best to avoid these issues in the review, but there could still be some omissions. We will improve the process in the future to ensure that such things happen less frequently. At the same time, we will continue to update the instructions to correct any previous errors. Sorry again for your bad experience.Hello Jim,
I should have put a smiley face at the end and you would have realised I was not being very serious, sorry.
Yes, Victor is very helpful but I still think that this model should not have been marketed yet because it's obvious that it had never been built using the instructions supplied. However, I am not planning to give in yet and will keep on going.
BTW, my aim is to build it as a hull only model with some small detail changes (because I'm rapidly running out of storage space).
Cheers
Tom
- Joined
- May 31, 2021
- Messages
- 86
- Points
- 88

I completely understand. It's not an easy job to design and build a model and hopefully we'll all learn from this.Because our pilot model was being tested before the completion of the instructions (as you can imagine that if we didn’t do the pilot model, we would not be able to do the instructions), so there might be some numbering errors. We have tried our best to avoid these issues in the review, but there could still be some omissions. We will improve the process in the future to ensure that such things happen less frequently. At the same time, we will continue to update the instructions to correct any previous errors. Sorry again for your bad experience.
While I'm here, did you see the email I sent you about the capstan cylinder part numbers being missed off from the PDF and the written instructions? I know it's easy to lose track of something in a busy mail inbox, we've all done it.
Cheers
Tom
- Joined
- Oct 14, 2020
- Messages
- 294
- Points
- 323

- Joined
- May 31, 2021
- Messages
- 86
- Points
- 88

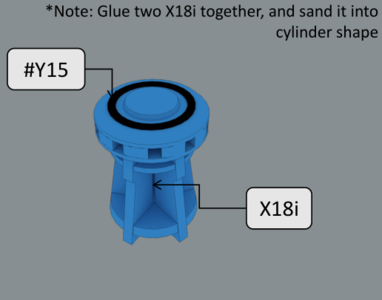
OK, I understand now. It was step 59 I was referring to - it shows this assembly that suddenly has a beige extension that threw me.Yes that was two X18I glued toghter and shaped, as i mentioned in the written instruction:
View attachment 334418
and the 3D instruction:
View attachment 334419
sorry for missing that one, hope this helps
Tom
- Joined
- May 31, 2021
- Messages
- 86
- Points
- 88

You know you are getting old when you notice that you've glued a part on back to front. You very carefully remove it and refit it - only to realise you've put it back the wrong way again! Doh! 

That's why I love modelling in wood - if it's a real problem and a part breaks, a replacement can usually be make from scrap.
Tom
That's why I love modelling in wood - if it's a real problem and a part breaks, a replacement can usually be make from scrap.

Tom
Hi Tom, I am really glad your thoughts took over your initial emotions and you will continue with the build!Hello Jim,
I should have put a smiley face at the end and you would have realised I was not being very serious, sorry.
Yes, Victor is very helpful but I still think that this model should not have been marketed yet because it's obvious that it had never been built using the instructions supplied. However, I am not planning to give in yet and will keep on going.
BTW, my aim is to build it as a hull only model with some small detail changes (because I'm rapidly running out of storage space).
Cheers
Tom
The complexity of POF kits is not the same as POB, and it does require some advanced skills. I think many modelers underestimate their skills and soon it may lead to disappointments.
Again, I am glad you decide to continue with your build!
- Joined
- Mar 1, 2022
- Messages
- 683
- Points
- 308

Hi i have found the issue, it is my problem, the deck clamp L1 and L2 were being marked inversely on the instruction, so that now the beam is being placed more towards the back.
I will change it on the instruction immediately, also i will send you a new pair of L1 from UK tomorrow. So sorry for this.
Just don't warry about that. Your disappointment was understandable, and so your bitterness.It's all my fault guys, I was so fed up with things that I got a bit short tempered and confused myself with the whole 'keel' thing when I wa writing the log.
Sorry
JUST MY INFLATIONARY 25 CENTS CALM DOWN, KNOW SENCE HAVING A SHOUTING MATCH, ONLY GOD AND HIS SON ARE PERFECT WE ARE NOT TAKING THINGS APART I HAVE DONE THIS SO MANY TIMES CAN NOT COUNT THEM WITH A LITTLE PATIENCE YOU CAN TAKE THINGS APART WITHOUT ANY DAMAGE I HAVE DONE IT WITH PVA, AND CA JUST GET 100% ACOTONE BRUSH IT ON THE JOINT THEN CAREFULLY PRY IT APART, YOU MAY HAVE TO APPLY 2 OR MORE COATS ON THE JOINT IT WILL COME APART WITHOUT ANY DAMAGE JUST BE CAREFULL. GOD BLESS STAY SAFE
Hi i have found the issue, it is my problem, the deck clamp L1 and L2 were being marked inversely on the instruction, so that now the beam is being placed more towards the back.
I will change it on the instruction immediately, also i will send you a new pair of L1 from UK tomorrow. So sorry for this.
I am also building this model now. Haven't gotten as far with my build but in general I would like to say that the instructions could be better elaborated and better explained. There are ambiguities in the description that should not be on a quality model. Would say that the manufacturer has been in a little too much of a hurry to release the model on the market. Personally, I miss a real 2-D drawing with views of the boat. I'll probably be able to build the model, but that's because I have good experience from previous builds.
Great to know you are building the same model. Would it be possible to show your assembly progress in a build log? Since you are an experienced modeler, your log could be of great help to others. What do you think?I am also building this model now. Haven't gotten as far with my build but in general I would like to say that the instructions could be better elaborated and better explained. There are ambiguities in the description that should not be on a quality model. Would say that the manufacturer has been in a little too much of a hurry to release the model on the market. Personally, I miss a real 2-D drawing with views of the boat. I'll probably be able to build the model, but that's because I have good experience from previous builds.
- Joined
- Jul 27, 2021
- Messages
- 443
- Points
- 323

Great to know you are building the same model. Would it be possible to show your assembly progress in a build log? Since you are an experienced modeler, your log could be of great help to others. What do you think?
;-)
I already have a build log on sos at Hayling 1760.Great to know you are building the same model. Would it be possible to show your assembly progress in a build log? Since you are an experienced modeler, your log could be of great help to others. What do you think?
- Joined
- Dec 25, 2021
- Messages
- 129
- Points
- 213

Hello,I'm the designer of Modelship Dockyard,I'm very sorry for the trouble caused by the lack of detailed instructions。
I really have a lot of experience to share when making the pilot model, which we do not do well。
Hayling's manual describes continuous updating of user feedback。
Please feel free to contact me and Victor if you have problems with Hayling production. We will do everything we can to help。
We don't know enough about the production habits of users outside China. This is our problem. Sorry again
In the next product manual, we will share the experience and skills in production in more detail。
Thank you very much for your comments, which have greatly helped our growth
- Joined
- Dec 25, 2021
- Messages
- 129
- Points
- 213

I am also building this model now. Haven't gotten as far with my build but in general I would like to say that the instructions could be better elaborated and better explained. There are ambiguities in the description that should not be on a quality model. Would say that the manufacturer has been in a little too much of a hurry to release the model on the market. Personally, I miss a real 2-D drawing with views of the boat. I'll probably be able to build the model, but that's because I have good experience from previous builds.
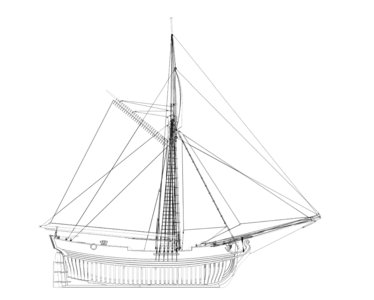
We did prepare 2D drawings,
However, according to actual production experience, it is not critical, so it is omitted.
I provided attachments for download
A0 paper 1:1 printing
Attachments
- Joined
- May 31, 2021
- Messages
- 86
- Points
- 88

I am also building this model now. Haven't gotten as far with my build but in general I would like to say that the instructions could be better elaborated and better explained. There are ambiguities in the description that should not be on a quality model. Would say that the manufacturer has been in a little too much of a hurry to release the model on the market. Personally, I miss a real 2-D drawing with views of the boat. I'll probably be able to build the model, but that's because I have good experience from previous builds.
Still, it's all part of the hobby and I am enjoying the challenge in a funny sort of way.
- Joined
- May 31, 2021
- Messages
- 86
- Points
- 88

Another day, another head scratch.
Step 48 as shown on PDF. Note the shape of p/n J1-1:
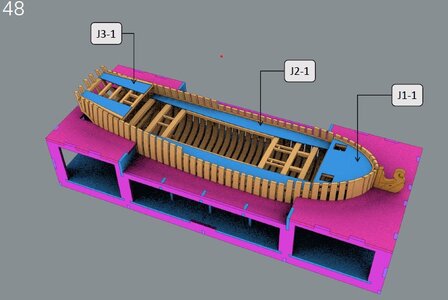
P/n J1-1 from the kit:
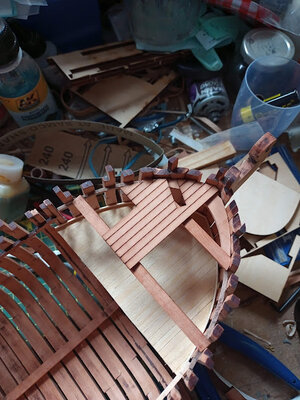
I know there is a waterway to fit so it's not in the exact location and that there is a second J1-1 in the kit that fits the other side but I can't see how things progress from here when the shape is all wrong. Unless I've missed a bit somewhere.
Step 48 as shown on PDF. Note the shape of p/n J1-1:

P/n J1-1 from the kit:

I know there is a waterway to fit so it's not in the exact location and that there is a second J1-1 in the kit that fits the other side but I can't see how things progress from here when the shape is all wrong. Unless I've missed a bit somewhere.
- Joined
- Oct 14, 2020
- Messages
- 294
- Points
- 323

Hi i have replied your email you can have a checkAnother day, another head scratch.
Step 48 as shown on PDF. Note the shape of p/n J1-1:
View attachment 334635
P/n J1-1 from the kit:
View attachment 334636
I know there is a waterway to fit so it's not in the exact location and that there is a second J1-1 in the kit that fits the other side but I can't see how things progress from here when the shape is all wrong. Unless I've missed a bit somewhere.
- Joined
- May 31, 2021
- Messages
- 86
- Points
- 88

Thanks Victor, got your reply.Hi i have replied your email you can have a check
This is your suggested fix for it: "After placing all the beams, carlings, and waterway plank, there should be a hole for placing hatch there. There might be some spaces after you place the hatch depending on where you place your carlings, you can put with some 1mm wood there to fill the space." It will leave a rather odd planking mismatch so I will probably cover the whole foredeck with my own wood strip.
Are you going to modify the PDF and instructions to warn future builders?
Tom
- Joined
- Oct 14, 2020
- Messages
- 294
- Points
- 323


