
-

SUBSCRIBE TO SHIPS IN SCALE TODAY!
The beloved Ships in Scale Magazine is back and charting a new course for 2026!
Discover new skills, new techniques, and new inspirations in every issue.
NOTE THAT OUR NEXT ISSUE WILL BE July/August 2026 -

Win a Free Custom Engraved Brass Coin!!!
As a way to introduce our brass coins to the community, we will raffle off a free coin during the month of August. Follow link ABOVE for instructions for entering.
You are using an out of date browser. It may not display this or other websites correctly.
You should upgrade or use an alternative browser.
You should upgrade or use an alternative browser.


No problem Sulaire. Use what is necessary for you. To be honest I stole it also from somebody from this forumvery impressive work. I looked back at the beginning of your build and saw the keel holder you built - I need one and I will steal your idea if that's ok - your photos are great to show me how to make one
 .
.Dear fellow modelers,
finally I finished gluing of all the bulkheads and also the supports between them. Now I will try to fit the deck. I already sanded the top of the bulkheads, which was sticking out of the row. See this pictures. Just inside was sanded.

I sanded also top of all the bulkheads in order to god rid off places which were uneven - I mean the place where deck is going.

Added also the support for holding of the mast.


The next step is fitting of the false deck and them fairing of the bulkheads.
Again not a lot of time for doing this. Lot of snow was falling and we were riding the skies as much as possible. Thanks for the support and that this forum exists.
Take care.
finally I finished gluing of all the bulkheads and also the supports between them. Now I will try to fit the deck. I already sanded the top of the bulkheads, which was sticking out of the row. See this pictures. Just inside was sanded.
I sanded also top of all the bulkheads in order to god rid off places which were uneven - I mean the place where deck is going.
Added also the support for holding of the mast.
The next step is fitting of the false deck and them fairing of the bulkheads.
Again not a lot of time for doing this. Lot of snow was falling and we were riding the skies as much as possible. Thanks for the support and that this forum exists.
Take care.
Dear fellow modelers, greetings from Slovakia again. After week of holiday I am back. With my wife and friends we were doing some skialping in West Tatras. We have rented small old cottage there and enjoyed really great slopes. Here is video from one day.
Yesterday I had little bit of time and came back to my workshop. I started with the deck fitting and gluing.
At first I marked placed where the deck needed to be trimmed. I used my carving knife and chisel to trim the upper false deck. You can see the small markings by pencil in places where the gap needed to be enlarged in order to fit.

I used rubber bands to hold the scrap wood I found around the workshop to hold the upper false deck until glue dried. Here are some pictures.


I also used drops of CA glue to make sure it holds well. Be aware that if small drop of CA glue drops on your rubber band it will break and rubber bands start shooting like bullets over your workshop.
I had only one free hour so I planned ahead and cut for myself couple of planks for holding other parts of deck. For the wood I used pieses of plywood laying around the workshop. Here is picture. This plywood is very easy to break but I tested it and it will be sufficient for my needs.

Thanks for support and your interest. Till next time.
Yesterday I had little bit of time and came back to my workshop. I started with the deck fitting and gluing.
At first I marked placed where the deck needed to be trimmed. I used my carving knife and chisel to trim the upper false deck. You can see the small markings by pencil in places where the gap needed to be enlarged in order to fit.
I used rubber bands to hold the scrap wood I found around the workshop to hold the upper false deck until glue dried. Here are some pictures.
I also used drops of CA glue to make sure it holds well. Be aware that if small drop of CA glue drops on your rubber band it will break and rubber bands start shooting like bullets over your workshop
.I had only one free hour so I planned ahead and cut for myself couple of planks for holding other parts of deck. For the wood I used pieses of plywood laying around the workshop. Here is picture. This plywood is very easy to break but I tested it and it will be sufficient for my needs.
Thanks for support and your interest. Till next time.
Your clamping method is looking very unconventional - but if it is working - you solved the problem.
Think about to buy some clamps - you will need them also in future very often and there are coming situations, where you can not use the big size wooden spoon
Think about to buy some clamps - you will need them also in future very often and there are coming situations, where you can not use the big size wooden spoon
I have already bought lots of clamps Uwe, the problem is that the springs on these are very strong and are breaking the wood. Also I could use some pins but after I found this method on some forum with rubber bands I liked it. that is why I prepared the planks from plywood. I will use them in next step. It was just I put the glue and I thought that the deck will hold in place. So I improvisedYour clamping method is looking very unconventional - but if it is working - you solved the problem.
Think about to buy some clamps - you will need them also in future very often and there are coming situations, where you can not use the big size wooden spoon
.
Last edited:
Dear fellow modelers,
yesterday I was again in my workshop. It is so fun and soo satisfying to see something forming under my hands.
The upper deck was glued as I wanted. My unconventional clamping method worked well.
I started to model the holder for middle small deck. Here are some picturec.

For the second support I added side supports. Then I measured the lenght of deck support and cut it and then glue together


The good thing is that the line of the bulkheads is looking well. The preparation and thinking ahead finally repaid. Here is picture.

I also tried one fancy thing I have seen in one of the logs and I think I will do this everywhere possible on the ship. I use basic wood filler for this.


Hope you enjoy. Till next time.
yesterday I was again in my workshop. It is so fun and soo satisfying to see something forming under my hands.
The upper deck was glued as I wanted. My unconventional clamping method worked well
.I started to model the holder for middle small deck. Here are some picturec.
For the second support I added side supports. Then I measured the lenght of deck support and cut it and then glue together
The good thing is that the line of the bulkheads is looking well. The preparation and thinking ahead finally repaid. Here is picture.
I also tried one fancy thing I have seen in one of the logs and I think I will do this everywhere possible on the ship. I use basic wood filler for this.
Hope you enjoy. Till next time.
Attachments
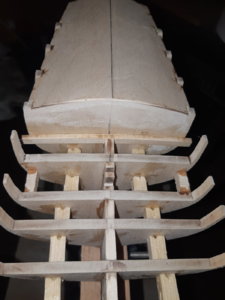
Dear fellow modelers,
some progress again - I am now comming to point where I need to figure out next steps of building. My current mind plan is comming to an end.
At first I upgraded the stand I use for holding the ship. The holder was scratching the keel so I added some old rug to prevent it.
I added everything necessary to glue the small false deck and then glued it to rest of the build. You can see from the pictures I used side supports for holding of the main and quarter deck beam.


The small deck needed to be sand flush with quarter deck beam. Also pictures from Zoly´s build helped.

Then I started forming the main false deck. Nearly all the sluts needed to be deepened. Also I needed to find the center of false deck to glue it correctly.
It was a gradual process of fitting and cutting again and again. The false deck is very fragile and some of the sides have broken little bit. No worries these places will not be seen at final build.

The glue was spread only in places which will be covered by false deck. You can see it from this picture.

Then I fixed everything with my new method - planks and rubber bands.


You can see that the glue is flowwing from the joints so I think it is working properly.


Also my wife says Hi...") .
.

Total build around 50 hours. Do not know precisely, the clock sheet is in my workshop.
Till next time.
some progress again - I am now comming to point where I need to figure out next steps of building. My current mind plan is comming to an end
.At first I upgraded the stand I use for holding the ship. The holder was scratching the keel so I added some old rug to prevent it.
I added everything necessary to glue the small false deck and then glued it to rest of the build. You can see from the pictures I used side supports for holding of the main and quarter deck beam.
The small deck needed to be sand flush with quarter deck beam. Also pictures from Zoly´s build helped
.Then I started forming the main false deck. Nearly all the sluts needed to be deepened. Also I needed to find the center of false deck to glue it correctly.
It was a gradual process of fitting and cutting again and again. The false deck is very fragile and some of the sides have broken little bit. No worries these places will not be seen at final build.
The glue was spread only in places which will be covered by false deck. You can see it from this picture.
Then I fixed everything with my new method - planks and rubber bands.
You can see that the glue is flowwing from the joints so I think it is working properly.
Also my wife says Hi...
.Total build around 50 hours. Do not know precisely, the clock sheet is in my workshop.
Till next time.
Dear fellow modelers,
yeasterday I was once again doing some modeling. Here is picture of glued main false deck. I think it is quite smoth. Happy with result.


I started with the fairing of the hull. I probably did not finish yet. It will still need some small adjustments but again from most part I am done. I did quite a lot testing with planks and it looks like it is sufficient. From Rober Hunt practicum I obtained it was written there that it will take 15 minutes each side. I have been doing it for two hours.... Here are some pictures of finished sanding.
I used for this small peace of round wood on which sand paper was CA glued. In one moment only 4 bulhead were sanded


I also test fitted the waterway. Still need to trim the waterway to final form. I broke couple of top of bulkhead when I was sanding inside of them. I used CA glue to glue them back. Worked like a charm. The way I think I will continue will be that I will trim and test fit the waterway to mark the possition of wale (according to plan the wale should be in same hight as waterway). Then I will glue the wale and black strake and only after then I will sand the inside of the top of the bulkheads.

Before all of this I need to do the framing of the bow and framing of the stern.
Thanks for support and likes.
Till next time.
yeasterday I was once again doing some modeling. Here is picture of glued main false deck. I think it is quite smoth. Happy with result.
I started with the fairing of the hull. I probably did not finish yet. It will still need some small adjustments but again from most part I am done. I did quite a lot testing with planks and it looks like it is sufficient. From Rober Hunt practicum I obtained it was written there that it will take 15 minutes each side. I have been doing it for two hours...
. Here are some pictures of finished sanding.I used for this small peace of round wood on which sand paper was CA glued. In one moment only 4 bulhead were sanded
I also test fitted the waterway. Still need to trim the waterway to final form. I broke couple of top of bulkhead when I was sanding inside of them. I used CA glue to glue them back. Worked like a charm. The way I think I will continue will be that I will trim and test fit the waterway to mark the possition of wale (according to plan the wale should be in same hight as waterway). Then I will glue the wale and black strake and only after then I will sand the inside of the top of the bulkheads.
Before all of this I need to do the framing of the bow and framing of the stern.
Thanks for support and likes.
Till next time.
Last edited:
Dear fellow modelers.
Yesterday I was again in my workshop. I finished fairing of the hull. I was very thorough with testing plank and I think I found all places which were not in line on bulkheads. On some places I needed only very thin shimming. I used ordinar administrative paper and wood glue.

Also one wood shim was needed. I will sand it next time.

I started with the framing of the bow. I needed to use adult machine.
Here are same pictures from the process. I used belt grinder for rough sanding.


I did not finish it, next time maybe. It was one of the days you will not stop until something. My wife came and we went for walk with our dogo.
Here are some pictures from todays skialp. Hope this type of pictures are allowed and you are also enjoying them.

Here we are going up of one slope. Something similar you can see on opposite side in this picture We are in valley.

We got little lost on the way back in forest.

Our dogo has second birthday today.

Till next time.
Yesterday I was again in my workshop. I finished fairing of the hull. I was very thorough with testing plank and I think I found all places which were not in line on bulkheads. On some places I needed only very thin shimming. I used ordinar administrative paper and wood glue.
Also one wood shim was needed. I will sand it next time.
I started with the framing of the bow. I needed to use adult machine
.Here are same pictures from the process. I used belt grinder for rough sanding.
I did not finish it, next time maybe. It was one of the days you will not stop until something. My wife came and we went for walk with our dogo.
Here are some pictures from todays skialp. Hope this type of pictures are allowed and you are also enjoying them
.Here we are going up of one slope. Something similar you can see on opposite side in this picture We are in valley.
We got little lost on the way back in forest
.Our dogo has second birthday today.
Till next time.
Attachments

Dear fellow modelers,
I am continuing in fairing of the hull and fitting the bow fillers. it is continuous process during which I am testing the fit and sanding a little all the time. Here are some pictures from process.

Then I made the bulkheads extensions for the bow filler section. I used nails for strenghthening the connection.


Then more sanding and test fitting


Then the other side.

Till next time. I can not wait until I will continue again.
I am continuing in fairing of the hull and fitting the bow fillers. it is continuous process during which I am testing the fit and sanding a little all the time. Here are some pictures from process.
Then I made the bulkheads extensions for the bow filler section. I used nails for strenghthening the connection.
Then more sanding and test fitting
Then the other side.
Till next time. I can not wait until I will continue again.
Last edited:
Hello again fellow modelers.
Through these days I am every evening in my workshop having fun. Just for hour and half or less but still having a blast. Working with wooden models is something very different from plastic. On one side you have to somehow have more information about the matter but on other hand you are more free in building. You have to build jigs and other needed tools. It is like you have plans and manuals and everything but when you are actually building you are feeling the wood the contours the way how it should be or just how you like it. I know that also with plastic you can do whatever - you can find examples also here on SOS where LE SOLEIL ROYAL 1/100 HELLER is completelly rebuild with stirofoam and it is beautiful, but for me during plastic modelling I did not feel that. Everything was did according to plan, painted by hand (everything was done only with 3 paintbrushes and it have taken a lot of time, bellieve me) and sanded a little to fit better.
With wood you are actually building. It is awesome.
Here are two pictures from yesterday season. It was about more fairing and some shimming. I finally glued bow fillers. And I started to work on the stern. No pictures from that because only laser burn was sanded of parts.

I started to think about the forming of the planks. Few weeks ago I bought kettle and yesterday I modified it to steam bender. It is amazing what little bit of warm, water and steam could do with flexibility of planks. They were similar to butter. I test bend one and I can not wait to see it today.

Again thanks for likes and I hope I am not bothering much with everyday progress. I like to do the log everytime I have something new.
Till next time.
Through these days I am every evening in my workshop having fun. Just for hour and half or less but still having a blast. Working with wooden models is something very different from plastic. On one side you have to somehow have more information about the matter but on other hand you are more free in building. You have to build jigs and other needed tools. It is like you have plans and manuals and everything but when you are actually building you are feeling the wood the contours the way how it should be or just how you like it. I know that also with plastic you can do whatever - you can find examples also here on SOS where LE SOLEIL ROYAL 1/100 HELLER is completelly rebuild with stirofoam and it is beautiful, but for me during plastic modelling I did not feel that. Everything was did according to plan, painted by hand (everything was done only with 3 paintbrushes and it have taken a lot of time, bellieve me) and sanded a little to fit better.
With wood you are actually building. It is awesome.
Here are two pictures from yesterday season. It was about more fairing and some shimming. I finally glued bow fillers. And I started to work on the stern. No pictures from that because only laser burn was sanded of parts.
I started to think about the forming of the planks. Few weeks ago I bought kettle and yesterday I modified it to steam bender. It is amazing what little bit of warm, water and steam could do with flexibility of planks. They were similar to butter. I test bend one and I can not wait to see it today.
Again thanks for likes and I hope I am not bothering much with everyday progress. I like to do the log everytime I have something new.
Till next time.
Dear fellow modelers,
these last days we have the corono also in Slovakia. Everything is closed, but no problem for us model builders. We can by antisocial even without the spreading virus. I spend yesterday 8 hours in my workshop modeling the stern of the ship. I love how the shape is becoming more and more visual. Hre are some pictures with comentary.
Here are first two pieces glued to keel. You can see from the picture that they are slighly beveled to the top. I did a lot of fitting with the windows to find position I liked.

Here were all windows test fitted and I stardet to work on forming of wing transom and filler block. The scalpel knife help very well in forming of them.


Here I was looking for optimal position for windows.

I made a mistake with the filler block so I needed to improvise. I have shorten a little bit the filler block and switched with new cutted. The left one was litle bit shorter. Nothing to wory about. Wing transom and filler block are glued here. Also side filler blocks were glued here.


Then I added the windows headers and sills. The down part still need to be sanded down. I have also broken one windov but nothing which CA glue will not repair.

I like the fit.

Thank for following me.
Happy modeling.
Till next time.
these last days we have the corono also in Slovakia. Everything is closed, but no problem for us model builders. We can by antisocial even without the spreading virus. I spend yesterday 8 hours in my workshop modeling the stern of the ship. I love how the shape is becoming more and more visual. Hre are some pictures with comentary.
Here are first two pieces glued to keel. You can see from the picture that they are slighly beveled to the top. I did a lot of fitting with the windows to find position I liked.
Here were all windows test fitted and I stardet to work on forming of wing transom and filler block. The scalpel knife help very well in forming of them.
Here I was looking for optimal position for windows.
I made a mistake with the filler block so I needed to improvise. I have shorten a little bit the filler block and switched with new cutted. The left one was litle bit shorter. Nothing to wory about. Wing transom and filler block are glued here. Also side filler blocks were glued here.
Then I added the windows headers and sills. The down part still need to be sanded down. I have also broken one windov but nothing which CA glue will not repair.
I like the fit.
Thank for following me.
Happy modeling.
Till next time.
Dear fellow modelers,
today I planked my first plank in my history of modeling. It was amazing.
In today´season I finalised sanding of the stern. I am very happy with the result. Picture below...

My first plank was wale on both sides. First I used my home made steamer and steamed them for half hour. Then I secured them directly on the ship until they dryed. Then I glued them. I used waterway for measuring the place for wale. It should be same hight. Here are same pictures from process.
First applying the wood glue under marks.

Securing with clamps. The bow part was glued with CA glue.


I left enough place for walnut wale. I will be very carefull with fitting of the walnut part.

I started to play with canons when I was waiting for glue to dry.

One last picture is my mother with my wife doing embroidery. Guess what picture she is doing.
Yes it is ship with sials. Will post picture when done.

Till next time.
today I planked my first plank in my history of modeling. It was amazing.
In today´season I finalised sanding of the stern. I am very happy with the result. Picture below...
My first plank was wale on both sides. First I used my home made steamer and steamed them for half hour. Then I secured them directly on the ship until they dryed. Then I glued them. I used waterway for measuring the place for wale. It should be same hight. Here are same pictures from process.
First applying the wood glue under marks.
Securing with clamps. The bow part was glued with CA glue.
I left enough place for walnut wale. I will be very carefull with fitting of the walnut part.
I started to play with canons when I was waiting for glue to dry.
One last picture is my mother with my wife doing embroidery. Guess what picture she is doing.
Yes it is ship with sials
. Will post picture when done.Till next time.
Very good work and progress - many thanks for the regular progress report, interesting to follow.
And regards to your wife and mother - really good looking
And regards to your wife and mother - really good looking
Thank you very much for your kind words Uwe. It brings that much joy to building when you can share your jorney with somebody who can appreciate modeling.Very good work and progress - many thanks for the regular progress report, interesting to follow.
And regards to your wife and mother - really good looking
Dear fellow modelers,
quick update, I steamed black strakes and also made openings on them. I clamped the black strakes on hull just to dry them.
Next step will be planking the stern. When this will be done I can glue black strake and waterways.
Here are photos from yesterday


I will continue work today.
Till next time.
quick update, I steamed black strakes and also made openings on them. I clamped the black strakes on hull just to dry them.
Next step will be planking the stern. When this will be done I can glue black strake and waterways.
Here are photos from yesterday
I will continue work today.
Till next time.
Dear fellow modelers,
today was again blast. I was doing many things at once.
Also massive planks differenciation and usage was in play.
I started with cabin windows. I did imitation of glass from plastic bottle. Here si a picture.

I decided that I will paint windows with golden colour. I like it very much.

Firstly I coloured everything inside cabin to black colour that nothing will be seen from outside.

And here are some photos from planking.


I made new jig for bending of the planks for cabin planking.

And also planked my first bend plank. I added little support for the windows. You do not want to fall your window inside.

Total spent time building 75 hours.
Till next time.
today was again blast. I was doing many things at once.
Also massive planks differenciation and usage was in play.
I started with cabin windows. I did imitation of glass from plastic bottle. Here si a picture.
I decided that I will paint windows with golden colour. I like it very much.
Firstly I coloured everything inside cabin to black colour that nothing will be seen from outside.
And here are some photos from planking.
I made new jig for bending of the planks for cabin planking.
And also planked my first bend plank. I added little support for the windows. You do not want to fall your window inside
.Total spent time building 75 hours.
Till next time.
Last edited:
- Joined
- Jan 9, 2020
- Messages
- 10,730
- Points
- 938

Dear Ciciak
I really enjoy following your log. It is wonderful to see such enthusiasm and excitement in a build. Also, I really admire the involvement of your wife and mother in the project - that makes it very special. I wish you the best of luck with your build and happiness in your life. Continue to do things the way that you do and enjoy life!
Kind regards-Heinrich