-

Win a Free Custom Engraved Brass Coin!!!
As a way to introduce our brass coins to the community, we will raffle off a free coin during the month of August. Follow link ABOVE for instructions for entering.
-

PRE-ORDER SHIPS IN SCALE TODAY!
The beloved Ships in Scale Magazine is back and charting a new course for 2026!
Discover new skills, new techniques, and new inspirations in every issue.
NOTE THAT OUR FIRST ISSUE WILL BE JAN/FEB 2026
You are using an out of date browser. It may not display this or other websites correctly.
You should upgrade or use an alternative browser.
You should upgrade or use an alternative browser.
BALDER, Vlaardingen Herring Lugger from 1912, scratch build scale 1:50 Plate-On-Frame
- Thread starter Peter Voogt
- Start date
- Watchers 65
How exquisitely difficult! Bravo on your processing, Peter.
Great work Peter, that looks very promising.
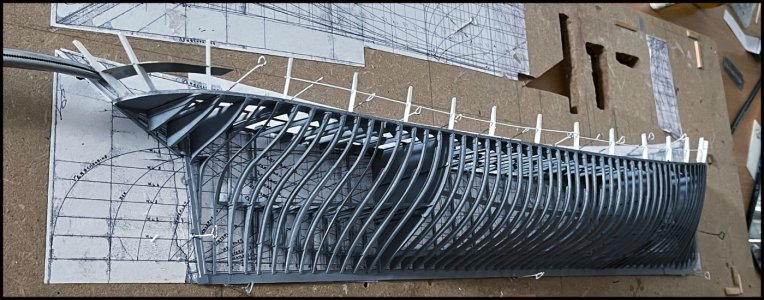
When I see half the model laid out like this on top of the construction plans, it is a picture in itself. A diorama already finished.
Fantastic model building!
Thanks, Dean /Stephan / Johann / Paul. Making the supports was very labor intensive. Till the curve of the aft, there are 13 supports. Each with its own length and angle.How exquisitely difficult! Bravo on your processing, Peter.
For the detail-lovers: The lengths of the supports from the front til the aft:
In mm: 20,6 / 19,9 / 19,6 / 19,3 / 19,0 / 18,7 /18,4 / 18,4 / 18,4 / 18,9 / 19,4 / 20,3 / 21,5. And the 3 in the aft up to 35,2.
Regards, Peter
Last edited:
Really great presentation Peter. The colour combination of the Grey "steel" with the wooden interior is just stunning to see.
Thanks, Maarten. Perhaps the original interior shows a darker appearance. But to give the wood a overal nice stain would be another challenge. And maybe the dark wood color is from years lighting of the fire of the Donkey kettle ……..Really great presentation Peter. The colour combination of the Grey "steel" with the wooden interior is just stunning to see.
Let’s see how it will be on the model over a few years.
Regards, Peter
Also, I think, over some time (years) the wood color becomes darker, it is called age.Thanks, Maarten. Perhaps the original interior shows a darker appearance. But to give the wood a overal nice stain would be another challenge. And maybe the dark wood color is from years lighting of the fire of the Donkey kettle ……..
Let’s see how it will be on the model over a few years.But for now the light wood color gives a nice view on the details (and the imperfections …..).
Regards, Peter
Luckily most of the time with wood ……Also, I think, over some time (years) the wood color becomes darker, it is called age.
My thoughts have also been a bit darker lately
Thanks, Jim.All good, I like her!
Regards, Peter
... in fact, mine as well, but...as you said.My thoughts have also been a bit darker lately..... but that has to do with current politics
...... we are not talking about that here.


- Joined
- Dec 22, 2022
- Messages
- 131
- Points
- 213

Whatever the politics and however upset we are (and they do upset us), your model sheds light on the darkness that surrounds us. I've never made an Admiralty model, and I probably never will, but I like how someone makes one. Your ship is a masterpiece!My thoughts have also been a bit darker lately..... but that has to do with current politics
...... we are not talking about that here.

Thanks for this lightning words and compliments, Anatolii.Whatever the politics and however upset we are (and they do upset us), your model sheds light on the darkness that surrounds us. I've never made an Admiralty model, and I probably never will, but I like how someone makes one. Your ship is a masterpiece!
Regards, Peter
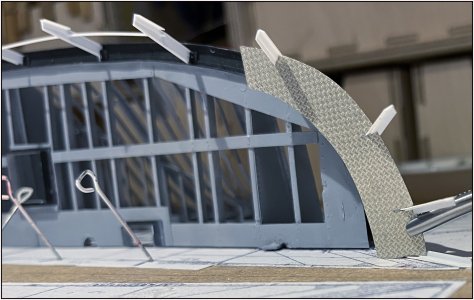
The floor made of aluminum sheet:

With 4 new supports incl. corner profiles as in the picture of the Balder.
To keep you at flying height where I'm all running into .......
Everything realigned:

But I still have to place everything dry-fit. Because I don't know if the end result has the desired shape, slope and rounding. And everything also has to be sprayed in color.
There are 17 supports that are clamped with their foot between 2 small knees in the waterway. Everything also has to be tension-free, because in no time one of the 17 has shifted again.
I also almost end up with the "Chicken or Egg" question: First make the supports and handrail and then the plates of the hull or first the plates and then the supports and handrail? But the starboard side gets no plates ………Why choose the difficult option and not the easiest first?
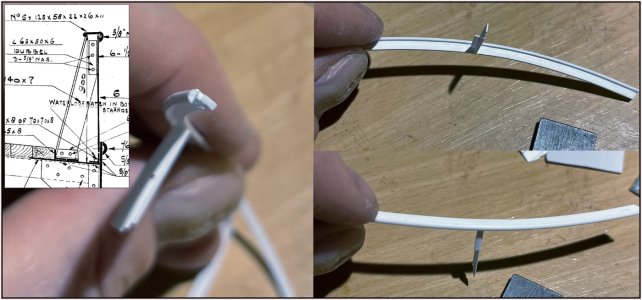
The next step was the top part of the bulwark. I assembled it from 2 pieces of Evergreen: 0.75 x 2.5 mm strip with a 1.5 mm half round on the side:

Top left a detail of the old drawing where the construction of the bulwark supports can be seen. On the bottom the small knees in the waterway, at the top under the handrail the piece of angle iron to secure the support to the plate and at the top the shape of the handrail.
On the right in the photo: the bottom where the support fits in the corner and at the top the rounding on the side.
Advantage of assembling from two parts. The preformed rounding of both stays in place better after gluing.
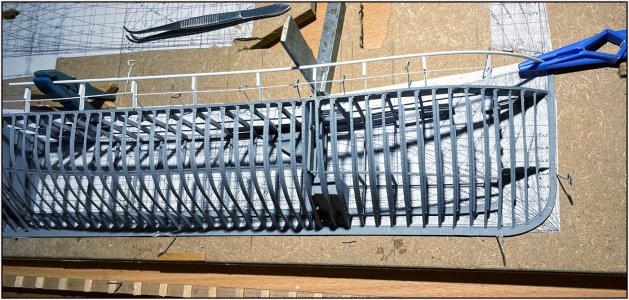
With the help of some clamps and supports the front part in place:

Everything seems to follow the curves of the sheer and outside well.
From this low angle you can see that I have to take into account the several curves:

The sheer and the curve of the bow. It remains fascinating how all those curves run and coincide.
But that’s also with all of your ship models.
Everything is still going well after about 10 hours of tinkering. On to the rear part and joining both parts.
Regards, Peter

With 4 new supports incl. corner profiles as in the picture of the Balder.
To keep you at flying height where I'm all running into .......
Everything realigned:

But I still have to place everything dry-fit. Because I don't know if the end result has the desired shape, slope and rounding. And everything also has to be sprayed in color.
There are 17 supports that are clamped with their foot between 2 small knees in the waterway. Everything also has to be tension-free, because in no time one of the 17 has shifted again.
I also almost end up with the "Chicken or Egg" question: First make the supports and handrail and then the plates of the hull or first the plates and then the supports and handrail? But the starboard side gets no plates ………Why choose the difficult option and not the easiest first?
The next step was the top part of the bulwark. I assembled it from 2 pieces of Evergreen: 0.75 x 2.5 mm strip with a 1.5 mm half round on the side:

Top left a detail of the old drawing where the construction of the bulwark supports can be seen. On the bottom the small knees in the waterway, at the top under the handrail the piece of angle iron to secure the support to the plate and at the top the shape of the handrail.
On the right in the photo: the bottom where the support fits in the corner and at the top the rounding on the side.
Advantage of assembling from two parts. The preformed rounding of both stays in place better after gluing.
With the help of some clamps and supports the front part in place:

Everything seems to follow the curves of the sheer and outside well.
From this low angle you can see that I have to take into account the several curves:

The sheer and the curve of the bow. It remains fascinating how all those curves run and coincide.
But that’s also with all of your ship models.
Everything is still going well after about 10 hours of tinkering. On to the rear part and joining both parts.
Regards, Peter
Last edited:
I couldn't express it better than Paul and Grant. Spot on!
Pete
Double ditto…… and also what everyone else is saying, it’s an incredible build. I am in awe of how you are doing all this Peter.
Thanks for the compliments, Roger.Double ditto…… and also what everyone else is saying, it’s an incredible build.
Sometimes I even don't know where to start with a new part......I am in awe of how you are doing all this Peter.
Regards, Peter
Looking at all the ways you clamp and support the members prior to glue down, the tension-free requirement must be tough to meet. Do you foresee the deck planking imposing any unwanted stresses that might want to warp the sheer of the deck?Everything also has to be tension-free,
- Joined
- Aug 8, 2019
- Messages
- 5,579
- Points
- 738

Love your curves, and that about the curves and the bow. So true, it is a difficult part. Something I keep running in again.The sheer and the curve of the bow. It remains fascinating how all those curves run and coincide.
But that’s also with all of your ship models.
Hallo Peter. I may not comment much, but believe me, with every update I am amazed at what you show us here.
Thanks for thinking with me, Daniel.Looking at all the ways you clamp and support the members prior to glue down, the tension-free requirement must be tough to meet. Do you foresee the deck planking imposing any unwanted stresses that might want to warp the sheer of the deck?
The deck planks will be pre curved in the shape of the sheer. That will be another challenge.
Regards, Peter
Last edited:
Thanks, Stephan. It’s constantly looking from all directions that the flow of the curves is right.Love your curves, and that about the curves and the bow. So true, it is a difficult part. Something I keep running in again.
Regards, Peter
Thanks, Herman. That is mutual towards your beautiful build.Hallo Peter. I may not comment much, but believe me, with every update I am amazed at what you show us here.
Regards, Peter


