Maybe so Peter however you certainly know where to finish..Sometimes I even don't know where to start with a new part......
-

Win a Free Custom Engraved Brass Coin!!!
As a way to introduce our brass coins to the community, we will raffle off a free coin during the month of August. Follow link ABOVE for instructions for entering.
-

PRE-ORDER SHIPS IN SCALE TODAY!
The beloved Ships in Scale Magazine is back and charting a new course for 2026!
Discover new skills, new techniques, and new inspirations in every issue.
NOTE THAT OUR FIRST ISSUE WILL BE JAN/FEB 2026
You are using an out of date browser. It may not display this or other websites correctly.
You should upgrade or use an alternative browser.
You should upgrade or use an alternative browser.
BALDER, Vlaardingen Herring Lugger from 1912, scratch build scale 1:50 Plate-On-Frame
- Thread starter Peter Voogt
- Start date
- Watchers 65
- Joined
- Oct 28, 2018
- Messages
- 760
- Points
- 403

Always nice to see your progress Peter
Regards
Henk
Regards
Henk
Thanks, HenkAlways nice to see your progress Peter
Regards
Henk
Regards, Peter
On the paper linedrawing template the handrail was aligned in its entirety:

And given a heat memory treatment with the hair dryer.
After aligning all 17 supports on the entire handrail, everything was loosened again and sprayed.
Then put everything back in position. When everything was in place, support by support was fixed with each one checking all remaining supports again. Finally this result:

It looks like a railing, but ......... look back at the previous photos of the bulwark.
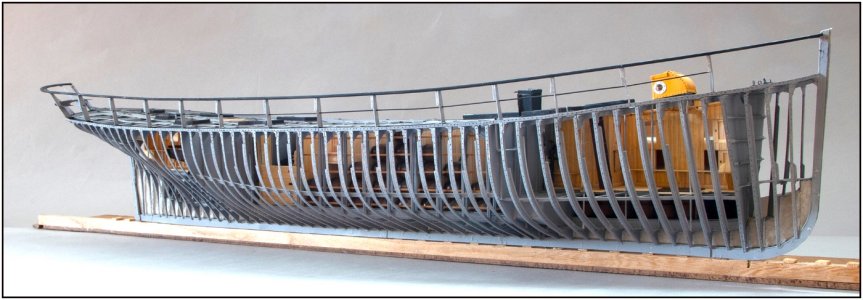
In my opinion beautiful flowing lines:

And the 37 gram starboard part is now temporarily attached to the port part by the mini magnets. The part retains its own half plank but this is a nice bonus.
Also the beautiful lines diagonally from behind:

With the intermediate floor in the rear.
From this angle:

A single intermediate bar still needs a little tap.
A chapter closed that I was quite dreading and that also required a lot of patience and perseverance.
Regards, Peter

And given a heat memory treatment with the hair dryer.
After aligning all 17 supports on the entire handrail, everything was loosened again and sprayed.
Then put everything back in position. When everything was in place, support by support was fixed with each one checking all remaining supports again. Finally this result:

It looks like a railing, but ......... look back at the previous photos of the bulwark.
In my opinion beautiful flowing lines:

And the 37 gram starboard part is now temporarily attached to the port part by the mini magnets. The part retains its own half plank but this is a nice bonus.
Also the beautiful lines diagonally from behind:

With the intermediate floor in the rear.
From this angle:

A single intermediate bar still needs a little tap.
A chapter closed that I was quite dreading and that also required a lot of patience and perseverance.
Regards, Peter
Last edited:
- Joined
- Jun 17, 2021
- Messages
- 3,202
- Points
- 588

What a lovely, graceful overall composition of the aggregate of disparate little complex parts. An absolutely stunning technical and artistic achievement 


I consider myself privileged to have been along for the ride!
Pete


I consider myself privileged to have been along for the ride!
Pete
As they say it looks smooth as a baby's bottom. That rail belongs on that ship!
Just marvelous in every way, Peter. Congratulations!
Beautiful execution Peter! All the flowing lines, on the railing and the frame, reveal what a beautiful ship it is. Its like a 3d mesh. 
You made me blush, Pete. Very nice words and compliments. I am privileged with a lot of visits, comments and compliments.What a lovely, graceful overall composition of the aggregate of disparate little complex parts. An absolutely stunning technical and artistic achievement
I consider myself privileged to have been along for the ride!
Pete
Regards, Peter
Fascinating indeed, Stephan. When the model is in front of the camera I always see beautiful line combinations. Had to be selective with placing photos.I always keep looking to these lines. Fascinating build.
Regards, Peter
Thanks, Daniel. As mentioned before, in Dutch this type of schip has a ‘geveegde kont’: ‘a swept ass’. It’s the shape of the double curved aft. No idea what the correct English name is ……As they say it looks smooth as a baby's bottom. That rail belongs on that ship!
Regards, Peter
Last edited:
Thanks, Paul. I am very pleased with the results till now. I always hoped for it, but it has to come true.Just marvelous in every way, Peter. Congratulations!
Regards, Peter.
Thanks, Dean. It’s indeed the combination of lines that make her beautiful.Beautiful execution Peter! All the flowing lines, on the railing and the frame, reveal what a beautiful ship it is. Its like a 3d mesh.
Regards, Peter
A double curved aft in English is a “butt”!Thanks, Daniel. As mentioned before, in Dutch this type of schip has a ‘geveegde kont’: ‘a swept ass’. It’s the shape of the double curved aft. No idea what the correct English name is ……
Regards, Peter

And all beautiful women have a nice one!
Sounds logical and more sophisticated …..A double curved aft in English is a “butt”!
Then ‘she’ has one ……And all beautiful women have a nice one!
Regards, Peter
Good morning Peter. I’m a little late here and everything has been said- it is marvellous!! I love the way you present your photos. Do you edit the photo onto a background or is it taken in a “booth” environment. Which ever way it works a treat. Cheers Grant
Thanks, Grant.Good morning Peter. I’m a little late here and everything has been said- it is marvellous!! I love the way you present your photos. Do you edit the photo onto a background or is it taken in a “booth” environment. Which ever way it works a treat. Cheers Grant
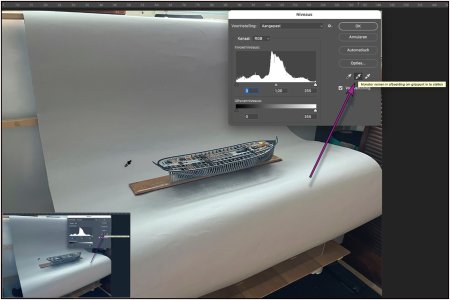
I made myself this -> Phototable <- and very soon I hung a piece of grey studio paper over it. The table is quite a hindrance and now use the grey paper in a creative way:

This paper has an '18% grey value' which is a standard in photography. Many exposure meters are calibrated to this value. With the blinds for the windows behind and next to the setup I can regulate the light.
In Photoshop I use the 'Adjustment' 'Levels' (shortly: Ctrl+L) and I get a frame with the histogram and 3 pipettes. I then use the middle one to select my grey point. That must be in the same exposure area as your object. So here approximately behind the aft. Further colour correction is then almost unnecessary. After that I use the histogram to adjust the brightness. In the example above it's still a bit to dark.
If I use the 'grey-pipet' on the vertically hanging piece of paper under the model, I would get a deviation because the wooden cabinet reflects its colour there. In the frame on the bottom left you can see what happens. But now it starts a bit technical ............
For sure other programs can also check the grey-balance.
Regards, Peter
Last edited:
- Joined
- Dec 9, 2019
- Messages
- 966
- Points
- 403

WitajNa papierowym szablonie do rysowania linii poręcz została wyrównana w całości:
View attachment 507197
I poddano je zabiegowi pamięci cieplnej za pomocą suszarki do włosów.
Po ustawieniu wszystkich 17 podpór na całej poręczy, wszystko zostało ponownie poluzowane i spryskane.
Następnie odłóż wszystko z powrotem na miejsce. Gdy wszystko było na swoim miejscu, podpora po podporze została naprawiona, przy czym każda z nich ponownie sprawdziła wszystkie pozostałe podpory. Na koniec taki wynik:
View attachment 507198
Wygląda jak barierka, ale... spójrz na poprzednie zdjęcia wału przeciwpowodziowego.
Moim zdaniem piękne, płynne linie:
View attachment 507199
A 37-gramowa prawa część jest teraz tymczasowo przymocowana do lewej części za pomocą magnesów. Część zachowuje swoją własną pół-deskę, ale to miły bonus.
Również piękne linie po skosie od tyłu:
View attachment 507200
Z podłogą pośrednią z tyłu.
Z tego kąta:
View attachment 507201
Pojedynczy takt pośredni nadal wymaga lekkiego puknięcia.
Zamknąłem rozdział, którego bardzo się obawiałem i który wymagał ode mnie mnóstwa cierpliwości i wytrwałości.
Pozdrawiam, Piotr
Pięknie to wszystko wygląda Piotrze, podziwiam . Pozdrawiam Mirek
Thanks for the compliments, Mirek.Hello
It all looks beautiful Piotr, I admire it. Greetings Mirek
Regards, Peter

