- Joined
- Oct 23, 2018
- Messages
- 880
- Points
- 403

It's always a pleasure to see your updates Peter. It's fantastic to see, what you do with styrene.
 |
As a way to introduce our brass coins to the community, we will raffle off a free coin during the month of August. Follow link ABOVE for instructions for entering. |
 |
 |
The beloved Ships in Scale Magazine is back and charting a new course for 2026! Discover new skills, new techniques, and new inspirations in every issue. NOTE THAT OUR FIRST ISSUE WILL BE JAN/FEB 2026 |
 |


Thanks, Christian. It’s a nice material to work with. And can be combined well with wood.It's always a pleasure to see your updates Peter. It's fantastic to see, what you do with styrene.
You have a good point, Russ. I've been thinking about it too. If the ship is pitching through the waves, there's bound to be spray on the deck. Parts could then wash away. I'll think about a rack or something like that.When you were working on the forecastle access Peter, I was going to ask if there was a designated stowage area for the removable door panels. I see now from your last post that they are just wedged in between the schijnlicht and the vent. I find it interesting that there aren't, for example, brackets along side the access house to secure them while not in place.
Thanks for the compliments.I continue to marvel at your workmanship Peter. Well done!
Great work as always! Looking forward to more!The closure of the 4th opening, seen from the bow:
View attachment 548233
In the old drawings, this is called a 'lantern'. This is in contrast to the hood above the forecastle. That's called a 'schijnlicht'. I think it's called a 'sky vent' in English. It's the vent above the oven in the galley.
I cut both hinge parts from 0.15 mm Evergreen sheet:
View attachment 548234
And folded both parts around a piece of 0.5 mm spring wire. Then joined them together so they could still hinge. Next time I'll use the macro-lens .......
Then the following steps:
View attachment 548235
- glued the hinges to the hatch;
- folded them around the edge;
- secured the hatch on the right place on the hood;
- glued them to the hood and tested the hinges.
It still works and fits around the raised edge on the deck.
Fitted with rivets:
View attachment 548236
It's made of sheet metal, of course.......
Then off to the paint shop:
View attachment 548237
Both round frames with window panes installed.
View attachment 548238
And joined to the others.
PS: Painted the three bulkheads of the access to the forecastle white....
Regards, Peter
Thanks, Dean. Once again, all hands were on deck to recreate those old-fashioned iron hinges. I had to fold them with my smallest tweezers and the tip of my scalpel blade. And adding glue with the point of a needle. Again ……. On the limit. ……Beautiful work Peter. Your scaled hinges are great. I know how hard it is to work with tiny pieces, and what you have achieved is far more difficult than it looks.
I enjoy watching it come together.
Thanks, Sergey. For sure …… there is coming more …..Great work as always! Looking forward to more!
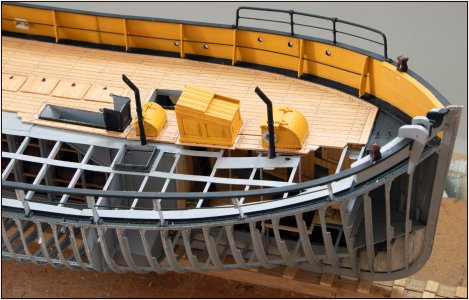
Nice solution, looks better indeed.
Much better solution with the extra strips of deck.
I saw that correction coming. Well done, Peter!
Thanks, Stephan&Maarten&Paul&Dean&those sho gave it a ‘like’. It’s all in de details, in your mind as well as on the model.Looks much nicer! Good solution.
Good afternoon Peter. This is the best solution by far…..it looks great and all fits nicely into place. Cheers GrantSo I made a piece of deck:

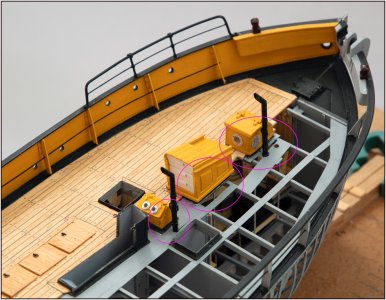
This is a smart solution and makes the deck and its deck houses and hatches visually very appealing.I wasn't satisfied with how the three covers had there 'fit' on the starboard deck:
View attachment 548480
I'd glued some small planks onto the forward one, but that's just sloppy. The other two float above the plating.
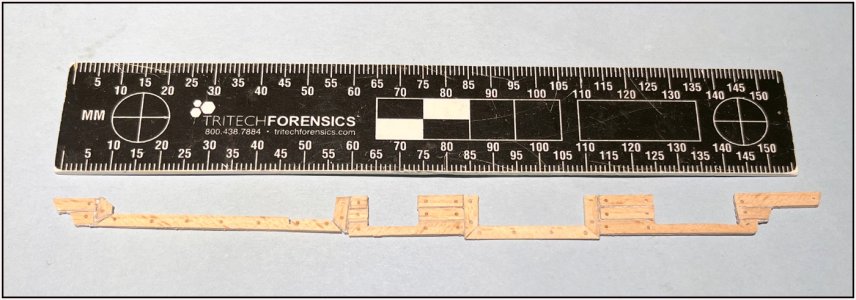
So I made a piece of deck:
View attachment 548481
Following the pattern of the port section. It's quite delicate... so be careful.
Always check on the starboard section:
View attachment 548482
It all fits just past both funnels.
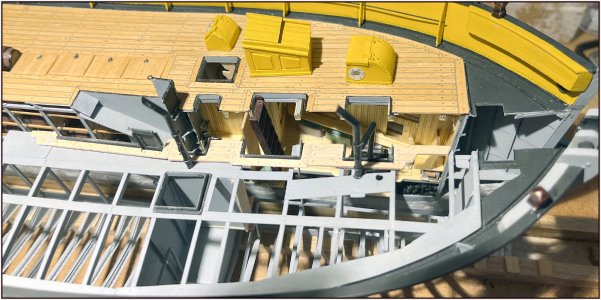
In place:
View attachment 548483
Also coated with the layers of linseed oil. A cover will also be placed on the long opening of the mast 'kossing'. This will be included along with the deck parts.
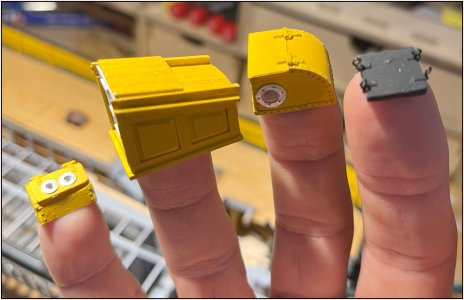
In Amsterdam, there was also amazement at the size of everything.
View attachment 548484
Unless someone says I have very large fingers .......... Not completely happy with the painting of the last one. But in 'normal view' on the deck .....
Regards, Peter
Thanks, Grant. Still some minor adjustments …….Good afternoon Peter. This is the best solution by far…..it looks great and all fits nicely into place. Cheers Grant
Thanks, Johan. The 3 covers has now also the function to clamp both parts together. And with some friction they can also stay on deck on only the port side. I’ll show that later.This is a smart solution and makes the deck and its deck houses and hatches visually very appealing.
The only drawback I see is that the deck furnishings cannot be permanently installed, but hey, een kniesoor die daar op let. (Translated: "A brooder who pays attention to that".)
I wouldn't say "large fingers", instead I would use "small scale", but than again, some people built in 1:200.
At least this scale gives the option for some nice detailing, an option you make full use of.
