Basic Elements of Rigging

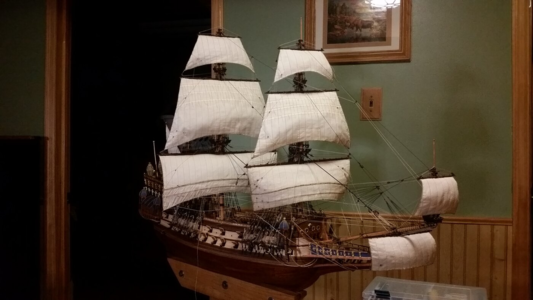
Doing a Billings Cutty Sark that I purchased in London in 1972 while on our honeymoon.

I have discarded the factory rigging sheets as they were almost worthless. Got the plans from the museum and blew them up on an engineering copier at my former place of toil. My go to is "Masting and Rigging the Clipper Ship and Ocean Carrier" by Harold Underhill. I think I got it through Alibris.com, which is a consortium of used book sellers. Gets into more detail than I need, but well worth it.

By the time of construction of the Cutty Sark, wire rope/cable had all but replaced tarred hemp for standing riggind. I used black rope on all my standing rigging, as this is the color of wire. Coincidence that it is the same color as tarred hemp? Due to its increased strength, the standing rigging is smaller than older ships, which I think most people on this site build.

My two cents.
Jim Regan
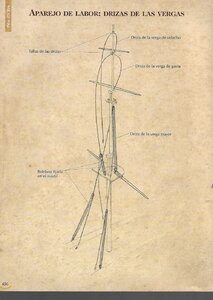
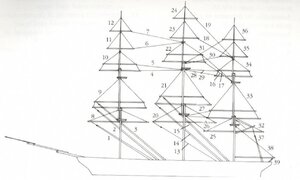
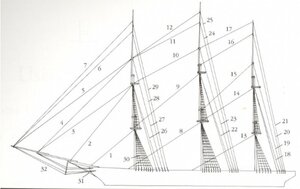
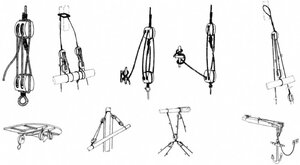
I have been building Warship from Victoria over the most well known Spanish Ship from the Trafalgar Battle and Norske Love- Billing Boats. then both Cutty Sark and Thermopylae too. I have more than 500 images of both standing and running rigging, types of blocks, etc.. below a few examples129-JARCIA DE LABOR DRIZAS DE VERGAS.jpgrig 8.jpg139 JARCIA DE LABOR- DRIZAS DE LAS VERGAS).jpg
 
As all of the other SoS modelers have said above this reply, your work and pdf will go into my "How To" book as an clearly and well written tutorial. PT-2
 
This is a slightly (but important) revised version of the PDF "The Basic Elements of Rigging" attached. The main principle discussed or mentioned is the correct order of which you install your Stays and Preventer Stays.
 

Attachments

  • Rigging Basics.pdf
    46.6 KB · Views: 159
This is a slightly (but important) revised version of the PDF "The Basic Elements of Rigging" attached. The main principle discussed or mentioned is the correct order of which you install your Stays and Preventer Stays.
Excellent work!
 
This is a BASIC diagram of a Yard with Sails layout.

Hello John,
that is correct. I do not remember mentioning the installation order. My intent was just a 'basic' summary of the difference between standing, running and sail management. According to Wolfram Zu Monfeld, yes, he does show that the Shrouds are all installed first, then the stays are looped over the entire shroud pairs. This is where the "Tensioning" of the stays come into play by pulling any slack out of the Shrouds, especially if the Mast is being pulled back too much. But if the Mast is being pulled back to much, then the Shroud pairs are probably too tight anyways.
Thank you for your input. And BTW - there is so much more to rigging. Many more terms and applications than what is mentioned in my short article. There are MANY things to remember when rigging the first parts of a shi

I thought I would post my viewpoint on "The Basic Elements of Rigging" and in hopes, it might bring some help to those new to this.

All warships will have basically the same rigging "Pattern". The easiest as has been mentioned is to work in an orderly fashion and I would go as far as saying that it is really a necessity to work in an order to avoid being trapped in a situation that you can not reach or get to a particular section.

A quick word about your Mast and building it and how it relates to rigging.
Before diving into this article, I want to mention that carefully consider how you build your mast. My suggestion is to build your mast UP TO the FIRST tops and DO NOT add anymore upper mast sections until you complete all the LOWER shrouds for all the mast. It is much easier if you do not have the UPPER mast section installed and interfering. IF you do build your entire mast, then you will be faced with threading your Shroud pairs inbetween the "Main Top Mast Bottom" and the "Head of the Main Mast" trying to feed in also down into the Trestletrees. If the upper Mast tops were not installed yet, then you have the freedom of just looping your shroud around the "Head of the Main Mast" (stump) without any other interference.

Below is, in my opinion, is a good order of things with the first item mentioned would be the FIRST thing to rig up:
EDIT: Shrouds are all installed first, then the stays are looped over the entire shroud pairs. Please see the following thread/post as more correct info has been posted about this subject.

STANDING RIGGING (Stationary)

  • All Shrouds. All Shrouds support the mast as of Port to Starboard (or side to side support). All Shrouds will attach to the Deadeyes which have their own rigging. The Shrouds also have Ratlines that run horizontally. ALL mast will have Shrouds. Shrouds are all installed first, then the stays are looped over the entire shroud pairs.
  • Usually, depending on the size of the ship, the first, leading, or fore-shroud will be "served" (the line is wrapped) all the way from dead-eye up to trees. This keeps the sails that sometimes touch the fore shroud from fraying.
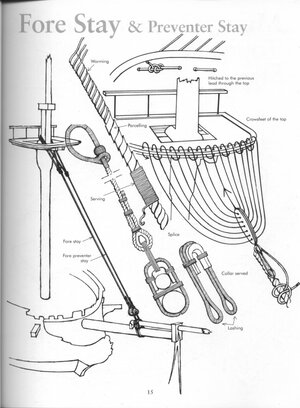
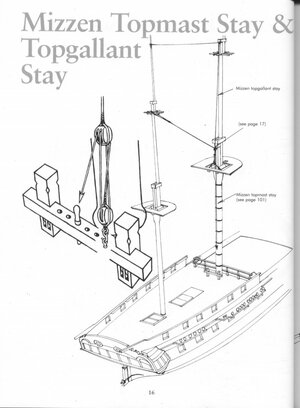
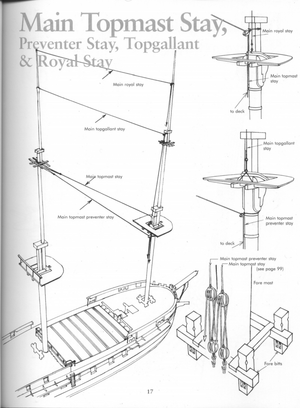
  • All Stays. All Stays support the mast running in the CENTER of the ship from Fore to Aft. For instance, a "Stay" will run from the very top foremast down to the bowsprit tip. Then with that in mind, you will also have another stay on the foremast located about halfway down that will run down to the bowsprit. This "pattern" is repeated with the Main Mast. An example, the top of the Main Mast will have a line that will run from the TOP of the Main Mast to the BASE of the foremast. And again, take the Mizzen Mast. From the TOP of the Mizzen Mast, a line to the BASE of the Mainmast. What I mention here is an example or typical. It is possible to have several STAYS but they all run center-line fore to aft. It is also possible to have some stays that attach to the mast and will run to each side of the ship to offer even more support. They are all STATIONARY. the stays are looped over the entire shroud pairs.
  • Stays for the "Flying Jibs and Staysails". This portion of rigging could be allocated in either section, but I chose to include it here because according to some research I did, the Flying Jibs and Staysails need to have a STATIONARY line of which the sail is "supported by". For a Staysail that is mounted between the foremast and mainmast, there would be for instance one line that would run from the BASE of the aft foremast up to the end of the staysail, then run the length of the staysail, using a pulley and then terminating at the "fore" BASE of the Main Mast. Where the line travels from mast to mast at the top is where the staysail will be "attached" with loops or rings. Then each staysail will have its own line to tie off (running part)

RUNNING RIGGING (lines that move or make adjustments to sails or yards)
  • Yard Lifts. All yards must be lifted up and down. Most yard lifts are basically rigged the same. Each end of the yard has lines that travel up to the mast with a pulley of some sort and that line eventually makes it way (usually) to the BASE of its Mast.
  • Yard Braces. Yard braces have lines that attach to each end of the Yard. The Yard must be able to swing from side to side to allow the wind to capture which makes the ship go forth. Yard braces also will have pulleys that the line eventually ends at a "BELAYING PIN RAIL" This applies to every yard must have braces.
  • Sail Management. ALL sails must be managed. Lifted up and down and managed the tightness, etc. You will have Sheets, Leech lines, Bunt lines, Clew lines, etc, ALL of which MUST be used and eventually terminate at the BELAYING PIN RAILS. It should be noted here that there is an order for tieing off the belaying pins. The LOWEST sail management will tie off at the LEADING pin whilst the TOP most sail management will tie off at the most TRAILING pin.
All of which is simply repeated over and over again for each Yard, each Mast, and each sail. It will become obvious that at some point, you will see that just doing one mast - yard - sail situation that all of them are rigged the SAME. Nothing is different basically. Everything is GROUPED. The PIN RAILS will be grouped for EVERYTHING that has to do with that one mast and yard set. You will have the first group of Pin Rails for the running rigging of the Foremast. Then you will have a second group of Pin Rails for the running rigging of the Main Mast, and lastly another group of Pin Rails for all the running rigging for the Mizzen mast. remember that most of the time, the yard lifts most likely will have a PIN RAIL or BITTS at the BASE of each Mast that handles the Yard up and down motion.

At this time we can discuss Sails, no Sails, or Furled Sails:
This topic always stirs up some facts, fiction or otherwise. So, I admit that I have a limited understanding of this matter too, but I am willing to give it a go, and again this is my personal viewpoint that I use on my ships.
  • Sails: Rigging with sails. This is simple. Apply all the fore mentioned elements as all aspects of blocks and tackle to manage the sails will apply here.
  • Furled Sails: These are sails that are partially lifted position. Either the ship is at sea and does not need this particular sail, or all the sails are in a furled position. The main point is that you will again fulfill ALL aspects as all the sails installed - even if the furled sails are neatly tucked all the way to the yardarm. The point is that you allow the impression that the sails could still be let down and used again if the ship needs some other maneuvering.
  • No Sails installed - but stowed away: This is the tricky one. Remember that ALL standing rigging is still there. The question to ask is if all the sails are taken down, then you know that the CLEW Blocks and LEECH blocks if there are any, will REMAIN on the sail itself. The other question that remains is what to do about SHEET lines, LEECH lines, and BUNT lines and the associated Blocks. The question arises is this: Do these lines stay installed on the yardarms? My answer would depend on how long the sails would be stowed and for what purpose. For temporary maintenance for a few months at the dry dock, then the Captain might order that all the sail management lines stay affixed on yardarms and those lines brought down to the belaying pins as well. I would assume that if the sails were to be taken down for a very long period of time, perhaps the Captain might order that all sails management lines and blocks be completely removed. I think this part would be under the decision of the modeler as there would not be any fast rule. This would, of course, include even the ropes fixed on the yards that help hold the sails in place as well. I think this latter part should be a decision that the modeler would take. The last ship that I built, the Panart San Felipe, I built it with no sails as if the sails were stowed away. Therefore, there was no rigging on the ship for Leech, Bunts, sheets, clews lines. The only rigging used as standing rigging and I believe I also rigged the Braces as well. The Braces are what steers the yards to capture the wind. When a ship is at sail, most of the time, the yardarms are NOT going to be at 90 degrees of the Mast, but rather offset may be up to 30 degrees and it is the braces that perform this. The Braces are not part of the sail management but are kind of in a category of there own.
In conclusion, I hope that you find this basic course helpful as you make your decisions on how to rig your ship.

John (Neptune) adds to the discussion and he is correct: The shrouds usually go on first with the stays over the top of them. Thank you @neptune

Kindly,
Donald B. Driskell
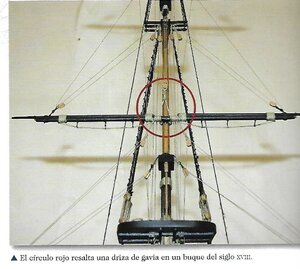
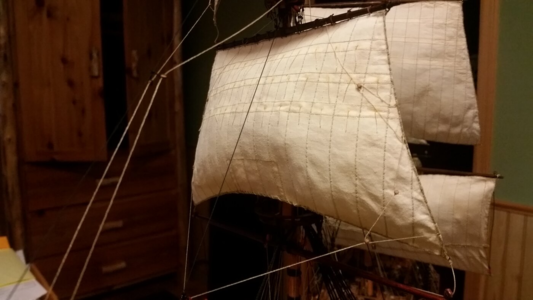
Awesome information! I should have read through this before starting. One question I have is do you have a way to make the sails look like they are being blown by the wind rather than just flat? I hope I am making sense.
 
Shrouds or stays first? Answer: Temporary stays. In order to keep masts aligned fore-aft, tie some temporary stays to the hull. They don't have to be pretty. They just have to work. Remove them later. Rigging the shrouds in pairs already keeps the transverse alignment of the masts. When rigging sails on yards, with yards at at strong angle, I also used temporary brace lines to hold the yards in position so the that the sheets, clew lines, lifts, and other lines are rigged at the proper tension.
 
Awesome information! I should have read through this before starting. One question I have is do you have a way to make the sails look like they are being blown by the wind rather than just flat? I hope I am making sense.
Like you, I never liked the look of flat sails hanging listlessly on the yardarms. Take a look at my build log for the French man of war La Couronne on how to make billowing sails appear wind filled. Starting here, the sails were stretched:

Sail Cloth Stretching

Once the sails are stiffened, you have to keep the bottom of the sail from touching the mast or top to make the wind blown effect. That's where the bowlines come in. Many simpler models leave the bowlines out, but they pull the sail forward and keep the sheet lines at the bottom corners of the sail taut. Dig through my build log pages and learn what fabric to use, and how the sails are sewn and stretched. This sail making method comes from Olha Batchvarov, a master ship model builder from Russia. Her work is incredible.

1604763388224.png


Almost done...
1604764121122.png
 
Donnie wrote, "Grey threads are usually used to model steel cable."

There is a book entitled "Pamir (A Voyage to Rio in a Four-Masted Barque)" by Hilary Tunstall-Behrens that makes a reference to coating steel rope with white lead.
 
I thought I would post my viewpoint on "The Basic Elements of Rigging" and in hopes, it might bring some help to those new to this.

All warships will have basically the same rigging "Pattern". The easiest as has been mentioned is to work in an orderly fashion and I would go as far as saying that it is really a necessity to work in an order to avoid being trapped in a situation that you can not reach or get to a particular section.

A quick word about your Mast and building it and how it relates to rigging.
Before diving into this article, I want to mention that carefully consider how you build your mast. My suggestion is to build your mast UP TO the FIRST tops and DO NOT add anymore upper mast sections until you complete all the LOWER shrouds for all the mast. It is much easier if you do not have the UPPER mast section installed and interfering. IF you do build your entire mast, then you will be faced with threading your Shroud pairs inbetween the "Main Top Mast Bottom" and the "Head of the Main Mast" trying to feed in also down into the Trestletrees. If the upper Mast tops were not installed yet, then you have the freedom of just looping your shroud around the "Head of the Main Mast" (stump) without any other interference.

Below is, in my opinion, is a good order of things with the first item mentioned would be the FIRST thing to rig up:
EDIT: Shrouds are all installed first, then the stays are looped over the entire shroud pairs. Please see the following thread/post as more correct info has been posted about this subject.

STANDING RIGGING (Stationary)

  • All Shrouds. All Shrouds support the mast as of Port to Starboard (or side to side support). All Shrouds will attach to the Deadeyes which have their own rigging. The Shrouds also have Ratlines that run horizontally. ALL mast will have Shrouds. Shrouds are all installed first, then the stays are looped over the entire shroud pairs.
  • Usually, depending on the size of the ship, the first, leading, or fore-shroud will be "served" (the line is wrapped) all the way from dead-eye up to trees. This keeps the sails that sometimes touch the fore shroud from fraying.
  • All Stays. All Stays support the mast running in the CENTER of the ship from Fore to Aft. For instance, a "Stay" will run from the very top foremast down to the bowsprit tip. Then with that in mind, you will also have another stay on the foremast located about halfway down that will run down to the bowsprit. This "pattern" is repeated with the Main Mast. An example, the top of the Main Mast will have a line that will run from the TOP of the Main Mast to the BASE of the foremast. And again, take the Mizzen Mast. From the TOP of the Mizzen Mast, a line to the BASE of the Mainmast. What I mention here is an example or typical. It is possible to have several STAYS but they all run center-line fore to aft. It is also possible to have some stays that attach to the mast and will run to each side of the ship to offer even more support. They are all STATIONARY. the stays are looped over the entire shroud pairs.
  • Stays for the "Flying Jibs and Staysails". This portion of rigging could be allocated in either section, but I chose to include it here because according to some research I did, the Flying Jibs and Staysails need to have a STATIONARY line of which the sail is "supported by". For a Staysail that is mounted between the foremast and mainmast, there would be for instance one line that would run from the BASE of the aft foremast up to the end of the staysail, then run the length of the staysail, using a pulley and then terminating at the "fore" BASE of the Main Mast. Where the line travels from mast to mast at the top is where the staysail will be "attached" with loops or rings. Then each staysail will have its own line to tie off (running part)

RUNNING RIGGING (lines that move or make adjustments to sails or yards)
  • Yard Lifts. All yards must be lifted up and down. Most yard lifts are basically rigged the same. Each end of the yard has lines that travel up to the mast with a pulley of some sort and that line eventually makes it way (usually) to the BASE of its Mast.
  • Yard Braces. Yard braces have lines that attach to each end of the Yard. The Yard must be able to swing from side to side to allow the wind to capture which makes the ship go forth. Yard braces also will have pulleys that the line eventually ends at a "BELAYING PIN RAIL" This applies to every yard must have braces.
  • Sail Management. ALL sails must be managed. Lifted up and down and managed the tightness, etc. You will have Sheets, Leech lines, Bunt lines, Clew lines, etc, ALL of which MUST be used and eventually terminate at the BELAYING PIN RAILS. It should be noted here that there is an order for tieing off the belaying pins. The LOWEST sail management will tie off at the LEADING pin whilst the TOP most sail management will tie off at the most TRAILING pin.
All of which is simply repeated over and over again for each Yard, each Mast, and each sail. It will become obvious that at some point, you will see that just doing one mast - yard - sail situation that all of them are rigged the SAME. Nothing is different basically. Everything is GROUPED. The PIN RAILS will be grouped for EVERYTHING that has to do with that one mast and yard set. You will have the first group of Pin Rails for the running rigging of the Foremast. Then you will have a second group of Pin Rails for the running rigging of the Main Mast, and lastly another group of Pin Rails for all the running rigging for the Mizzen mast. remember that most of the time, the yard lifts most likely will have a PIN RAIL or BITTS at the BASE of each Mast that handles the Yard up and down motion.

At this time we can discuss Sails, no Sails, or Furled Sails:
This topic always stirs up some facts, fiction or otherwise. So, I admit that I have a limited understanding of this matter too, but I am willing to give it a go, and again this is my personal viewpoint that I use on my ships.
  • Sails: Rigging with sails. This is simple. Apply all the fore mentioned elements as all aspects of blocks and tackle to manage the sails will apply here.
  • Furled Sails: These are sails that are partially lifted position. Either the ship is at sea and does not need this particular sail, or all the sails are in a furled position. The main point is that you will again fulfill ALL aspects as all the sails installed - even if the furled sails are neatly tucked all the way to the yardarm. The point is that you allow the impression that the sails could still be let down and used again if the ship needs some other maneuvering.
  • No Sails installed - but stowed away: This is the tricky one. Remember that ALL standing rigging is still there. The question to ask is if all the sails are taken down, then you know that the CLEW Blocks and LEECH blocks if there are any, will REMAIN on the sail itself. The other question that remains is what to do about SHEET lines, LEECH lines, and BUNT lines and the associated Blocks. The question arises is this: Do these lines stay installed on the yardarms? My answer would depend on how long the sails would be stowed and for what purpose. For temporary maintenance for a few months at the dry dock, then the Captain might order that all the sail management lines stay affixed on yardarms and those lines brought down to the belaying pins as well. I would assume that if the sails were to be taken down for a very long period of time, perhaps the Captain might order that all sails management lines and blocks be completely removed. I think this part would be under the decision of the modeler as there would not be any fast rule. This would, of course, include even the ropes fixed on the yards that help hold the sails in place as well. I think this latter part should be a decision that the modeler would take. The last ship that I built, the Panart San Felipe, I built it with no sails as if the sails were stowed away. Therefore, there was no rigging on the ship for Leech, Bunts, sheets, clews lines. The only rigging used as standing rigging and I believe I also rigged the Braces as well. The Braces are what steers the yards to capture the wind. When a ship is at sail, most of the time, the yardarms are NOT going to be at 90 degrees of the Mast, but rather offset may be up to 30 degrees and it is the braces that perform this. The Braces are not part of the sail management but are kind of in a category of there own.
In conclusion, I hope that you find this basic course helpful as you make your decisions on how to rig your ship.

John (Neptune) adds to the discussion and he is correct: The shrouds usually go on first with the stays over the top of them. Thank you @neptune

Kindly,
Donald B. Driskell
this was very helpful , thanks !!
 
Maybe I can add more detailed info like some diagrams.
HI Donni, I have just seen your messages.
I was yesterday working on the same subject. I divided the Riggen into 3 parts:
1: STANDING RIGGEN
2: RUNNING RIGGEN MAST AND YARDS
3: RUINING RIGGEN MAINTAINING THE SAILS.
There is not a big difference between your and main, except I have more than 100 Riggen images- very detailed, and all with Uk text- but after seeing your comments and others, I am in doubt. I have attached a few. S part from i have many images of different Rggen blocks, seizing, splicing
Please let me know- el cape

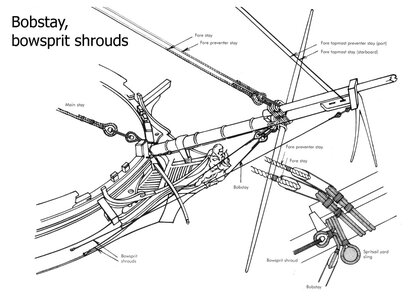
1BOWSPRIT_BOBSTAY, BOWSPRIT SHROUDS.jpg

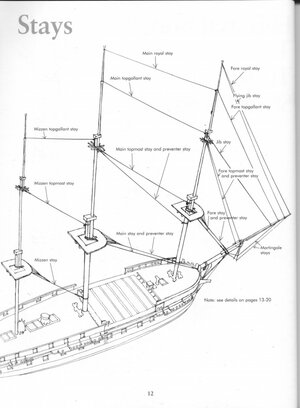
12_STAYS.jpg

15_2FORE MAST_ FORE STAY & PREVENTER STAY.jpg

16_4MIZZEN_MIZZEN TOPMAST STAY, TOPGALLANT STAY (3).jpg

17_3MAIN MAST_MAIN TOPMAST STAY,.jpg
 
HI Donni, I have just seen your messages.
I was yesterday working on the same subject. I divided the Riggen into 3 parts:
1: STANDING RIGGEN
2: RUNNING RIGGEN MAST AND YARDS
3: RUINING RIGGEN MAINTAINING THE SAILS.
There is not a big difference between your and main, except I have more than 100 Riggen images- very detailed, and all with Uk text- but after seeing your comments and others, I am in doubt. I have attached a few. S part from i have many images of different Rggen blocks, seizing, splicing
Please let me know- el cape

View attachment 345641

View attachment 345642

View attachment 345643

View attachment 345644

View attachment 345645
nice to hear from you again NORWAY-
 
This is a BASIC diagram of a Yard with Sails layout.

This diagram clearly shows the Bunt lines going from a block at the mast in the front of the sail, (through a cringle at the bottom of the sail) and back up the back of the sail to the mast. Yet other diagrams and descriptions state they just go from the block to the bottom of the sail. Were both used? Which is correct?
 
This diagram clearly shows the Bunt lines going from a block at the mast in the front of the sail, (through a cringle at the bottom of the sail) and back up the back of the sail to the mast. Yet other diagrams and descriptions state they just go from the block to the bottom of the sail. Were both used? Which is correct?
the first one. see my drawing further up. a typical English Riggen
1695135785921.png
 
One thing most people forget when looking at rigging diagrams or other images in a plan sheet, if often other items are not represented to help clarify the specific subject being discussed.

That is why you don't see shrouds on masts when looking for diagram of the stays in image El Capi posted above.

It is hard to say that A comes before B because B is not shown in the diagram of how to rig A.

You need good photos or diagrams showing all related rigging as they are installed, to see if the chicken or the egg came first.
 
Back
Top