Bluenose build - DaveFx35

Joined
Apr 12, 2020
Messages
62
Points
113

Location
Canton, Ga
Well I finally decided to do my first build log.
Normally I would just lurk in the background and watch the great work by others.
I've always been reluctant to expose my mistakes publicly, but since others have shown the courage to do so, here it goes.

I started putting the jig together.
I decided to mount it to a 3/4" piece of MDF board to keep it flat.

IMG-0276.jpg

Since Heinrich was working with Don on frame construction techniques, I decided to work along on frame 8.
I had to modify the process slightly. I used a glue stick to attach the pieces to the paper pattern as I was gluing it up.
I did this because I have hand tremors that make it hard to accurately place the parts during glue up and clamping.
I'm not recommending this for others, but it's necessary for me.
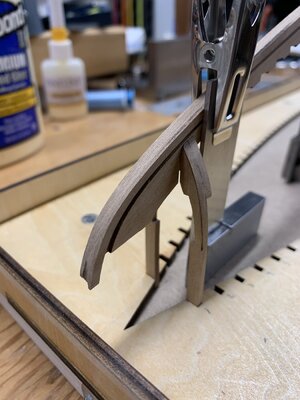
I'm using a thick piece of flat steel and magnets to use as my base.

The first picture is the front of frame 8 post glue-up after removing the clamps but before removal from the paper backing.
The second is the back of frame 8, glued and clamped.

IMG-0272.jpgIMG-0273.jpg

I'm thinking of making some registering pieces for the keel slots to use during front/back glue-up.
Will post some shots of this after I give it a try.

My initial observations:
. The frames are really small (compared to my 1/36 bomb ketch!), really challenging for shaky hands.
. The laser cut isn't a perfect 90 degrees. Will need to keep that in mind as work progresses.
. Removing laser char sucks!
Tried several things with limited success (different sanding tools, mini scrapers and Dremel wire wheels).
Way too easy to mess up the part and hard to remove entirely. Suggestions are welcomed!
I found a thread by Dave Stevens on using a sandblasting air gun (air eraser) that looks promising (good excuse for another tool).
https://shipsofscale.com/sosforums/threads/air-brush.3806/#post-74805
I'm going to do a couple of frames at stem/mid-ship and stern before moving on to the keel assembly.

Thoughts on finishing:
I like to finish my wood to a 600 grit, polished looking but not shiny. Tested on some scrap, it will reduce frame thickness slightly.
This is a big difference from my scratch built x-section where you can finish your way down to the proper thickness from slightly over thick piece.
I know not everyone likes such a fine finish but I prefer it.
I use polymerized tung oil for for the frames below the decks and a beeswax/turpentine finish above deck.
The tung oil is slightly darker than the beeswax finish.
Will delay finishing till as late in the process as possible, usually in steps as the build progresses before an area becomes hard to access.
Wood glue won't work over the finish.

One last question. Any thoughts on whether gluing the frames to the jig is necessary and if so, when?
I saw some discussion on this in one of the other threads.
I'm sure Heinrich will address it when the time comes, but I'm curious.

Well enough babbling for now. Hope everyone has a healthy and happy new year!

Regards,
Dave
 
Hi Dave, happy to see you started a log. You have some real good ideas happening here already.
For the sanding I use a sanding stick with 120 grit, I find if I use a finer grit for the initial sanding and fairing I sometimes get a little heavy handed that causes breakage, which is not a good thing. Removing the char and shaping goes quite fast using 120 grit using a light touch. The outside and inside edges I stop with 120 grit as these edges will invariably need more fairing after being mounted in the jig, so I feel there is no need to go any further at this point. The front and back surfaces(the flat sides) I finish with 600 grit as these won't be accessible later on.
Finally, when it comes time to permanently mount the frames you are going to need to have the ability to turn the jig upside down in order to drop the frames into place. I am thinking you will have to, at some point, remove your jig from the mdf board you have it attached to.
Again , it's great to see your build log!
 
DonRobinson - thanks for the feedback.
The coarser grits do work better but I'll need to take it slowly.
As you indicated, I'll be sanding to 600 on the frame faces and maybe wax finishing at this point.
I'll have to think it through though.
I've attached the jig to the MDF with screws only to make removal easier.

Doing keel and frames simultaneously.

First gotcha - when clamping with soft tipped clamps, use a scrap piece to prevent marking the wood.
IMG-0280 - Copy.jpg

I'm looking at ways to register the front and back frame when gluing up.
I cut and fit two blocks but have not glued it yet. It seems to align pretty well.
Need to be careful not to glue the block.
Is this overkill?

IMG-0287.jpg


Heinrich, thanks once again for the support and encouragement.

Regards,
Dave
 
I'm looking at ways to register the front and back frame when gluing up.
I cut and fit two blocks but have not glued it yet. It seems to align pretty well.
Need to be careful not to glue the block.
Is this overkill?
Regards,
Dave
Hello Dave,
In my view is the fitting of the frames with the two blocks no overkill. I had the same in mind.
Special with so many (tiny) frames.
Nice work on the frames.
Regards, Peter
 
If you are afraid of glueing those little blocks, you can wrap a piece of thin paper around it, like Rizzla cigaret rolling paper. Then the paper will glue and can sand away.
Regards, Peter
Don't worry about your hand shake problem as you have a process to stabilize parts and hole them accurately. I think that my vision problem with adult macular degeneration in my former working eye, now mostly malfunctioning and distorted, leaving me with my bad left eye and no sense of depth perception at all may be a greater challenge for me. I have to extend tools and hand work out until I get a touchdown, not always where I think it will be and often misplaced laterally as well. Oh well, as I have said elsewhere, for me challenges are what take the boredom out of life as long as they are not too frequent.
Keep up your nice work and you will have a fine schooner with all of those nicely finished frames. Rich (PT-2)
 
Well I'm back to post some updates.

I've been using the registration blocks with little problem as long as you use damp q-tip or paper towel to clean it up prior to using.

Been working on frames and the keel with some success and a few setbacks.
I've got around 15 frames glued up and 5 frames filed and cleaned up.
As noted by others, the glue up is not so bad although a little time consuming.
However clean up and beveling take some time and care.
Frame 1 (despite it saying 2). Sorry for the focus issues, using an iPhone

IMG-0308.jpg
IMG-0309.jpg

Didn't quite finish the bevel above in red oval.

Doing the beveling is strangely satisfying but takes an hour or so on the steeper beveled frames.
I have an old set of needle files that are OK, but not great. They load up quickly and requires frequent use of a file cleaning card.
Will be looking at an upgrade - post 36 in https://shipsofscale.com/sosforums/threads/yuanqing-bluenose-don-robinson.6589/page-2#post-145977

I've completed glue up of main part of the keel.
Gluing and clamping was challenging to say the least. Hard to get everything aligned and clamped before the glue sets up (titebond 2)

IMG-0303.jpg

IMG-0306.jpg

The small stainless steel clamps were quite useful and cheap.

Now for the bad news.
I had some alignment issues in gluing up the the notched cheek pieces which hold the bottom of the frames..
It's not disastrous but will require clean up and somewhat embarrassing to acknowledge.
In the photo below slot 1 (green) has been partially cleaned up but 2, 3 and beyond (red) show the error.
Curiously I had no issue on the back pieces.

NScC5gm62TjM0zbJ-NP40fz1-jeDJjYjUMNJCnr-3Xb1KBiblVWhlRYn6W0p1dW1p37IbIcxeyYqvnT8vrhB4q3rZxCd5m...jpg

Here is are a few shots of frame 1 test fitted in place

IMG-0312.jpg

IMG-0315.jpg

It's been a good experience so far with lots of lessons learned.
Sometimes I get in too much of a rush or too tired and have to learn to step back and look before I leap!

Well that's it for now.

Dave
 

Attachments

  • IMG-0315.jpg
    IMG-0315.jpg
    183.5 KB · Views: 7
Well I'm back to post some updates.

I've been using the registration blocks with little problem as long as you use damp q-tip or paper towel to clean it up prior to using.

Been working on frames and the keel with some success and a few setbacks.
I've got around 15 frames glued up and 5 frames filed and cleaned up.
As noted by others, the glue up is not so bad although a little time consuming.
However clean up and beveling take some time and care.
Frame 1 (despite it saying 2). Sorry for the focus issues, using an iPhone

View attachment 204210
View attachment 204214

Didn't quite finish the bevel above in red oval.

Doing the beveling is strangely satisfying but takes an hour or so on the steeper beveled frames.
I have an old set of needle files that are OK, but not great. They load up quickly and requires frequent use of a file cleaning card.
Will be looking at an upgrade - post 36 in https://shipsofscale.com/sosforums/threads/yuanqing-bluenose-don-robinson.6589/page-2#post-145977

I've completed glue up of main part of the keel.
Gluing and clamping was challenging to say the least. Hard to get everything aligned and clamped before the glue sets up (titebond 2)

View attachment 204216

View attachment 204217

The small stainless steel clamps were quite useful and cheap.

Now for the bad news.
I had some alignment issues in gluing up the the notched cheek pieces which hold the bottom of the frames..
It's not disastrous but will require clean up and somewhat embarrassing to acknowledge.
In the photo below slot 1 (green) has been partially cleaned up but 2, 3 and beyond (red) show the error.
Curiously I had no issue on the back pieces.

View attachment 204221

Here is are a few shots of frame 1 test fitted in place

View attachment 204212

View attachment 204213

It's been a good experience so far with lots of lessons learned.
Sometimes I get in too much of a rush or too tired and have to learn to step back and look before I leap!

Well that's it for now.

Dave
After seeing the halo of metal clips I thought that with the price it would be advantageous to expand my clips inventory/array and have them now. . . possibly for something else before YQ. Thanks for the link. Rich
 
Made some more progress.
Glued up 35 frames so far.
Completed the keel and have glued 14 frames to it. Only broke 1 while inserting.
Beveling and cleaning up frames is very labor intensive.

I used scrap sanded to size to help minimize fitting issues when putting frames on the keel and for placing the keelson later'
IMG-0318.jpg

I decided to pin the transom keel pieces. It seemed like a weak spot based on other's comments.
Not correct but it's a lot more solid.
IMG-0328.jpg

Here's shots from stem and stern.
Everything is glued up except frame 32 (i didn't use frame 31 as I managed to snap off the top portion of one side of the frame - I'm concerned that it's a little weak). I'm using this to make sure the keel is centered.
It's starting to look like a ship!
IMG-0332.jpg
IMG-0331.jpg
 
Made some more progress.
Glued up 35 frames so far.
Completed the keel and have glued 14 frames to it. Only broke 1 while inserting.
Beveling and cleaning up frames is very labor intensive.

I used scrap sanded to size to help minimize fitting issues when putting frames on the keel and for placing the keelson later'
View attachment 205660

I decided to pin the transom keel pieces. It seemed like a weak spot based on other's comments.
Not correct but it's a lot more solid.
View attachment 205661

Here's shots from stem and stern.
Everything is glued up except frame 32 (i didn't use frame 31 as I managed to snap off the top portion of one side of the frame - I'm concerned that it's a little weak). I'm using this to make sure the keel is centered.
It's starting to look like a ship!
View attachment 205663
View attachment 205662
OK,I am curious what the two paddle shaped devices aft of the forward frames are. . . look like spacing and support implements on long rods supported and held by something else. I apologize for not being in the build phase here but just presently watching learning what I can and not stressing about forgetting a lot before I am actively engaged. Rich
 
Back
Top