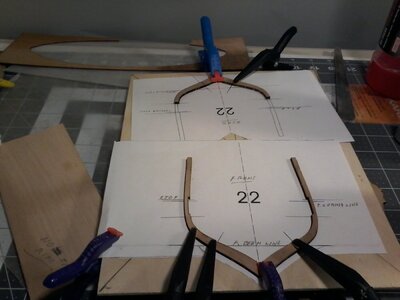
HI ALL, HAVE NOT BEEN IDEL, MODIFIED HOW DOING FRAMES TO GET MORE PRODUCTION WITHOUT SACRFICING ACCURACY THESE ARE MY FRAME BOAEDS WITH FRAME NO 22 GLUE DRYING FRAME NO 21 COMPLETE WAITING FOR GLUE TO SET END OF DAY 2 FRAMES DONE, HAVE ORDERED SOME MORE BIRCH PLY MIDWEST I CAN MAKE A LOT OF FRAME BOARDS AND WORK ON A COUPLE AS GLUE DRYS, THE ONLY DRAW BACK IS I DO NOT HAVE ENOUGH ROOM TO PUT MOR THEN 3 OR 4 AWAY TO DRY WITCH I LIKE TO WAT OVERNIGHT TO DRY BTW I AM HAVING A PROBLEM WITH GLUE HOLDING ON THE REAR FRAME JOINTS, I HAVE BEEN USING WELL BOND, NOW HAVE SWITCHED TO ELMERS CARPENTERS GLUE CLEAR DRYING, ANYONE ELSE HAVING THIS PROBLEM. GOD BLESS STAY SAFE ALL

-

SUBSCRIBE TO SHIPS IN SCALE TODAY!
The beloved Ships in Scale Magazine is back and charting a new course for 2026!
Discover new skills, new techniques, and new inspirations in every issue.
NOTE THAT OUR NEXT ISSUE WILL BE July/August 2026 -

Win a Free Custom Engraved Brass Coin!!!
As a way to introduce our brass coins to the community, we will raffle off a free coin during the month of August. Follow link ABOVE for instructions for entering.
- Home
- Forums
- Ships of Scale Group Builds and Projects
- Bluenose PoF Group Build
- Bluenose Group Build Logs
You are using an out of date browser. It may not display this or other websites correctly.
You should upgrade or use an alternative browser.
You should upgrade or use an alternative browser.
- Joined
- Jan 9, 2020
- Messages
- 10,738
- Points
- 938

Hello Don. I have not had any problems with the PVA holding on the rear joints. Maybe, using a clip with a wider head (like the blue one in your picture that provides a bigger footprint) might help. Also see if you can find that Bison D2 glue that I mentioned to @Pathfinder65 Jan. I have no experience with either Weldbond or Elmers, but I much prefer the Bison product to Titebond II or III.

This is all I use - the most incredible PVA glue imaginable!> I just have no idea whether I can export it! (By the way, it costs about 1.50 USD for this tub!)
This is all I use - the most incredible PVA glue imaginable!> I just have no idea whether I can export it! (By the way, it costs about 1.50 USD for this tub!)

I usually use SIG BOND glue. Alphitic resin, yellow in color. Used a lot by wood frame airplane builders. https://sigmfg.com/products/sig-bond-aliphatic-resin-glue
EJ
EJ
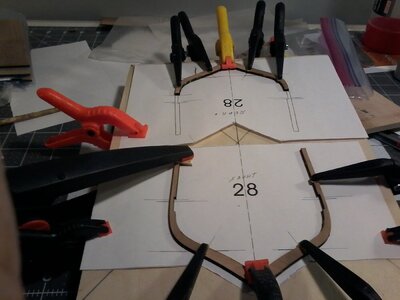
OK HERE IS ANOTHER FRAME BEING COMPLETED THIS IS THE FRAME BOARDS THAT I MADE THE FRAMES GO QUICKLY WHIL THE GLUE IS DRYING ON ONE I COMPLETE ANOTHER WITH MORE BOARDS MORS FRAMES KEEPING ACCRESAY I LET THE GLUE ON INDIVIDUAL JOINTS DRY FOR AT LEAST 6 HOURS WHEN I PUT THE 2 TOGETHER IT IS OVERNIGHT THIS MAYBE OVERKILL BUT WANT TO BE SURE THE FRAMES ARE FRAGILE STILL NOT SURE IF I NEED SPREADERS, PLEASECOMENT GUYS NEED TO KNOW IF ANYTHING LOOKS WRONG. GOD BLESS STAY SAFE ALL DON
Attachments

Looks like you got the hang of it Don!
THANK YOU VERY MUCH DON. GOD BLESS STAY SAFE ALL DON
OOPS FORGOT TO ASK WHAT SIZE DRILL IS 2MM (WIRE DRILL NO.?) ALSO THE BEST DIRILLS WHAT AND WHERE CAN I GET THEM BOTH HAND AND FOR MY MINI/ POWERED DRILL, THANKS. GOD BLESS STAY SAFE ALL DON
THANK YOU HEINRICH VERY MUCH, HOW IS ANNA DOING GIVE HER MY BEST. GOD BLESS STAY SAFE ALL DON
- Joined
- Jan 9, 2020
- Messages
- 10,738
- Points
- 938
OK Don - Here goes.

I start by marking the reverse side of the Frames clearly.

The drawings illustrate the bevel lines very clearly - for the Front Frame on the Left and the Rear Frame on the Right.

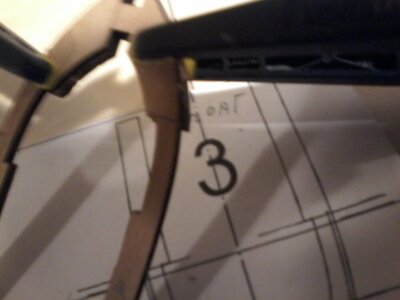
When we look at Frame #3 we can clearly see the bevel lines indicated on the both the Front and Rear Sides of the Frame. This is an exact repetition of what we saw on the Frame Drawings.

The Front of the Frame is lined up with the INSIDE line so that the bevel lines remain visible on the OUTSIDE of the Frame once it is in the correct position.

The Rear Frame is placed exactly ON the lines so that there are NO LINES VISIBLE once it is in the correct position.
Now I will start the gluing and post more a bit later.
I start by marking the reverse side of the Frames clearly.
The drawings illustrate the bevel lines very clearly - for the Front Frame on the Left and the Rear Frame on the Right.
When we look at Frame #3 we can clearly see the bevel lines indicated on the both the Front and Rear Sides of the Frame. This is an exact repetition of what we saw on the Frame Drawings.
The Front of the Frame is lined up with the INSIDE line so that the bevel lines remain visible on the OUTSIDE of the Frame once it is in the correct position.
The Rear Frame is placed exactly ON the lines so that there are NO LINES VISIBLE once it is in the correct position.
Now I will start the gluing and post more a bit later.
JUST SUPERB, THE TEACHER SPEAKS WITH CLARITY, THANK YOU SO MUCH GOD BLESS STAY SAFE YOU AND YOURS DON
OK HEINRICH I GOT THAT BUT NOW HOW NO I GLUE IT UP WHAT DOES IT LOOK LIKE GLUEDUP AND DO ALL FRAME THAT GE BEVELED THE SAME WAY. GOD BLESS YOU AND YOURS DON

Hi Don,
we are lucky to have Heinrich here, to walk us though any issues that pop up.")
.
we are lucky to have Heinrich here, to walk us though any issues that pop up.
.
OK HERE ARE PICTURES OF DRY FITTED FRAME NO. 3 I DO NOT KNOW IF I HAVE IT RIGHT OR NOT. GOD BLESS STAY SAFE ALL DON
Attachments
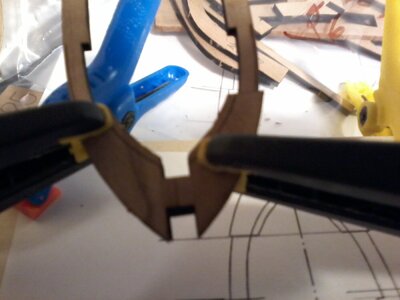
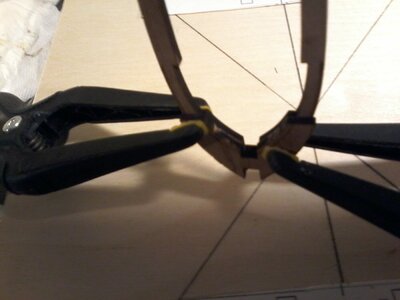
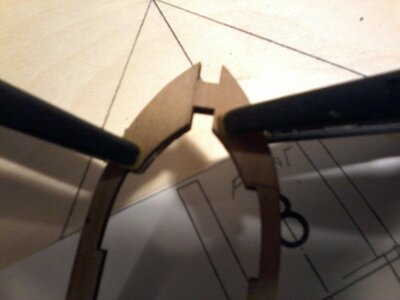
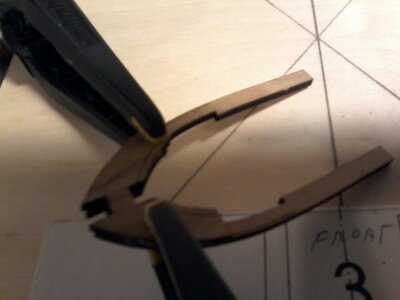
HI HEINRICH, HAVE I GOT THE DRY FIT RIGHT FOR GLUEING UP BEFORE BEVELING NOT SURE. GOD BLESS STAY SAFE ALL DON
THAT IS FINE DEAR FRIEND AND I HAVE TO GO TO SLEEP. GOD BLESS STAY SAFE YOU AND YOURS DON
- Joined
- Jan 9, 2020
- Messages
- 10,738
- Points
- 938
So by now I am sure that you have glued or will shortly glue the back and front halves of Frame #3 together. You will see that when viewed from the front, the rear frame will overlap the front one. Now you simply proceed with bevelling the front frame from the indicated lines.


Now it's time for the bevelling on the rear part of the frame.

As you bevel, you will see a line of sawdust developing on the frame. I use this line as an indication of how smooth and equal my curve is.

Here you can see both sides bevelled. I have tried to hold the frame so that the light clearly catches the bevel, but I can obviously only manage to catch one side at a time.

And when we put the bevelled frame on the drawing, it all matches up. It may not look like at it on this picture, because I did not have time to get onto a chair in order to take the picture directly from the top. It thus appears not to be in perfect alignment with the drawing because of angles.
Kind regards - Heinrich
Now it's time for the bevelling on the rear part of the frame.
As you bevel, you will see a line of sawdust developing on the frame. I use this line as an indication of how smooth and equal my curve is.
Here you can see both sides bevelled. I have tried to hold the frame so that the light clearly catches the bevel, but I can obviously only manage to catch one side at a time.
And when we put the bevelled frame on the drawing, it all matches up. It may not look like at it on this picture, because I did not have time to get onto a chair in order to take the picture directly from the top. It thus appears not to be in perfect alignment with the drawing because of angles.
Kind regards - Heinrich