
-

SUBSCRIBE TO SHIPS IN SCALE TODAY!
The beloved Ships in Scale Magazine is back and charting a new course for 2026!
Discover new skills, new techniques, and new inspirations in every issue.
NOTE THAT OUR NEXT ISSUE WILL BE MARCH/APRIL 2026 -

Win a Free Custom Engraved Brass Coin!!!
As a way to introduce our brass coins to the community, we will raffle off a free coin during the month of August. Follow link ABOVE for instructions for entering.
You are using an out of date browser. It may not display this or other websites correctly.
You should upgrade or use an alternative browser.
You should upgrade or use an alternative browser.
Build Log "CAF" HMS Enterprise
- Thread starter Paul132
- Start date
- Watchers 40
-
- Tags
- caf model enterprise pof


Looks really good, Paul.Jim, here are 2 photos in the morning light of the wales, this was only 1 coat
- Joined
- Jan 31, 2021
- Messages
- 595
- Points
- 353

Not too much completed today, as giant Parrot attacked ship, and entire crew eaten....actually completed all trennal work on main deck, and decided to stain it....bad move....now sanding off the stain...will just varnish it, and show photos tomorrow
Last edited by a moderator:
Kurt Konrath
Kurt Konrath
Monster pet from pirate ship captain attacking your ship.
Maybe just inspecting the work for crew to come later.
Maybe just inspecting the work for crew to come later.
Kurt Konrath
Kurt Konrath
Are you sure it was stain on the deck, with the big bird, it may be something else your scraping from the deck!Not too much completed today, as giant Parrot attacked ship, and entire crew eaten....actually completed all trennal work on main deck, and decided to stain it....bad move....now sanding off the stain...will just varnish it, and show photos tomorrowView attachment 283635


- Joined
- Jan 31, 2021
- Messages
- 595
- Points
- 353
LOL...nope stainAre you sure it was stain on the deck, with the big bird, it may be something else your scraping from the deck!
- Joined
- Jan 31, 2021
- Messages
- 595
- Points
- 353
Ok, so sanded off the deck stain....and gave it 2 coats of varnish, still not sure I like it....a learning experience here....just leave the wood natural with varnish going forward. Pleased with the 1250 trennals look however.


Last edited by a moderator:
- Joined
- Jan 31, 2021
- Messages
- 595
- Points
- 353
Good afternoon Paul- stunning photos- I love your view. Great build so far.Jim, here are 2 photos in the morning light of the wales, this was only 1 coat
View attachment 283519View attachment 283520
Cheers
Grant
- Joined
- Jan 31, 2021
- Messages
- 595
- Points
- 353
Grant, thankyou...we are on the Chesapeake Bay in Virginia
Good afternoon Paul- stunning photos- I love your view. Great build so far.
Cheers
Grant
- Joined
- Jan 31, 2021
- Messages
- 595
- Points
- 353
Have been working on the Bulworks, have been doing alot of finessing around the gunports as well. Since this was my first true POF, if anyone has a good way of laying off the gunports and cutting them out on the frames, please share with me. Also started building and painting some deck fixtures that will go under foredeck, and quarter deck.


Last edited by a moderator:

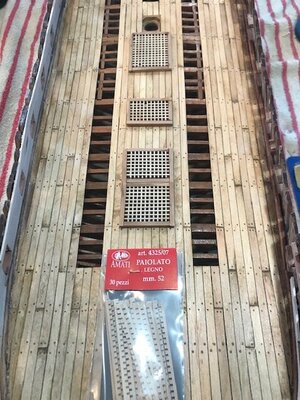
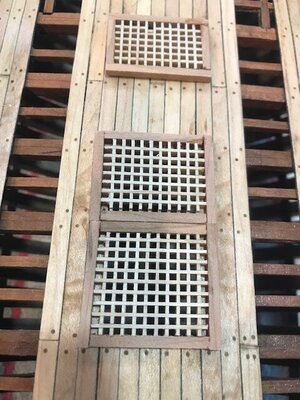
Looking good Paul. I also purchased aftermarket gratings for my build.
Kurt Konrath
Kurt Konrath
Dec looks good with new finish, a lesson learned, but in future, try finish out on scrap pieces to see how they look before working on main ship.Ok, so sanded off the deck stain....and gave it 2 coats of varnish, still not sure I like it....a learning experience here....just leave the wood natural with varnish going forward. Pleased with the 1250 trennals look however.
View attachment 284002
View attachment 284004
Some woods have a noticeable change with certain types of stain or varnish or oils.
Oh and are you sure about the count on trennals, you might have missed a few, but they do look great.


- Joined
- Jan 31, 2021
- Messages
- 595
- Points
- 353
Didnt feel like much today....but 6 hours later....layed most of the cabin floor, but ran out of supplied material as u can see, had some scraps the same thickness, so have marked and painted that, hopefully enough to wrap it up. Also built the stern bench seat, and captains table, still some sanding and poly for those. Also, gave the first coat of red to Port Bulwark.


Last edited by a moderator:
- Joined
- Jan 31, 2021
- Messages
- 595
- Points
- 353
Today. finished up the cabin floor, with some left over wood the same thickness as the supplied floor, painted the stern window seats(green leather) and installed, and poly the captains table. Also stared on the Captains cabin screen panels, construction was easy once I figured out where all the parts went(unfortunately most have been falling out of the laser cuts, so I matched all parts to the 3 panels on the plans first. Each part of the panel is 3 pieces, front and back, and the raised insert, which requires the sides to be sanded to give it the raised look.


Kurt Konrath
Kurt Konrath
Isn't this ship one of those where the walls could be moved to position a cannon in port of the great cabin.