
Great caulking imitation on the deck, Gibby. If you don't mind, the caulking is only used on the deck and the hulls, it wasn't used on the walls and bulkhead compartments\deviders.Here I used black nylon embroidery thread

-

SUBSCRIBE TO SHIPS IN SCALE TODAY!
The beloved Ships in Scale Magazine is back and charting a new course for 2026!
Discover new skills, new techniques, and new inspirations in every issue.
NOTE THAT OUR NEXT ISSUE WILL BE July/August 2026 -

Win a Free Custom Engraved Brass Coin!!!
As a way to introduce our brass coins to the community, we will raffle off a free coin during the month of August. Follow link ABOVE for instructions for entering.
You are using an out of date browser. It may not display this or other websites correctly.
You should upgrade or use an alternative browser.
You should upgrade or use an alternative browser.
Build Log "CAF" HMS Enterprise
- Thread starter Paul132
- Start date
- Watchers 40
-
- Tags
- caf model enterprise pof
Makes sense. I guess you could say I was being somewhat extra with lolGreat caulking imitation on the deck, Gibby. If you don't mind, the caulking is only used on the deck and the hulls, it wasn't used on the walls and bulkhead compartments\deviders.
- Joined
- Jan 31, 2021
- Messages
- 600
- Points
- 353

Thats pretty cool, thanksYes sir. I have a video of how I did it. But yes I place my middle or king plank then the thread then another plank
No problemThats pretty cool, thanks
- Joined
- Jan 31, 2021
- Messages
- 600
- Points
- 353
Thanks, getting a few replies the pencil method seems easier. I will try this first
Hey, Paul. The caulking imitation can be done in many ways. The most commonly used would be to blacken the edges of the planks with a black pencil (B or 1B), some likes to rub the edges with a graphite pencil (not my favorite). Those methods are simple enough and give a decent result. One of the advanced methods is to use very thin black paper. On the scale of 1:48, it should be about 0.6 ~0.7mm. I called advanced because it will require some practice and careful gluing the paper.
I also know about painting the edges, but I never use this method.
Sorry for the Off-topic, Paul.Makes sense. I guess you could say I was being somewhat extra with lol
We oftentimes want to emphasize the timbers of the wall, I mean that it was built from separate planks. One of the ways is to bevel the edges from both sides. when glue, the shadow from bevels will give that representation.
- Joined
- Jan 31, 2021
- Messages
- 600
- Points
- 353
Just want to say Thank for the Forum we have here and the replies and answers for a newbie like me!
Sorry for the Off-topic, Paul.
We oftentimes want to emphasize the timbers of the wall, I mean that it was built from separate planks. One of the ways is to bevel the edges from both sides. when glue, the shadow from bevels will give that representation
- Joined
- Jan 31, 2021
- Messages
- 600
- Points
- 353
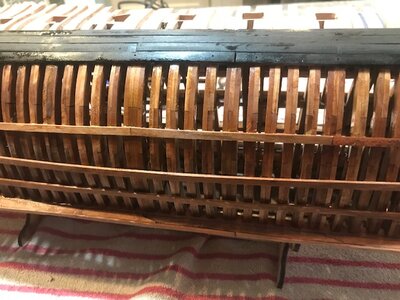
Folks, began planking the Main Gun Deck, using a Three Shift Butt system for the most part will leave a 3 plank opening on each side of the grates to show some beam detail(feeling guilty covering up so much detail). Also, experimented with some Trennals holes in Beams 4 and 5. Will definitely go with the Beam 5 as is closer to scale. Now just need some toothpicks for Trennals.


Last edited by a moderator:


- Joined
- Jan 31, 2021
- Messages
- 600
- Points
- 353
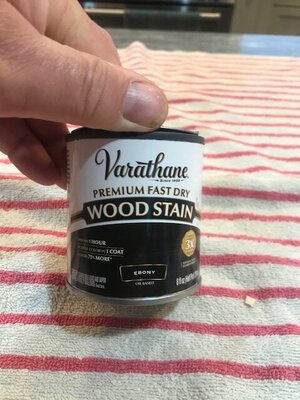
Ok....took a break from Toothpick Trennals(only did 4 deck beams worth today), and gave a final sanding to the Star Board side frames and wales. Found this Ebony Stain at the local hardware store, and tried it on the wales. Seems to be good. Also Varnished the Frames below the wales with their first coat today
Attachments

- Joined
- Jan 31, 2021
- Messages
- 600
- Points
- 353
Lou, thanks.... are you still building Grando? Pictures? Build Log?
Yeah! Paul that looks great! Those finishes really make her pop
No, I haven’t started it yet - I decided to finish a couple shelved models that I have, beginning with the Amati Revenge, that build log is here: https://shipsofscale.com/sosforums/threads/revenge-1577-1-64-victory-models-amati.8981/
Greetings is this stain waterbased or poly\oilbased? How fast does it dry and how deep does it penetrate the timber?Ok....took a break from Toothpick Trennals(only did 4 deck beams worth today), and gave a final sanding to the Star Board side frames and wales. Found this Ebony Stain at the local hardware store, and tried it on the wales. Seems to be good. Also Varnished the Frames below the wales with their first coat today
- Joined
- Jan 31, 2021
- Messages
- 600
- Points
- 353
Jim, Oil Based, Drys Quickly, in under an hour....but really in the first 10 minutes, it penetrated very well. Left a nice full/flat finish. I will send an updated photo in a bit
Greetings is this stain waterbased or poly\oilbased? How fast does it dry and how deep does it penetrate the timbe
- Joined
- Oct 17, 2020
- Messages
- 1,761
- Points
- 488

ottimo ,molto bello complimentiSi signore. Ho un video di come l'ho fatto. Ma sì, posiziono la mia tavola centrale o re, poi il filo e poi un'altra tavola