
Aside from your precise work and results I am humbled by what I see of your build shop area compared with my den/desk work area and cluttered tools and materials both on the desk and floor. Something to be said for a good shop build space. PT-2

-

SUBSCRIBE TO SHIPS IN SCALE TODAY!
The beloved Ships in Scale Magazine is back and charting a new course for 2026!
Discover new skills, new techniques, and new inspirations in every issue.
NOTE THAT OUR NEXT ISSUE WILL BE July/August 2026 -

Win a Free Custom Engraved Brass Coin!!!
As a way to introduce our brass coins to the community, we will raffle off a free coin during the month of August. Follow link ABOVE for instructions for entering.
You are using an out of date browser. It may not display this or other websites correctly.
You should upgrade or use an alternative browser.
You should upgrade or use an alternative browser.
CAF Models La Salamandre...1:48 My Attempt
- Thread starter BigMike
- Start date
- Watchers 37
-
- Tags
- caf model la salamandre

Thank you for the compliment, I am not the best at explaining things so I’ll try to keep the pics coming.Hi Mike
I agree and join in the compliments of all the members here,
Impressive progress in building the ship &
the frames looks really beautiful.
It is interesting to read and observe your working methods.
I'll continue to follow")
Thanks PT-2, I was fortunate to get one of the bedrooms when the kids left. It is nice to have some room now but the Admiral keeps after me to keep the mess down.Aside from your precise work and results I am humbled by what I see of your build shop area compared with my den/desk work area and cluttered tools and materials both on the desk and floor. Something to be said for a good shop build space. PT-2
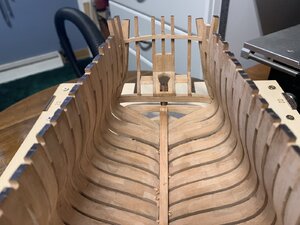
Well I finished the stern framing, a lot of shaping to the quarter timbers. The hawse pieces were made and shaped in the supplied jig. The pics I took of this are gone, no idea what happened.
Next I took the ship out of the jig, it popped right out. Installed the hawse assembly, I had to add a 1.5mm strip of wood to the 1st frame to get a good fit to the rabbet. Now it was time to sand and sand.
So far I am pretty happy with how things are going, the hawse fitting was a little frustrating but we got through it. Only thing left is to put in the filler pieces at the bow then it’s on to box #2.
Made up a simple build board to hold the model while marking beam clamp and location of other beams inside the hull.
I marked where the top of the build jig was on the hull so I could make sure model was sitting the same as it was in original build jig.
More to follow...
Attachments

Shaping of hawse frames are probably the most difficult thing to do on a POF model. Looks like you did a great job!!!! Carry on!!!!The hawse pieces were made
Top notch craftsmanship there Mike, way to go man !!!
Thanks guys!

Nice work and appearance. With that good wood have you thought about how you will finish it and if you may expose on a back side lower half of the framing? PT-2Great work, Mike! It looks really accurate, and the effect of the natural wood is already beginning to show.


Thanks everyone for all the likes and compliments. It’s nice to see all the interest in my log, it really gives you the incentive push on.
Hi everyone, been busy with the wife this week getting some work done before she starts back to work tomorrow. She works for the local public school system here. I’m a little nervous with starting back up but we have to get back to some sort of normalcy around here.
Not much done in the shop but I really want to try to post every week. I put down some interior planking and the deck clamps fo the Gun deck. I assembled the riders, they go together the same as the frames. The riders are dry fit in for now, still have to finish the third one.
I am going to install .8mm copper wire for bolts in the keelson and the riders. I think I will use .5 mm wire for the deck clamp we will see. I also marked the location of the beams for the lower platforms.
Thats it for now
These larger scale build views make me want to put my tool belt on, safety vest and hard hat, and walk right in to do as I am ordered. Nice work. PT-2Hi everyone, been busy with the wife this week getting some work done before she starts back to work tomorrow. She works for the local public school system here. I’m a little nervous with starting back up but we have to get back to some sort of normalcy around here.
Not much done in the shop but I really want to try to post every week. I put down some interior planking and the deck clamps fo the Gun deck. I assembled the riders, they go together the same as the frames. The riders are dry fit in for now, still have to finish the third one.
I am going to install .8mm copper wire for bolts in the keelson and the riders. I think I will use .5 mm wire for the deck clamp we will see. I also marked the location of the beams for the lower platforms.
Thats it for now
View attachment 173685View attachment 173686View attachment 173687View attachment 173688
VERY nice work Mike.Can't believe you have got this far in a little over two months!
Kind Regards
Nigel
Kind Regards
Nigel
Really nice Mike, youre frame work looks like you have been polishing it all week.
Thanks Clair but your little Nina looks pretty darn good dude!Ya know @BigMike , I once built a model almost as good as yours.... then I woke up.
Love the work you do sir