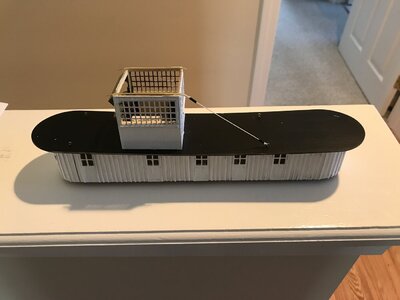
Chaperon 1884 Stern Wheeler

Ugh. Decision Time:

896BB701-39C8-4ED6-9B08-B84B15E52612.jpegt

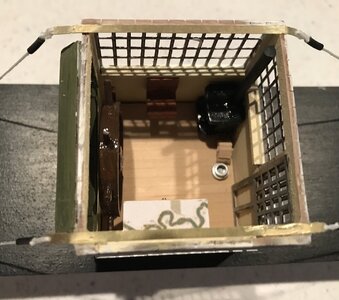
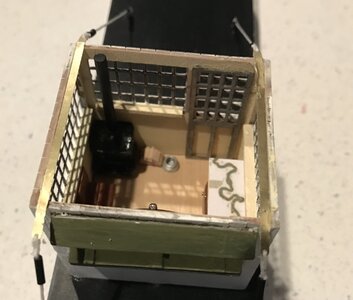
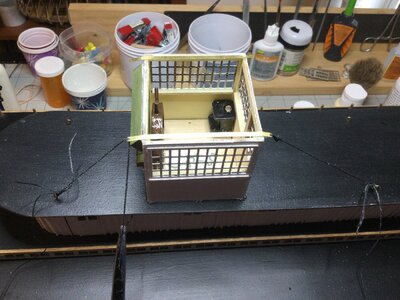
The Pilot House furniture. I added the floor, ships wheel and stove. There was not enough space left to add the “4 foot” bench, so a smaller bench is in the works.

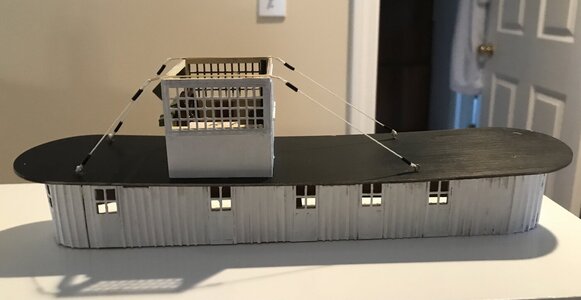
Then there are the four “cables” that tie down the Pilot House. I used .75 mm thread, BUT, with lashings at both ends I stopped, that lashup looked terrible. I’m now looking for better alternatives. I’ve ordered 1/48 scale turnbuckles and some .75 and 1 mm brass rods. I think that might be a better look.
 
Time for plan C:

After a half of a day with "out of stock", "currently unavailable" and "we don't have it" on various web stores, I invoked builders license and here's the result.


D5010AA8-53B4-4EB9-AA6B-78AD26848A01.jpeg


I used the kits white .021 inch rigging line and the insulation from 24 gauge wire to simulate the wire and turnbuckles.
 
Time for plan C:

After a half of a day with "out of stock", "currently unavailable" and "we don't have it" on various web stores, I invoked builders license and here's the result.


View attachment 303304


I used the kits white .021 inch rigging line and the insulation from 24 gauge wire to simulate the wire and turnbuckles.
Scratch building gives very often the result you want to see. My wife's sewing box also sometimes offers a solution.
You are going to manage that ‘bad eyed looking problem’ to a nice outcome. The cables gives now a extra little bit of contrast on the dark roof.
Regards, Peter
 
Hi Jan. The shackles, wire and turnbuckles look perfectly in sync. No worries there! Thumbsup
 
Scratch building gives very often the result you want to see. My wife's sewing box also sometimes offers a solution.
You are going to manage that ‘bad eyed looking problem’ to a nice outcome. The cables gives now a extra little bit of contrast on the dark roof.
Regards, Peter
Indeed, after my mornings research, I took a coffee break and wandered down to my basement railroad empire. While I was stripping the insulation off a piece of 24 gauge wire, I had the “Eureka” moment. That was the end of wiring in a relay and a return to the shipyard to see it the idea would work.
 
Last edited:
Hi Jan. The shackles, wire and turnbuckles look perfectly in sync. No worries there! Thumbsup
I think that little innovation will work out just fine. It’s not what the eye sees but what the brain interprets. :rolleyes:

( Other than a vague headache I’m back to my ornery self, my reaction to this Booster was much less than the previous one.)
 
Pilot house Plan C is done.

4A60038E-3B38-4917-A3BC-F635F019CD35.jpeg

I think it came out well.

A quick look into the Pilot House before the roof goes on.

6E23AA41-64C8-4C2E-969A-8D450DB5A91E.jpeg1E669F93-F1D5-43FE-A7A4-A491D5B77C0D.jpeg

I made a minor error. I didn’t mill out the area deep enough where the brass strips sit. I think the slight gap between the top of the walls and the bottom of the roof will not show once the fancy decor is glued to the roof edges.
 
Pilot house Plan C is done.

View attachment 303674

I think it came out well.

A quick look into the Pilot House before the roof goes on.

View attachment 303675View attachment 303676

I made a minor error. I didn’t mill out the area deep enough where the brass strips sit. I think the slight gap between the top of the walls and the bottom of the roof will not show once the fancy decor is glued to the roof edges.
Nice details, Jan. With the extra wood for the stove and the spittoon :)
Regards, Peter
 
SO NICE Jan! Well done on a nice addition to your build. You're getting pretty good at this! You may need to rethink the ‘bumblers’ logo.
Paul, thank you for that. I’m still working my way through the idea that a kit is the basic start for a build. My “Bumbling” is a great topic of conversation in house. My shipyard contains the discards of three potbelly stoves, two map tables, four benches, and two spittoons. Oh did I mention the frame work for the Duyfken, the frame for the WB and two lifeboat frames. The next great event of this build is the paddlewheel. Oh boy, big fingers and small parts and LOTS of patience.
 
That looks excellent my friend! Congratulations to a job well done and a fine addition to your model! Thumbsup
Thank you Heinrich. I like my version much better than the empty little square box shown on the kits plans. The plans representation of the tie down cables was a maybe yes maybe no on my build preference. A search for pictures of Riverboat Pilot Houses on the Internet showed very few with this kind of lash up.
 
Paint or not to Paint:

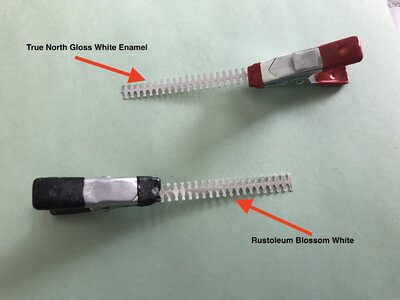
I'm at the point of adding the first trim, so I'm back to how to paint Brass. I tried Craftsmart White Acrylic, three coats later I sanded that off.

7D1BF35B-AE42-435B-8279-85D80DB9C262_1_201_a.jpeg

The True North white enamel took 24 hours to dry. But it's only one coat. The Rustoleum required several passes to cover up the Brass look.

So there you have it. I'm still trying to figure this part out. I starting to think that unpainted Brass trim would look great.
 
Last edited:
Paint or not to Paint:

I'm at the point of adding the first trim, so I'm back to how to paint Brass. I tried Craftsmart White Acrylic, three coats later I sanded that off.

View attachment 304170

The True North white enamel took 24 hours to dry. But it's only one coat. The Rustoleum required several passes to cover up the Brass look.

So there you have it. I'm still trying to figure this part out. I starting to think that unpainted Brass trim would look great.
Hi Jan. The “True North Glass White Enamel” looks better. A flatter and tighter result. Maybe it dries a little faster in the oven? But don't set it too high. But on the other hand: what is 24 hours? Paint everything at ones and the next day …….. :)
Unpainted Brass Trim? When building a Paddle Steamer you are simply 'condemned’ to paint a lot of white. I think the decoration in brass is getting too much bling-bling. That would be a shame after so much work.
Regards, Peter
Hi Peter. My knowledge of types of paint would barely fill the bottom of a thimble. So its been touch and go with that bit. The True North white was brushed on, the Rustoleum was from a rattle can. The painted pieces are the trim for the Pilot House.

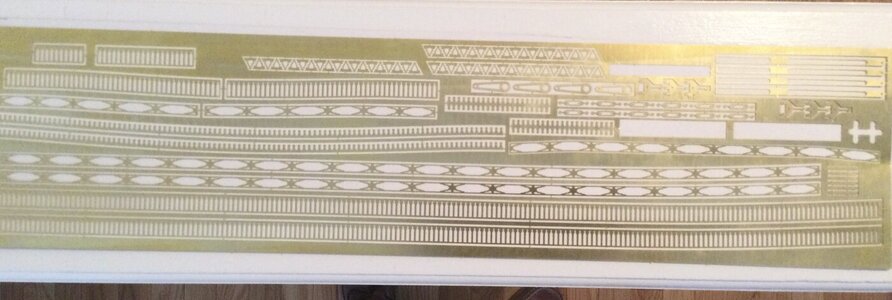
AND here is the rest of the BLING.

677B477E-9F30-4FD4-A62D-88E127B31332.jpeg

Regardless of the method I use I think it will take a wee bit of time to get this part done.

Ah, drying in the oven sounds great, BUT I might be on my own after that little job. We just had a new oven installed last week and the Admiral would :eek::eek::eek:
 
Back
Top