-

Win a Free Custom Engraved Brass Coin!!!
As a way to introduce our brass coins to the community, we will raffle off a free coin during the month of August. Follow link ABOVE for instructions for entering.
-

PRE-ORDER SHIPS IN SCALE TODAY!
The beloved Ships in Scale Magazine is back and charting a new course for 2026!
Discover new skills, new techniques, and new inspirations in every issue.
NOTE THAT OUR FIRST ISSUE WILL BE JAN/FEB 2026
You are using an out of date browser. It may not display this or other websites correctly.
You should upgrade or use an alternative browser.
You should upgrade or use an alternative browser.
Chaperon 1884 Stern Wheeler
- Thread starter Pathfinder65
- Start date
- Watchers 35
-
- Tags
- chaperon model shipways
Hello, Jan. Technically speaking, they suggested using a hobby knife as the fairing tool only because it is a common and available tool for most modelers. A much better tool (from my personal experience) is the long sanding stick. The length should cover three or four adjacent bulkheads. It must be absolutely even flat. The nail sanding sticks will not do as they are flexible. You can make one from plywood and double-sided sticky tape. They will last long...but if it is worn out, replace the tape and new sandpaper.he instructions indicate that bulkheads/frames 1 - 5 and the bow filer needed to be trimmed/faired to the engraved laser line Using a SHARP #11 blade. I had to wait until the Admiral was out, since my “carving” skills are nil and I take meds that could be problematic if I were to slip.
Excellent advice, I've been making sanding sticks from scraps using Elmers Glue Stick and sandpaper. I found that once the sandpaper has clogged its easy to peal off and replaced with another glue stick covered piece.Hello, Jan. Technically speaking, they suggested using a hobby knife as the fairing tool only because it is a common and available tool for most modelers. A much better tool (from my personal experience) is the long sanding stick. The length should cover three or four adjacent bulkheads. It must be absolutely even flat. The nail sanding sticks will not do as they are flexible. You can make one from plywood and double-sided sticky tape. They will last long...but if it is worn out, replace the tape and new sandpaper.
Jan
Hi Jan,
And now a word from a total novice...
Tiny sanding sticks are worthless for what you are attempting. I propose a hunk of wood (6-8 inches long - 2 inches wide - 2 inches tall) - you want something you can hold in your hand not only with your fingertips. Use long motions with the sanding block such that you are sanding 3, 4 or 5 bulkheads at a time. Use the char on the edge of the wood to keep track of where you are making changes. The #11 blade idea will never get this done!
If this what you are already doing then just ignore this post!!! Just trying to help!
Hi Paul,Hi Jan,
And now a word from a total novice...
Tiny sanding sticks are worthless for what you are attempting. I propose a hunk of wood (6-8 inches long - 2 inches wide - 2 inches tall) - you want something you can hold in your hand not only with your fingertips. Use long motions with the sanding block such that you are sanding 3, 4 or 5 bulkheads at a time. Use the char on the edge of the wood to keep track of where you are making changes. The #11 blade idea will never get this done!
If this what you are already doing then just ignore this post!!! Just trying to help!
That is great advice. I will definitely give that a try. Sharp blades and Eliquis aren’t exactly the tools my Admiral has in mind for me to use. A good cut and the results would require me to call the EMTs for both of us because she would be history. The sight of “blood” is not one of her favorite things.
Jan
@Bluebeard.
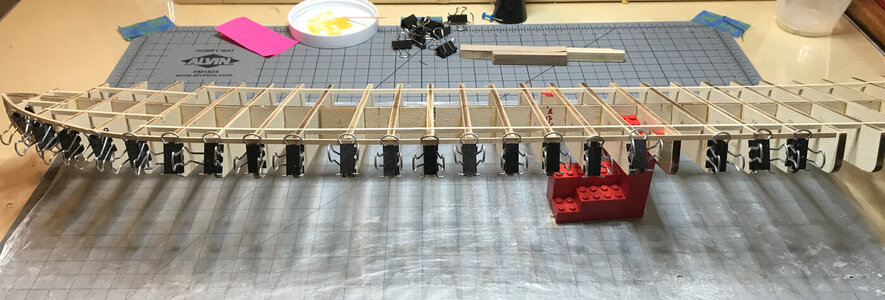
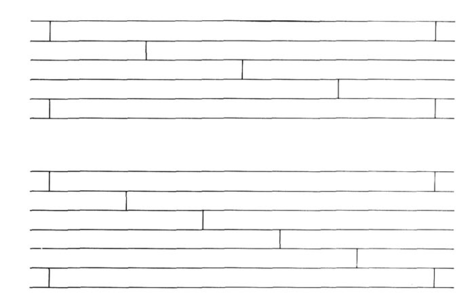
Since the 1/16" X 1/8" strips for the side of the hull planking aren't long enough to reach the full length of the hull, do you have a suggestion as to where the butt joints should fall.
The first plank/strake.

Should the the joints be staggered midships???
Jan
Since the 1/16" X 1/8" strips for the side of the hull planking aren't long enough to reach the full length of the hull, do you have a suggestion as to where the butt joints should fall.
The first plank/strake.

Should the the joints be staggered midships???
Jan
- Joined
- Jan 9, 2020
- Messages
- 10,566
- Points
- 938

Hello Jan. I think that Sasha's advice to scale the 6-9 metres lengths to your scale is a good idea with the proviso that the butt joint co-incides with a bulkhead. If the bulkhead is too thin to accommodate the juncture of both planks that make up the butt-joint, glue a widening strip to it - either aft or fore - whichever you deem fit. This may obviously vary from bulkhead to bulkhead.
Hmm, 9 m is about 30 ft, divided by 48 (scale of ship) is about .625 ft, times 12 in is about an 8 in length for a plank. I think I can work with that. The three plank stagger suggested by Alexander should work out, its only thirteen strakes to a side. The only exception I'm making is the first strake, that hull length I'll divide into two 16in pieces just to have a solid reference to the sheer. There is a slight up-curve at both ends of the hull and I want to be able to follow that line as I do the rest of the planking.Hello Jan. I think that Sasha's advice to scale the 6-9 metres lengths to your scale is a good idea with the proviso that the butt joint co-incides with a bulkhead. If the bulkhead is too thin to accommodate the juncture of both planks that make up the butt-joint, glue a widening strip to it - either aft or fore - whichever you deem fit. This may obviously vary from bulkhead to bulkhead.
Jan
Last edited:
Kurt Konrath
Kurt Konrath
Sounds like you have a plan to work, and now to work the plan as they say.
Keeping on eye on this as I have the AL King of Mississippi steam boat in my SABLE collection.
Keeping on eye on this as I have the AL King of Mississippi steam boat in my SABLE collection.
@Heinrich,The beginning of planking - exciting!You are progressing very well and everything looks like it is under total control. Continue!

Yup, it's a slow process, can't be hurried. It also takes a lot of mini clamps. But it's nice to see that part come together.
Jan
Hi Jan,Planking Progress:
I’ve managed to get the Starboard side of the hull completed. So far my method of soaking, bending, fitting and clamping until dry is working out pretty good.
View attachment 249496
The flip side.
View attachment 249498
Tonight I’ll be working on the port side.
Jan
That looks like a straight tight long steamboat flatbottom. It's a real challenge to keep her flat and straight.
Regards, Peter
Hello, Jan! She is getting the shape... 
Hi Peter,Hi Jan,
That looks like a straight tight long steamboat flatbottom. It's a real challenge to keep her flat and straight.
Regards, Peter
Once the Port side is completed the width of the planking changes to 1/2 inches. That should help with the flat bottom. It’s been a wee bit of a challenge so far, it took some trial and error until I finally got started in the right direction.
Jan
Wow Jan! Your planking looks really really good. I love the long lines on this ship and your deft handling of the wood bending over the curves. Awesome!
Thank you for your nice comments. This part is very slowly coming together.Wow Jan! Your planking looks really really good. I love the long lines on this ship and your deft handling of the wood bending over the curves. Awesome!
Jan


