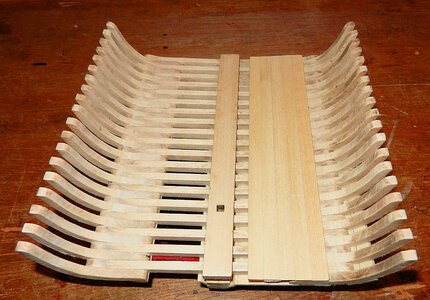
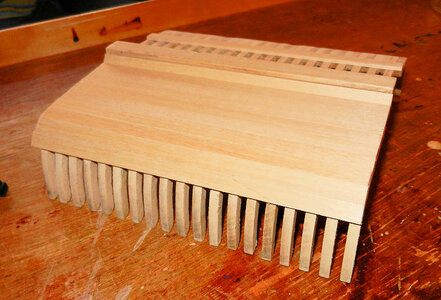
Cross-section of a 17th-century Pinas by Peter

My dearest Peter. First off, hartelijk gefliciteerd met je verjaardag! I trust that you will soon have the coughing and sneezing under control.

I was wondering what Hans was up to and now I know - the cross-section of the Pinas. It is great that you are building this, and I will follow the build with great interest! So far so good!
 
Heinrich my friend, the coughing and sneezing will get under control i have no doubt about that, and welcome to my crossection of the Pinas tomorrow there wil be an other update , so we wil see how it turns out .
And thank you for the birthday wishes. How is your Admiral Anna doing? i hope she is well to my friend
 
This cross-section is the latest kit in the Kolderstok series, and it was developed and build by Matthias Noback.

It contains a very good building instruction , and there is no plywood used at all, it is build of Basswood except for the masts.

The kit is developed according to the book written in 1671, of Nicolaes Witsen, "Aeloude en Hedendaagse Scheepsbouw en Bestier " ( ancient and current shipbuildig and -management ), which describes the construction of a Pinas, a relatively heavaly armed square-rigged merchantman, also called a "mirror ship "
Witsen's book was the first book published in the then Republic of the United Netherlands on shipbuilding in the 17th century and the centuries before
The book did not have technical constructiondrawings and in-depth calculations,but it did contain an overvieuw of all parts, designations and dimensions and derived dimensions from keel to mast, with guidlines for construction.
In the mid-1990s, Ab Hoving, the then curator of the Rijksmuseum,produced a revised and more readeble version of the rather impenetrable original, " Nicolaes Witsens Scheeps-bouw-konst Open Gestelt " ( Nicolaes Witsen's art of shipbuilding explained ) 1994.
Both books were used as source for the design of this model, a cross-section of a 17th century Pinas with a length of 138 Amsterdam feet ( 39 meter ) and a width of 29 feet (over 8 meters).
Of the original 24 guns present, 3 are shown.
This cross-section highlights the part of the ship around the mainmast, including spindle, knights, pumpgalley and cannons, is open on one side and has skin planking on the other
This part has been taken from the introduction of the building instructions, which is also the work of Matthias Noback.
Hallo @pingu57
we wish you all the BEST and a HAPPY BIRTHDAY
Birthday-Cake
 
Great work, PeterThumbsup:)
happy Birthday my friend Birthday-Cakewish you all the best and happiness!
I will keep following with great curiosity after your work on this model
 
Hallo @pingu57
we wish you all the BEST and a HAPPY BIRTHDAY
Birthday-Cake
Thank you very much Uwe, i love your Granado bye the way
Also from my side a Happy Birthday, Peter
Regards, Peter
Thank you so much Peter, it has been a wonderfull day
Hey Peter, have a great birthday!
Thanks Paul it was a great day, not in the least because we heard from our friend Heinrich
Gefeliciteerd met je verjaardag, Peter Birthday-Cake
Dank je wel Jim, ik hoop dat jullie hem lang mogen meemaken
Great work, PeterThumbsup:)
happy Birthday my friend Birthday-Cakewish you all the best and happiness!
I will keep following with great curiosity after your work on this model
Thank you Shota, there wil be an update this morning, so we'll see
 
i am so sorry for the delay, i was going to make my update this morning, but something stumbled on my path.
Last time i showed you some foto's with just a couple of futtocks placed, but i managed to place them all, there was a moment that i was struggling a bit, because it looked like there was not enough room between the floortimbers, but at some point i took every futtock i had and i placed them partial and temporarely between the floortimbers, and that was the trick in my case.
I then placed the first planks over the futtocks in the hold ( the Ceiling ), the first plank was not glued, that was removable, in order to clean the limber hole, and to make it free of any debris

DSCN5405.jpg.JPG

When this was done, i went a bit further with the bottomplanking, i stopped in the middle of the bilges, this is where the futtocks make a sharp turn upwards,and that was also the first plank where i made a joint in.
It is a bit difficult to see, but the jouint starts at the fifth futtock from the right, and at the seventh futtock it ends. On the bottom of the crossection i did not make any joints, because they wil not be vissible when it is resting on its stand
DSCN5406.jpg.JPG

Now it is again time to clean the next portion of futtocks, so this can take a while before i will be happy with them.

Until the next time, my friends.
 
Beautiful floor planking, my friend. What wood is the kit using? (I know you probably mentioned that in the introduction, but I'm too lazy to have a look! :D )
 
Beautiful floor planking, my friend. What wood is the kit using? (I know you probably mentioned that in the introduction, but I'm too lazy to have a look! :D )
It is all basswood my friend, except for the mast.
Altough on the Dutch forum somebody is making the kit in oak. the timbers and the futtocks are still basswood, but for the planking he asked Hans Kolderstok for oak planks. Also looking great by the way
 
It is all basswood my friend, except for the mast.
Altough on the Dutch forum somebody is making the kit in oak. the timbers and the futtocks are still basswood, but for the planking he asked Hans Kolderstok for oak planks. Also looking great by the way
I am just thinking that the wood will look lovely with the Clou stain which I have used on the WB.
 
I am just thinking that the wood will look lovely with the Clou stain which I have used on the WB.
You could be right Heinrich, but i am going to stain it with the medium oak stain from Kolderstok.
At the moment some people on Modelbouwforum.nl are brushing the wood first with a steelbrush so it is getting the Rough appearence, but that is not my flavour, so i am staining the wood as it is.
 
You could be right Heinrich, but i am going to stain it with the medium oak stain from Kolderstok.
At the moment some people on Modelbouwforum.nl are brushing the wood first with a steelbrush so it is getting the Rough appearence, but that is not my flavour, so i am staining the wood as it is.
I have used both the medium and dark stain from Kolderstok - and I would choose the Clou every time. I agree with you that the weathered look is also not my thing - except when someone like @shelk does it - he is a master of that!
 
I have used both the medium and dark stain from Kolderstok - and I would choose the Clou every time. I agree with you that the weathered look is also not my thing - except when someone like @shelk does it - he is a master of that!
Oh yes there are some experts in the weathering i will have a look at @shelk , but this brushing is not even weathering,, it is just roughing the wood.
A good weathering is beautiful to see .
 
It has been a while since the last update, but i had a little set back, with the next futtocks to place, i got the same problem as with the first ones.
The side that is left open is quite reasonable, but at the other side i had some problems.
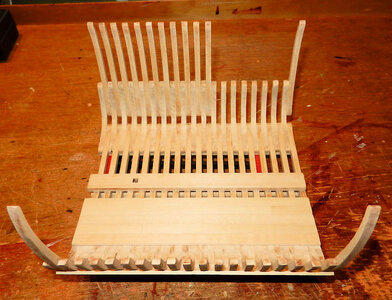
DSCN5408.jpg.JPG

At the other side i had to place the futtocks one by one. Fit, correct and then place it, and clamp it to let it dry
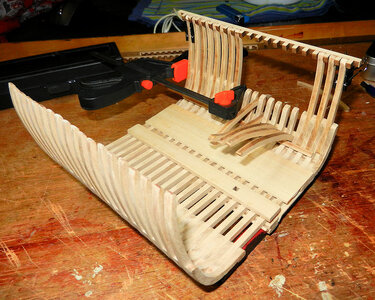
DSCN5412.jpg.JPG

At that moment, i was doubting myself, was i doing something the wrong way or what???

I checked everything that i was doing, and what did i use to do it, and after some communication with Matthias, the designer of the kit, it appears to be that the teeth of my comb are not exactly on the sice of the futtocks, they are slightly of, and my futtocks where also a somewhat thickker as they should be.
So i had to improvise a bit.

For those who wanted to buy this kit also, i still think it is an excellent kit, but don't rely on the comb alone, place the first futtocks temporarily between the floortimbers when placing the them on the keel. so you wil have a better placing of your first parts.
The other builders on modelbouwforum.nl did not have the problem as big as i had, but that was a bit of bad luck of my side i guess.
Anyway, i got all futtocks in and it looked very satisfying, altough i had to dive into my toolcabinet voor a clamp that i normally don't use for modelbuilding.
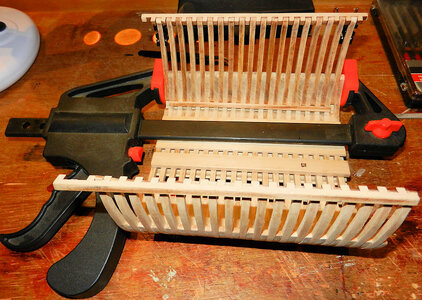
DSCN5413.jpg.JPG

A giant clamp for these small futtocks ROTFROTFROTF

Now it is time to clean the remaining futtocks, and that wil take me a while again.
 
Last edited:
@dockattner ,Paul,
the jig is there, but it is verry simplified.
there are four combs that should control the width of the build, but i had combs where the teeth are slightly smaller as they should have been, and the material of my futtocks where slightly thicker as needed, and that was basicly the cause of my problem, but nevertheless, a great kit to build.
On my last photo, you can see the combs sitting on top of the futtocks.
 
Back
Top