Don, i wish you a lot of building pleasure with this kit, but please take my advice, and use the first futtocks to place temporarely ( no glue ) between the floortimbers when placing the floortimbers. and try to get some copy's of the futtock drawing, so you can cut the outside away, and use that as a chek-up when you work your way up to the top futtocks. God Bless and stay safe, PeterMINE CAME IN WAITING FOR MY DAUGHTER TO BRING IT TO ME, I LIVE IN A ASSITED LIVING AT MY AGE GOING ON 86 IN A WHEEL CHAIR AND THROUGH CHRIST AND FAITH STILL HERE AND BUILDING 3 GOING ON RIGHT NOW SONN I WILL START THIS ONE LOOKING FORWARD TO IT. GOD BLESS STAY SAFE ALL DON
-

Win a Free Custom Engraved Brass Coin!!!
As a way to introduce our brass coins to the community, we will raffle off a free coin during the month of August. Follow link ABOVE for instructions for entering.
-

PRE-ORDER SHIPS IN SCALE TODAY!
The beloved Ships in Scale Magazine is back and charting a new course for 2026!
Discover new skills, new techniques, and new inspirations in every issue.
NOTE THAT OUR FIRST ISSUE WILL BE JAN/FEB 2026
You are using an out of date browser. It may not display this or other websites correctly.
You should upgrade or use an alternative browser.
You should upgrade or use an alternative browser.
Uwe,post by post I like this kit more and more
and btw your work make it more and more interesting
This really is a lovely kit to work on, despite that little teaser, where you can work around when you are aware of it, i am having a lot of fun building it.
I am glad i am making it interesting to follow.
Paul, you are making me Blush.Thank you for the designer's insight @matthiasnoback. Based on Peter's results the kit design seems very complete. Of course, not everyone is as experienced and skilled as Peter - but a section model is a great place to learn to be a better modeler. I would have been wise to do something like that before attempting my current plank-on-frame project.
And i believe that your attempt on the POF project "King Fisher " is something that whe can all learn a lot of, and i think you will have a lot of time for a crossection to build ahead of you.
True storybut it is modelbuilding, and it is not a jigsaw puzzle which you just lay out
DittoThat is looking very good, my friend. Well done!
Thank you for the compliment Grant.Ditto
My dear Shota,
i am very happy that you like the model, and the way i am building it .
Thank you
i am very happy that you like the model, and the way i am building it .
Thank you
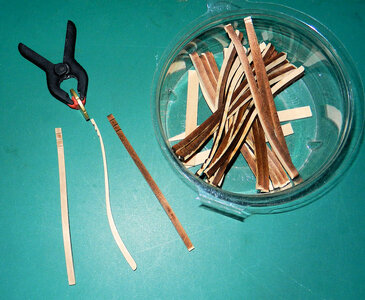
A very smal update this time, at the moment i am very busy cleaning the last futtocks, i am not cleaning them al as good as the shown one, because they are extremely delicat, i am afraid i break off all tops when i have them in my fingers to long

The coin above the futtock is a €0,10 coin so it is not extremely thick, this thicknes causes the modeler to be really carefull.
As you can see in the dish, i will be busy, for quite some time.

Edit, i just got the tip of Matthias that it might be easyer to clean the top futtocks while they are already placed, so that is the way i am going to do it.
so i am going to proceed to fit in the futtocks, and after that the inner planking, before final placement of the futtocks.

The coin above the futtock is a €0,10 coin so it is not extremely thick, this thicknes causes the modeler to be really carefull.
As you can see in the dish, i will be busy, for quite some time.


Edit, i just got the tip of Matthias that it might be easyer to clean the top futtocks while they are already placed, so that is the way i am going to do it.
so i am going to proceed to fit in the futtocks, and after that the inner planking, before final placement of the futtocks.
Last edited:
- Joined
- Jan 9, 2020
- Messages
- 10,566
- Points
- 938

That is good advice from Matthias, my friend. That way the whole assembly will be much sturdier and the chances of breaking those tips will be less. However, be that as it may, you are making excellent progress!
Thank you my friend, and Yes it wil be sturdier,, how much sturdier, that remains to be seen at that moment.That is good advice from Matthias, my friend. That way the whole assembly will be much sturdier and the chances of breaking those tips will be less. However, be that as it may, you are making excellent progress!


Last edited:
Have you thought about this product
Liquid to "clean" char
Yuri showed some pictures of how it removed char, so it is not as visible, without any sanding. It also supposedly does not stain or color the wood at all. I will be buying some today and testing it out on scraps, with char burn on them.
Liquid to "clean" char
Yuri showed some pictures of how it removed char, so it is not as visible, without any sanding. It also supposedly does not stain or color the wood at all. I will be buying some today and testing it out on scraps, with char burn on them.
Hello Brad,Have you thought about this product
Liquid to "clean" char
Yuri showed some pictures of how it removed char, so it is not as visible, without any sanding. It also supposedly does not stain or color the wood at all. I will be buying some today and testing it out on scraps, with char burn on them.
I did not even know that there experiments like this, i would have to try that with a brand of cleaner that is available here in the Netherlands, but what i have seen of Yuri i don't find it clean enough, so i would have to sand it anyhow
Anyway, for this crossection it is to late, but i'll try some out with a Dutch version some day
Thanks for the tip
Those parts looks very fragile, Peter. Looking forward how you will manage them.A very smal update this time, at the moment i am very busy cleaning the last futtocks, i am not cleaning them al as good as the shown one, because they are extremely delicat, i am afraid i break off all tops when i have them in my fingers to long
View attachment 428644
The coin above the futtock is a €0,10 coin so it is not extremely thick, this thicknes causes the modeler to be really carefull.
As you can see in the dish, i will be busy, for quite some time.
Edit, i just got the tip of Matthias that it might be easyer to clean the top futtocks while they are already placed, so that is the way i am going to do it.
so i am going to proceed to fit in the futtocks, and after that the inner planking, before final placement of the futtocks.
Regards, Peter
Peter,Hello Brad,
I did not even know that there experiments like this, i would have to try that with a brand of cleaner that is available here in the Netherlands, but what i have seen of Yuri i don't find it clean enough, so i would have to sand it anyhow
Anyway, for this crossection it is to late, but i'll try some out with a Dutch version some day
Thanks for the tip
Agree it is not in lieu of sanding. It may make the color contrast less. Brown instead of dark black...this may mean less sanding and less noticeable?
I will experiment and post some pictures. As you said, it is too late for my and your current builds.
Hello Peter, i am trying to handle them with great care, and i will follow the advice of Matthias, but the details at the top will be done wile i can keep them in my handThose parts looks very fragile, Peter. Looking forward how you will manage them.
Regards, Peter
Brad, i am looking forward to your experiments, i will try someting out myself as well before i start a new shipPeter,
Agree it is not in lieu of sanding. It may make the color contrast less. Brown instead of dark black...this may mean less sanding and less noticeable?
I will experiment and post some pictures. As you said, it is too late for my and your current builds.
My apologies, it has taken way to long for this updat to coem here on this forum, but i am rather busy lately, and i did have a little setback.
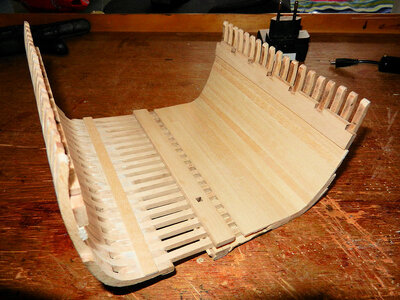
I cleaned all of the next timbers wich i have shown you on my last update, they are not totally clean but only the details on the top s are cleaned, and from the rest of the timber, i only took of the loose char.
After this i planked the inside of the hold, the Ceiling??until the deckbeam shelf.

I also made some test planking with treenails and the stain i had choosen, but having don this, my Admiral said, I don't like this.
So i asked Hans Kolderstok to send me some other stains, and i made some new test bits.
Whe came out at the same treenail, and the same stain as i wanted to use anyhow, so i could continue.
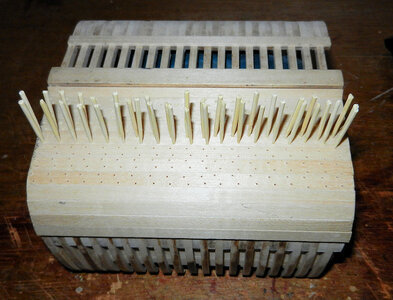
I took a drill, and started drilling holes for treenail, first only on the bottom of the crossection, to see how it would look like if there where a lot of treenails vissible.

I filled the holes with the treenails (toothpicks ) one plank at the time, the size of my fingers, and the bad sight of my eyes did not allow more toothpicks at the same time, but slowly is also working.
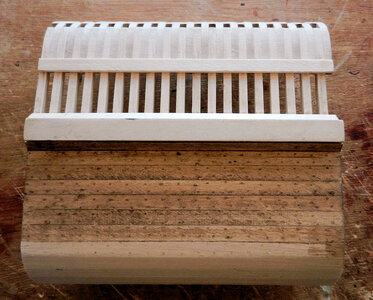
When all planks where done, i sanded the bottom of the crossection, and applied some stain, the middle-oak stain from Kolderstok, and this is the result.

After a thorough check from my admiral, i got the permission to continue, so i will.
See you next time.
I cleaned all of the next timbers wich i have shown you on my last update, they are not totally clean but only the details on the top s are cleaned, and from the rest of the timber, i only took of the loose char.
After this i planked the inside of the hold, the Ceiling??until the deckbeam shelf.

I also made some test planking with treenails and the stain i had choosen, but having don this, my Admiral said, I don't like this.
So i asked Hans Kolderstok to send me some other stains, and i made some new test bits.
Whe came out at the same treenail, and the same stain as i wanted to use anyhow, so i could continue.
I took a drill, and started drilling holes for treenail, first only on the bottom of the crossection, to see how it would look like if there where a lot of treenails vissible.

I filled the holes with the treenails (toothpicks ) one plank at the time, the size of my fingers, and the bad sight of my eyes did not allow more toothpicks at the same time, but slowly is also working.
When all planks where done, i sanded the bottom of the crossection, and applied some stain, the middle-oak stain from Kolderstok, and this is the result.

After a thorough check from my admiral, i got the permission to continue, so i will.
See you next time.
That is looking vey good, Peter. Nice planking and treenailing. Agree with your Admiral: go one!My apologies, it has taken way to long for this updat to coem here on this forum, but i am rather busy lately, and i did have a little setback.
I cleaned all of the next timbers wich i have shown you on my last update, they are not totally clean but only the details on the top s are cleaned, and from the rest of the timber, i only took of the loose char.
After this i planked the inside of the hold, the Ceiling??until the deckbeam shelf.
View attachment 434061
I also made some test planking with treenails and the stain i had choosen, but having don this, my Admiral said, I don't like this.
So i asked Hans Kolderstok to send me some other stains, and i made some new test bits.
Whe came out at the same treenail, and the same stain as i wanted to use anyhow, so i could continue.
I took a drill, and started drilling holes for treenail, first only on the bottom of the crossection, to see how it would look like if there where a lot of treenails vissible.
View attachment 434059
I filled the holes with the treenails (toothpicks ) one plank at the time, the size of my fingers, and the bad sight of my eyes did not allow more toothpicks at the same time, but slowly is also working.
When all planks where done, i sanded the bottom of the crossection, and applied some stain, the middle-oak stain from Kolderstok, and this is the result.
View attachment 434060
After a thorough check from my admiral, i got the permission to continue, so i will.
See you next time.
Regards, Peter


