Thank you for the compliment Peter, i am glad that you agree with the Admiral. I will follow her instructionsThat is looking vey good, Peter. Nice planking and treenailing. Agree with your Admiral: go one!
Regards, Peter
-

Win a Free Custom Engraved Brass Coin!!!
As a way to introduce our brass coins to the community, we will raffle off a free coin during the month of August. Follow link ABOVE for instructions for entering.
-

PRE-ORDER SHIPS IN SCALE TODAY!
The beloved Ships in Scale Magazine is back and charting a new course for 2026!
Discover new skills, new techniques, and new inspirations in every issue.
NOTE THAT OUR FIRST ISSUE WILL BE JAN/FEB 2026
You are using an out of date browser. It may not display this or other websites correctly.
You should upgrade or use an alternative browser.
You should upgrade or use an alternative browser.
This compliment from a man who is a master in hull building makes me blush, my friendOh yes! That is a double thumbs-up from me as well, my friend!
Good morning Peter. Wonderful work on those treenails. I like the outcome for sure- very realistic. Cheers GrantMy apologies, it has taken way to long for this updat to coem here on this forum, but i am rather busy lately, and i did have a little setback.
I cleaned all of the next timbers wich i have shown you on my last update, they are not totally clean but only the details on the top s are cleaned, and from the rest of the timber, i only took of the loose char.
After this i planked the inside of the hold, the Ceiling??until the deckbeam shelf.
View attachment 434061
I also made some test planking with treenails and the stain i had choosen, but having don this, my Admiral said, I don't like this.
So i asked Hans Kolderstok to send me some other stains, and i made some new test bits.
Whe came out at the same treenail, and the same stain as i wanted to use anyhow, so i could continue.
I took a drill, and started drilling holes for treenail, first only on the bottom of the crossection, to see how it would look like if there where a lot of treenails vissible.
View attachment 434059
I filled the holes with the treenails (toothpicks ) one plank at the time, the size of my fingers, and the bad sight of my eyes did not allow more toothpicks at the same time, but slowly is also working.
When all planks where done, i sanded the bottom of the crossection, and applied some stain, the middle-oak stain from Kolderstok, and this is the result.
View attachment 434060
After a thorough check from my admiral, i got the permission to continue, so i will.
See you next time.
True storyThis compliment from a man who is a master in hull building
Good afternoon Grant, thank you for the compliment, i am having one advantage, this is a dutch build ship, so it is not a problem if the tree nails ain't sitting exactly in the correct place, the dutch always have some flaws here and thereGood morning Peter. Wonderful work on those treenails. I like the outcome for sure- very realistic. Cheers Grant
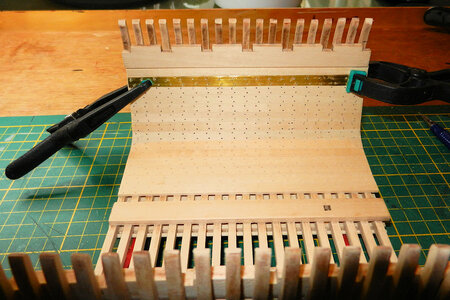
A little update on the Pinas Crossection, because there where a lot of holes to be drilled for the treenails, i tried to make a mold for the placement of the holes,
it did not work completely as i thought , but most of the nails where drilled with it.
Only there where a few planks that are somewhat smaller as the rest, so i had a bit of improvising to do, but the inside of the hull has been drilled.
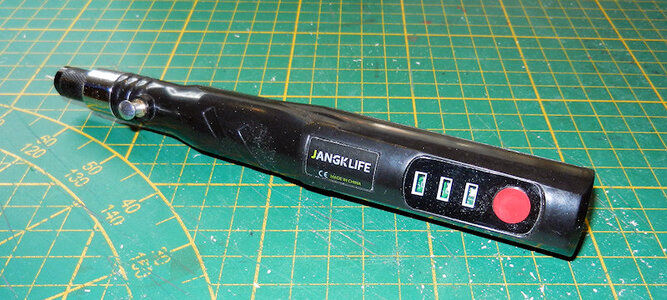
The drilling was also a little thing, i have a Proxxon with cord, and the cord was constantly teasing me during the drilling, so i went to Alie, and i treated myself to a cordless machine for a few euro's, and that is working wonderfully.
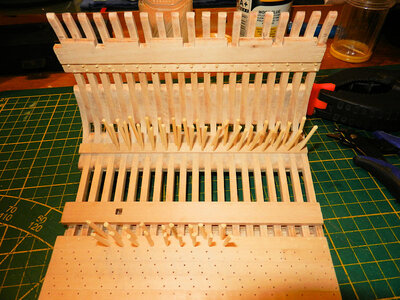
At this moment i am trying to get the treenails in, which is not going very fast, but there is some progress, as you can see.
See you all next time

it did not work completely as i thought , but most of the nails where drilled with it.
Only there where a few planks that are somewhat smaller as the rest, so i had a bit of improvising to do, but the inside of the hull has been drilled.

The drilling was also a little thing, i have a Proxxon with cord, and the cord was constantly teasing me during the drilling, so i went to Alie, and i treated myself to a cordless machine for a few euro's, and that is working wonderfully.

At this moment i am trying to get the treenails in, which is not going very fast, but there is some progress, as you can see.

See you all next time
I am really enjoying following along on this build. You have some very admirable work qualities.
HI PETER GREAT WORKI FOLLOWING GREATLY WILL START MINE SOON FOLLOWING YOURS HOPE I CAN GET IT CLOSE TO YOURS. GOD BLESS STAY SAFE YOU AND YOURS DON
+I am enjoying this also Paul, i stepped out of my comfortzone with this, but i love this build.I am really enjoying following along on this build. You have some very admirable work qualities.
This way of building is completely new for me, so it is trial and error, but there is progress
Hi Don, very nice that you are starting soon as well, i hope to see your crossection in a short time on SOS, god bless and stay safe, PeterHI PETER GREAT WORKI FOLLOWING GREATLY WILL START MINE SOON FOLLOWING YOURS HOPE I CAN GET IT CLOSE TO YOURS. GOD BLESS STAY SAFE YOU AND YOURS DON
Thank you my friend, i am very pleased with the outcome of all these holes, they could have been a bit smaller, but in that case you would hardly see themWonderful work, my friend. The holes look very good - clean and tidy - and lend the hull great realism. I also think that you got the size of the holes spot on!
- Joined
- Oct 23, 2018
- Messages
- 886
- Points
- 403

Really nice progress, Peter. Try to make your own treenails with a drawing plate and if possible with the same timber as the planks. In my opinion it look s much better than toothpicks.
A nice start with the treenails, Peter.A little update on the Pinas Crossection, because there where a lot of holes to be drilled for the treenails, i tried to make a mold for the placement of the holes,
it did not work completely as i thought , but most of the nails where drilled with it.
Only there where a few planks that are somewhat smaller as the rest, so i had a bit of improvising to do, but the inside of the hull has been drilled.
View attachment 436052
The drilling was also a little thing, i have a Proxxon with cord, and the cord was constantly teasing me during the drilling, so i went to Alie, and i treated myself to a cordless machine for a few euro's, and that is working wonderfully.
View attachment 436053
At this moment i am trying to get the treenails in, which is not going very fast, but there is some progress, as you can see.
View attachment 436054
See you all next time
Regards, Peter
Great work on the treenails. This makes the overall image so much more realistic.
Really nice progress, Peter. Try to make your own treenails with a drawing plate and if possible with the same timber as the planks. In my opinion it look s much better than toothpicks.
Thanks for the tip, and the compliment Cristian, i'll see if i can get my hands on a drawing plate, so i can try it.
Thanks Peter, it keeps me of the streetA nice start with the treenails, Peter.
Regards, Peter
Thanks Herman, that was exactly what i am trying to realizeGreat work on the treenails. This makes the overall image so much more realistic.
Hello everybody, a little update on the crossection, i don't have a lot of time for the crossection at the moment, i have to do some jobs around the house, but i did manage to do some little things, the treenailing on the inner planking, called the "Ceiling " is completed for the moment, it did cost some very bad words, but it looks like this.
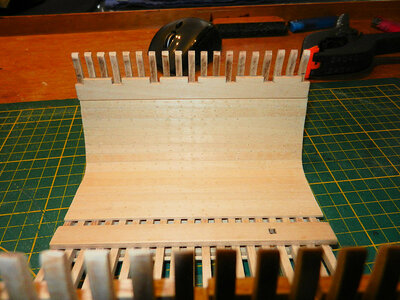
And because Cristian( @AnobiumPunctatum ) gave the tip to make my own treenails from basswood, i bought a drawing plate, and i am going to do some testing with it, so perhaps the next series of treenails will be done with treenails that are a little thinner.
For the treenails on this part of the ship i went along with the toothpicks that i had, to avoid big differences in treenailing.
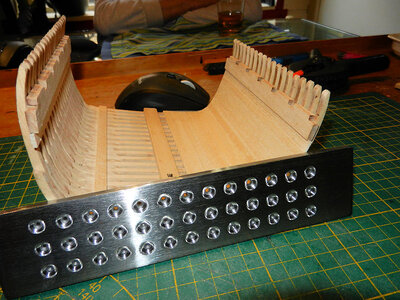
For the placement of the knees on the open side, i placed another timber, to give the knees a bit of support when placed, otherwise they would be hanging in free space. Since i am a bit clumsy, that did not look like a good idea to me.
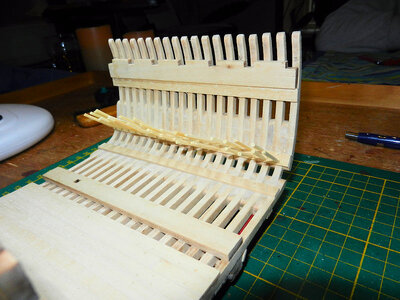
That is my tiny update for today, i hope to give you in the next update a bit more to look at
See you all next time.


And because Cristian( @AnobiumPunctatum ) gave the tip to make my own treenails from basswood, i bought a drawing plate, and i am going to do some testing with it, so perhaps the next series of treenails will be done with treenails that are a little thinner.
For the treenails on this part of the ship i went along with the toothpicks that i had, to avoid big differences in treenailing.

For the placement of the knees on the open side, i placed another timber, to give the knees a bit of support when placed, otherwise they would be hanging in free space. Since i am a bit clumsy, that did not look like a good idea to me.

That is my tiny update for today, i hope to give you in the next update a bit more to look at
See you all next time.
Good morning Peter. Stunning work. I agree that drawing wood through a draw plate is the way to go with treenails. I wish I had done this. Cheers GrantHello everybody, a little update on the crossection, i don't have a lot of time for the crossection at the moment, i have to do some jobs around the house, but i did manage to do some little things, the treenailing on the inner planking, called the "Ceiling " is completed for the moment, it did cost some very bad words, but it looks like this.
View attachment 439378
And because Cristian( @AnobiumPunctatum ) gave the tip to make my own treenails from basswood, i bought a drawing plate, and i am going to do some testing with it, so perhaps the next series of treenails will be done with treenails that are a little thinner.
For the treenails on this part of the ship i went along with the toothpicks that i had, to avoid big differences in treenailing.
View attachment 439379
For the placement of the knees on the open side, i placed another timber, to give the knees a bit of support when placed, otherwise they would be hanging in free space. Since i am a bit clumsy, that did not look like a good idea to me.
View attachment 439380
That is my tiny update for today, i hope to give you in the next update a bit more to look at
See you all next time.


