Cross-section of a 17th-century Pinas by Peter

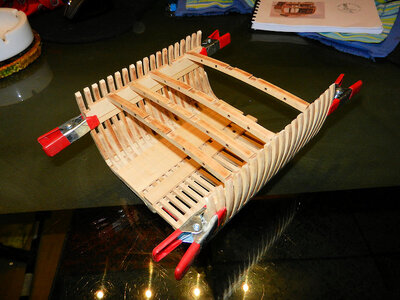
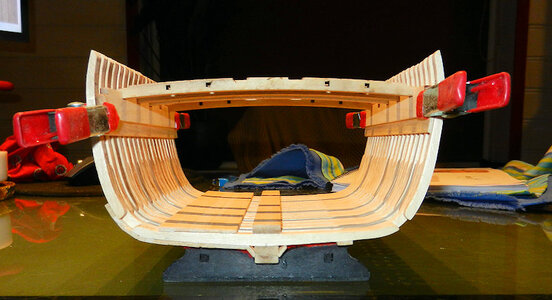
It has been a while since the last update, but i had a little set back, with the next futtocks to place, i got the same problem as with the first ones.
The side that is left open is quite reasonable, but at the other side i had some problems.

View attachment 428125

At the other side i had to place the futtocks one by one. Fit, correct and then place it, and clamp it to let it dry

View attachment 428126

At that moment, i was doubting myself, was i doing something the wrong way or what???

I checked everything that i was doing, and what did i use to do it, and after some communication with Matthias, the designer of the kit, it appears to be that the teeth of my comb are not exactly on the sice of the futtocks, they are slightly of, and my futtocks where also a somewhat thickker as they should be.
So i had to improvise a bit.

For those who wanted to buy this kit also, i still think it is an excellent kit, but don't rely on the comb alone, place the first futtocks temporarily between the floortimbers when placing the them on the keel. so you wil have a better placing of your first parts.
The other builders on modelbouwforum.nl did not have the problem as big as i had, but that was a bit of bad luck of my side i guess.
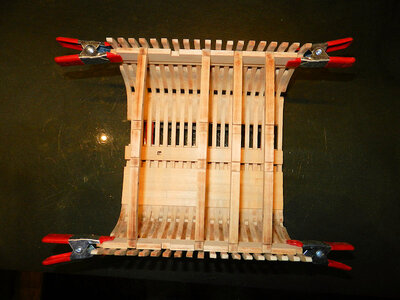
Anyway, i got all futtocks in and it looked very satisfying, altough i had to dive into my toolcabinet voor a clamp that i normally don't use for modelbuilding.

View attachment 428127

A giant clamp for these small futtocks ROTFROTFROTF

Now it is time to clean the remaining futtocks, and that wil take me a while again.
Dear Peter. It is good to see you post an update, but unfortunate that had to struggle unnecessarily. @dockattner Paul, the "comb" that Peter is referring to, acts like a kind of movable jig which should be fine provided that the thickness of the wood is consistent throughout. Having said that, I agree 100% with you that a fixed and proper jig would be far better and would ensure greater accuracy.

Nevertheless, my friend, I am very glad to see that you found a solution to the problem (even if it took a giant clamp!) and are moving forward. It is looking very good!
 
@dockattner ,Paul,
the jig is there, but it is verry simplified.
there are four combs that should control the width of the build, but i had combs where the teeth are slightly smaller as they should have been, and the material of my futtocks where slightly thicker as needed, and that was basicly the cause of my problem, but nevertheless, a great kit to build.
On my last photo, you can see the combs sitting on top of the futtocks.
Thanks Peter. I agree that the comb controls the alignment of the futtocks - my concern is more about the breadth (beam) of the ship. As the frames are being built in-situ it doesn't seem there is anything that controls their shape. But I'm still pretty new at this ship-modeling thing so I'm certain the confusion lies with me...
 
Dear Peter. It is good to see you post an update, but unfortunate that had to struggle unnecessarily. @dockattner Paul, the "comb" that Peter is referring to, acts like a kind of movable jig which should be fine provided that the thickness of the wood is consistent throughout. Having said that, I agree 100% with you that a fixed and proper jig would be far better and would ensure greater accuracy.

Nevertheless, my friend, I am very glad to see that you found a solution to the problem (even if it took a giant clamp!) and are moving forward. It is looking very good!
My dear Heinrich, your explanation of the comb is spot on, and the reason for the combs is probably that it is just a smal crossection, and perhaps the price plays a roll in it as wel, it is not an expensive kit, but despite the combs, a verry nice kit to build, first of all, no ply-wood at all, and the rest of the material has a great fit.
And as far as the problems, they are there they are teasing, but , but it is modelbuilding, and it is not a jigsaw puzzle which you just lay outROTFROTF
 
Thanks Peter. I agree that the comb controls the alignment of the futtocks - my concern is more about the breadth (beam) of the ship. As the frames are being built in-situ it doesn't seem there is anything that controls their shape. But I'm still pretty new at this ship-modeling thing so I'm certain the confusion lies with me...
That is a good point, Paul, but the modelbuilder has to take care of that issue.
Matthias Noback provided a drawing of the build , and you have to use that drawing to take of the width of the build, and if you follow this drawing, then your measurements are going good.
You can see that drawing in post nr 2. and that is working quite nicely
Thank you Peter. I'm enjoying following along...
 
My dear Heinrich, your explanation of the comb is spot on, and the reason for the combs is probably that it is just a smal crossection, and perhaps the price plays a roll in it as wel, it is not an expensive kit, but despite the combs, a verry nice kit to build, first of all, no ply-wood at all, and the rest of the material has a great fit.
And as far as the problems, they are there they are teasing, but , but it is modelbuilding, and it is not a jigsaw puzzle which you just lay outROTFROTF
Very true my friend. We should not lose sight of the fact that the emphasis is on building models and for sure that requires a certain amount of elbow grease and innovation!
 
my concern is more about the breadth (beam) of the ship.
Paul, your concerns about the beam of the ship, i temporarely placed the deckbeam shelves, and some deckbeams, and they are spot on.
If one followes the drawing , it should come out perfectly.

DSCN5418.jpg.JPGDSCN5420.jpg.JPGDSCN5421.jpg.JPG

The deckbeam shelves are not lined out perfectly yet, but as you can see, it is a perfect fit
 
Just discovered your build log and love the workmanship, pictures and documentation! Also your willingness to disassemble and re-assemble when you spot a minor discrepancy in impressive!

Thank you for sharing your work, techniques and clamps of all sizes!

I have a watch on your build and will follow to the end!
Welcome Brad, good to see you here, and i am glad that you like it.
And yes, when i build something , and i don't like what i have done, than it wil be dismantled, and re-assembled, and i will mention it as wel on the forum
That is the best way to get good advice from fellow builders.
But i saw that you are building a crossection as wel, i am going to read that tomorrow, because that is also a great build, what i just saw
 
The way you choose to build the hull is the most complicated way. The timber has to be milled exactly to the same thickness. You have to be very precise glueing it together. SO, in my opinion your result is looking really really good.
 
The way you choose to build the hull is the most complicated way. The timber has to be milled exactly to the same thickness. You have to be very precise glueing it together. SO, in my opinion your result is looking really really good.
Hello Cristian
I agree with you, that you have to work very precise when you are glueing this together, But if it works out the good way, it is very satisfactory. And so far i like it very much.
Thanks for dropping by in my build :)
 
Very nice work, @pingu57 ! And some great pictures too.

To address @dockattner 's question about providing something like a frame that keeps everything in place; that certainly would have been an option but I only thought about it after designing the kit, noticing that it was used in some other cross-sections... The reason I didn't add it afterward is not an economic one. It's that the station drawings, together with some suggestions in the manual to use the combs, and additional strips to align intermediate parts, turn out to be sufficient to get all the parts in the right place. To me this introduces a fun element, since it makes the model building process similar to the real ship building process.

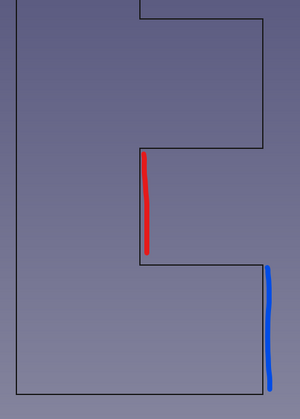
After @pingu57 mentioned his issues to me, I did change the design of the combs just a tiny bit, so the red part is slightly shorter than the blue part. Since the lower parts of the model will fit between the teeth of the comb, the longer blue line means there is more room between those parts to add the next array of parts. Note that these are really small differences, but of course, I want the building experience to be as smooth and fun as possible.

Screenshot 2024-02-16 102451.png
 
Very nice work, @pingu57 ! And some great pictures too.

To address @dockattner 's question about providing something like a frame that keeps everything in place; that certainly would have been an option but I only thought about it after designing the kit, noticing that it was used in some other cross-sections... The reason I didn't add it afterward is not an economic one. It's that the station drawings, together with some suggestions in the manual to use the combs, and additional strips to align intermediate parts, turn out to be sufficient to get all the parts in the right place. To me this introduces a fun element, since it makes the model building process similar to the real ship building process.

After @pingu57 mentioned his issues to me, I did change the design of the combs just a tiny bit, so the red part is slightly shorter than the blue part. Since the lower parts of the model will fit between the teeth of the comb, the longer blue line means there is more room between those parts to add the next array of parts. Note that these are really small differences, but of course, I want the building experience to be as smooth and fun as possible.

View attachment 428256
This is a great explanation, Matthias. What I really admire is the willingness to modify certain aspects based on customers' feedback. That is the way to move forward and develop the hobby!
 
Thank you for the designer's insight @matthiasnoback. Based on Peter's results the kit design seems very complete. Of course, not everyone is as experienced and skilled as Peter - but a section model is a great place to learn to be a better modeler. I would have been wise to do something like that before attempting my current plank-on-frame project.
 
After @pingu57 mentioned his issues to me, I did change the design of the combs just a tiny bit,
Matthias, first of all, thank you for the compliment, and i am glad that you made a small change to the combs, this will improve the building experience from future builders, a lot, and that is only good for the hobby.
As i told @Heinrich a few posts back, it is modelbuilding, and it does not have to be a JigSaw puzzle wich you just lay out. This is much more fun to do
 
Back
Top