-

Win a Free Custom Engraved Brass Coin!!!
As a way to introduce our brass coins to the community, we will raffle off a free coin during the month of August. Follow link ABOVE for instructions for entering.
-

PRE-ORDER SHIPS IN SCALE TODAY!
The beloved Ships in Scale Magazine is back and charting a new course for 2026!
Discover new skills, new techniques, and new inspirations in every issue.
NOTE THAT OUR FIRST ISSUE WILL BE JAN/FEB 2026
You are using an out of date browser. It may not display this or other websites correctly.
You should upgrade or use an alternative browser.
You should upgrade or use an alternative browser.
D805 Piet Hein, ex HMS Serapis, WW2 S class destroyer
- Thread starter Marquinius
- Start date
- Watchers 14
- Joined
- Jul 18, 2024
- Messages
- 475
- Points
- 323

The detailing has begun ... from my last ship I know that I best work from one "compartment" to the next. In this case I decide to start filling in the bridge details. Hmm ... a 40mm tall director control tower has taken some 8 hours and I am not done yet. And I have to see if all the work actually will be discernible, as "rivets" of 0.3 mm diameter have a tendency to disappear in the background. We will see. Here's halfway, with still another side ladder and such to do and to place rivet lines around the tubular shape.
Never thought my geometry lessons of decades ago would come in handy
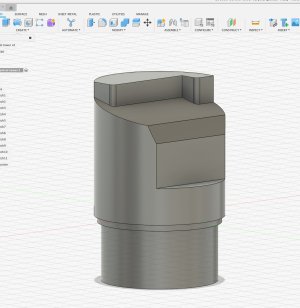
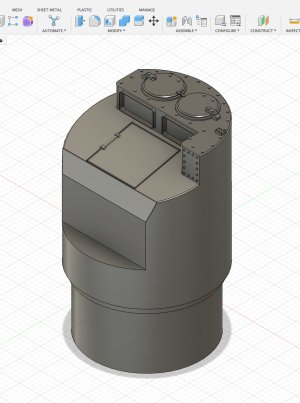
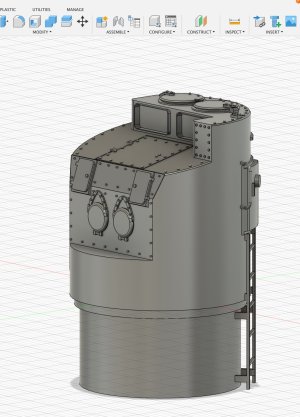
Never thought my geometry lessons of decades ago would come in handy


- Joined
- Jul 18, 2024
- Messages
- 475
- Points
- 323

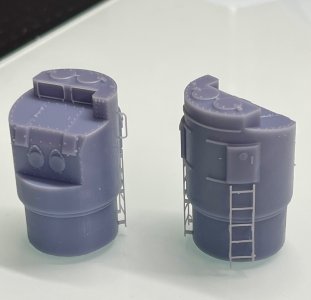
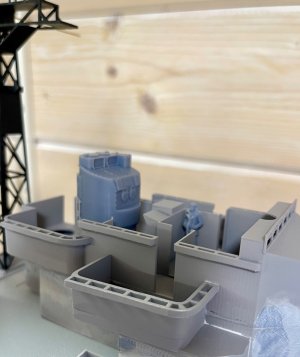
I printed three of which two were successful. The third got lost in the resin tank: good opportunity to clean the machine .
To bring things in perspective I always place one or two sailors on the model. I’m still looking for sailors in typical North Atlantic gear in 72 scale, so for now I use my lone sailor (US) model.
All is still loose parts and most even without primer. Another lesson learned: making sure it all fits and is of high quality before getting the CA out.


- Joined
- Jul 18, 2024
- Messages
- 475
- Points
- 323

We have this phenomenon "sunshine' once every - long time -, so I am doing other stuff. Feels good though.
Oh, and I sold my FDM printer and of course bought a new one. So awaiting new techie toys before I will probably reprint all of the deckhouses .
.
In the mean time, the true boss is keeping an eye on things.

Oh, and I sold my FDM printer and of course bought a new one. So awaiting new techie toys before I will probably reprint all of the deckhouses
 .
.In the mean time, the true boss is keeping an eye on things.

- Joined
- Aug 14, 2018
- Messages
- 825
- Points
- 403

Hi Marco seeing you truly great looking rangefinders/directors reminded of a pic of Winnie watching our boys give what to the Nazis during the south of France landings, that I seen recently, and this reminded me I wanted to ask you if you can tell me what this opening is.(arrowed) I thought it might be some sort of 'clear view' but it seems a strange place for it. Any ideas?I printed three of which two were successful. The third got lost in the resin tank: good opportunity to clean the machine .
To bring things in perspective I always place one or two sailors on the model. I’m still looking for sailors in typical North Atlantic gear in 72 scale, so for now I use my lone sailor (US) model.
All is still loose parts and most even without primer. Another lesson learned: making sure it all fits and is of high quality before getting the CA out.
View attachment 515442
View attachment 515443

It was sunny here today as well JJ..
- Joined
- Jul 18, 2024
- Messages
- 475
- Points
- 323

I had to go to ‘perplexity’ , which is a really handy tool when you want to get into things. This image looks like a Hunt class or Tribal class destroyer. These had fixed recessed positions for an Aldis lamp.
Does this make sense? Double checking assured that some destroyers had this set up.
Does this make sense? Double checking assured that some destroyers had this set up.
- Joined
- Jul 18, 2024
- Messages
- 475
- Points
- 323

Oh, and perplexity could “see” the red arrow, so knew what I was asking for?
- Joined
- Jul 18, 2024
- Messages
- 475
- Points
- 323

But … it could well be a clear view screen. I looked at other bridges and found a lot of those clear view screens port and starboard.
- Joined
- Jul 18, 2024
- Messages
- 475
- Points
- 323

With all the chores and other hobbies D805 sometimes goes on the back burner. But never for too long.
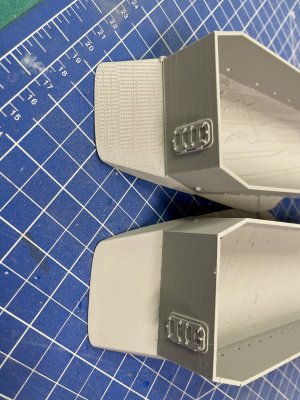
I am still in some trial and error phase to get my 3D prints to a level I really like, especially where largish flat surfaces are mingled with fine detail. If you look at the deckhouses you'll agree that the general shape is OK. But I really really want to print those little details with my FDM (Filament) printer. Of course I can revert to resin, but that's not really what you print flat surfaces with. And ... I sold my old FDM printer and now have this brand new HUGE Bambu Lab H2D ... so there is some pressure to get it right. And guess what, the machine delivers. I finally can print larger structures and the support management is top notch. The top model shows damaged by supports underside and layer lines on side surfaces, bottom shows smooth print all over. Same STEP file, so just a printer thingy.
So another small step, albeit on a BIG machine . Side note: of course I could have just done the thing from balsa and small bent wire strips, like JJ does ... which is actually more awesome than printing. But that's one step too far for me. Perhaps at a later stage.
I am still in some trial and error phase to get my 3D prints to a level I really like, especially where largish flat surfaces are mingled with fine detail. If you look at the deckhouses you'll agree that the general shape is OK. But I really really want to print those little details with my FDM (Filament) printer. Of course I can revert to resin, but that's not really what you print flat surfaces with. And ... I sold my old FDM printer and now have this brand new HUGE Bambu Lab H2D ... so there is some pressure to get it right. And guess what, the machine delivers. I finally can print larger structures and the support management is top notch. The top model shows damaged by supports underside and layer lines on side surfaces, bottom shows smooth print all over. Same STEP file, so just a printer thingy.
So another small step, albeit on a BIG machine

- Joined
- Aug 14, 2018
- Messages
- 825
- Points
- 403

Wow Marco the difference is outstanding, I have bought commercially produced 3D and have hated the layering lines that ruin the realism and have had to spend ages smoothing the surface, but you and your new machine is way better. Can the door closing levers be printed longer? or is that a bridge too far? Thank you for the credit but conversely I think what you are doing in 3D is way beyond anything I could manage. I wish I was twenty years younger and have time to work out how to use this technology, but then that's not the first time I have wished that!With all the chores and other hobbies D805 sometimes goes on the back burner. But never for too long.
I am still in some trial and error phase to get my 3D prints to a level I really like, especially where largish flat surfaces are mingled with fine detail. If you look at the deckhouses you'll agree that the general shape is OK. But I really really want to print those little details with my FDM (Filament) printer. Of course I can revert to resin, but that's not really what you print flat surfaces with. And ... I sold my old FDM printer and now have this brand new HUGE Bambu Lab H2D ... so there is some pressure to get it right. And guess what, the machine delivers. I finally can print larger structures and the support management is top notch. The top model shows damaged by supports underside and layer lines on side surfaces, bottom shows smooth print all over. Same STEP file, so just a printer thingy.
So another small step, albeit on a BIG machine. Side note: of course I could have just done the thing from balsa and small bent wire strips, like JJ does ... which is actually more awesome than printing. But that's one step too far for me. Perhaps at a later stage.
View attachment 519739
Keep pushing that envelope.
Regards
Just wondering how you can remove the swirl marks in the surface? Great work by the way.
- Joined
- Jul 18, 2024
- Messages
- 475
- Points
- 323

I’m not sure which swirl marks you mean? The bottom image is with the new printer. The only problem I still see, are the layer lines on the side of the deckhouse. FDM will never completely be without them.Just wondering how you can remove the swirl marks in the surface? Great work by the way.
But I probably misunderstood your question. And I appreciate critical remarks, as that’s the way to go forward and learn.
- Joined
- Jul 18, 2024
- Messages
- 475
- Points
- 323

Funny though … I’m having more issues with what I thought to be the straightforward parts. Looking forward to the detailed parts, as they will prove to be simple … I hope.
- Joined
- Jul 18, 2024
- Messages
- 475
- Points
- 323

The door levers can probably be printed longer, and I will try, but the hard part is removing the supports. Those levers simply snap off.Wow Marco the difference is outstanding, I have bought commercially produced 3D and have hated the layering lines that ruin the realism and have had to spend ages smoothing the surface, but you and your new machine is way better. Can the door closing levers be printed longer? or is that a bridge too far? Thank you for the credit but conversely I think what you are doing in 3D is way beyond anything I could manage. I wish I was twenty years younger and have time to work out how to use this technology, but then that's not the first time I have wished that!
Keep pushing that envelope.
Regards
- Joined
- Jul 18, 2024
- Messages
- 475
- Points
- 323

Ehrm … because it’s fun trying? But if the last few trial and error don’t deliver, I’ll go that way. But it’s quite a kicker to see how fine you can print filament.Why don't you print large flat parts with FDM, but detailing with resin?
About detail: it’s no so much the doors. I have them as separate entities, so can resin print those and super glue them to the fdm sides. No problem. But those really small half circle water deflectors over the portholes are finicky to print, let alone glue. It’s 1/72 scale, so these are 0.2 thick little ribs of about 2mm length.
- Joined
- Jul 18, 2024
- Messages
- 475
- Points
- 323

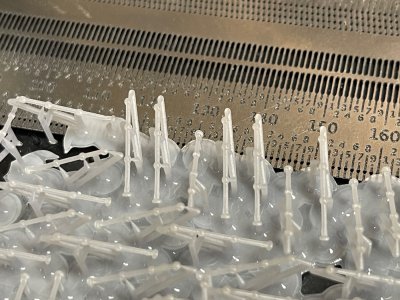
A future chore requires some thinking: railings. In 1/72 scale. So a first trial to print the stanchions. Very successful print-wise , but completely useless for the ship. “Fiddly” is an understatement. I’m not even going to try to get them of the heap, as they already started waving in the wind when I picked it up.
I’ll go for photo etch via China.
I’ll go for photo etch via China.

- Joined
- Aug 14, 2018
- Messages
- 825
- Points
- 403

Hi Marco I have tried the PE, and them being flat, and even if you build up lots of coats of paint the still don't look realistic in 1/48, not sure about 1/76 you would have to try them. Your picture above reminds me of something that got loose from Quatermass's pit; love it! Seriously though if you don't try you will never know and that's what I like about this project.
All the best JJ..
All the best JJ..


