Hmm. I wrote off the first curl as doable - now this second element has gotten my attention. You seem to have an untapped variety of skills available to you my friend! Bravo!
-

Win a Free Custom Engraved Brass Coin!!!
As a way to introduce our brass coins to the community, we will raffle off a free coin during the month of August. Follow link ABOVE for instructions for entering.
-

PRE-ORDER SHIPS IN SCALE TODAY!
The beloved Ships in Scale Magazine is back and charting a new course for 2026!
Discover new skills, new techniques, and new inspirations in every issue.
NOTE THAT OUR FIRST ISSUE WILL BE JAN/FEB 2026
You are using an out of date browser. It may not display this or other websites correctly.
You should upgrade or use an alternative browser.
You should upgrade or use an alternative browser.
No lion is necessary - a "simple" cat (head) would be already very good - step by step
starting with smaller cats
starting with smaller cats
Good evening Herman. Wow that is brilliant- carving skills in your repertoire as well. Cheers GrantSome further work on the stem elements.
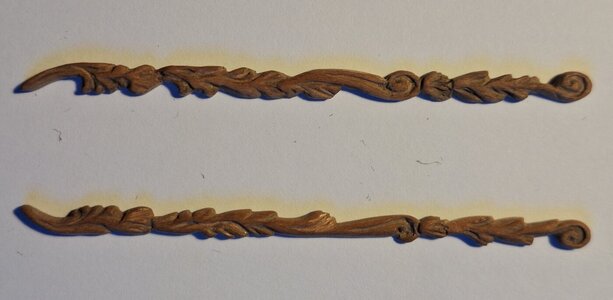
A slot has been milled/filed in which ornamentation will come. In front of that is a (narrow) space for the figurehead. On top of all this the next curved beam ending in a decorated curl. The inspiration for this curl came from the stem of the replica.
The elements are not glued yet.
View attachment 434857
View attachment 434856
View attachment 434855
View attachment 434854
Very nice carvings, Herrmann. These things are simply fascinating.
Hmm. I wrote off the first curl as doable - now this second element has gotten my attention. You seem to have an untapped variety of skills available to you my friend! Bravo!
wonderful carving
Good evening Herman. Wow that is brilliant- carving skills in your repertoire as well. Cheers Grant
Very nice carvings, Herrmann. These things are simply fascinating.
Wow and a double WOW! I am sure that lion is in within your scope of rapidly and ever-expanding capabilities, Herman. And please no kitty's head for the 7P. Only a South African lion will do her justice!
Thank you all for the positive comments.
Although I want to proceed my build by making the wales and gunports I could not let go the idea for designing the ornaments for the stem and stern beam and of course for the lion figurehead.
The ornamentation for the stern beam (the heigth approx. 5 mm.)
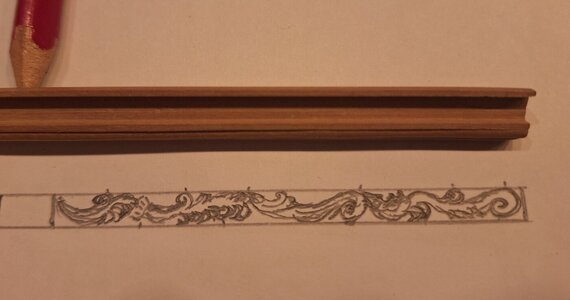
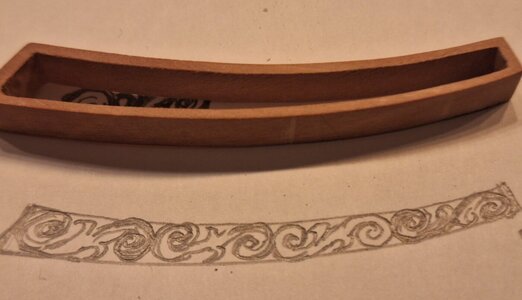
Ornamentation for the stem (the heigth goes from 4 to 6 mm.):
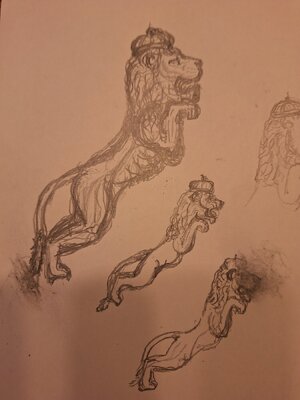
And the first drawings for the South African lion. I must say it is not an easy job to draw a convincing image of a lion (with crown) and this is only as seen from Ithe side. It certainly will take several more tries and a front view. I think that you must be able to draw the image of what you want to carve otherwise it will be much harder too make that carving.
- Joined
- Oct 23, 2018
- Messages
- 880
- Points
- 403

I do not have the talent to carve figures. I tried it one time. So I am happy that are other techniques available for such figurines. I wish you a lot of fun during this project in your project.
That’s a very good step, Herman. Making the drawing you made a imprint in your head for further visualization during the carving. Looking forwards to this carvings of yours.Thank you all for the positive comments.
Although I want to proceed my build by making the wales and gunports I could not let go the idea for designing the ornaments for the stem and stern beam and of course for the lion figurehead.
The ornamentation for the stern beam (the heigth approx. 5 mm.)
View attachment 435371
Ornamentation for the stem (the heigth goes from 4 to 6 mm.):
View attachment 435372
And the first drawings for the South African lion. I must say it is not an easy job to draw a convincing image of a lion (with crown) and this is only as seen from Ithe side. It certainly will take several more tries and a front view. I think that you must be able to draw the image of what you want to carve otherwise it will be much harder too make that carving.
View attachment 435373
Regards, Peter
In my time at Batavia Werf, Timon Pasterkamp was in the process of making a 1:10 scale carving proposal for the Provincien’s figurehead. In my opinion, the model was animated and lively, and better proportioned than what they ended up carving at full scale:
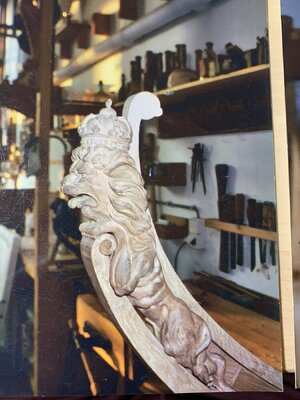
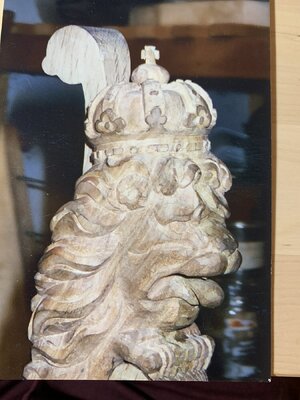
I liked it so much that I tried my best to copy it in walnut:
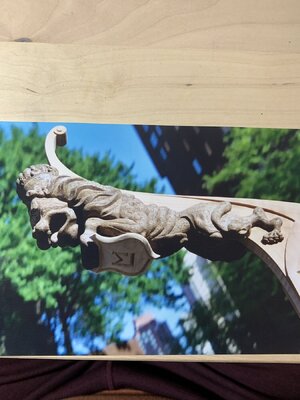
I didn’t really get the proportions quite right, but I was satisfied with the details.
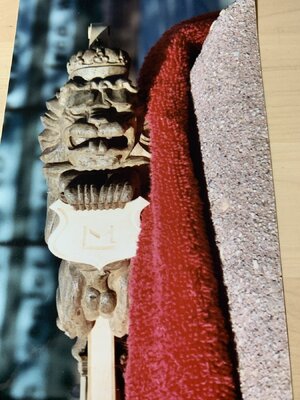
I could have improved upon this effort, if the torso were a little more elongated, and the back a little more arched. I think you capture those particular features quite well in your sketches above.


I liked it so much that I tried my best to copy it in walnut:

I didn’t really get the proportions quite right, but I was satisfied with the details.

I could have improved upon this effort, if the torso were a little more elongated, and the back a little more arched. I think you capture those particular features quite well in your sketches above.
Hi Marc. Thank you for showing these carvings. I think you are quite right. Timon Pasterkamp did a fabulous job. I too would have preferred it over the full scale carved figurehead now on the replica.
I hope I can come close to his carving but on a scale of 1:50 it is tiny.
I hope I can come close to his carving but on a scale of 1:50 it is tiny.
Last edited:
While working on the wales I alternate this part of the build with some work on the ornaments. The carving work for the stern beam has been completed.
First I made a strip of wood to fit into the stern beam. That strip was glued onto a piece of paper that was glued onto a piece of wood to get a solid base for carving. Once finished it is easy to remove the carving from the wood base by means of a knife -the paper is then scraped form the carving.
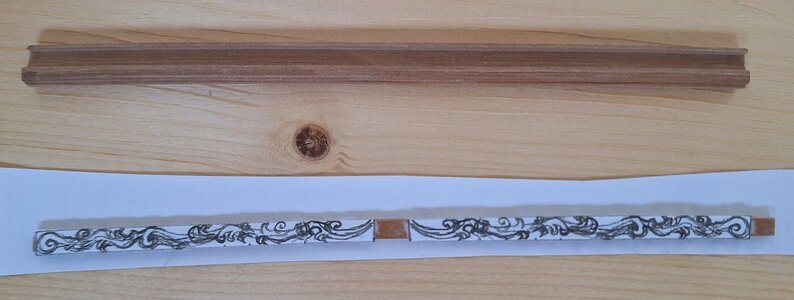
The carvings for each side of the stern beam.
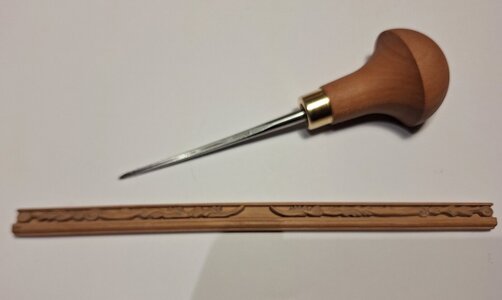
The palm gouge I used to make this carving (together with a file and finished with steel wool).
The end result of the carvings in the stern beam.

Later the beam and carvings will get the color ochre yellow. But for now they will be stored.
First I made a strip of wood to fit into the stern beam. That strip was glued onto a piece of paper that was glued onto a piece of wood to get a solid base for carving. Once finished it is easy to remove the carving from the wood base by means of a knife -the paper is then scraped form the carving.

The carvings for each side of the stern beam.

The palm gouge I used to make this carving (together with a file and finished with steel wool).

The end result of the carvings in the stern beam.

Later the beam and carvings will get the color ochre yellow. But for now they will be stored.
Wonderful Herman!
- Joined
- Oct 23, 2018
- Messages
- 880
- Points
- 403

Really wonderful carving
Good afternoon Herman. Wow. I’m blown away at your carvings. I cannot carve and admire you guys who can achieve this. Cheers GrantWhile working on the wales I alternate this part of the build with some work on the ornaments. The carving work for the stern beam has been completed.
First I made a strip of wood to fit into the stern beam. That strip was glued onto a piece of paper that was glued onto a piece of wood to get a solid base for carving. Once finished it is easy to remove the carving from the wood base by means of a knife -the paper is then scraped form the carving.
View attachment 437485
The carvings for each side of the stern beam.
View attachment 437487
The palm gouge I used to make this carving (together with a file and finished with steel wool).
View attachment 437486
The end result of the carvings in the stern beam.
View attachment 437488
Later the beam and carvings will get the color ochre yellow. But for now they will be stored.
- Joined
- Apr 20, 2020
- Messages
- 6,224
- Points
- 738

wonderful carving dear HermanWhile working on the wales I alternate this part of the build with some work on the ornaments. The carving work for the stern beam has been completed.
First I made a strip of wood to fit into the stern beam. That strip was glued onto a piece of paper that was glued onto a piece of wood to get a solid base for carving. Once finished it is easy to remove the carving from the wood base by means of a knife -the paper is then scraped form the carving.
View attachment 437485
The carvings for each side of the stern beam.
View attachment 437487
The palm gouge I used to make this carving (together with a file and finished with steel wool).
View attachment 437486
The end result of the carvings in the stern beam.
View attachment 437488
Later the beam and carvings will get the color ochre yellow. But for now they will be stored.
This is proof that in addition to being a model builder, you are also a gifted woodcarver. Just a big WOW, Herman.While working on the wales I alternate this part of the build with some work on the ornaments. The carving work for the stern beam has been completed.
First I made a strip of wood to fit into the stern beam. That strip was glued onto a piece of paper that was glued onto a piece of wood to get a solid base for carving. Once finished it is easy to remove the carving from the wood base by means of a knife -the paper is then scraped form the carving.
View attachment 437485
The carvings for each side of the stern beam.
View attachment 437487
The palm gouge I used to make this carving (together with a file and finished with steel wool).
View attachment 437486
The end result of the carvings in the stern beam.
View attachment 437488
Later the beam and carvings will get the color ochre yellow. But for now they will be stored.
Regards, Peter
Thank you all for the positive comments and likes.
My focus on the build is becoming a bit fragmented. Before attaching the stem I want to make the wales to be able to adjust the stem to the protruding wales. Before attaching the wales I want to have the gunport lids ready so that they can be sanded flush with the hull. It might also be wise to nail the hull (still gathering courage for that part of the build) before attaching the wales for ease of sanding. And before finishing the hull (probably shellac) further reinforcements for the hull (the protection against damage by the anchors / anchor-cable) and the rests will be made.
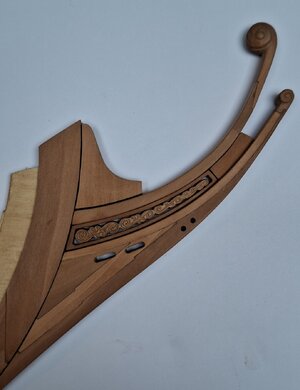
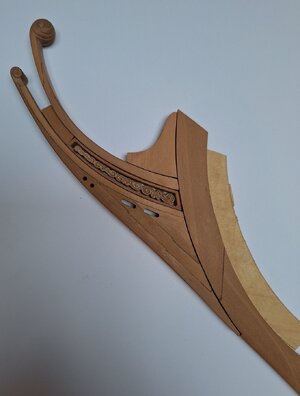
In the meantime I did some further carving for the stem.
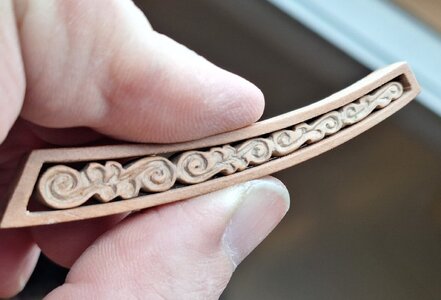
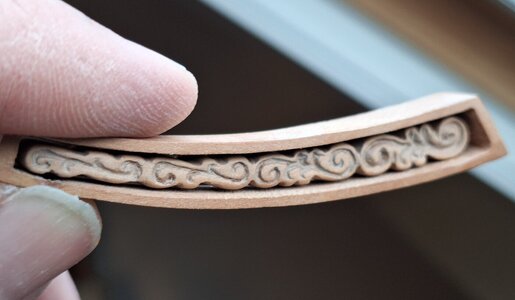
All parts of the stem that are now finished:
My focus on the build is becoming a bit fragmented. Before attaching the stem I want to make the wales to be able to adjust the stem to the protruding wales. Before attaching the wales I want to have the gunport lids ready so that they can be sanded flush with the hull. It might also be wise to nail the hull (still gathering courage for that part of the build) before attaching the wales for ease of sanding. And before finishing the hull (probably shellac) further reinforcements for the hull (the protection against damage by the anchors / anchor-cable) and the rests will be made.
In the meantime I did some further carving for the stem.


All parts of the stem that are now finished:


