Nice neat planking.Stern
The stern cabin windows are a mixture of pre cut timber shapes and brass.
View attachment 322468View attachment 322473
View attachment 322489
To achieve the colouring on there brass I painted the brass pre-formed item completely with black acrylic paint as in the top of the right image above. I then used a 600 grit sand paper pad to gently rub across the entire plate rubbing away the paint on the highest surfaces. Similar approach was applied to the decoration at the top of the cabin windows.
Deck Fittings
Deck fittings were applied. Not totally happy with the brown colour but too late was the cry. In future I would tend towards some sort of lighter stain rather than using the acrylic paints. These were painted before joining this forum and I suspect there are articles relating to painting and staining.
View attachment 322469View attachment 322470View attachment 322471View attachment 322472
View attachment 322478
I tend not to always fully follow instructions. There are railings that run along the length of the ship but I decided to leave these until later in the build as they looked like they could be easily bumped. That did prove to be the case so this change of order was justified.
Launch and Cannons
The launch was an interesting little sub project. It is a hull build albeit in miniature. I built the basic launch as per the instructions and around this time discovered SOS.
View attachment 322484
I came across the work of Luigisoft on SOS who was asking a question about rigging and he posted an image that inspired me in a number of ways:
1) Review colours
2) Add more detail e.g. add oars
This resulted in a much improved result.
View attachment 322476View attachment 322479
I added blocks and "rope" to the cannon which were not in the plan.
View attachment 322481
Bow
Additional fittings were constructed and added. Although the brass finished looked attractive I also painted all brass fittings (hinges, handles etc.) to be black as that would seem to be more in keeping with an ocean going vessel. This black painting is not shown in these images. Also the yellow rope stays were repainted brown as the yellow did not look correct.
View attachment 322477View attachment 322475
-

Win a Free Custom Engraved Brass Coin!!!
As a way to introduce our brass coins to the community, we will raffle off a free coin during the month of August. Follow link ABOVE for instructions for entering.
-

PRE-ORDER SHIPS IN SCALE TODAY!
The beloved Ships in Scale Magazine is back and charting a new course for 2026!
Discover new skills, new techniques, and new inspirations in every issue.
NOTE THAT OUR FIRST ISSUE WILL BE JAN/FEB 2026
You are using an out of date browser. It may not display this or other websites correctly.
You should upgrade or use an alternative browser.
You should upgrade or use an alternative browser.
Endeavour by Occre 1:54 [COMPLETED BUILD]
- Thread starter KeithLyall
- Start date
- Watchers 31
My congratulations for reaching this important stage of building - Looking very goodHull Completed
Well after 18 months of build the hull is finally complete. Overall pleased with the result ....
View attachment 323303
View attachment 323301
View attachment 323302View attachment 323304View attachment 323305View attachment 323308
View attachment 323307View attachment 323310
View attachment 323315View attachment 323316View attachment 323317
View attachment 323306
View attachment 323309
View attachment 323311
Hi Keith,
Your model is coming along well.
I am building the same ship from Occre. I have a build log on this site. Have a look, if you are interested.
There are some pitfuls along the way. I find the plans for the rigging not so good.
Best of luck with your build.
The link: https://shipsofscale.com/sosforums/threads/hmb-endeavour.4655/
Trevor
- Joined
- Jun 13, 2022
- Messages
- 310
- Points
- 168

Hi Trevor,Hi Keith,
Your model is coming along well.
I am building the same ship from Occre. I have a build log on this site. Have a look, if you are interested.
There are some pitfuls along the way. I find the plans for the rigging not so good.
Best of luck with your build.
The link: https://shipsofscale.com/sosforums/threads/hmb-endeavour.4655/
Trevor
Thank you for your feedback and for directing me to your build log. I wish I had come across that much earlier as it is very helpful. I have experienced some of the challenges that you have highlighted. I have looked through your very thorough log and and I am already planning some changes to my model based on some of your observations particularly in relation to the rigging.
Best regards
Keith
Hi Keith,
Firstly may I say you have done a really great job on building you ship.
Your skill level is way above mine, I tend to lack patience nowadays.
Secondly that is abetter kit altogether and much more detailed.
Again great work.
I will now be following this build.
Firstly may I say you have done a really great job on building you ship.
Your skill level is way above mine, I tend to lack patience nowadays.
Secondly that is abetter kit altogether and much more detailed.
Again great work.
I will now be following this build.
- Joined
- Jun 13, 2022
- Messages
- 310
- Points
- 168

I use the needle threader shown in the bowsprit image above. It is pushed through any hole and springs out to form a diamond shape through which the thread can be easily passed and then pulled back through the hole pulling the thread with it. If this does not make sense let me know and I can provide a set of images of the process.Thrilled with your effort, and quality, will be watching out for your rigging and sails videos. Question, threading the shrouds through the cats eyes after they were in position, and glued? Any clues about getting the needle through the tiny holes? dnettleton@outlook.com
- Joined
- Jun 13, 2022
- Messages
- 310
- Points
- 168

Hi Martin,Hi Keith,
Firstly may I say you have done a really great job on building you ship.
Your skill level is way above mine, I tend to lack patience nowadays.
Secondly that is abetter kit altogether and much more detailed.
Again great work.
I will now be following this build.
Thanks for your feedback. I think you are selling yourself short as you have done a great job, particularly if your first model. I built Mantua’s President as my first kit. Although it lacked detail I learned a lot of techniques and determined tools that I needed to assist with construction. I think you a correct with regard to the detail of the kit. The Occre kit has a lot of detail which I was looking for following building the President. However based on forums on SOS I have found advice and guidance on adding even more detail. From a patience perspective I find that I do most work in the winter during wet miserable days and also do short stints particularly with tedious tasks or even mix with more interesting tasks.
Thank you for the comment Keith.
Altho I have been model making for many years I seem to struggle to get that professional Finnish that you guys do. (if that makes sense)
Martin555.
Altho I have been model making for many years I seem to struggle to get that professional Finnish that you guys do. (if that makes sense)
Martin555.
- Joined
- Jun 13, 2022
- Messages
- 310
- Points
- 168

Firstly Happy New Year to everyone and I hope 2023 is a good year for all including many successful builds.
It has been a while since I last posted. In August 2022 (where did that time go?) I had completed the hull and deck fittings of the Occre Endeavour and was starting to progress on the masts, yards and rigging. Since my last post I have been making progress particularly over the festive period when I managed to contract Covid and hence ended up isolating which was an ideal time to further my build. I had a production line of masts and yards as below ...
Building the Tops
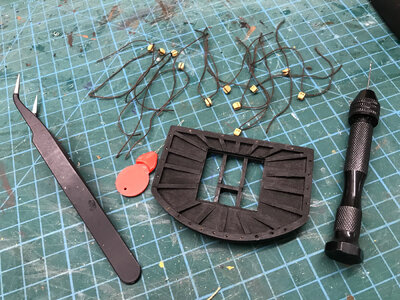
A threader is ideal for getting threads through holes
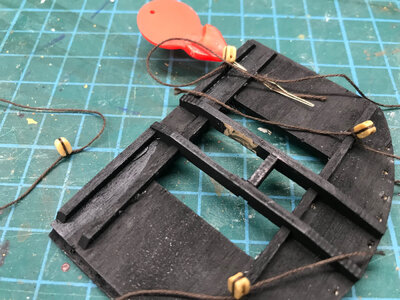
... and an extra pair of "hands" is always useful to hold the tops, plus a pair of locking forceps
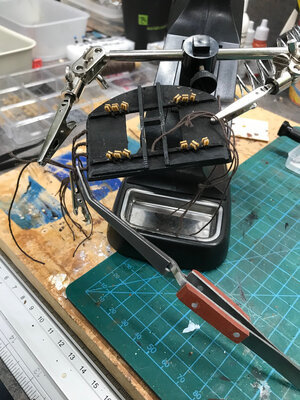
The completed top attached to the mast via cheeks.
Note: I added a rail to the top after seeing an example on another build. This was not part of the Occre plan
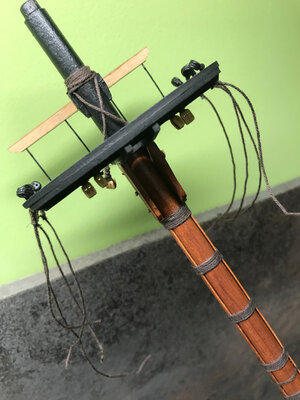
I then continued to build the different parts of the masts using the plans ...
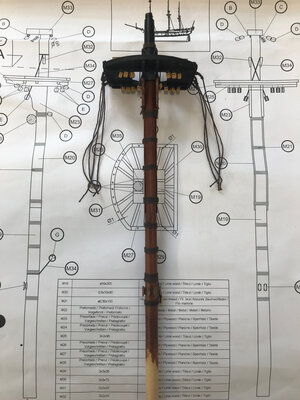
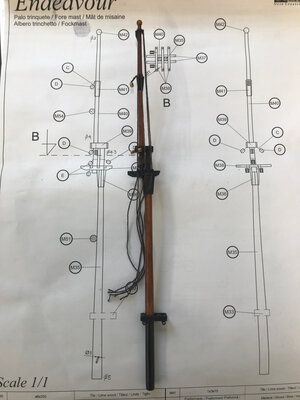
The rigging feels like a game of chess, trying to determine the optimum construction order giving easiest access to the build.
What has worked for me is:
1) Build/fit out the masts (but all mast sections are currently separate i.e. I have not yet attached the topmast to the lower mast, as in the photo above)
2) Fit out the yards with pulleys and fixings
3) Glue the Mizzen lower mast into the hull
4) Attach Mizzen lower mast stays
5) Attach the shrouds (and ratlines) on the Mizzen lower mast. Note: By not attaching the top mast at this point it is easier to attach the shrouds
6) Attach the Mizzen top mast to the lower mast
7) Attach the upper shrouds and ratlines
8) Attach the futtock shrouds
9) Attach the yards and thread the running rigging
Mizzen mast attached to hull (3)
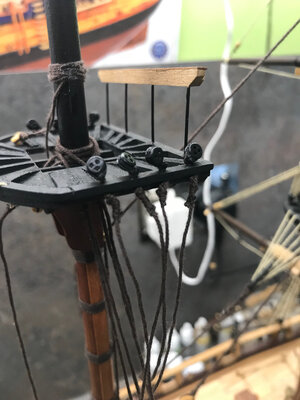
Shrouds on lower Mizzen mast (5)
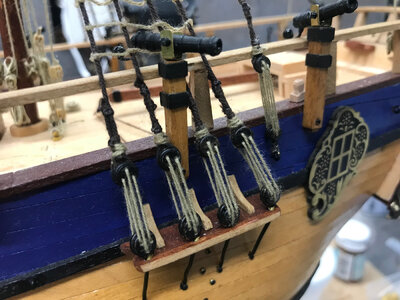
Notes:
1) Initially I tied a knot in the end of the deadeye rigging. However this meant that I had to get a threader into the back of the deadeye i.e. between the hull and dead eye which was painful. As such I changed approach and threaded the deadeyes in reverse so that I was pulling the thread from the back of the lower deadeye which meant the threader was pushed through the dead eye from the front which was much easier. Once all dead eyes were threaded I pulled the thread through to tie a knot before tensioning.
2) When threading the deadeyes and ratlines, don't skimp on thread. On occassions I did so and ended up cursing as it was difficult tying knots with little spare thread to work with.
Mizzen mast shrouds, ratlines, (7) and yards installed with running rigging (9)
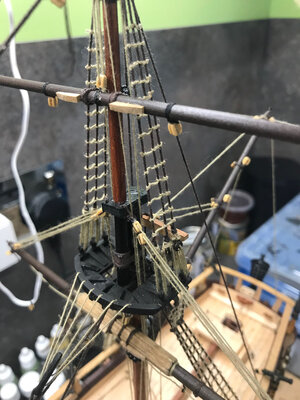
Note for the Occre Endeavour, the rigging plans are poor compared to the rest of the paperwork provided i.e. the build of the hull is well documented. There appear to be additional pulleys and the plan view of the deck does not show all of the points where running rigging is attached. It has involved a lot of head scratching at times.
As an aside, tools that I have found most useful are ...
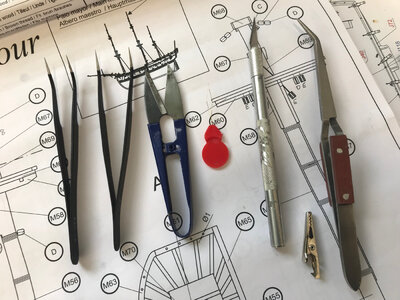
1) Tweezers with 45 degree tips are excellent for tying knots and accessing tight areas of the model
2) Bonzai snips are great for cutting threads, particularly the ends of ratlines
3) Threader is ideal for getting threads through deadeyes
4) Scalpel for applying spots of glue to knots
5) Crocodile clip for holding threads whilst tying knots
6) Spring loaded forceps ideal for holding the shrouds whilst attaching to the deadeyes
I'll post a few more images of the main and fore mast steps as I progress those.
It has been a while since I last posted. In August 2022 (where did that time go?) I had completed the hull and deck fittings of the Occre Endeavour and was starting to progress on the masts, yards and rigging. Since my last post I have been making progress particularly over the festive period when I managed to contract Covid and hence ended up isolating which was an ideal time to further my build. I had a production line of masts and yards as below ...
Building the Tops

A threader is ideal for getting threads through holes

... and an extra pair of "hands" is always useful to hold the tops, plus a pair of locking forceps

The completed top attached to the mast via cheeks.
Note: I added a rail to the top after seeing an example on another build. This was not part of the Occre plan

I then continued to build the different parts of the masts using the plans ...


The rigging feels like a game of chess, trying to determine the optimum construction order giving easiest access to the build.
What has worked for me is:
1) Build/fit out the masts (but all mast sections are currently separate i.e. I have not yet attached the topmast to the lower mast, as in the photo above)
2) Fit out the yards with pulleys and fixings
3) Glue the Mizzen lower mast into the hull
4) Attach Mizzen lower mast stays
5) Attach the shrouds (and ratlines) on the Mizzen lower mast. Note: By not attaching the top mast at this point it is easier to attach the shrouds
6) Attach the Mizzen top mast to the lower mast
7) Attach the upper shrouds and ratlines
8) Attach the futtock shrouds
9) Attach the yards and thread the running rigging
Mizzen mast attached to hull (3)

Shrouds on lower Mizzen mast (5)

Notes:
1) Initially I tied a knot in the end of the deadeye rigging. However this meant that I had to get a threader into the back of the deadeye i.e. between the hull and dead eye which was painful. As such I changed approach and threaded the deadeyes in reverse so that I was pulling the thread from the back of the lower deadeye which meant the threader was pushed through the dead eye from the front which was much easier. Once all dead eyes were threaded I pulled the thread through to tie a knot before tensioning.
2) When threading the deadeyes and ratlines, don't skimp on thread. On occassions I did so and ended up cursing as it was difficult tying knots with little spare thread to work with.
Mizzen mast shrouds, ratlines, (7) and yards installed with running rigging (9)

Note for the Occre Endeavour, the rigging plans are poor compared to the rest of the paperwork provided i.e. the build of the hull is well documented. There appear to be additional pulleys and the plan view of the deck does not show all of the points where running rigging is attached. It has involved a lot of head scratching at times.
As an aside, tools that I have found most useful are ...

1) Tweezers with 45 degree tips are excellent for tying knots and accessing tight areas of the model
2) Bonzai snips are great for cutting threads, particularly the ends of ratlines
3) Threader is ideal for getting threads through deadeyes
4) Scalpel for applying spots of glue to knots
5) Crocodile clip for holding threads whilst tying knots
6) Spring loaded forceps ideal for holding the shrouds whilst attaching to the deadeyes
I'll post a few more images of the main and fore mast steps as I progress those.
- Joined
- Jun 5, 2021
- Messages
- 165
- Points
- 88

Hello Keith
I appreciate the detail of the assembly of the Endeavour
I am in the process of editing myself but much less advanced
I struggle with the blocks in the bow to get the right shape, but since I have few tools, it's quite difficult!
All my best wishes for the new year.
Already the success of the model is a good start
Marco
- Joined
- Jun 13, 2022
- Messages
- 310
- Points
- 168

Hi Marco, yes the bow blocks took some work. I used a basic chisel and mallet. I dry fitted the blocks against the hull and used a pencil to mark the outlines of the curves. I then screwed a block of wood into the back of each block. This allowed me to clamp the block and worked with the chisel to remove large chunks and get a basic/rough shape. I then used a rasp file and sand paper to shape the block and repeatedly dry fitted and kept working the block until I had a smooth transition with the rest of the hull. Once completed I glued the blocks onto the hull and performed a final sand a Ross the hull and bow blocks. If you look in an earlier post you will see the bow blocks fitted. Hope that helps.Hello Keith
I appreciate the detail of the assembly of the Endeavour
I am in the process of editing myself but much less advanced
I struggle with the blocks in the bow to get the right shape, but since I have few tools, it's quite difficult!
All my best wishes for the new year.
Already the success of the model is a good start
Marco
- Joined
- Jun 5, 2021
- Messages
- 165
- Points
- 88

Hi Keith,Hi Marco, yes the bow blocks took some work. I used a basic chisel and mallet. I dry fitted the blocks against the hull and used a pencil to mark the outlines of the curves. I then screwed a block of wood into the back of each block. This allowed me to clamp the block and worked with the chisel to remove large chunks and get a basic/rough shape. I then used a rasp file and sand paper to shape the block and repeatedly dry fitted and kept working the block until I had a smooth transition with the rest of the hull. Once completed I glued the blocks onto the hull and performed a final sand a Ross the hull and bow blocks. If you look in an earlier post you will see the bow blocks fitted. Hope that helps.
Thank you for these good tips that I will use with profit
Marco
Great progress!Firstly Happy New Year to everyone and I hope 2023 is a good year for all including many successful builds.
It has been a while since I last posted. In August 2022 (where did that time go?) I had completed the hull and deck fittings of the Occre Endeavour and was starting to progress on the masts, yards and rigging. Since my last post I have been making progress particularly over the festive period when I managed to contract Covid and hence ended up isolating which was an ideal time to further my build. I had a production line of masts and yards as below ...
Building the Tops
View attachment 349143
A threader is ideal for getting threads through holes
View attachment 349145
... and an extra pair of "hands" is always useful to hold the tops, plus a pair of locking forceps
View attachment 349141
The completed top attached to the mast via cheeks.
Note: I added a rail to the top after seeing an example on another build. This was not part of the Occre plan
View attachment 349144
I then continued to build the different parts of the masts using the plans ...
View attachment 349138View attachment 349137
The rigging feels like a game of chess, trying to determine the optimum construction order giving easiest access to the build.
What has worked for me is:
1) Build/fit out the masts (but all mast sections are currently separate i.e. I have not yet attached the topmast to the lower mast, as in the photo above)
2) Fit out the yards with pulleys and fixings
3) Glue the Mizzen lower mast into the hull
4) Attach Mizzen lower mast stays
5) Attach the shrouds (and ratlines) on the Mizzen lower mast. Note: By not attaching the top mast at this point it is easier to attach the shrouds
6) Attach the Mizzen top mast to the lower mast
7) Attach the upper shrouds and ratlines
8) Attach the futtock shrouds
9) Attach the yards and thread the running rigging
Mizzen mast attached to hull (3)
View attachment 349132
Shrouds on lower Mizzen mast (5)
View attachment 349129
Notes:
1) Initially I tied a knot in the end of the deadeye rigging. However this meant that I had to get a threader into the back of the deadeye i.e. between the hull and dead eye which was painful. As such I changed approach and threaded the deadeyes in reverse so that I was pulling the thread from the back of the lower deadeye which meant the threader was pushed through the dead eye from the front which was much easier. Once all dead eyes were threaded I pulled the thread through to tie a knot before tensioning.
2) When threading the deadeyes and ratlines, don't skimp on thread. On occassions I did so and ended up cursing as it was difficult tying knots with little spare thread to work with.
Mizzen mast shrouds, ratlines, (7) and yards installed with running rigging (9)
View attachment 349131
Note for the Occre Endeavour, the rigging plans are poor compared to the rest of the paperwork provided i.e. the build of the hull is well documented. There appear to be additional pulleys and the plan view of the deck does not show all of the points where running rigging is attached. It has involved a lot of head scratching at times.
As an aside, tools that I have found most useful are ...
View attachment 349130
1) Tweezers with 45 degree tips are excellent for tying knots and accessing tight areas of the model
2) Bonzai snips are great for cutting threads, particularly the ends of ratlines
3) Threader is ideal for getting threads through deadeyes
4) Scalpel for applying spots of glue to knots
5) Crocodile clip for holding threads whilst tying knots
6) Spring loaded forceps ideal for holding the shrouds whilst attaching to the deadeyes
I'll post a few more images of the main and fore mast steps as I progress those.
Very nice work indeed.
Good afternoon Keith. This is good work. Looking awesome. Cheers GrantFirstly Happy New Year to everyone and I hope 2023 is a good year for all including many successful builds.
It has been a while since I last posted. In August 2022 (where did that time go?) I had completed the hull and deck fittings of the Occre Endeavour and was starting to progress on the masts, yards and rigging. Since my last post I have been making progress particularly over the festive period when I managed to contract Covid and hence ended up isolating which was an ideal time to further my build. I had a production line of masts and yards as below ...
Building the Tops
View attachment 349143
A threader is ideal for getting threads through holes
View attachment 349145
... and an extra pair of "hands" is always useful to hold the tops, plus a pair of locking forceps
View attachment 349141
The completed top attached to the mast via cheeks.
Note: I added a rail to the top after seeing an example on another build. This was not part of the Occre plan
View attachment 349144
I then continued to build the different parts of the masts using the plans ...
View attachment 349138View attachment 349137
The rigging feels like a game of chess, trying to determine the optimum construction order giving easiest access to the build.
What has worked for me is:
1) Build/fit out the masts (but all mast sections are currently separate i.e. I have not yet attached the topmast to the lower mast, as in the photo above)
2) Fit out the yards with pulleys and fixings
3) Glue the Mizzen lower mast into the hull
4) Attach Mizzen lower mast stays
5) Attach the shrouds (and ratlines) on the Mizzen lower mast. Note: By not attaching the top mast at this point it is easier to attach the shrouds
6) Attach the Mizzen top mast to the lower mast
7) Attach the upper shrouds and ratlines
8) Attach the futtock shrouds
9) Attach the yards and thread the running rigging
Mizzen mast attached to hull (3)
View attachment 349132
Shrouds on lower Mizzen mast (5)
View attachment 349129
Notes:
1) Initially I tied a knot in the end of the deadeye rigging. However this meant that I had to get a threader into the back of the deadeye i.e. between the hull and dead eye which was painful. As such I changed approach and threaded the deadeyes in reverse so that I was pulling the thread from the back of the lower deadeye which meant the threader was pushed through the dead eye from the front which was much easier. Once all dead eyes were threaded I pulled the thread through to tie a knot before tensioning.
2) When threading the deadeyes and ratlines, don't skimp on thread. On occassions I did so and ended up cursing as it was difficult tying knots with little spare thread to work with.
Mizzen mast shrouds, ratlines, (7) and yards installed with running rigging (9)
View attachment 349131
Note for the Occre Endeavour, the rigging plans are poor compared to the rest of the paperwork provided i.e. the build of the hull is well documented. There appear to be additional pulleys and the plan view of the deck does not show all of the points where running rigging is attached. It has involved a lot of head scratching at times.
As an aside, tools that I have found most useful are ...
View attachment 349130
1) Tweezers with 45 degree tips are excellent for tying knots and accessing tight areas of the model
2) Bonzai snips are great for cutting threads, particularly the ends of ratlines
3) Threader is ideal for getting threads through deadeyes
4) Scalpel for applying spots of glue to knots
5) Crocodile clip for holding threads whilst tying knots
6) Spring loaded forceps ideal for holding the shrouds whilst attaching to the deadeyes
I'll post a few more images of the main and fore mast steps as I progress those.
Hi Keith, I noticed you put nails in the hull of your Endeavour. This looks very nice. Where does this idea come from? Did you work according to an existing plan or did you design the pattern yourself?
- Joined
- Jun 13, 2022
- Messages
- 310
- Points
- 168

Hi, the idea came from the picture on the box and I thought looked a nice addition. Whether it is correct or not I am not sure but I liked the result. I just used the pins supplied for attaching the first layer of hull and used a fine paintbrush to paint black. Keep posting as interesting to see how others have interpreted the model
I didn't even notice that. Correct or not, it looks convincing, so I will follow in your footsteps and do the same thing. But I think I will use patina to (slightly) darken the nails instead of painting them black. Before second planking I removed the nails from the first layer of planks, so I can recycle those, with the advantage that they already have a battered look.Hi, the idea came from the picture on the box and I thought looked a nice addition. Whether it is correct or not I am not sure but I liked the result. I just used the pins supplied for attaching the first layer of hull and used a fine paintbrush to paint black. Keep posting as interesting to see how others have interpreted the model
- Joined
- Jun 13, 2022
- Messages
- 310
- Points
- 168

Will be interested to see how yours turns out. Thank is a bit keen removing the nails from the first layerI didn't even notice that. Correct or not, it looks convincing, so I will follow in your footsteps and do the same thing. But I think I will use patina to (slightly) darken the nails instead of painting them black. Before second planking I removed the nails from the first layer of planks, so I can recycle those, with the advantage that they already have a battered look.


