Or maybe we didn't show the error! I had some work around required in this area as well, although dry fitting first helped to keep this particular error form happening in my case.Not the first mistake and almost certainly not the last...
I set the platform on the fore mast shown as b9 in the drawing with the rear edge 4mm back from the mast which meant that the internal edge was again the mast. When I fixed the upper mast it was not parallel with the lower. View attachment 334890
I had to take it apart and reset it with the platform (correct term?) edge 6mm from the mast. Now it is parallel:
View attachment 334893
I was kicking myself for not checking the drawing but then discovered that the drawing shows it the way I had it at first:View attachment 334898
I haven't seen any other builders of the Endurance making the same error so maybe my lack of experience or brain cells is the cause.
I'll be looking out when I make the next two masts.
-

Win a Free Custom Engraved Brass Coin!!!
As a way to introduce our brass coins to the community, we will raffle off a free coin during the month of August. Follow link ABOVE for instructions for entering.
-

PRE-ORDER SHIPS IN SCALE TODAY!
The beloved Ships in Scale Magazine is back and charting a new course for 2026!
Discover new skills, new techniques, and new inspirations in every issue.
NOTE THAT OUR FIRST ISSUE WILL BE JAN/FEB 2026
You are using an out of date browser. It may not display this or other websites correctly.
You should upgrade or use an alternative browser.
You should upgrade or use an alternative browser.
Good afternoon. Very good work. Cheers GrantNot the first mistake and almost certainly not the last...
I set the platform on the fore mast shown as b9 in the drawing with the rear edge 4mm back from the mast which meant that the internal edge was again the mast. When I fixed the upper mast it was not parallel with the lower. View attachment 334890
I had to take it apart and reset it with the platform (correct term?) edge 6mm from the mast. Now it is parallel:
View attachment 334893
I was kicking myself for not checking the drawing but then discovered that the drawing shows it the way I had it at first:View attachment 334898
I haven't seen any other builders of the Endurance making the same error so maybe my lack of experience or brain cells is the cause.
I'll be looking out when I make the next two masts.
- Joined
- Dec 12, 2020
- Messages
- 148
- Points
- 88

Hello
The platform is called the top of the mast.
The holes you've made for the shrouds would wear these down quickly.
You should do it like the pictures even though your boat is more modern, but the shrouds flip over and drop to the other side
https://static.educalingo.com/img/es/800/cofa.jpg
https://www.todoababor.es/historia/la-cofa-en-las-postrimerias-del-siglo-xviii/
If you follow the instructions in the kit, you'll make a lot of mistakes, but you'll get the job done soon.
Choose between learning or enjoying
Cheers
- Joined
- Dec 12, 2020
- Messages
- 148
- Points
- 88

Here you can see the hole in the top of the mast, and the crow´s nest, of Endurance
https://images.squarespace-cdn.com/...QFCOIHVM1I1STTPL/image-asset.jpeg?format=750w
I am sick, I suffer from Advanced Modeler Syndrome
S.M.A. in Spanish language.
It takes YEARS to finish a boat
I do not recommend it, it is also contagious
https://images.squarespace-cdn.com/...QFCOIHVM1I1STTPL/image-asset.jpeg?format=750w
I am sick, I suffer from Advanced Modeler Syndrome
S.M.A. in Spanish language.
It takes YEARS to finish a boat
I do not recommend it, it is also contagious
Last edited:
Thanks for this information and the links.Hello
The platform is called the top of the mast.
The holes you've made for the shrouds would wear these down quickly.
You should do it like the pictures even though your boat is more modern, but the shrouds flip over and drop to the other side
https://static.educalingo.com/img/es/800/cofa.jpg
https://www.todoababor.es/historia/la-cofa-en-las-postrimerias-del-siglo-xviii/
If you follow the instructions in the kit, you'll make a lot of mistakes, but you'll get the job done soon.
Choose between learning or enjoying
The holes in the platform were pre-drilled by Occre not by me.
Your comments now make me think. It will be a while before I get to attaching the shrouds so I will try to make it more authentic when I do.
I hope to learn and enjoy at the same time
- Joined
- Dec 12, 2020
- Messages
- 148
- Points
- 88

Hello
My intention is to help, I see you understand.
As I said you can take two paths.
Follow Occre's instructions (they are not very good, I would say bad) not complicate your life and finish the kit without mental problems.
Another way is to do some research when in doubt, in this forum or on the internet.
Apply the knowledge to avoid making "important" mistakes about the Occre holes for the shrouds is a big mistake.
Perhaps they are like this to facilitate the cut of top , on both sides of the mast
This way you will have a better model, but it will take twice as long to finish it.
On the other hand, this second method is an excellent brain workout.
Greetings and forward
S.M.A. I can see how it can be contagious. I looked it to see if there is a cure, there isn't. Prevention is the only possibility and I think I have found the secret: My wife! Things can become very painful is I get too obsessed and neglect her, side effects can be serious though. ☺Here you can see the hole in the top of the mast, and the crow´s nest, of Endurance
https://images.squarespace-cdn.com/...QFCOIHVM1I1STTPL/image-asset.jpeg?format=750w
I am sick, I suffer from Advanced Modeler Syndrome
S.M.A. in Spanish language.
It takes YEARS to finish a boat
I do not recommend it, it is also contagious
Thanks for helping me learn.
- Joined
- Sep 9, 2021
- Messages
- 358
- Points
- 238

My wife has become addicted to Turkish TV series. So I have a couple of hours to escape to the garage.S.M.A. I can see how it can be contagious. I looked it to see if there is a cure, there isn't. Prevention is the only possibility and I think I have found the secret: My wife! Things can become very painful is I get too obsessed and neglect her, side effects can be serious though. ☺
Thanks for helping me learn.
- Joined
- Dec 12, 2020
- Messages
- 148
- Points
- 88

Make her comfortable in front of the TV, a cushion under her feet, some treats, her favorite drink and look tv guide for the best programs.My wife has become addicted to Turkish TV series. So I have a couple of hours to escape to the garage.
This way you will get some extra time for our favorite hobby
- Joined
- Jun 13, 2022
- Messages
- 310
- Points
- 168

Love the organised workspace. Great work so far and will follow with interest as Endurance likely to be my next challenge once my current Endeavour project completedA word about my workspace...
I live in a flat by the sea in Spain, I love it but it does restrict indoor activities.
I converted a redundant cupboard into what my wife calls my "man cave" with a pull-out work top. It's small size restricted my choice of build to ships under 90 cm but has the advantage of being compact which forces me to be more organised than is natural for me. It also stops me buying all sorts of tools that "might" be useful but, if I am honest, I really don't need. View attachment 318529View attachment 318527
Already the dedicated work area has helped me a lot and having everything within reach makes finding tools and patience so much easier.
Will be away in Valencia for a few days so no more progress until next week.
Thanks for the compliment. "Organised" is not my usual style at all, it has taken me 75 years and two wives to learn even this much!Love the organised workspace. Great work so far and will follow with interest as Endurance likely to be my next challenge once my current Endeavour project completed
- Joined
- Jun 13, 2022
- Messages
- 310
- Points
- 168

Well you have inspired me to tidy up my work area as I keep mislaying tools.Thanks for the compliment. "Organised" is not my usual style at all, it has taken me 75 years and two wives to learn even this much!
- Joined
- Dec 12, 2020
- Messages
- 148
- Points
- 88

Ordering and keeping the work area clean is only the privilege of those who live as a couple.
Congratulations to the lucky guards
Congratulations to the lucky guards
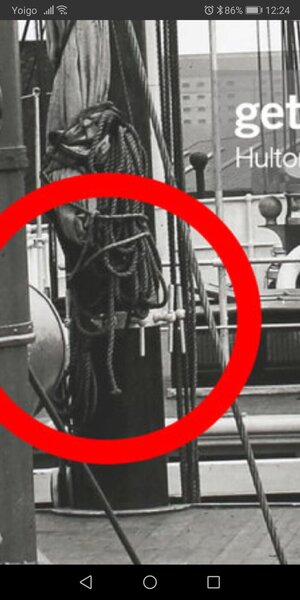
A number of Endurance builders have pointed to the fact that the eye bolts suggested in the instructions around the bottom of the masts would just not work in real life. JeffT posted a photo of the central mast showing how the ropes were attached :
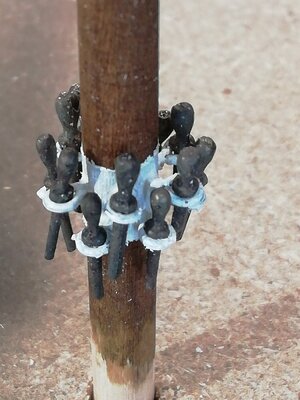
I decided to replicate this as far as possible. The fore mast required 11 fixings which I could not do to scale and still have them useful so I put two rows of six:
I'm now working in the main, central mast which only requires 7 fixings. However Jeff's photo shows them almost level with the cabin deck railing. That must have been a stretch for the crew to tie them off or am I missing something? Should I put mine at that height or, as with the fore mast, at about waist height?
Any help would be appreciated.

I decided to replicate this as far as possible. The fore mast required 11 fixings which I could not do to scale and still have them useful so I put two rows of six:

I'm now working in the main, central mast which only requires 7 fixings. However Jeff's photo shows them almost level with the cabin deck railing. That must have been a stretch for the crew to tie them off or am I missing something? Should I put mine at that height or, as with the fore mast, at about waist height?
Any help would be appreciated.
I struggled with exactly what you mention in your post concerning the location. I ended up putting mine nearer to the deck at a height similar to the fore and mizzen masts. Possibly not historically accurate, but visually pleasing.A number of Endurance builders have pointed to the fact that the eye bolts suggested in the instructions around the bottom of the masts would just not work in real life. JeffT posted a photo of the central mast showing how the ropes were attached :View attachment 336257
I decided to replicate this as far as possible. The fore mast required 11 fixings which I could not do to scale and still have them useful so I put two rows of six:View attachment 336258
I'm now working in the main, central mast which only requires 7 fixings. However Jeff's photo shows them almost level with the cabin deck railing. That must have been a stretch for the crew to tie them off or am I missing something? Should I put mine at that height or, as with the fore mast, at about waist height?
Any help would be appreciated.
- Joined
- Dec 12, 2020
- Messages
- 148
- Points
- 88

That's not "eye bolts".
They "are rods, bolts, or belaying pins"
In spanish is named "cabilla" and te place where they are "cabillero"
Even "wire ropes" as Google say
They "are rods, bolts, or belaying pins"
In spanish is named "cabilla" and te place where they are "cabillero"
Even "wire ropes" as Google say
I thought so too.I struggled with exactly what you mention in your post concerning the location. I ended up putting mine nearer to the deck at a height similar to the fore and mizzen masts. Possibly not historically accurate, but visually pleasing.
Looking at your photo the actual mast was of much bigger diameter that the Occre scale would suggest and without the railing the operation of just 7 sheets was obviously possible. On the model it would look out of place I think.
Thanks for the input. I'll go with setting it as the fore mast.
- Joined
- Dec 12, 2020
- Messages
- 148
- Points
- 88

I was referring to the method in the Occre instructions which shows eyes bolts fixed to the deck without the use of belaying pins:That's not "eye bolts".
They "are rods, bolts, or belaying pins"
In spanish is named "cabilla" and te place where they are "cabillero"
Even "wire ropes" as Google say

I did fix them at the decking stage in case I couldn't come up with a better solution later but now I have made a sort of cabillero around the mast with thinner blackened brass cabillas rather than the wooden ones suplied with the kit.
Not perfect, I know, but better than the "official" method I think.
- Joined
- Dec 12, 2020
- Messages
- 148
- Points
- 88

Hello
The kit manufacturer's instructions should not be followed to the letter, they are full of errors and "compromise" solutions.
Even now, in most of the kits plans are not included, only photographs of models made by those who do not care about these details and of course, the plague spreads.
I make (made) models of both, kits and plans (scratch) but the kit ones only served me to take advantage of the accessories and have a global idea of the boat.
Afterwards, I documented myself on the internet as much as possible, but of course, it took a long time to finish each model.
The problem is that this way of working requires much more time than making a kit without considering things.
I have a colleague, who builds his boats by reading the captain's logbook and the navy ordinances!!!!!!, photos and museum plans, etc.
It takes years to finish a ship
Two examples of my friend's work, who also draws his own plans by hand.
The characters are carved in boxwood by himself.
Logically, not all of us have that level of excellence, but it is good to consider some things
https://www.foromodelismonaval.es/download/file.php?id=168076
Cheers
Last edited:


