
Very good work my friend - I like your "metal" works - we can see on the results, that it is really worth to do the additional work

-

SUBSCRIBE TO SHIPS IN SCALE TODAY!
The beloved Ships in Scale Magazine is back and charting a new course for 2026!
Discover new skills, new techniques, and new inspirations in every issue.
NOTE THAT OUR NEXT ISSUE WILL BE MARCH/APRIL 2026 -

Win a Free Custom Engraved Brass Coin!!!
As a way to introduce our brass coins to the community, we will raffle off a free coin during the month of August. Follow link ABOVE for instructions for entering.
You are using an out of date browser. It may not display this or other websites correctly.
You should upgrade or use an alternative browser.
You should upgrade or use an alternative browser.
french 64-gunner LE FLEURON in scale 1:48 by Joachim
- Thread starter Uwek
- Start date
- Watchers 68
-
- Tags
- ancre le fleuron
- Joined
- Nov 4, 2020
- Messages
- 514
- Points
- 453

In the past few days I have made galleon knees and other parts of the galleon. I made the galleon knee from two parts. The galleon knees have gaps / depressions on the outer edges. A routing machine would be ideal for this, but I don't have one. I helped myself with my milling machine: I clamped a small metal rod (shaft of a broken micro drill) in the vice. I will press the piece of wood against the metal rod to mill the timber. The cutter comes from above (it would come from below on a router) and you have to set the height of the milling head and the distance to the metal rod. Push the timber firmly against the metal rod and the milling head and joints can be created . The metal rod ensures that you can always remove the same width of the joint and never remove too much wood. Such a joint would not be possible with a file, carving knife or something. However, give care to your fingers, first try it on other wood pieces. Especially at the ends of a workpiece, you have to be very careful that the milling cutter does not pull the wood away. If necessary, do not mill the joint at the end, but file manually.
For the openings in the bow for the anchor ropes, I turned brass metal sleeves that go through the bow and have a larger diameter on the outer wall than the opening. The starting material is an 11mm brass rod, into which 8 mm steel drills are drilled on the lathes. A small ring on the front of the sleeve for the outside remains 11mm thick. The remaining length is tapered to 9 mm in diameter using the lathes. The inside of the sleeve then has a wall thickness of approx. 0.5 mm and is stable. I haven't browned the sleeve yet, maybe I'll leave it like that, then you can see better, they're made of metal.
Now I wish everyone a nice Christmas
View attachment 124820View attachment 124821View attachment 124826View attachment 124827View attachment 124828View attachment 124829View attachment 124830View attachment 124831View attachment 124832View attachment 124833View attachment 124835View attachment 124836View attachment 124837View attachment 124838View attachment 124843View attachment 124844View attachment 124845
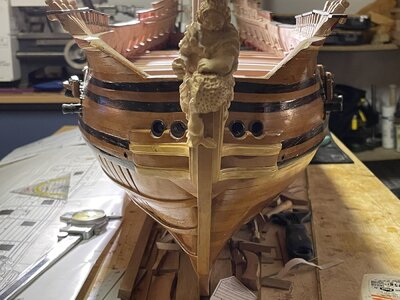
I was looking at your model for the first time:
There is a serious error on the openings for the anchor ropes!
They must be parallel to the keel, not perpendicular to the side!
Last edited by a moderator:
Maybe you can show us your comment and clarify it more with one photo, what exactly you mean?I was looking at your model for the first time:
There is a serious error on the openings for the anchor ropes!
They must be parallel to the keel, not perpendicular to the side!
I can see no error with the hawser holes.
Joachim:

Kudin:

Jacques Mailliere

Delacroix drawings:

It would be very good, if you could clarify this more in detail, best with a sketch or photo!
The holes in the model are perpenticular to the surface. In the plan they are parallel to the keel.
The francois for example, shows the holes with a kink. I don´t know if every hawsehole has this detail in this form.

The francois for example, shows the holes with a kink. I don´t know if every hawsehole has this detail in this form.
Ach soThe holes in the model are perpenticular to the surface. In the plan they are parallel to the keel.
The francois for example, shows the holes with a kink. I don´t know if every hawsehole has this detail in this form.
View attachment 193051
Delacroix has already pointed it out once before that it should be like the yellow, not the red lines:

- Joined
- Nov 4, 2020
- Messages
- 514
- Points
- 453
as Poul clearly explainded, the direction of the hole must be parallel to the keel, as in the green line; In this way, the cables have less friction during their movement. From the photo it is clear that the direction of the hole follows the red line:


- Joined
- Oct 31, 2019
- Messages
- 230
- Points
- 298

A really good discussion and I think , there exist many ways for the anchor chain and the holes, I can live with all possibilities At my real model the holes are now black and it’s hardly to see in reality, what degree the holes have. Yes The holes are not parallel, but I think the holes are nice. If they would be ugly, I would change it. I built the bow twice, because it was at first not so nice. And who really knows, how the original was, nobody of us saw her in Reality.
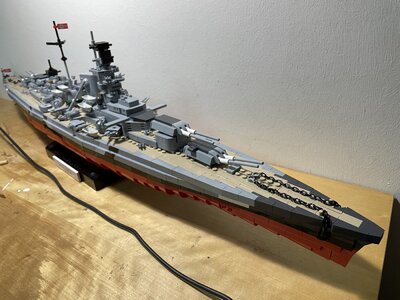
The newer ship Bismarck ((pictures of my Lego model , built in two weeks!) for example, has the holes on the side, so that the anchor chaine has to be pulled up in a 90 degree. And it works too.
The newer ship Bismarck ((pictures of my Lego model , built in two weeks!) for example, has the holes on the side, so that the anchor chaine has to be pulled up in a 90 degree. And it works too.
Attachments

- Joined
- Oct 31, 2019
- Messages
- 230
- Points
- 298
Now I'm reporting on the expansion of the two small rooms in the rear of the first canon deck. Of course, the two doors are special, which also open and approach hinges. The doors have a knob to open, too. For the grid windows in the doors, I ordered fine wire mats from Amazon, so finely you can't weave it yourself.


- Joined
- Oct 31, 2019
- Messages
- 230
- Points
- 298
I've been working at the rudder for a week. It consists of two wooden parts, which are joined together. I paint the rudder with red shellac.
The hinges are labor-intensive. 2x1 mm brass rod loop I on the plate grinder a little thinner, also so that they become more flexible. One thorn must be soldered on one part of the hinge, on the other a sleeve (which I previously drilled from a round rod on the lathe). 0.5 mm holes for the nails are then drilled into the hinges. I'm not ready yet, but I'll show my first pictures.


The hinges are labor-intensive. 2x1 mm brass rod loop I on the plate grinder a little thinner, also so that they become more flexible. One thorn must be soldered on one part of the hinge, on the other a sleeve (which I previously drilled from a round rod on the lathe). 0.5 mm holes for the nails are then drilled into the hinges. I'm not ready yet, but I'll show my first pictures.


- Joined
- Nov 4, 2020
- Messages
- 514
- Points
- 453
Now I'm reporting on the expansion of the two small rooms in the rear of the first canon deck. Of course, the two doors are special, which also open and approach hinges. The doors have a knob to open, too. For the grid windows in the doors, I ordered fine wire mats from Amazon, so finely you can't weave it yourself.
View attachment 197029View attachment 197030
I don't want to be too critical, but the hinges and door handles are clearly off the scale !!! Often, and this is the case, an oversized detail damages all the good work that has been done ...

I love hints but I don’t love critics every time for every detail, please stop that!

Joachim is doing here a good job, nevertheless nobody is perfect and also 99,9% of the models from us are not perfect.I think I expressed my thoughts in a polite way, I didn't want to be argumentative. Your model deserves more attention to detail!
If you prefer to make fun of you saying that everything is fine and that you did a wonderful job, happy you!
As we know, that you are working in your actual model in a smaller scale, it would be good, if you can show or explain how to reach better results.
As I know Joachim personally, he is open for any hint and tip, especially because it is the first scratch build model by Joachim after some finished kit models.

He is doing a beautiful job. Here are my thoughts on this. If I post a photo of my build and ask, what do you think? I want an honest constructive answer sort of like what Giampy gave, because I want to improve my modeling. So take a look at what you created and ask yourself... do I want to try and improve this, or am I fine with the way it is and I will use the advice on my next model. Your thoughts?Joachim is doing here a good job, nevertheless nobody is perfect and also 99,9% of the models from us are not perfect.
As we know, that you are working in your actual model in a smaller scale, it would be good, if you can show or explain how to reach better results.
As I know Joachim personally, he is open for any hint and tip, especially because it is the first scratch build model by Joachim after some finished kit models.
@Flying22low IMHO, I think there is a difference when you post the image (your work) and ask for an opinion. In such a case, you may expect both criticisms and\or compliments. Another case, if you just post your work to share without asking our thoughts. People have different reactions to criticism, and just because you see ways for improvements, it doesn't mean you have to criticize others' work, specifically if they don't ask for your opinion. There are much better ways for suggestions. Also, we know our skills and abilities, not everyone wants to improve them, and happy the way it is... We have a broad range of skills here on our forum, it makes it very interesting to watch without comparison.
I do agree with you. Its why I don't post my images. But I will if I want some critique. I think almost anyone here would like to improve their workmanship. I am fascinated by the quality of work people are showing here.
For me at this point I am only on my second build and will take whatever critique I can get, sometimes people are somewhat harsh in critiquing builds, but I take it it with a grain of salt.
For me at this point I am only on my second build and will take whatever critique I can get, sometimes people are somewhat harsh in critiquing builds, but I take it it with a grain of salt.