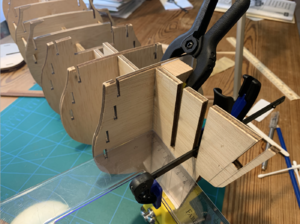
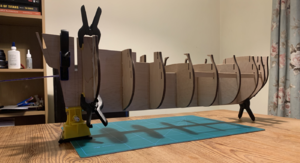
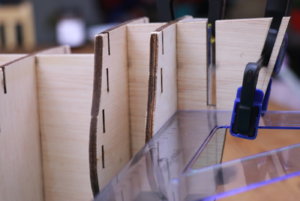
I will use your method with ruler and clamps to the the 90 degree bulkheads. I was thinking how to do it, I would probably fabricate some kind of JIG but this will work perfectly. And yes you can use wax paper. Just take anything your wife is baking cokkies with.
-

Win a Free Custom Engraved Brass Coin!!!
As a way to introduce our brass coins to the community, we will raffle off a free coin during the month of August. Follow link ABOVE for instructions for entering.
-

PRE-ORDER SHIPS IN SCALE TODAY!
The beloved Ships in Scale Magazine is back and charting a new course for 2026!
Discover new skills, new techniques, and new inspirations in every issue.
NOTE THAT OUR FIRST ISSUE WILL BE JAN/FEB 2026
You are using an out of date browser. It may not display this or other websites correctly.
You should upgrade or use an alternative browser.
You should upgrade or use an alternative browser.
H.M.S. Victory Constructo - by Wooden Ship Crafts
- Thread starter Wooden Ship Crafts
- Start date
- Watchers 26
-
- Tags
- constructo victory
I will use your method with ruler and clamps to the the 90 degree bulkheads. I was thinking how to do it, I would probably fabricate some kind of JIG but this will work perfectly. And yes you can use wax paper. Just take anything your wife is baking cokkies with.
That's very good and practical advice, thanks... what is your name by the way?
I never thought that I can use something from my wife's kitchen arsenal of tools
Hi Max my name is Matus. I upgraded my signature. I used this baking paper everytime I needed to mix two-component glue. It should also work for wood glue. But be aware that there are two sides of that paper and one is more "waxy".That's very good and practical advice, thanks... what is your name by the way?
I never thought that I can use something from my wife's kitchen arsenal of tools. I will try today and let you know how it goes
.
Hello, you, wonderful people!
Today is the new day. I made some progress, two frames have been installed and glued. With the PVA glue, I wait at least 2 hours per frame to make sure glue holds parts. Also, I apply 2 drops of a CA glue on the side of the frame to make sure it holds exactly how I positioned it.

The model looks better now . Have a look.

Can't wait to finish.
Who knows what oil, color, or some wooden thing I have to use to make my plunking more realistic between each other?
I've some models, they have a very nice wooden looking floors.
Appreciate for any guides, videos or links.
Today is the new day. I made some progress, two frames have been installed and glued. With the PVA glue, I wait at least 2 hours per frame to make sure glue holds parts. Also, I apply 2 drops of a CA glue on the side of the frame to make sure it holds exactly how I positioned it.

The model looks better now

Can't wait to finish.
Who knows what oil, color, or some wooden thing I have to use to make my plunking more realistic between each other?
I've some models, they have a very nice wooden looking floors.
Appreciate for any guides, videos or links.
I have seen in different logs that people use black marker on the sides on the planks for deck.
Is this legal?
You have to search for "Caulking" of deck planks......
some take a marker, other pencil, you can also use thin black or dark grey paper (30 to 50 gramm/m2) between the planks.
some take a marker, other pencil, you can also use thin black or dark grey paper (30 to 50 gramm/m2) between the planks.
What do you mean by that?Is this legal?
Here is discussion from one another forum for that https://modelshipworld.com/topic/5605-deck-planking-simulation-of-caulking/
It looks that it will be lot of more work but the effect looks well.
Last edited:
What do you mean by that?
Here is discussion from one another forum for that https://modelshipworld.com/topic/5605-deck-planking-simulation-of-caulking/
It looks that it will be lot of more work but the effect looks well.
It was just a joke, reflecting my surprise on how easy plunking can be done. Thanks for sharing the link, as I was under the impression I have to buy something to do plunking black lines.
No problemIt was just a joke, reflecting my surprise on how easy plunking can be done. Thanks for sharing the link, as I was under the impression I have to buy something to do plunking black lines.
Max, I have seen many modelers use pencil graphite and only do one edge on each board but there are so many methods as Uwe mentioned that you have to choose the best method yourself.
I do agree with you that SOS is a great modeling forum, keep those photos coming!
I do agree with you that SOS is a great modeling forum, keep those photos coming!
Hi Max it all depends on scale. Your victory will be a rather small scale somewhere between 1:72 to 1:96. Then the marker or soft black pencil (like 2B pencil) works best. Some softer woods will absorb more of the black marker and then a pencil works better, for harder wood type with a fine grain the marker works fine.
Creating caulking with paper or plastic cover sheets works better for the larger scales 1:48 and bigger.
Creating caulking with paper or plastic cover sheets works better for the larger scales 1:48 and bigger.
Really cool. Keep up the good work. Your videos are amazing and they have very good quality. I am thinking of buying this model and I think I will and I will follow your steps!! Congrats and Merry Christmas!
Thanks for the suggestion. I will try a pencil, and a marker and compare the results. I will keep you updated.Max, I have seen many modelers use pencil graphite and only do one edge on each board but there are so many methods as Uwe mentioned that you have to choose the best method yourself.
I do agree with you that SOS is a great modeling forum, keep those photos coming!
Hi Max it all depends on scale. Your victory will be a rather small scale somewhere between 1:72 to 1:96. Then the marker or soft black pencil (like 2B pencil) works best. Some softer woods will absorb more of the black marker and then a pencil works better, for harder wood type with a fine grain the marker works fine.
Creating caulking with paper or plastic cover sheets works better for the larger scales 1:48 and bigger.
Thanks for the explanation. My wife will get an extra portion of useful information
I will try a pencil, I have a regular one, not sure if this is 2B, probably not.
Really cool. Keep up the good work. Your videos are amazing and they have very good quality. I am thinking of buying this model and I think I will and I will follow your steps!! Congrats and Merry Christmas!
That's great to hear. Thanks a million for the feedback. This model is cool to work with, so I recommend. The only thing, I faced as of today, I have had zero tools in my apartment, so almost everything (except a pen) I bought to start work
Wow, 1K views for my build log. This is impressive. Happy to see that someone is interested in my work. Thanks, each and everyone for the likes and comments, and suggestions, you really help me a lot.
My local time is 00:26 I am writing this message, today we are going to have a new video. Super excited to share with you and hear feedback.
A photo from today's work and the teaser for the video.

See you tomorrow (today), as I now go to bed .
.
My local time is 00:26 I am writing this message, today we are going to have a new video. Super excited to share with you and hear feedback.
A photo from today's work and the teaser for the video.

See you tomorrow (today), as I now go to bed
Hello everyone!
Happy to share the link to the next video Frames Installation and false keel H.M.S. Victory
Happy to hear your feedback.
Happy to share the link to the next video Frames Installation and false keel H.M.S. Victory
Happy to hear your feedback.
Hi Max,
I am delighted that you found and are enjoying the forum. I love to hear the excitement and enthusiasm in your building. It reminds me of myself of years ago. If you want to caulk your planks, I suggest to just use a simple regular soft pencil lead. Just run the pencil lead down one side of the planking strip (and this is for the deck only). You might think that it is not enough, but you will see that it will be. Sometimes, less is more.
If you use a stain or oil, then please be careful. My opinion is that I have seen models that were soaked with shellac or some type of lacquer that did not look natural.
Think of a real ship. The real ship often had a dull flat paint on it. For a stain, I have always used something like Minwax golden oak or Minwax natural stain. If and only if I were to use a satin finish, it has always been Minwax polyurethane "satin" finish. It adds such a small amount of luster that it leaves the wood still natural.
Ok, so, I know I am getting way ahead of your game right now. Please do not use a glossy finish.
Key Point #1: Hot water is your friend. Use hot water (even running the plank back and forth under running hot water as you carefully bend the planks)
The large flat strips that follow fore and aft that you were having problems with the alignment...what are those for? Are those for just stability, or are they going to be used for the backdrop to mount the cannons to? I was wondering if those flat strips were preshaped to follow the "sweep of the hull". I can not tell.
Key Point #2: Make 100% sure your hull is straight. Turn the FRAME upside down on a flat surface. Look and see if all four corners have the same measurement to the flat surface. You do NOT want to have any warp. Or very very little warp. Why? These small errors of warpage ADD UP to be a larger problem down the road.
Key Point #3: When you are at the part where you fit the (assuming a false deck) usually, you will have a false deck solid plywood that attaches to your bulkheads on top. THen your deck planking glues to this false deck. Why am I bringing this up? Well, this is also a problem that I see often. Make 100% sure that your Cannons on Deck, (the Cannon barrels) will LINE UP with your Cannon Port Lid openings on the DECK. I have seen many models that the Cannons (Barrels) on the Deck did not line up good with the Deck Cannon Port Frame Openings and the Cannons had to point a little downward. Sometimes, it was the opposite, the cannons were pointing upwards for the barrels to push through the port windows. By study and preparation, you might catch this beforehand. I have seen modelers have to remove the wheels from the carriages so that the Cannon Barrels would fit through the Port Lids on deck. This is mostly a DECK problem. You can MOCK up this situation by assembling one cannon carriage and barrel and placing the assembly on deck. How is this corrected? Well, I am not familiar with this kit, but most kits will have the BULWARK (which is one piece) that already has the Cannon port lids made for you in one piece. All you have to do is simply slightly raise or slightly lower the Bulwark to accommodate the best alignment of the cannons. Your kit might not apply to this, but I just wanted you to know just in case.
Oh, by the way, thanks for joining the SOS family. It is my desire to make your forum experience a happy and enjoyable one.
Sincerely,
Donald B. Driskell
Founder
I will use your method with ruler and clamps to the the 90 degree bulkheads. I was thinking how to do it, I would probably fabricate some kind of JIG but this will work perfectly. And yes you can use wax paper. Just take anything your wife is baking cokkies with.
I used a foil instead of a paper between my pen brick and the frame. Well... there is zero glue on the foil and removal is super smooth. I don't have to clean with the sand stick anymore. Thanks for the suggestion. It really works


