
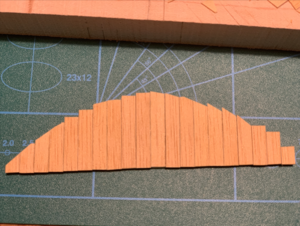
This is quite common in kits thet use standard parts in their kits which are not allways to scale. The more you fine tune this the better the result and that is what kit bashing is. Up to you.The second deck no 23 is ready. Planks are glued and centered. I found out after the second one, that the center plank has to be installed and glued on the ship rather than having a deck on a table. It will allow removing, at least for me, event a tiny 0.5mm misalignment, that I have with this deck as well.
View attachment 128254
For the third deck no 24, I am going to glue a plank while the deck is on the ship, and then move the deck to a table and continue. It's like the 100% dead center approach in my case.
So happy that I:
Also, I've found out that H.M.S. Victory 1:84 scale has 3mm width planking, my kit from constructo gives me 5mm width with 1:94 scale. Something in my kit is incorrect. 5mm multiply by 94 will be 47cm or the real scale. Kind of incorrect. What do you think?
- a) write down all my lessons learned and
- b) I will be way better with all these "new findings" when I will start the next model.

-

SUBSCRIBE TO SHIPS IN SCALE TODAY!
The beloved Ships in Scale Magazine is back and charting a new course for 2026!
Discover new skills, new techniques, and new inspirations in every issue.
NOTE THAT OUR NEXT ISSUE WILL BE MARCH/APRIL 2026 -

Win a Free Custom Engraved Brass Coin!!!
As a way to introduce our brass coins to the community, we will raffle off a free coin during the month of August. Follow link ABOVE for instructions for entering.
You are using an out of date browser. It may not display this or other websites correctly.
You should upgrade or use an alternative browser.
You should upgrade or use an alternative browser.
H.M.S. Victory Constructo - by Wooden Ship Crafts
- Thread starter Max Workshop
- Start date
- Watchers 26
-
- Tags
- constructo victory

The further you will build, the more discrepancies you may find out. This is not to scare you, it more so you can well prepared. For the most part, manufactures don't bother with authentics of the kit model, they make them somewhat affordable, much simplify. So... you have to decide how you will proceed: following the manufacture way or your own. As Maarten said - 'Bashing' is the proper term.

"Houston, we have a problem!"
I measured the left and right side of each and every frame and.... drum roll, I have different lengths for almost every single frame.
Here is the visual presentation with the length of my H.M.S. Victory.
View attachment 128008
Here is a table with frames and lengths in millimeters between them.
Frame Left Side (Top), mm Right Side (Bottom), mm Between 3 and 4 27,5 26,5 4 and 5 30,2 32 5 and 7 66 67,25 7 and 8 69,2 68 8 and 9 65,5 64,8 9 and 10 72,5 74 10 and 11 68,2 66 11 and 13 66 68 13 and 14 30 30,3 14 and 15 22 21,25 15 and 16 37 36,5
I did measure right before the gun sides and the top like below on the picture. Except between frames 15 and 16, where I checked the very top length.
View attachment 128009
From your experience, will this difference affect the build a lot, or it is a matter to do more sanding before gluing plunking strips?
Up until now, I was under the impression that my model's sides are perfectly 90 degrees deadly right (except the first 3 frames as I wasn't sure at all). But now, when I used my new ruler, it seems like I might be in trouble.
Looking for an advice.


This is why I was saying about adding the blocks to the bulkheads, it holds them to the right angle, having said that the ammounts you are out by shouldn't be a problem,
best regards John,

In the meantime, I work on the planking for the lower deck.
The previous PVA glue I used to use is not a good one, from now on I switched to Gorilla PVA.

This deck is now under the 4 books press.
Very important to use high-quality glue as there is a good chance that with the bad one something would go wrong. Like in my case and deckings.
There are two things I learned.
- I shouldn't glue all the planks at the same time. It may lead to deck curving. I spent a few days trying to align curly deckings.
- Use high-quality glue.

As you may notice, I glued only a few planks to allow them to dry 24 hours before the next part. Just in case my decks will decide to curve") .
.
The next step is to finish bigger deck #24 and progress with the front one.
Cheers, wonderful people!
The previous PVA glue I used to use is not a good one, from now on I switched to Gorilla PVA.
This deck is now under the 4 books press.
Very important to use high-quality glue as there is a good chance that with the bad one something would go wrong. Like in my case and deckings.
There are two things I learned.
- I shouldn't glue all the planks at the same time. It may lead to deck curving. I spent a few days trying to align curly deckings.
- Use high-quality glue.
As you may notice, I glued only a few planks to allow them to dry 24 hours before the next part. Just in case my decks will decide to curve
.The next step is to finish bigger deck #24 and progress with the front one.
Cheers, wonderful people!
Last edited:
Here is the Gorilla PVA glue I was talking in the previous post. I recommend.

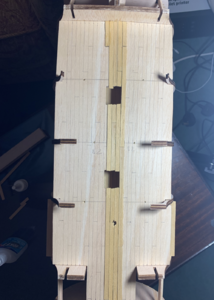
I finished planking for the front deck and deck #24 today and allow for the next 12-24 hours to dry under my books.

Deck #24

Next is to glue the front deck and start with measurements for decks 22, 23 and 24. I will see what is the best way to glue them and make a solid line without a curly effect for 22 and 23. Deck 24 seems fine, I will have a look this evening.
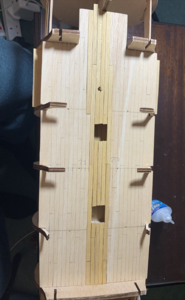
I finished planking for the front deck and deck #24 today and allow for the next 12-24 hours to dry under my books.
Deck #24
Next is to glue the front deck and start with measurements for decks 22, 23 and 24. I will see what is the best way to glue them and make a solid line without a curly effect for 22 and 23. Deck 24 seems fine, I will have a look this evening.
Attachments
Finally, I finished the first 4 steps of the instructions . Hundreds to go...
.png")


. Hundreds to go...I moved to the next step of my model build.
The middle deck that I glued and nailed to the beams.
Here are a few pictures before.

From the other angle.

And with nails

What I want to say about the nails. They are really big for the nail gun that I bought a month or two back.
The left nail comes with H.M.S. Victory and the right one comes with a nail gun. Obviously, I have to find a bigger gun for my model and nails. As it did happen that one nail has been broken while I was trying to nail it on the deck.

The next step that I decided to go with is to mark my future planks on the deck. I simply used a pencil to make a plan of planks on the deck.
Before doing this, I found information about the number of steps I may go with for the planking. H.M.S. Victory original ship has 4 step planking, even on the Facebook group, there were comments that I definitely should go with 4 steps. I was having the other opinion to go with 2 steps. But after some time and research, I decided to stop on 4 steps.
Also, as H.M.S. Victory has 6 to 12 meters strips, I stopped with 12 cm for my model and with 4 steps it was clear to me that I have to put the neighbor plank 3 cm upper than the previous. Here is how the markings look like.

The first strip goes directly to the center of the deck. As you can see, I used almost 2.5 strips 12 cm long each.

The middle deck that I glued and nailed to the beams.
Here are a few pictures before.
From the other angle.
And with nails
What I want to say about the nails. They are really big for the nail gun that I bought a month or two back.
The left nail comes with H.M.S. Victory and the right one comes with a nail gun. Obviously, I have to find a bigger gun for my model and nails. As it did happen that one nail has been broken while I was trying to nail it on the deck.
The next step that I decided to go with is to mark my future planks on the deck. I simply used a pencil to make a plan of planks on the deck.
Before doing this, I found information about the number of steps I may go with for the planking. H.M.S. Victory original ship has 4 step planking, even on the Facebook group, there were comments that I definitely should go with 4 steps. I was having the other opinion to go with 2 steps. But after some time and research, I decided to stop on 4 steps.
Also, as H.M.S. Victory has 6 to 12 meters strips, I stopped with 12 cm for my model and with 4 steps it was clear to me that I have to put the neighbor plank 3 cm upper than the previous. Here is how the markings look like.
The first strip goes directly to the center of the deck. As you can see, I used almost 2.5 strips 12 cm long each.
Hello everyone.
Does anyone have any experience with the Constructo HMS Victory 1:94 model?
I am about to go to step 12 of the instructions book, but both #46 side gun sides are shorter for about 3 cm than it should be.
Is this a bug of the instructions book or issue with my two gun sides?
It seems like I will have to cut new sides with the proper heights from my remaining materials.


Please advise.
Does anyone have any experience with the Constructo HMS Victory 1:94 model?
I am about to go to step 12 of the instructions book, but both #46 side gun sides are shorter for about 3 cm than it should be.
Is this a bug of the instructions book or issue with my two gun sides?
It seems like I will have to cut new sides with the proper heights from my remaining materials.
Please advise.
Last edited:
Excellent job so far!
Excellent job so far!
Thanks for stopping by and positive feedback, William!


The next step in my model building is to sand the middle deck with sandpaper. I used 180 grips for this.


I've had a height issue with the gun sides #46, there were 5 cm less than it is required. So I went ahead and cut new ones. I am not sure whether it is an issue with my model material or if I missed something, but anyway I spend a good amount of time checking other models and asking for advice.
Here are both gun sides installed and waiting for me to glue it.

I bought Yacht Varnish and looking to apply it on my middle deck before I continue. For now, I applied varnish on my test decking to see how it looks like and whether I like it. Also, I decided to go and paint gun sides with black matt color. This is also on my list to do.
I've had a height issue with the gun sides #46, there were 5 cm less than it is required. So I went ahead and cut new ones. I am not sure whether it is an issue with my model material or if I missed something, but anyway I spend a good amount of time checking other models and asking for advice.
Here are both gun sides installed and waiting for me to glue it.
I bought Yacht Varnish and looking to apply it on my middle deck before I continue. For now, I applied varnish on my test decking to see how it looks like and whether I like it. Also, I decided to go and paint gun sides with black matt color. This is also on my list to do.
Excellent job! Most impressive!

Very nice! The deck looks superb!
- Joined
- Feb 29, 2020
- Messages
- 24
- Points
- 58

I have enjoyed following your build log.
I started to build Artesania Latina Harvey 1847 Baltimore Clipper in 2001. I took a little break from the build until last month, yes basically a 19 year break. The build is moving along nicely now.
I have always looked at the HMS Victory kit but was intimidated by the massiveness of it. Now after reading this log, my Constructo kit of the HMS Victory arrived at my house yesterday.
Thank you!
I have enjoyed following your build log.
I started to build Artesania Latina Harvey 1847 Baltimore Clipper in 2001. I took a little break from the build until last month, yes basically a 19 year break. The build is moving along nicely now.
I have always looked at the HMS Victory kit but was intimidated by the massiveness of it. Now after reading this log, my Constructo kit of the HMS Victory arrived at my house yesterday.
Thank you!
Thank you for stopping by my build log. Happy to hear from you are now on-board with the shipbuilding, especially when its H.M.S. Victory. Does the scale the same as mine like 1:94?
Please send a link to your build log, I am interested to follow.
- Joined
- Feb 29, 2020
- Messages
- 24
- Points
- 58
It feels great and I must say relaxing to have returned to shipbuilding. I am still working on finishing my current build (a twenty year project) of the Harvey Baltimore Clipper. I did purchase the exact same Constructo kit, 1/94. I have only peeked in the H.M.S. Victory box. I look forward to your updates.
Hello Max,how are you doing ?any progress on your build?
Hello Max,how are you doing ?any progress on your build?
Hello, due to the worldwide lockdown I wasn't able to get access to my ship(((super sad face.
I finally get back to it, just yesterday.
Hopefully, I still can remember what should I do next and can continue.
I hope everything is well on your side.
Thanks for asking.
Hello friends,
I've been looking for quite a while to see what can I do with my HMS Victory and what I did last time.
The thing is, I am looking to improve my second level decking due to the reason that I applied more sandpaper than I really wanted. That's probably because of the lack of my experience building wooden ships. But hey, we all learn and start from something.
Here is my HI-GLOSS Yacht Varnish that I bought in a local shop here in Dublin. I think it should be ok to apply like once and see the result.

What do you think?
Feedback is welcome.
I've been looking for quite a while to see what can I do with my HMS Victory and what I did last time.
The thing is, I am looking to improve my second level decking due to the reason that I applied more sandpaper than I really wanted. That's probably because of the lack of my experience building wooden ships. But hey, we all learn and start from something.
Here is my HI-GLOSS Yacht Varnish that I bought in a local shop here in Dublin. I think it should be ok to apply like once and see the result.
What do you think?
Feedback is welcome.