Hayling Hoy: POF kit [COMPLETED BUILD]

I could use some advice. When do I start finishing the wood? I think I'd like to use natural Danish oil throughout most of the model and am conscious that the internal details are only going to get harder to access at this point. The only thing I'm going to color are the wales, and maybe with a dark Danish oil.
Do I start now? I know I'll have to think ahead for surfaces that will need to be glued.
Thanks
 
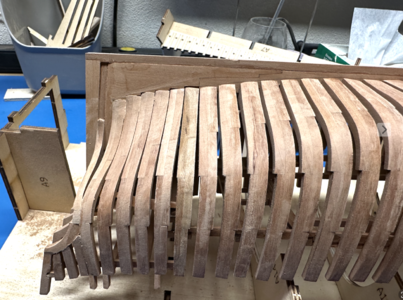
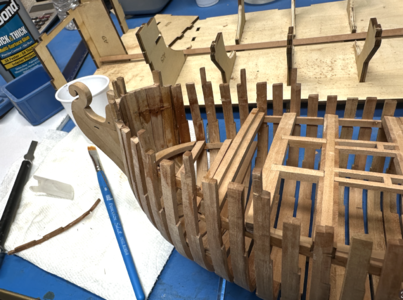
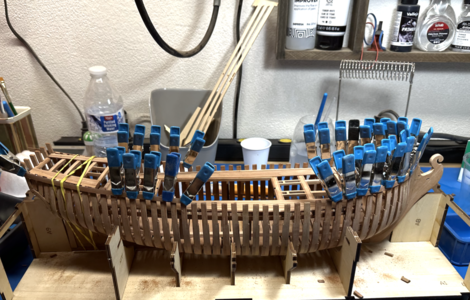
Now on to more. I finally settled those last hawse pieces, now that the forward hull is better secured with clamps and i've removed part of the jig that gives me more access to the bow.
I have to admit, I didn't really think it was going to come together but now I think it looks pretty good.
Here's the starboard piece fitted after shaping it as much as I dared on it's own. Port is the piece on that side shaped into place.
View attachment 393638
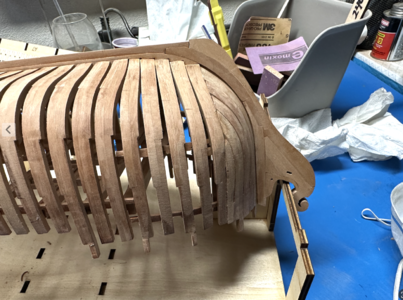
And now my near final bow.
View attachment 393639
I still plan to pop it out of the jig at some point and better fair and fine sand the frames.

I have to say, I am proud of the work I did on the hull, but pre-bevelling the frames isn't great. I think of this because now you can start to see better that each was shaped individually. Also, it's difficult to bevel the frames with strictly flat curves, especially with my Dremel setup. Most surfaces of the bevels have a slight rounding to them. Fortunately, overall, they aren't too far from fair and will be plankable with a little more work. Finally, after shaping the hawse pieces in place, the fairing of the un-bevelled frames seems time consuming but doable and for a much better look. In a future POF kit, I'll look for something I can fair later. Although I'm not looking forward to the inside. I sanded off some skin on my finger trying to get in there and fair a little more before I installed the keelson. I made a tool on the 3D printer that helped, but I do understand the moaning in build logs when builders get to fairing frames. It could take most of the time it did to build the frames in the first place.
I can relate on pre-beveling frames, or in my case bulkheads. There is no way to know before you start laying down planks if you've not done enough or too much. Of course, leaving a little meat on the bones is preferable. Keeping the faces square and not rounding them is an issue no matter how you do it!
Everything looks great so far! I am suitably impressed! Hard to believe you are so new to this! Looks more like the work of an experienced old hand. I am trying to keep up with all the challenges you've encountered so far and your more than competent, creative solutions. I'm getting a lot of useful instruction. Big WOW factor!
Beautiful project so far. Thumbsup
"Eyeball-ometry-I'll add that to my lexicon. ;)

Pete
 
Last edited:
The knees went in somewhat smoothly. The clamps really weren't in the exact right spot. The guides yielded good vertical alignment, but where a bit hazy on horizontal alignment. I'm close, but the hanging knees didn't necessarily line up with the frames. I was able to set the center one on a frame, but the others that are butted against the other knees are mostly off the frame. It's hard to tell though. I don't think there was really anything I could do except go many steps forward in the construction and dry fit to get the alignment. It sounds like a pain, but without another reference point, I might have insisted. Live and learn. Maybe I should have looked more carefully at the Seawatch publication on the topic and built one of David Antscherl's jigs for measuring and marking clamp installation within the hull. At my stage, it might be a bit above my pay grade. Again, another thing to chalk up to experience and time.
1694616090541.png
 
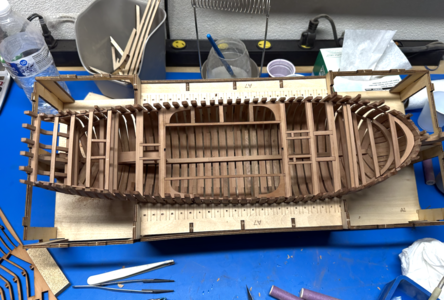
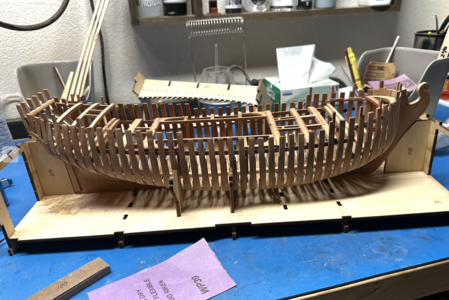
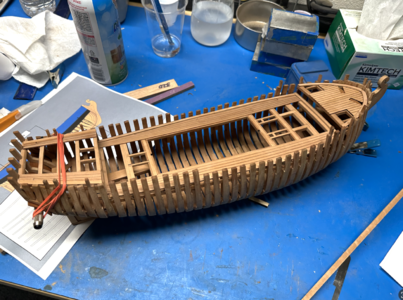
I finally broke the work out of the jig. I'm using the jig as a cradle now.
1694616202894.png
I have a lot of sanding to go. The frames don't have enough extra to be faired properly, but they look pretty close. It would have looked a lot better had I not beveled and did all the sanding now. Although, now that I've started to fay the half frames, I'm back-calculating how much time and how many skinned knuckles I would have expended fairing everything after assembly. I'm looking forward to it in the future, but after having spent the time to bevel everything as best as I could, I am glad I don't have to really do that too.
1694616388896.png
Some deep grooves in the deadwood, lots of sanding ahead. Also, the #18 frame I made a second time doesn't really fit properly the second time around either. I wish I popped this thing out much earlier, I would have found it. Now I am too invested for that much surgery. But it's hard to tell in this picture. I obviously need a lot of work on getting the heels of the half frames right, but I think that's tough for everyone.
The hawse timbers didn't turn out so badly from a distance. I sure could use some help in figuring out how to fabricate and fix hawse timbers. Any suggests or resources would be helpful. Most references just show up with formed timbers. It would be nice to know how to do it, step by step, and what tools to use. Again, maybe it's easier when you are not doing the beveling, or at least not all of the beveling, up front. I could use help on this topic, please suggest something if you could.
1694616744444.png
 
As I mentioned, the false keel wasn't in the kit as described. It was on the parts sheets instead and I moved on with construction without it. I'll install soon. I also had some surgery to perform on the transom. It was tough, but I think I am ready to give it a final shape. Busy for the rest of the week, and the garage is too hot at night, so maybe this weekend I can finish those jobs and get the frames fully shaped and finish sanded and then move on to the decking.

In the hands of someone like me, it's not a superb admiralty model, but I think it's going to look great in my office and it continues to be fun (and not super frustrating). Nice work Model Dockyard!
 
This all looks really nice Glenn. I wish I could offer suggestions for the final shaping of the hawse timbers, but my track record isn't so great in this regard... Rather than getting them right in the first place my approach has been to stumble across problems I created and then try to remedy those issues. Not the work of a master!
 
This all looks really nice Glenn. I wish I could offer suggestions for the final shaping of the hawse timbers, but my track record isn't so great in this regard... Rather than getting them right in the first place my approach has been to stumble across problems I created and then try to remedy those issues. Not the work of a master!
Thanks Paul, but I'm following your Kingfisher and I think you are being a bit too modest. If you think of anything, I'm glad to invest and try.
 
I forgot to mention a stylistic choice I made along the way. Despite spending the time to build it, I left the galley out. i can get past it not having a deck to sit on, but it sits in an impossible way. The hearth faces toward an area with no deck in the instructions. It looks really crammed and, off course, my little chimney collapse makes for a rather rough looking stack. If it turns out later that I needed it, I will build a little stack of wood and stain or paint it black. Just my take on it. I am more in it for the hull anyway, looking for the experience. Delightful details are great and the small capstan and windlass projects should provide enough interest, IMHO.
 
Thanks Tobias,

Yes there are plans with David Antscherl's book and they are splendid. I suppose I could have put them to better use locating those parts. I still need to build his fancy height/depth gauge. His book is good but you really need a volume or two from his series, The Fully Framed Model, if this is your first time around. He skips things in the new book and refers to the other work for more information. It is still extremely informative and, of course, inspiring to see that level of craftsmanship documented.

But you're right, I do have plans that I can reference, even if they didn't come with the kit.
I have the book and the plans and have just started to trace the frame members so I can cut them on my laser. I am going to cut each frame as one part and glue to together! do any of you think this will work? My first scratch build!
 
I have the book and the plans and have just started to trace the frame members so I can cut them on my laser. I am going to cut each frame as one part and glue to together! do any of you think this will work? My first scratch build!
I think cutting the floor timbers and futtocks are worth it, the improvement in the model is worth the time. The drawing process takes a good amount of thinking, especially if you want to scribe the bevels, but it's pretty doable. For the kit, from replacing frames, you need 3/16", 5/32", and 1/8" stock.
 
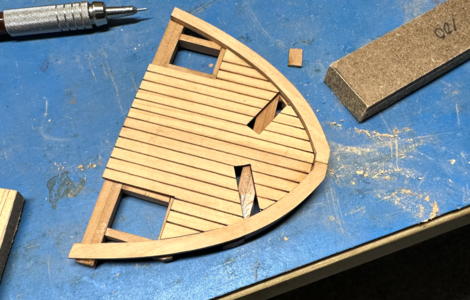
Time for the waterways and decking.
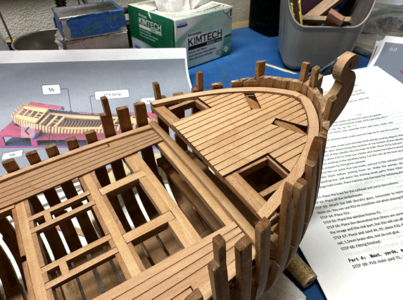
It turns out that the clamps for the forrecastle are too far aft by about 5mm and the waterway and decking doesn't fit. I had to perform some surgery. Fortunately most of the scars will be below deck.
1694784001220.png

It took quite a while, but I got it back together and the deck fit plus a little. Unfornately, the last beam of the deck is a bit far forward of the last beam on the main deck. It's isn't going to be exactly right when I go to put a bulkhead at the deck.

I feel like a lot of this work and the issues with the knees couldn't have been avoided with a clearer guide for locating the clamps. The horizontal position of the clamps for the main deck were up to some interpretation and there really wasn't any help with the forecastle deck. If it's a kit with all pre-cut pieces, there's the assumption that you can follow the instructions with some blind faith and good technique. This was kind of a let down.

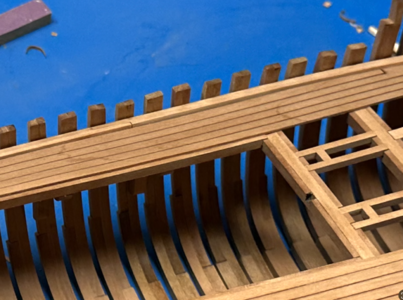
The waterways and decks are a bit oversized. I'm not 100% sure why that it since the lengths are set by the precut clamps. The decks and waterways for the main deck don't match up very well. That's holding them together off the model. I shaped a little going onto the model but you just can't get them to fit well. I really wish I had bought some 1/32" cherry strip. I also don't know why the deck only covers what it does. A little more blind faith.

Not feeling too good about the project at the moment. The deck installation is gappy near the waterway and there's no good way to bring the deck back up again. The shapes were just to much a mismatch. Also, the deck is barely on the long carling. I feel like I am kind of along for the ride at this part.

It doesn't look bad unless you get in too close.
1694784627033.png

Another reason I don't like precut decking is wood grain. The decking on the port side of the main deck has some beautiful wood grain, but it looks like stains on the deck when you use the wood this way instead of strips.
1694784899437.png
I should be happier with the progress, but if the decking is any indication, I am kind of dreading the planking, up soon. I'm just not convinced precut pieces are going to work out well. I am trying to figure out a way to try it without committing to it. It would be nice if it doesn't work out that I can just buy some additional stock and spile the planking.

Right now, getting the planking sheet onto the transom. Standard fare and a little oversized to trim to size.
 
I see what you mean about the figure in the grain of a single sheet of wood, scored to simulate the deck planks, looking like a stain since it traverses what would be several individual deck planks. Decking plank by plank would be slower but would accommodate adjustment to conform to the ship as it took shape under construction, including the inevitable error creep, and ultimately give a better look and more satisfying results. Despite the kit maker's best intentions (with which the road to H e** is paved) this shortcut was not a good idea. Surprising as well, given all the individually hand-crafted parts required. Proving, once again, there is no free lunch.Cautious

I must add, however, that your model is looking very good, despite your occasional travails. Very pleasing to the casual observer (me) so far Thumbsup

Pete
 
Last edited:
I ran into a big problem. The next step in the ceiling planking. Unfortunately, this is the first time that I have to install something that has to register to the hull planking. I am nowhere close. I really could have used a good guide to install the forecastle deck clamps (I mention again). The deck is now too high to accommodate the pre-made ceiling planking. In fact, it's too high to accept and inboard planking. I should have seen this coming but when I was eyeballing the placement of the clamp, i wasn't taking into account the additional height of the waterway (and a little bit of the beams).
1694871590000.png
I began surgery on the forecastle deck. I was able to pull out the deck and beams as one piece, which saves a lot of problems. Unfortunately the clamps themselves are a shadow of there former selves having been installed twice and needing to come out again. I am just going to have to take my chances on the reinstallation. But I have other things to figure out first.
1694872960343.png

So here's where I hit a big snag.The ceiling pieces set up where the frames will be cut off. The problem is they have to register with the outer planking. The outer planking is all pre-cut. The instructions direct you to blindly do the inside ceiling as the first step, but I think it will all be much tidier if I do the outer planking first.

I started the outer planking, the first run of strakes, below.
1694873112131.png
The top futtocks are roughly cut down to size. Cutting down the frames is not mentioned, ever, in the instructions as far as I can tell. This is a little unnverving as a first-time POF builder. I'll sand/rasp them down once I install the inner planking.

I am going to wait to reinstall the forecastle clamps and deck until I have a final height from the inner planking that matches the outer planking. I think the building strategy put forward by the instructions is a bit poor and can lead to some unfortunate stuff. You really need to read and reread the whole thing, hope you get it all, and come up with your own strategy to do a good job. Also, I've noticed the instructions are getting more vague, the diagrams less helpful. This is too bad.
 
" All kit building is kit-bashing/scratch -building." From what I can observe you are doing a marvelous job at both. I admire your perseverance, determination and willingness to do remedial surgery to get it as close to right and your satisfaction as possible. Thumbsup Bravo!

Your fan, Pete
 
" All kit building is kit-bashing/scratch -building." From what I can observe you are doing a marvelous job at both. I admire your perseverance, determination and willingness to do remedial surgery to get it as close to right and your satisfaction as possible. Thumbsup Bravo!

Your fan, Pete
Thanks a lot Pete!
The instructions are pretty frustrating (did I mention my displeasure with the lack of a guide for the forecastle deck clamps?), but I think I can still make something that looks nice with patience and some elbow grease.
 
I plan on stopping at the completed hull, partial planks, and fittings along with the bowsprit with gammoning. I read ahead and the outlook for the bowsprit is troubling. I think the stock is a dowel, there is no square stock or precut scribed part for it. It is octagonal at the end that meets the deck but there's no way to pull the length of that section off the plans. Also, it is cut at an angle to meet the deck. I guess I could eyeball it or drop a protractor onto the side plan, but there isn't a clean way to accurately do it. This is a case where a simple 2D drawing or two would have really helped. And now I don't have stock in the kit to do it properly.

I bought David Antscherl's book The Hayling Hoy of 1759-1760 from Seawatch Books. It comes with plans and excellent diagrams that are sorely missing from the kit. At ~$70, it is a big addition to the cost of the build, but it is a masterwork in it's own right anyway. Now all I have to do is buy or build up some stock.

Enough grousing (and maybe unfairly bashing the work of others), time to get back in the shop and add more outer planking to stabilize the hull better before I complete surgery on my forecastle patient.
 
I have full confidence you will! I am enjoying following your log. (In the context of a reply to your previous post)

Pete
 
Back
Top