HIGH HOPES, WILD MEN AND THE DEVIL’S JAW - Willem Barentsz Kolderstok 1:50

Hello Everyone

Let me show you where I am tonight, some things to take note of and then also one of the options open to the individual builder that I mentioned last night.

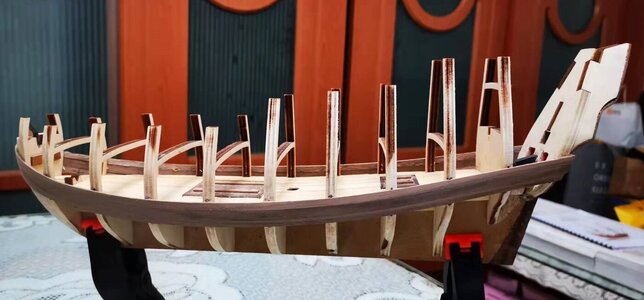
The third planks on both sides were laid down today.

微信图片_20211211181338.jpg
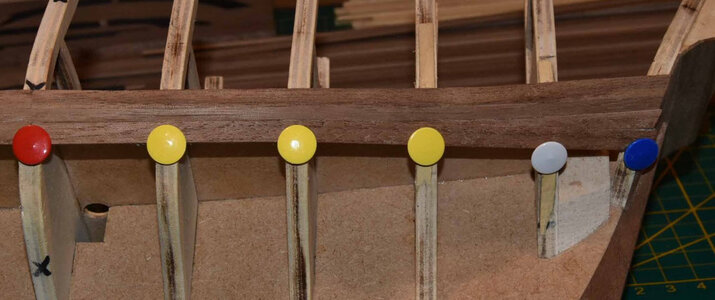
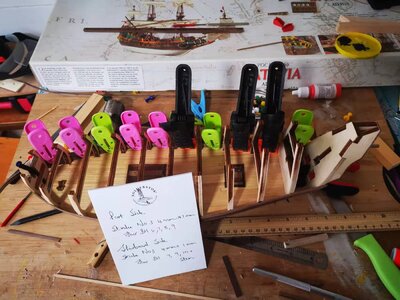
Port Side: In addition to fixing the strake to the bulkheads by means of push pins (my primary means of fixation), I also use clamps on the planks themselves which aid in alignment. Until today I had not been able to use them as there was sufficient part of the planks protruding above the deck to give the clamps a proper grip.
微信图片_20211211181344.jpg
Starboard Side: I use Kolderstok's most handy notepad, to jot down which bulkhead/s need/s additional fairing.

Tonight, I am not going to inundate you with a plethora of pictures again as I want to share some brainstorming with you. However, the three pics below show the current status:

微信图片_20211211181400.jpg
Starboard Side

微信图片_20211211181407.jpg
Port Side

微信图片_20211211181353.jpg
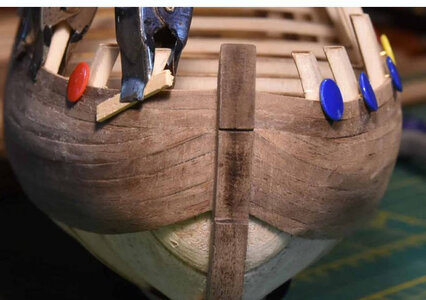
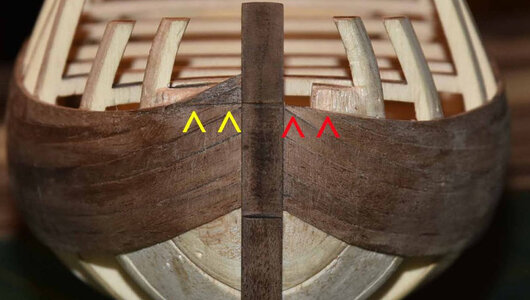
Bow: Now here, I have followed Piet's example by already shaping the bowsprit opening in the bow filler BEFORE planking. This means that my next plank cannot extend all the way to the keel. If I do extend it, it would simply mean that I have to cut part of the plank away again.

Thus so far I have laid down three planks: All three these planks were neither beveled nor tapered - they were laid down as they came from their mother.

1. 4mm x 1.5mm
2. 6mm x 1.5mm
3. 4mm x 1.5mm

Now the instructions call for THREE 6mm x 1.5mm planks with their ends tapered to 4mm to be laid next. The instructions are very clear so this is what I SHOULD be starting tomorrow. However, I started thinking and this is where my brainstorming comes in. Please take a look below of the completed build of @pietsan Piet Sanders:

JPG_1893_6507_bewerkt-1.jpg
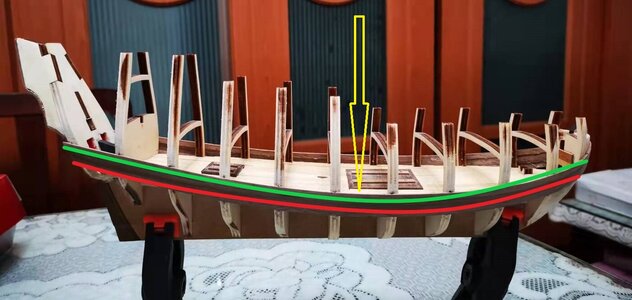
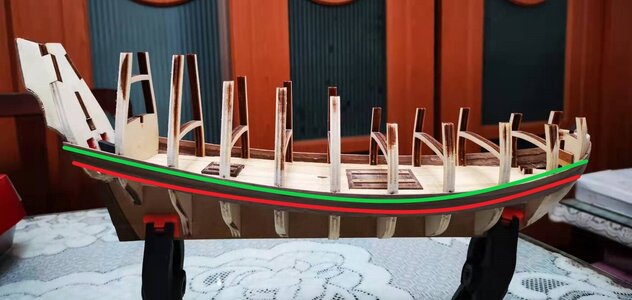
The three colored lines indicate the three real wales ("Berghouten" in Dutch) on the Willem Barentsz. These wales are eventually formed by gluing TWO 4mm x 1.5mm strakes on top of each other to provide double thickness. The Red Line indicates the first 4mm x 1.5mm plank that I laid down, the green line indicates the 4mm x 1.5mm plank that I laid today. The section between them is the 6mm x 1.5mm plank that I put down yesterday. The Yellow Line is for future reference as we are not yet close to that.

Normally speaking, the wales are only attached to the hull after the planking has been completed and sanded smooth. Then, it is of course a real challenge to fit those wales. And this is what got me thinking.
微信图片_20211211181400.jpg
Here I have my two future wales sitting beautifully accessible - both by push pins and clamps. True, the bottom one is tricky because the clamps will have to go in from underneath, but why do I not add the double planks on top of the first ones right now and finish off the first two wales. Just think, without push pins and without clamps that second plank is going to be a "real-you-know-what" to align properly and fix.

Please tell me what you guys think - I look forward to your comments and suggestions.
 
Hello Everyone

Let me show you where I am tonight, some things to take note of and then also one of the options open to the individual builder that I mentioned last night.

The third planks on both sides were laid down today.

View attachment 274954
Port Side: In addition to fixing the strake to the bulkheads by means of push pins (my primary means of fixation), I also use clamps on the planks themselves which aid in alignment. Until today I had not been able to use them as there was sufficient part of the planks protruding above the deck to give the clamps a proper grip.

View attachment 274955
Starboard Side: I use Kolderstok's most handy notepad, to jot down which bulkhead/s need/s additional fairing.

Tonight, I am not going to inundate you with a plethora of pictures again as I want to share some brainstorming with you. However, the three pics below show the current status:

View attachment 274973
Starboard Side

View attachment 274974
Port Side

View attachment 274975
Bow: Now here, I have followed Piet's example by already shaping the bowsprit opening in the bow filler BEFORE planking. This means that my next plank cannot extend all the way to the keel. If I do extend it, it would simply mean that I have to cut part of the plank away again.

Thus so far I have laid down three planks: All three these planks were neither beveled nor tapered - they were laid down as they came from their mother.

1. 4mm x 1.5mm
2. 6mm x 1.5mm
3. 4mm x 1.5mm

Now the instructions call for THREE 6mm x 1.5mm planks with their ends tapered to 4mm to be laid next. The instructions are very clear so this is what I SHOULD be starting tomorrow. However, I started thinking and this is where my brainstorming comes in. Please take a look below of the completed build of @pietsan Piet Sanders:

View attachment 274976
The three colored lines indicate the three real wales ("Berghouten" in Dutch) on the Willem Barentsz. These wales are eventually formed by gluing TWO 4mm x 1.5mm strakes on top of each other to provide double thickness. The Red Line indicates the first 4mm x 1.5mm plank that I laid down, the green line indicates the 4mm x 1.5mm plank that I laid today. The section between them is the 6mm x 1.5mm plank that I put down yesterday. The Yellow Line is for future reference as we are not yet close to that.

Normally speaking, the wales are only attached to the hull after the planking has been completed and sanded smooth. Then, it is of course a real challenge to fit those wales. And this is what got me thinking.

View attachment 274977
Here I have my two future wales sitting beautifully accessible - both by push pins and clamps. True, the bottom one is tricky because the clamps will have to go in from underneath, but why do I not add the double planks on top of the first ones right now and finish off the first two wales. Just think, without push pins and without clamps that second plank is going to be a "real-you-know-what" to align properly and fix.

Please tell me what you guys think - I look forward to your comments and suggestions.
Hum, well I certainly see an advantage to adding the wales at this time. However, should the planking be less than perfect and scraping and/or sanding be required after all planking then I can see the wales would be a hindrance to that.
Of course, I speak as one who’s work will probably be less than perfect :( yours I’m sure will be perfect.
Just my two cents worth Heinrich.

Ron
 
@rtibbs Thank you for the reply and comment Ron. Actually, those two wales will only influence the area that has been planked up to now. Even if they are doubled to form the wales, I don't really think they will impede on the rest of the hull, but it's nevertheless a valid point Ron. Thank you for thinking along.
 
Hello Everyone

Let me show you where I am tonight, some things to take note of and then also one of the options open to the individual builder that I mentioned last night.

The third planks on both sides were laid down today.

View attachment 274954
Port Side: In addition to fixing the strake to the bulkheads by means of push pins (my primary means of fixation), I also use clamps on the planks themselves which aid in alignment. Until today I had not been able to use them as there was sufficient part of the planks protruding above the deck to give the clamps a proper grip.

View attachment 274955
Starboard Side: I use Kolderstok's most handy notepad, to jot down which bulkhead/s need/s additional fairing.

Tonight, I am not going to inundate you with a plethora of pictures again as I want to share some brainstorming with you. However, the three pics below show the current status:

View attachment 274973
Starboard Side

View attachment 274974
Port Side

View attachment 274975
Bow: Now here, I have followed Piet's example by already shaping the bowsprit opening in the bow filler BEFORE planking. This means that my next plank cannot extend all the way to the keel. If I do extend it, it would simply mean that I have to cut part of the plank away again.

Thus so far I have laid down three planks: All three these planks were neither beveled nor tapered - they were laid down as they came from their mother.

1. 4mm x 1.5mm
2. 6mm x 1.5mm
3. 4mm x 1.5mm

Now the instructions call for THREE 6mm x 1.5mm planks with their ends tapered to 4mm to be laid next. The instructions are very clear so this is what I SHOULD be starting tomorrow. However, I started thinking and this is where my brainstorming comes in. Please take a look below of the completed build of @pietsan Piet Sanders:

View attachment 274976
The three colored lines indicate the three real wales ("Berghouten" in Dutch) on the Willem Barentsz. These wales are eventually formed by gluing TWO 4mm x 1.5mm strakes on top of each other to provide double thickness. The Red Line indicates the first 4mm x 1.5mm plank that I laid down, the green line indicates the 4mm x 1.5mm plank that I laid today. The section between them is the 6mm x 1.5mm plank that I put down yesterday. The Yellow Line is for future reference as we are not yet close to that.

Normally speaking, the wales are only attached to the hull after the planking has been completed and sanded smooth. Then, it is of course a real challenge to fit those wales. And this is what got me thinking.

View attachment 274977
Here I have my two future wales sitting beautifully accessible - both by push pins and clamps. True, the bottom one is tricky because the clamps will have to go in from underneath, but why do I not add the double planks on top of the first ones right now and finish off the first two wales. Just think, without push pins and without clamps that second plank is going to be a "real-you-know-what" to align properly and fix.

Please tell me what you guys think - I look forward to your comments and suggestions.
Hello Heinrich,
That's quite the dilemma you're facing.
Would it be possible to form and fit the first two wales now, still easily accessible, the third, upper Wales once you planked upto the yellow line, maybe creating some simple jigs to keep the shapes. Then continue planking, sanding and sanding some more and after that's done to your satisfaction, then bond the wales. The main issue you then still face is to properly clamp the wales, possibly using some small nails, to be removed and smoothed over after the glue has dried properly. By pre-forming the wales now probably gives you the least pretension...Thumbs-Up
 
Last edited:
Hi Johan. Thank you very much for your input. As I mentioned in the log, the accepted way is to do the wales last, but I just asked myself why it should be like that. Your suggestion is exactly my idea as well - Do the wales now (the first two that are accessible), then plank up to the yellow line, do the yellow wale as well and then just carry on. Otherwise small nails would be the logical thing to attach the wales when done the normal way.
 
Heinrich, ask @pietsan Piet Sanders how he did it. If he succeeded, you will too.

I will be gluing them now. Comfortable. Sanding the hull planks above and below I don't see a problem. With your hands and a bent piece of sand paper will be easy.

Now sand the plank that is between the 2 , yet not thick, wales. Then add a plank above and below the , not yet thick wales. Sand the union of those planks with the wale. Now, I will add the plank that provides thickness to the wales. Sand and move on to finish the hull.

Why you haven't bent a 3x4 mm plank directly to do the wale ? Could be you don't have it.

I do not understand your issue here :

....Bow: Now here, I have followed Piet's example by already shaping the bowsprit opening in the bow filler BEFORE planking. This means that my next plank cannot extend all the way to the keel. If I do extend it, it would simply mean that I have to cut part of the plank away again.....

I will glue all the planks and then, when finished, and well dry and solid, file the opening on the hull planks. The one you already have done , on the filler, will be the perfect template for the opening size and position

Daniel
 
Hi Johan. Thank you very much for your input. As I mentioned in the log, the accepted way is to do the wales last, but I just asked myself why it should be like that. Your suggestion is exactly my idea as well - Do the wales now (the first two that are accessible), then plank up to the yellow line, do the yellow wale as well and then just carry on. Otherwise small nails would be the logical thing to attach the wales when done the normal way.

Ok you posted just before mine and more or less we are saying the same.

Why the kit hasn't provided a 3x4 plank for the wale ? I am sure with that hull curvature you can bent it without trouble. Of course, depending on the wood used.

Daniel
 
@Dematosdg Hi Daniel. Thank you very much for the think-along. At the bow there is not really a problem - I just mentioned that to show prospective builders that they have two options. Either remove the material as I have done, and then do not plank to the keel, or plank to the keel and shape the bowsprit insert later.

I am very glad that you agree with me that it would be easier to do now.Thumbsup The more I look at it, the more it makes sense.
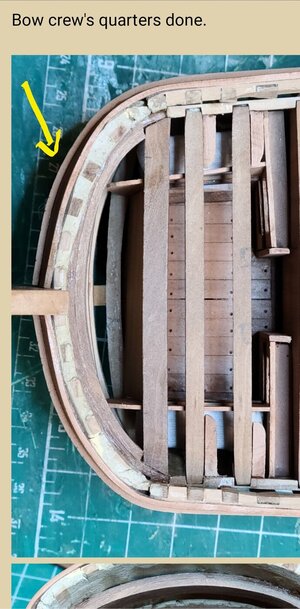
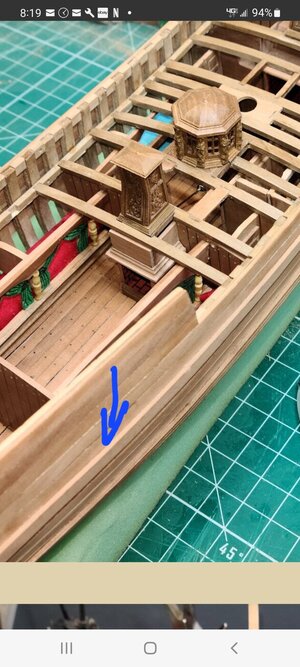
As to why the kit does not supply that piece - I am not so sure you would be able to bend a 4mm x 3mm piece of wood - it's almost a square block! Also it is the vertical curve that will present the issue - that is quite severe.
 
@Dematosdg

As to why the kit does not supply that piece - I am not so sure you would be able to bend a 4mm x 3mm piece of wood - it's almost a square block! Also it is the vertical curve that will present the issue - that is quite severe.

My Pegasus wale 2x4 bent with no problem.

The kit came with pear wood 2,5x4 to do the hull planking and I was so afraid that I replaced with 1,5x4 . But for the wale I tried and discovered that PEAR WOOD was easy to bent.

See the curvature of Pegasus Bow.

Screenshot_20211211-081829_Chrome.jpg
Screenshot_20211211-081924_Chrome.jpg

With your Bow curvature will be very easy.

Well, something for another ship, as you do not have 3x4 mm.

Cheers
Daniel
Ps: Don't give it too much thought. Go the way YOU !!! feel comfortable on doing it.
 
On those pictures, I glued the 2,5x4. over the already placed 1,5x4 plank hull already sanded. So the wale can be cleared seen protruding.

Daniel
 
@Dematosdg Maybe the Dutch walnut is more resilient to bending than the Chinese Pear.ROTF Thanks for the vote of confidence Daniel - that is probably exactly what I will do!
 
Next time order from Max (ZHL MODEL) some pear wood planks. You will get them in a week probably.

No need for that. The Kolderstok kits come with superb quality walnut or oak. Pear would be totally out of character with the hull ambience of a 16th Century Dutch ship - it's just not going to look right.
 
A couple of things from the novice builder. ME
First reading Pietsan's log I have questions regarding a couple of words:
(1) Rejuvenate which I take to mean taper?
(2) Sieve. Not sure what it means in regard to his planking procedure.

Bow view.jpg

I know this has been discussed previously at length, however, from his #178 post he states the following:
"The problem was that the slats at the bow went up too far, so that neatly bending the last 3 slats would be a problem and that I would also end up too high (see previous update). I'm going to cut out the piece at the bow that goes up a bit too strongly, after which the next slats can be glued in a normal way. The photo below makes it clear" Sorry the photo above Redface

Does this mean you will have to do the same to yours or if the initial planks were not positioned up that far then cutting would not be required?

Just tryin' to learn before I start mine. :eek:

Ron
 
@rtibbs Hi Ron. Those are great questions and questions I have asked myself too. So let me first answer the one question that I know the definite answer to. :)

"Rejuvenate" comes from the Dutch word "verjonging" which indeed means to taper the planks.
"Sieve" - I have no idea what the original Dutch would translate to - for that I will have to read Piet's original log - which I will do in the morning and give you an answer to. (Maybe you can send me a screenshot of the page on the Modelbouwforum site otherwise I wouldn't even know where to start looking. :eek:)

Now for the really difficult question about the planks ending too far up at the bow. The kit has demarcated lines on all the bulkheads which the very first plank has to follow. So the short answer is YES - if both Piet and I have stuck perfectly to the lines, then, in theory, I will have the same challenge. However, it is difficult to tell at this point as I still have at least another two planks to go before I reach the point Piet was at, at the time of the picture you are referring to. So, give me two or three days and I will have an answer for you!
 
2nd Bow view.jpg
"The planks around the bow look a bit different, due to the earlier mistake of the 1st (basic) bar, there is still one bar of 4 mm on top in the same way."
This is from thread #202

As to the Sieve question
Side view.jpg

"part of the corridor can be glued neatly along the previous bar and the insteker without difficulty, Then we continue with the plating upwards, the next bar (1 to SB and 1 to BB is again a bar of 4 mm. Since there is quite a bit of sieve in the boards, bending well into shape is necessary, so that you do not have to force to glue the slats. The photo above shows that the slats are"

Also referenced by another member's post:
"Looks good Pete. The sieve is indeed large on this model I have experienced. Now that I see your activities, I would have done it differently than stated in the building description.
It looks tight again as
usual
:worship:
"
 
@rtibbs Okiedokie Ron - that is an easy one. :)

"Sieve" is translated from the Dutch word "zeeg" which translates to the vertical curvature of the hull.

微信图片_20211211181400.jpg
The zeeg then is the U-shaped curvature of the hull planks as it sweeps sharply upwards from the middle towards the bow and stern.

Thank you for finding the passage - that made it easy to answer you! Thumbsup
 
Back
Top