HIGH HOPES, WILD MEN AND THE DEVIL’S JAW - Willem Barentsz Kolderstok 1:50

Hello Everyone

I will now take a step back and attempt to explain everything that has been done so far. This is as much of my thought process at this point as it is a build log so bear with me.

On this ship EVERYTHING is based on the position of the first 4mm plank which will also become the first wale. This plank is indicated by the yellow line on the picture below.

View attachment 275442
Photograph @pietsan Piet Sanders.

The instructions call for the installation of this plank first and from here this plank is regarded as the base plank. The instructions then list a very clear order in which the planking needs to take place from the base plank upwards on the hull.

View attachment 275443

NOTE: The three 1.5mm x 6mm planks in the green block are to be tapered to 4mm. All the other planks, including the first 1.5mm x 6 mm plank, are installed untapered.

With that first base strake laid on my model, this is what it looked like.

View attachment 275446
First Strake (4mm plank) Port Side

View attachment 275447
First Strake (4mm plank) Bow

View attachment 275445
Verification picture of Piet's build.

Next up was an untapered 6mm Plank.

View attachment 275451
Port Side: Two planks installed.

View attachment 275452
Bow Side: Two planks installed

Next up is another 4mm plank which will ultimately become the second wale.

View attachment 275453
Port Side: Three planks installed

View attachment 275454
The same three planks viewed from the bow.

So now let’s move on to what I did the last two days.

  • First off, I doubled the two 4mm planks so that they are now indeed Wale #1 and Wale #2. My reasons for doing this at this point have been discussed at length, but basically it boils down to easier access to the wales during installation.
  • Next, I glued a 6mm plank – tapered to 3mm at the bow – BELOW the first base wale. This is out of sequence with the build instructions, but I followed @pietsan Piet’s build so that I could have an exact picture at any given stage of how my build looks compared to his.
  • Now going back to planking upwards on the hull again, I laid down the next plank – a 6mm plank tapered at the bow to 4mm.
This is where I am now:

View attachment 275455
Four planks installed. Please disregard the plank sitting below the wale at this stage. This is out of sequence with the build instructions at this point. And in case you have thought - why am I only showing you the Port Side - I will do the next explanation of the layout on the Starboard Side. (Counting that plank - it would be 5 planks in total).

View attachment 275456
Starboard Side

View attachment 275457
Bow. Please do not pay attention to the unfinished edges of the planks at the bow - that will all be nicely filed and sanded down. Also note that the keel will be covering that section in its entirety.

So this is all good then??? Have a look at the picture below:

View attachment 275458

In that two mm gap, I still need to fit:

1 x 6mm Plank Tapered to 4mm
1 x 4mm Plank (Untapered)

View attachment 275459
EISH!
 
Hello Everyone

I will now take a step back and attempt to explain everything that has been done so far. This is as much of my thought process at this point as it is a build log so bear with me.

On this ship EVERYTHING is based on the position of the first 4mm plank which will also become the first wale. This plank is indicated by the yellow line on the picture below.

View attachment 275442
Photograph @pietsan Piet Sanders.

The instructions call for the installation of this plank first and from here this plank is regarded as the base plank. The instructions then list a very clear order in which the planking needs to take place from the base plank upwards on the hull.

View attachment 275443

NOTE: The three 1.5mm x 6mm planks in the green block are to be tapered to 4mm. All the other planks, including the first 1.5mm x 6 mm plank, are installed untapered.

With that first base strake laid on my model, this is what it looked like.

View attachment 275446
First Strake (4mm plank) Port Side

View attachment 275447
First Strake (4mm plank) Bow

View attachment 275445
Verification picture of Piet's build.

Next up was an untapered 6mm Plank.

View attachment 275451
Port Side: Two planks installed.

View attachment 275452
Bow Side: Two planks installed

Next up is another 4mm plank which will ultimately become the second wale.

View attachment 275453
Port Side: Three planks installed

View attachment 275454
The same three planks viewed from the bow.

So now let’s move on to what I did the last two days.

  • First off, I doubled the two 4mm planks so that they are now indeed Wale #1 and Wale #2. My reasons for doing this at this point have been discussed at length, but basically it boils down to easier access to the wales during installation.
  • Next, I glued a 6mm plank – tapered to 3mm at the bow – BELOW the first base wale. This is out of sequence with the build instructions, but I followed @pietsan Piet’s build so that I could have an exact picture at any given stage of how my build looks compared to his.
  • Now going back to planking upwards on the hull again, I laid down the next plank – a 6mm plank tapered at the bow to 4mm.
This is where I am now:

View attachment 275455
Four planks installed. Please disregard the plank sitting below the wale at this stage. This is out of sequence with the build instructions at this point. And in case you have thought - why am I only showing you the Port Side - I will do the next explanation of the layout on the Starboard Side. (Counting that plank - it would be 5 planks in total).

View attachment 275456
Starboard Side

View attachment 275457
Bow. Please do not pay attention to the unfinished edges of the planks at the bow - that will all be nicely filed and sanded down. Also note that the keel will be covering that section in its entirety.

So this is all good then??? Have a look at the picture below:

View attachment 275458

In that two mm gap, I still need to fit:

1 x 6mm Plank Tapered to 4mm
1 x 4mm Plank (Untapered)

View attachment 275459
Hello Heinrich,

And here I thought this build wasn't overly complex, and how I'm proven wrong.
Although it's been discussed and explained before, by both you and Hans (Kolderstok), I am still leaning towards the idea that the upsweep of your first plank should be more following the deck's curvature, especially given the issue you ran into. I read Piets' build log of his "Witte Swaen" and I understood that he ran into some issues as well, when planking above the first plank he put in.
Also, when looking at the build of the "Witte Swaen" in Harlingen, one can see a much more benign swayback of the two lower wales than in Piets' and your build, see the pictures of your post #256.
Since I am only looking at pictures, with no hands on experience and definitely not a shipwright, I should be very careful, but to me this looks as if some rethinking is necessary.
But, given the fact you are a rather experienced builder, I am looking forward towards the solution you undoubtedly come up with, probably surprising me with its ingenuity.

Eagerly awaiting your next posts!

Johan
 
Johan that is a great posting - thank you. First, let me say that by following Piet's exact layout, I knew I was going to encounter this issue - obviously because, as you say, he has encountered the exact same problem in doing so. However, he has a brilliant solution for this - not easy to execute - but it is theoretically doable for lesser mortals - for him it is entirely practical.

If I had given the wale less of an upswept to follow the lines of the deck, I would have run into the same problem - just later on. There is just no way that you can fit that number of planks into the available space. But if I had gone that route I would have had a problem without as proven or detailed a solution as the one Piet offers.

So, in summary, I suppose you can say that I went for the lesser of the two evils - the one I had an idea how to cope with. I hope this makes sense.
Hello Heinrich,

Thanks again for taking your time away from your build and answer the ignorant.
Your response does make sense and I'll try and keep from repeating myself. Instead, I'll sit back and watch the events unfold themselves.
In the meantime I'm rather impressed by both your build ánd your build log; a lot of valuable information for all modelers, both rookies as well as seasoned veterans.

With kind regards,

Johan
Johan you are always welcome. At the moment I am waiting for a plank to dry on the ship, so no problem! There is most certainly nothing ignorant about what you have said - it all makes perfect sense and is indeed probably the "correct" way of doing things.

I am very glad that you are enjoying the log. I do try and be as complete as I can - not only for our members, but also for myself - as I follow a line of thought. Following this option allows me to show our fellow members two techniques which are not seen every day. It also allows me to explain what certain terminology means. Hopefully, I will be able to post some progress later tonight.
 
Heinrich, my friend,, You are doing an excellent job on your Willem Barentsz, and you and i both know, that you are very capable to execute the planking plan Piet came up with, so i would say, to the shipyard, a good, firm cup of coffee, and there you go :cool::cool:

Good luck my friend, and have fun
Dear Peter. You have no idea how much I appreciate this post. It's always great to hear from you and when you are so confident my ability, it does me the world of good. Thank you my friend! Thumbsup
 
So let me show you what happened today so far.

微信图片_20211214134024.jpg
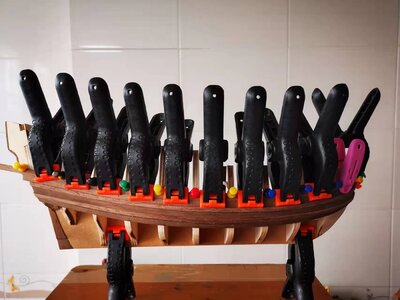
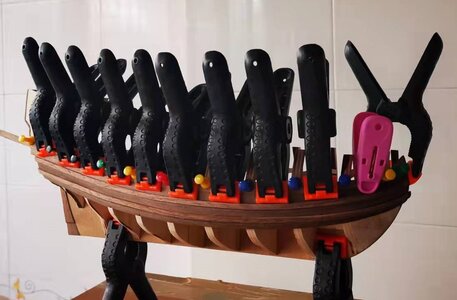
The fifth plank on starboard

微信图片_20211214134032.jpg has been tapered, and glued. As you can see I use every conceivable space on the ship to clamp and pin the plank.

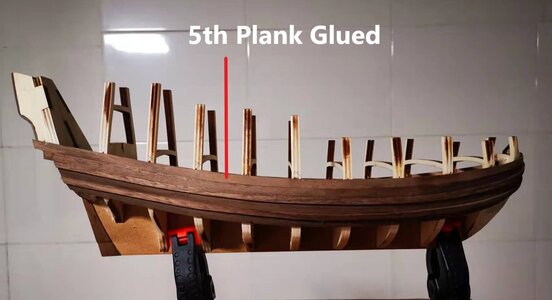
微信图片_20211214201847.jpg
The fifth plank on starboard has been laid.

微信图片_20211214201903.jpg
Here you can see the uneven number of planks clearly. Five on starboard, four on port side. Now it's time for the fifth on Port Side to be glued, laid down and clamped.
 
Yikes, my WB is scheduled for deliver today. :eek: I may just not open Pandora's Box quite yet. Cautious
On the other hand, I may lift the lid slightly to get the smell of the wood. ;)
Eagerly awaiting the resolution Heinrich.

Ron
Great stuff Ron! That is something really nice to look forward to. And you have to get a whiff of that wood. :)
 
So let me show you what happened today so far.

View attachment 275486
The fifth plank on starboard

View attachment 275487 has been tapered, and glued. As you can see I use every conceivable space on the ship to clamp and pin the plank.

View attachment 275488
The fifth plank on starboard has been laid.

View attachment 275489
Here you can see the uneven number of planks clearly. Five on starboard, four on port side. Now it's time for the fifth on Port Side to be glued, laid down and clamped.
"Dichtste bolstapeling" of clamps indeed! This must be nerve-wracking... #keeping fingers crossed#
 
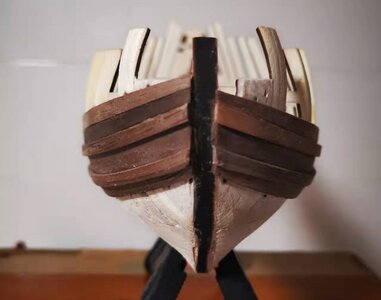
And nine o' clock in the evening in China, the 5th plank Port Side has been glued, laid down and clamped.

微信图片_20211214210206.jpg

And those two planks took me the WHOLE day!

I think this little ship misunderstood the title of my build log. "Devil's Jaw" refers to the Barents sea, not the hull planking ...
 
Back
Top