- Joined
- Jan 9, 2020
- Messages
- 10,566
- Points
- 938

I am very happy with how the hull is looking so far Peter!Yes indeed, Heinrich. She’s getting a beautiful sway !
Regards, Peter
 |
As a way to introduce our brass coins to the community, we will raffle off a free coin during the month of August. Follow link ABOVE for instructions for entering. |
 |
 |
The beloved Ships in Scale Magazine is back and charting a new course for 2026! Discover new skills, new techniques, and new inspirations in every issue. NOTE THAT OUR FIRST ISSUE WILL BE JAN/FEB 2026 |
 |

I am very happy with how the hull is looking so far Peter!Yes indeed, Heinrich. She’s getting a beautiful sway !
Regards, Peter

Hello Henk! A big welcome to the log - it is great to have you here and thank you for the nice comments!Checked in too late here...
Just to see if there are any pictures between the others, mouth cap on
Nice story you told here
Beautiful work Heinrich, and a very nice Dutch kit
Class work!


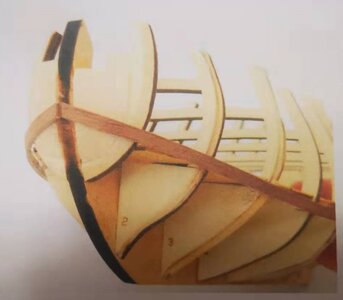
Correct, Hans.One important thing to say is that the height of the bulkheads does not determine the height of the planking. Many of the visible plywood bulkheads are broken away further in the build, so this is not something to aim at while mounting planks.

That's what my flight instructor said when he had to fly with me. Never knew why though..."Fools rush in where angels fear to tread"


Maybe when I start my build we can have a group counseling sessionExcellent work and explanation Heinrich.
When I get to my build I will tread in your

Ron and I have very good news for you. It does not seem as if any cutting is required on my build. I have just laid the 4mm plank (non-tapered) above the lost strake and it fits beautifully.Excellent work and explanation Heinrich.
When I get to my build I will tread in your

Anytime my friend. I am here for you guys!Maybe when I start my build we can have a group counseling session
KumbayaMaybe when I start my build we can have a group counseling session
Great explanation Heinrich. I have used the lost strake (not knowing they have a name) quite often in my hull planking efforts. I just thought of them as either fillers or course correctors when I would get offline so to speak. Interesting discussion about plank tapering. I always avoided placing two tapered edges next to each other so as to avoid a really bad looking joint line. I also cringe when it comes time to start tapering because it is such an unforgiving practice when done incorrectly (which I seem to do a lot).So I know that I said earlier that I am going to take a break from planking today. Well, that turned out to be a fib. It seems that addiction is the anme of the game.
Tonight, I want to share a few things with you which will hopefully be helpful.
Tapering of Planks on the Willem Barentsz
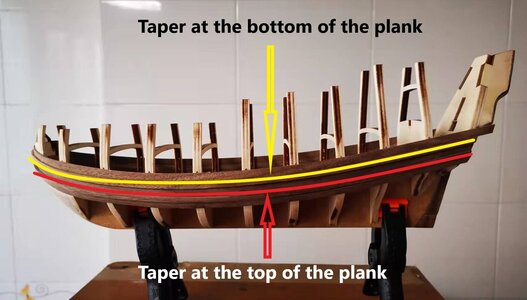
Now we all know that hull planks need to be tapered from time to time depending on the specific build. Many of the more experienced builders are very particular about the way they taper - some say they only taper the top part and some say only the bottom part. Well, truth of the matter is that Willem Barentsz requires both.
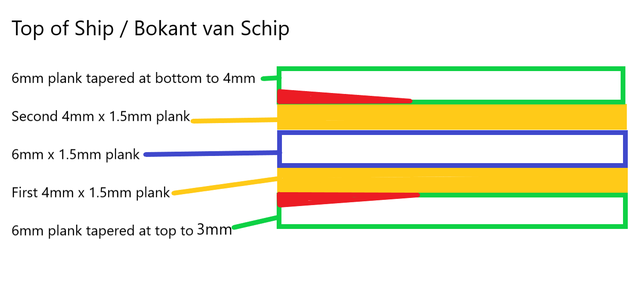
As a rule of thumb, the tapered plank is always placed so that the tapered portion adjoins the previously straight plank. Once again, I use this picture of the wales as an example. All planks above the top wale (yellow plank) will be tapered on the bottom of the plank, while those below the lower wale (red line) will be tapered at the top.
View attachment 275675
Graphically thus, it looks like this if we look at the layout of planks on the Willem Barentsz:
View attachment 275677
The second thing I want to address tonight is the "Lost Strake" or "Verloren Gang" as the Dutch so beautifully puts it.
The Lost Strake
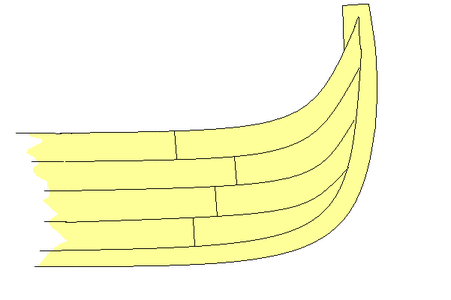
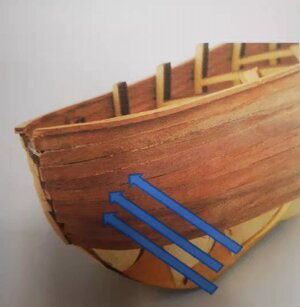
To different builders the term "lost strake" means different things and as such they have different definitions for it. However, I will make it easy for you: Simply put, a lost strake is a plank that does not run all the way from the stern to the stem, but ends "somewhere" before that time.
View attachment 275678
These are NOT lost strakes - they are simply a hull plank in sections which are all joined by butt-points and ultimately, all end up at the bow.
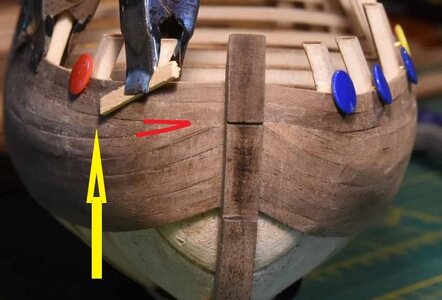
View attachment 275679
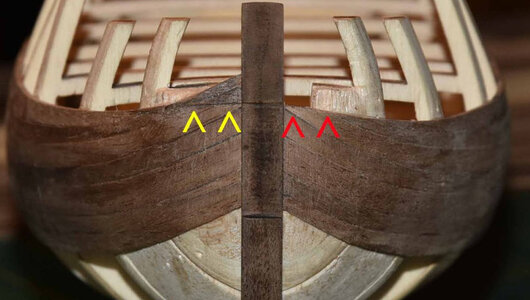
Looking again at @pietsan Piet Sanders's excellent build, the yellow arrow indicates a real "lost strake" while the red triangle indicates the exact point at which it ends - well short of the stem.
So why do we use them? Normally when the shear or "swayback" (thanks again @rtibbs Ron!) is too much and starts creating problems in either shaping the planks or placing them, a lost strake is used to "fill up" the shear so that the next plank can follow a more natural and straighter line. By implication, lost strakes are normally tapered and often - quite strongly.
Today, I only laid one plank - the last 6mm plank. This plank was tapered "severely" and used as a lost strake:
View attachment 275680
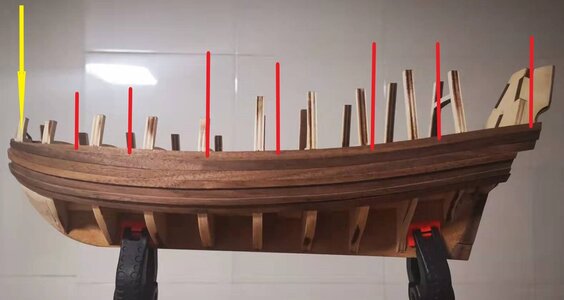
The red lines indicate the 3rd 6mm plank that was laid down (only on the port side for now) while the yellow line indicates the exact point at which the strake ends. If you look closely towards the bow you can see clearly just how sharply I tapered that plank.
So what was the effect in practice?
View attachment 275681
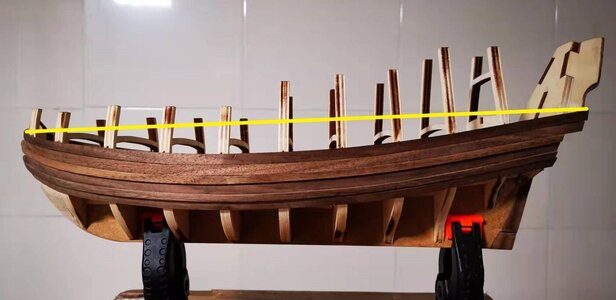
This was the picture I took last night with the second 6mm plank installed. Notice the gap between the yellow line and the top of the 5th plank.
View attachment 275682
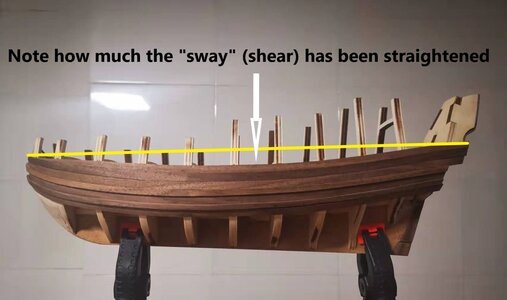
Now compare this picture after the last 6mm plank had been laid to the previous one. You will see that the gap is much smaller and the planking has an altogether "straighter" look at the top - all the result of the "lost strake".
Thank you all so much for following and responding. I wish you enjoy the log as much as I enjoy the build - it's a blast!


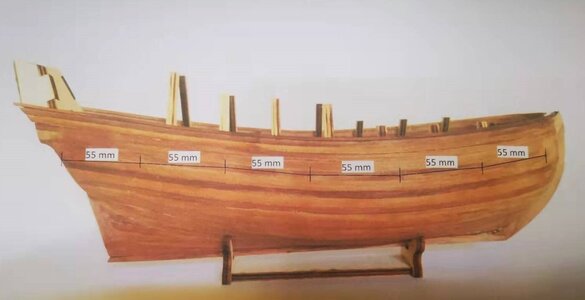

And to cut a long story short, that's what I did and why my planking is different to Piet's. I hope that makes sense to everyone
 Only now do I realize the pun - its a relevant one, but completely unintended.