Good afternoon Heinrich. Looking beautiful. The bashing of your stern paid healthy returns for your WB.The Coat of arms and “door” ( strange place for a door…leave the cabin into the icy seas- only on Dutch shipsDear Friends. The bulwark railing has been completed.
View attachment 341439
I am particularly pleased with this fit - I don't think I could have gotten it any better.
The stern has been closed, the frame around the door completed, the door/window installed, and the Amsterdam Coat of Arms installed.
View attachment 341440
View attachment 341441
When the stain has dried completely, I will give the whole stern a once-over with 2000-grit sandpaper and apply the second coat.
View attachment 341442
As you can see the starboard railing between the two canopies have also been placed. Tomorrow it is the turn of the Port Side.
-

Win a Free Custom Engraved Brass Coin!!!
As a way to introduce our brass coins to the community, we will raffle off a free coin during the month of August. Follow link ABOVE for instructions for entering.
-

PRE-ORDER SHIPS IN SCALE TODAY!
The beloved Ships in Scale Magazine is back and charting a new course for 2026!
Discover new skills, new techniques, and new inspirations in every issue.
NOTE THAT OUR FIRST ISSUE WILL BE JAN/FEB 2026
You are using an out of date browser. It may not display this or other websites correctly.
You should upgrade or use an alternative browser.
You should upgrade or use an alternative browser.
HIGH HOPES, WILD MEN AND THE DEVIL’S JAW - Willem Barentsz Kolderstok 1:50
- Joined
- Jan 9, 2020
- Messages
- 10,566
- Points
- 938

Thank you very much Grant. Yes, the "door" I suspect was more of a window than anything else. earlier in the build of WB1, I was kept up the whole night by an extremely lively discussion of what this "door/window" could have been used for!Good afternoon Heinrich. Looking beautiful. The bashing of your stern paid healthy returns for your WB.The Coat of arms and “door” ( strange place for a door…leave the cabin into the icy seas- only on Dutch ships) are totally in character with your build. Fine work. Cheers Grant

For ‘a while‘ not visiting your log and a lot of details added! The stern with the window/door (hatch?) and the Amsterdam XXX looks lovely, Heinrich.Dear Friends. The bulwark railing has been completed.
View attachment 341439
I am particularly pleased with this fit - I don't think I could have gotten it any better.
The stern has been closed, the frame around the door completed, the door/window installed, and the Amsterdam Coat of Arms installed.
View attachment 341440
View attachment 341441
When the stain has dried completely, I will give the whole stern a once-over with 2000-grit sandpaper and apply the second coat.
View attachment 341442
As you can see the starboard railing between the two canopies have also been placed. Tomorrow it is the turn of the Port Side.
Regard, Peter
- Joined
- Jan 9, 2020
- Messages
- 10,566
- Points
- 938

Thank you very much, Peter. These added details are small and take a long time, so it feels like there is no real progress. Hopefully the ship's boats will bring a nice diversion from the otherwise mundane tasks.For ‘a while‘ not visiting your log and a lot of details added! The stern with the window/door (hatch?) and the Amsterdam XXX looks lovely, Heinrich.
Regard, Peter
- Joined
- Jan 9, 2020
- Messages
- 10,566
- Points
- 938

Dear Friends
Work continues in every spare moment available. Tonight, I am showing you real Work in Progress pictures with sanding dust and wet glue et al.
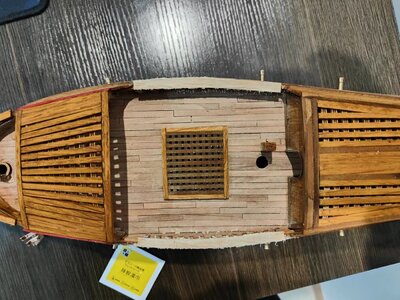
Both railings between the two canopies have been fitted and sanded smooth. The fit is beautiful and I'm very happy with that.
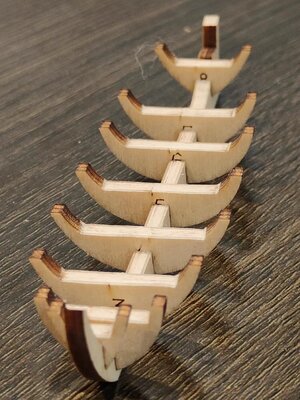
I have also assembled the keel and frames of the sloop (chaloup) which I think will be the version that I will use. You will notice that the sternmost bulkhead is missing. The reason is to be found below.
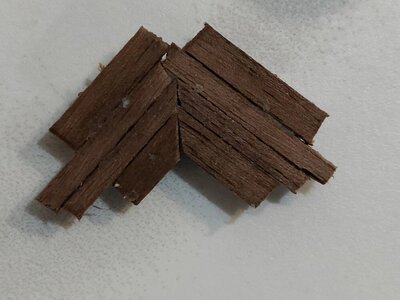
This monstrosity that looks as if it has no rhyme or reason, is in fact the rearmost bulkhead of the sloop that is being planked. I post this picture on purpose to show a process and not just a finished result.
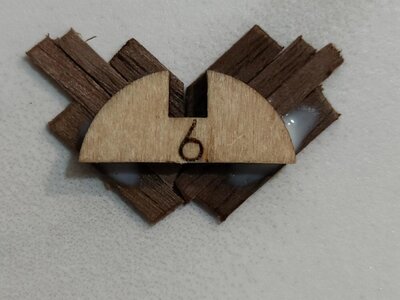
This is in actual fact what is happening on the other side! Bear in mind that the width of the bulkhead is approximately 12mm into which 6 planks on either side have been squeezed into at an angle of 45 degrees. The top two planks and bottom two ones have in fact been glued together before they were glued onto the bulkhead as there would simply not be enough gluing surface on the bulkheads for the planks to adhere to.
Hopefully, I can show you some better-finished pictures tomorrow night.
Work continues in every spare moment available. Tonight, I am showing you real Work in Progress pictures with sanding dust and wet glue et al.

Both railings between the two canopies have been fitted and sanded smooth. The fit is beautiful and I'm very happy with that.

I have also assembled the keel and frames of the sloop (chaloup) which I think will be the version that I will use. You will notice that the sternmost bulkhead is missing. The reason is to be found below.

This monstrosity that looks as if it has no rhyme or reason, is in fact the rearmost bulkhead of the sloop that is being planked. I post this picture on purpose to show a process and not just a finished result.

This is in actual fact what is happening on the other side!
 Bear in mind that the width of the bulkhead is approximately 12mm into which 6 planks on either side have been squeezed into at an angle of 45 degrees. The top two planks and bottom two ones have in fact been glued together before they were glued onto the bulkhead as there would simply not be enough gluing surface on the bulkheads for the planks to adhere to.
Hopefully, I can show you some better-finished pictures tomorrow night.
That is a verry nice change to the chaloup HeinrichThis monstrosity that looks as if it has no rhyme or reason
- Joined
- Jan 9, 2020
- Messages
- 10,566
- Points
- 938

I think so, Peter. I know that the stern looks rough now, but I am confident in my finishing abilities.That is a verry nice change to the chaloup Heinrich
Good morning Heinrich. Excellent work on the railings. It is so much fun to add all these little improvements to the ships boats. I wish I had include these planks to mine at the stern- good thinking. Cheers GrantDear Friends
Work continues in every spare moment available. Tonight, I am showing you real Work in Progress pictures with sanding dust and wet glue et al.
View attachment 341769
Both railings between the two canopies have been fitted and sanded smooth. The fit is beautiful and I'm very happy with that.
View attachment 341770
I have also assembled the keel and frames of the sloop (chaloup) which I think will be the version that I will use. You will notice that the sternmost bulkhead is missing. The reason is to be found below.
View attachment 341771
This monstrosity that looks as if it has no rhyme or reason, is in fact the rearmost bulkhead of the sloop that is being planked. I post this picture on purpose to show a process and not just a finished result.
View attachment 341772
This is in actual fact what is happening on the other side!Bear in mind that the width of the bulkhead is approximately 12mm into which 6 planks on either side have been squeezed into at an angle of 45 degrees. The top two planks and bottom two ones have in fact been glued together before they were glued onto the bulkhead as there would simply not be enough gluing surface on the bulkheads for the planks to adhere to.
Hopefully, I can show you some better-finished pictures tomorrow night.
- Joined
- Jan 9, 2020
- Messages
- 10,566
- Points
- 938

Thank you, Grant. The railings are straightforward but bending the oak is not!  The planked stern of the lifeboats is also a Dutch trademark which I learnt in my Batavia-building days. I could do it on the larger of the two boats, but on the smaller one it is simply not viable.
 The planked stern of the lifeboats is also a Dutch trademark which I learnt in my Batavia-building days. I could do it on the larger of the two boats, but on the smaller one it is simply not viable.
- Joined
- Jan 9, 2020
- Messages
- 10,566
- Points
- 938

Hello everyone.

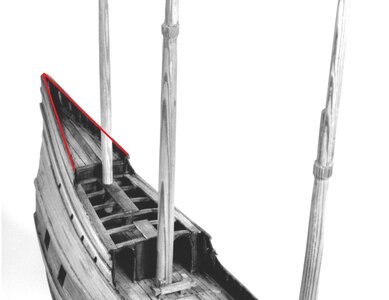
With the top rails completed and finished in CLOU stain, I am happy to share this picture with you. The red arrows point to the upper bulwarks railing at the stern while the yellow arrows indicate the top railing between the canopies. Note the perfect triangle I was able to achieve at the stern, keeping in line with that of Ab Hoving (see picture below).
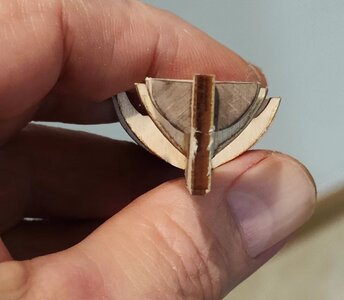
Out of the chaos of last night, came the planked stern. I am super happy with the outcome taking into account the size comparison with my thumb nail.
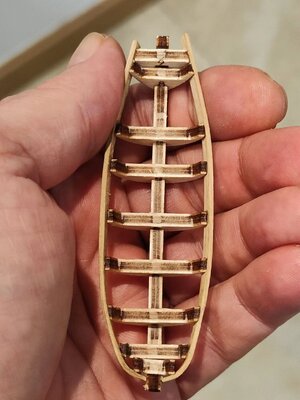
The first two planks have been placed on the boat (boot) - the smaller of the two lifeboats. Any unevenness at this stage will be covered by the top railing and wale that gets installed later on, so I am happy with that.
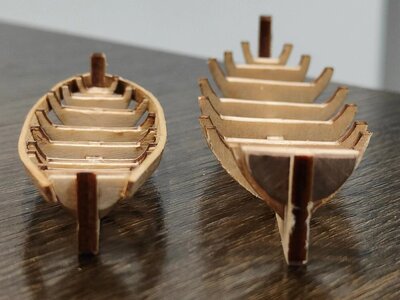
Next to her bigger sister, the little boat is starting to flaunt her lines!

With the top rails completed and finished in CLOU stain, I am happy to share this picture with you. The red arrows point to the upper bulwarks railing at the stern while the yellow arrows indicate the top railing between the canopies. Note the perfect triangle I was able to achieve at the stern, keeping in line with that of Ab Hoving (see picture below).


Out of the chaos of last night, came the planked stern. I am super happy with the outcome taking into account the size comparison with my thumb nail.

The first two planks have been placed on the boat (boot) - the smaller of the two lifeboats. Any unevenness at this stage will be covered by the top railing and wale that gets installed later on, so I am happy with that.

Next to her bigger sister, the little boat is starting to flaunt her lines!
Hi Heinrich,
Great progress, they are really small boats.
Cheers,
Stephen.
Great progress, they are really small boats.
Cheers,
Stephen.
- Joined
- Jan 9, 2020
- Messages
- 10,566
- Points
- 938

Thank you, Stephen. Yes, the smaller one of the two is really small. The problem is that I cannot use any clamps as they will distort the hull. That leaves finger pressure only until the glue dries sufficiently, so that I can remove my finger. This means that planking progress is slow, though.
Good morning Heinrich. Your WB is progressing into a fantastic “rendition”. I find it amazing how such a simple thing as 4 rails stained make an impressionable impact. Small boat- I find them so much fun. Cheers GrantHello everyone.
View attachment 341926
With the top rails completed and finished in CLOU stain, I am happy to share this picture with you. The red arrows point to the upper bulwarks railing at the stern while the yellow arrows indicate the top railing between the canopies. Note the perfect triangle I was able to achieve at the stern, keeping in line with that of Ab Hoving (see picture below).
View attachment 341927
View attachment 341928
Out of the chaos of last night, came the planked stern. I am super happy with the outcome taking into account the size comparison with my thumb nail.
View attachment 341929
The first two planks have been placed on the boat (boot) - the smaller of the two lifeboats. Any unevenness at this stage will be covered by the top railing and wale that gets installed later on, so I am happy with that.
View attachment 341930
Next to her bigger sister, the little boat is starting to flaunt her lines!
- Joined
- Jan 9, 2020
- Messages
- 10,566
- Points
- 938

Hi Grant. You are absolutely right. Everything that gets added now does seem to have quite a visual impact, so it's obviously up to the builders to make sure it is a good impact.Good morning Heinrich. Your WB is progressing into a fantastic “rendition”. I find it amazing how such a simple thing as 4 rails stained make an impressionable impact. Small boat- I find them so much fun. Cheers Grant
 The small boats are fun, but oh boy, they are fiddly little things.
Your WB is looking graet Heinrich, superb even.
And your litle ones are coming along very nicely. they were a real pain in the a..e to me

And your litle ones are coming along very nicely. they were a real pain in the a..e to me
- Joined
- Jan 9, 2020
- Messages
- 10,566
- Points
- 938

Thank you, my friend.Your WB is looking graet Heinrich, superb even.
And your litle ones are coming along very nicely. they were a real pain in the a..e to me

As a fellow tiny boat builder, I can only agree with everything you have said...every mistake seems bigger...every step seems harder  . Be encouraged - it looks very good at this stage!
- Joined
- Jan 9, 2020
- Messages
- 10,566
- Points
- 938

Thank you very much, Paul for the encouragement. What you are doing, however, with the esping is beyond my skill set! Your work on that little boat from scratch is out of this world. From one little boat builder to a fellow one.As a fellow tiny boat builder, I can only agree with everything you have said...every mistake seems bigger...every step seems harder. Be encouraged - it looks very good at this stage!
I just looked in my WB kit box, those are very small. Are you going have the smaller one sit inside the bigger one on the hatch cover when they are completed ?
- Joined
- Jan 9, 2020
- Messages
- 10,566
- Points
- 938

Hi Jan - good question. Installing the bigger one over the hatch grating with the smaller inside would certainly be logical. However, there are two caveats: Firstly, I have never seen examples of this being done on Dutch ships and secondly, the combined height of the two boats will not fit underneath the front canopy. So, I will not go for the Over-Under shotgun combination, but for the classic Side-by-Side.I just looked in my WB kit box, those are very small. Are you going have the smaller one sit inside the bigger one on the hatch cover when they are completed ?


