HIGH HOPES, WILD MEN AND THE DEVIL’S JAW - Willem Barentsz Kolderstok 1:50

Heinrich, my old friend, what a beautifull introduction you placed here, if you don't mind i'll take the backseat, and drop in sometimes to see how you are doing with this fenomenal ship of our history.
I wish you a lot of fun and many more of this historical points of interests

Greetings, Peter
My dear friend - there is no need for a backseat here - in fact, you can take a seat in the front row (I have a big kitchen!). Thank you very much for the kind words and you are most welcome here. Please enjoy the build!
 
Hello Everyone

Tonight I get to a part of the build that is very important and which will either add greatly to the aesthetics of the build or detract from it. You will remember in my previous posting that all frames had been glued to the keel except Frame #11. Tonight will feature the assembly and planking of Frame #11 or stern (Spiegel in Dutch).

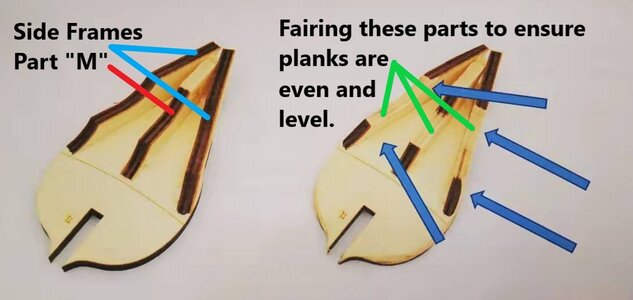
The two side frames are glued into their respective notches on the sides of Frame #11 while Part M is glued into the middle. When dry make sure that all 3 parts are sanded into an even curvature to ensure that the planks will lie flat.

微信图片_20211201214354.jpg

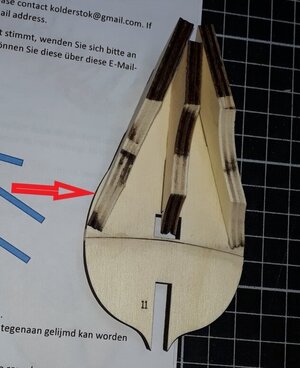
HOWEVER: You will notice that the outside frames do NOT lie flush with the outer edges of Bulkhead #11 (See red arrow in the picture below). This is NOT a mistake. Sand the outer edges of Bulkhead #11 level with the side frames. Photo: Kolderstok Instruction Manual

20191225_115011.jpg
Here you can clearly see the part of Frame #11 that is not flush with the side frames. This needs to be sanded flush with the side frames. Photograph: Ton Freubelaer's Build of the Willem Barentsz.

With the stern assembly now assembled and sanded to shape I could move on to the planking.

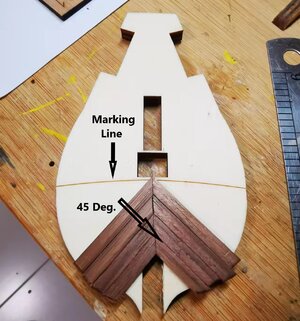
Kolderstok's instructions suggest that the stern be planked from the bottom upwards with 4mm x 1mm walnut planks up to the indicated marking line at an angle of 45 degrees. (See picture below)

Build 7.jpg

After this section was completed I used square wooden block with sandpaper only attached to the one side to sand the top edge into the desired curvature without removing any material from the stern itself.

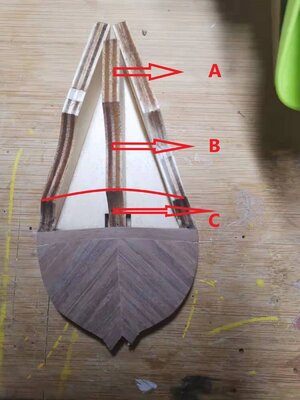
Now the instruction stipulate that the next section of the stern should be planked horizontally but still following the curvature of the marked line. From then on, right to the top, the planking should be horizontal and straight.

微信图片_20211201221005.jpg

Here you can see the first horizontal but rounded plank applied (Section C) while for the rest, all planking is horizontal and straight.
Section C: Horizontal and Rounded
Section B: Horizontal and Straight
Section A: Horizontal and Straight

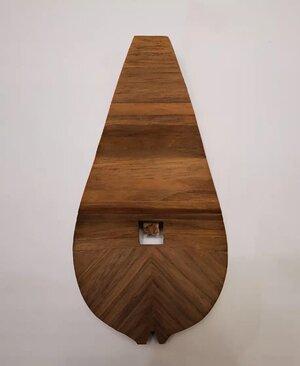
And after two days of meticulously sanding, measuring and planking, this is the result tonight. Most builders cut out the hole for the rudder much later in the build, but whilst the part had not yet been glued to the keel I took my chance of doing it right now whilst I could see clearly and still had relatively easy access to that section.

微信图片_20211201213824.jpg

Tomorrow I need to do the gunports in the stern - a nerve-racking exercise. Whilst I will not be cutting out the ports but only indicate their positions by scoring, I just hate the idea of putting a blade onto that stern. Bear in mind that no finish has been applied to the wood. That is what it looks like!

That is all for tonight from my side. Take care, enjoy your building and cherish your loved ones.
Warmest wishes
H
 
Nice progress and explanation, Heinrich.
Regards, Peter
Thank you very much Peter. The spiegel took a bit of time and is not yet finished. I thought it best to whatever needs to be done to it, before I glue it to the keel. It sits at quite an angle and to cut out the gunports and rudder opening when on the ship, might be tricky. Not that it is easy now, but it is at least a little bit better.
 
It's great to see quality planking Heinrich. I can see why you like the Abachi and that walnut really pops.
Thank you Roger. The planking came out very nice and I am happy with it. BUT ... I made a rookie mistake. The instructions clearly stipulated to use 1mm thick planks, but Heinrich used 1.5mm thick planks. Now I am having the world of trouble trying to get Frame #11 to fit properly. You can't just sand it thinner because then you change the angle. So ... where everything went well yesterday, today is just the opposite ... and it is all my own stupidity! :mad:
 
Thank you Roger. The planking came out very nice and I am happy with it. BUT ... I made a rookie mistake. The instructions clearly stipulated to use 1mm thick planks, but Heinrich used 1.5mm thick planks. Now I am having the world of trouble trying to get Frame #11 to fit properly. You can't just sand it thinner because then you change the angle. So ... where everything went well yesterday, today is just the opposite ... and it is all my own stupidity! :mad:
This was my first visit and trip through your well done log and build. The history and added imagery brings a life to the model. I'll keep visiting as you progress. Well done! Rich (PT-2)
 
Let’s get building. Now from the outset that I want to say that I actually did not intend starting the build of the WB just yet. With the Haarlem on hold for now, I thought let me go through the WB’s checklist and make sure that everything that is supposed to be there, is there. After all, I have had the kit for almost a month and have barely opened the box.

View attachment 272218
As I have come to expect from @Kolderstok, the kit was superbly packaged.

View attachment 272219
Box design - classy and clean.

And then you know how things go – I took the keel from the clear wrapping and with that in my hand thought let me just fit one bulkhead. An hour later all the bulkheads were removed from their sheeting and dry-fitted on the keel. Then I thought, let me just see how the first deck fits into its slots and when that went in like butter, I thought I might just as well glue everything in place. Before I knew it, bulkheads 1-6 were glued to the keel and the two bow portions of the deck (there are four separate pieces that make up the deck) were glued into place.

And then I realized two things: Build log and pictures (which I had neglected to take) and maybe it wasn’t such a great idea to start gluing things into place without having checked how the whole deck fits onto all the bulkheads. Oh s*** Well, as the far the rest of the bulkheads and deck go, I need not have feared – they all went together perfectly. And about the pictures – I am fortunate that I can rely on Kolderstok’s own test build pictures and those taken by Piet Sanders.

So at this point I need to backtrack to the start and explain how things SHOULD be done.

The first step is obviously to remove all bulkheads from their sheets. They are manufactured from plywood and are 5mm thick whilst the MDF keel is also 5mm. For someone who relies heavily on pushpins during the planking process, (like me) the 5mm thick bulkheads are a blessing.

View attachment 272222
Laser cutting is beautifully clean and crisp, but because of the thickness, be prepared to put in a little effort.

Next up, I would advise the dry-fitting of the bulkheads into the keel slots and check how the deck slots align with the respective bulkheads.

View attachment 272223
Dry-fitting of bulkheads into keel slots. Photo: Kolderstok Test-Build

When seating the bulkheads into the keel, it is VERY IMPORTANT to make sure that the tops of the bulkheads are perfectly level with the top of the keel. In some cases, it may be necessary just to give the slots a slight polish with a fine file or sandpaper to make sure that the bulkheads slide all the way to the bottom and are fully seated. If there are any protrusions here, it will mean that the deck does not lie flat on the keel and bulkheads.

View attachment 272225
This, for instance, would NOT be good. Here you can see the tops of the bulkheads protrude above the top of the keel. If this is the case, get out the file and/or sandpaper. Photo: @pietsan Piet Sanders.

View attachment 272226
This is what we want - the tops of the bulkheads and top of the keel are exactly level. Photo: Piet Sanders

View attachment 272227
When this is done correctly, we can see just how snugly the decks lie on top of the keel. Photo: Piet Sanders

If you are happy with the way that everything fits, remove all bulkheads and grab hold of Bulkhead #1. You will see that there are both an indent and notch cut into this bulkhead. Here we need to glue a 6mm walnut strip onto the REAR (non-marked side) of the bulkhead as indicated below. When this is done, it will create a "mine shaft" which will house the foremast. The semi-circled indent is for the bowsprit.

View attachment 272229
Photograph: Piet Sanders

Now we can glue all bulkheads (EXCEPT BULKHEAD #11 - the rearmost one that forms the stern) to the keel and fit the deck.

View attachment 272230
And that is what our assembly looks like at this point. Please please note that Bulkhead #11 is still dry-fit only at this stage.

View attachment 272228
In my case, I have also glued pieces of scrap plywood into the corners (between the decks and the hull) just for extra stiffness and strength. When doing this, just make sure that you leave the hole for the main mast open (marked with the red line).

And that my dear friends brings an end to proceedings for the day. Thank you all for following and for all the wonderful comments and participation that I have received until now. Until next time, please look after yourselves, take care and enjoy your building!

Heinrich
Fantastic introduction and a great start on this build, looks like a great kit I like it and look forward to following along.
 
Thank you Roger. The planking came out very nice and I am happy with it. BUT ... I made a rookie mistake. The instructions clearly stipulated to use 1mm thick planks, but Heinrich used 1.5mm thick planks. Now I am having the world of trouble trying to get Frame #11 to fit properly. You can't just sand it thinner because then you change the angle. So ... where everything went well yesterday, today is just the opposite ... and it is all my own stupidity! :mad:
Good morning Heinrich. As always your log is fantastic as is your building. I think these tribulations come along to Remind us how much we love building little ships...:rolleyes:.
 
Hi Rich. I was wondering when a tack of the Kyrenia would bring you to the Willem Barentsz shipyard. A Big welcome my friend!
 
Fantastic introduction and a great start on this build, looks like a great kit I like it and look forward to following along.
Thank you very much for the kind words Richie. You are most welcome to follow along!
 
Good morning Heinrich. As always your log is fantastic as is your building. I think these tribulations come along to Remind us how much we love building little ships...:rolleyes:.
You are so right Grant! And the inspiration that the forum gives is just phenomenal. I saw it in action today in my own shipyard.

The instructions call for SCORING the outline of the gunports only. So ... I scored them and my job looked terrible. I was disgusted. So if @DARIVS ARCHITECTVS Kurt can cut a hull to smithereens, @Peter Voogt can cut his Bluenose in half, @Dean62 can play non-stop with his lion, and you are calling for @dockattner Paul's syrens, then sure as hell I can cut out gunports!
 
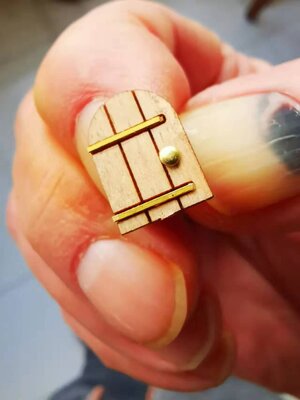
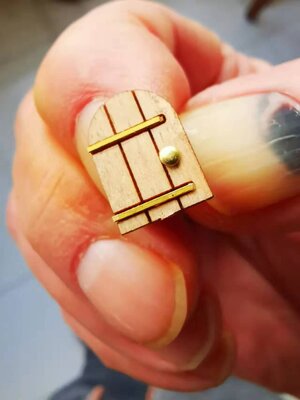
So the day - which started so nicely by making a petite little door ...

微信图片_20211202143703.jpg

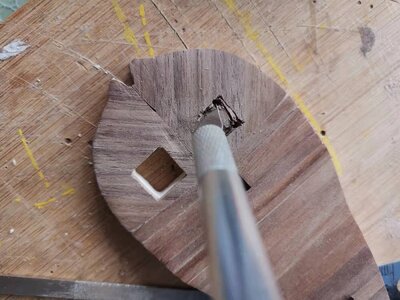
Quickly turned into DEMOLITION Time!!!

微信图片_20211202143655.jpg

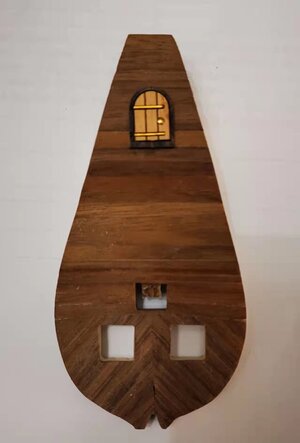
And Voila !

微信图片_20211202143719.jpg

And behind this frame is ample space for a scratch-built deck on which two beautiful, red gun carriages with bronze cannons can go! :)
 

Attachments

  • 微信图片_20211202143703.jpg
    微信图片_20211202143703.jpg
    105.9 KB · Views: 6
It would indeed have had to be one heck of a time warp tack - but hey - if there's one man who can do it, it's you!
 
So the day - which started so nicely by making a petite little door ...

View attachment 272753

Quickly turned into DEMOLITION Time!!!

View attachment 272765

And Voila !

View attachment 272766

And behind this frame is ample space for a scratch-built deck on which two beautiful, red gun carriages with bronze cannons can go! :)
I’m curious, is there a balcony with railing, to which the door leads to? It seems odd to have an external door that leads to nowhere! ;)
 
@Dean62 That is the door that would lead to the captain's cabin and was used during the loading procedure when items of value, expensive liquor, or the money that would be used for trading would be loaded onto the ship. That way it was kept out of the eye of the general crew. When docked it also allowed for transport of a different sorts - discreet visits to the captain and officers by certain ladies. ;)
 
Back
Top