-

Win a Free Custom Engraved Brass Coin!!!
As a way to introduce our brass coins to the community, we will raffle off a free coin during the month of August. Follow link ABOVE for instructions for entering.
-

PRE-ORDER SHIPS IN SCALE TODAY!
The beloved Ships in Scale Magazine is back and charting a new course for 2026!
Discover new skills, new techniques, and new inspirations in every issue.
NOTE THAT OUR FIRST ISSUE WILL BE JAN/FEB 2026
You are using an out of date browser. It may not display this or other websites correctly.
You should upgrade or use an alternative browser.
You should upgrade or use an alternative browser.
HIGH HOPES, WILD MEN AND THE DEVIL’S JAW - Willem Barentsz Kolderstok 1:50
Absolutely fantastic introduction Heinrich,View attachment 271975

Barents Sea
Covering an area of 1,405,000 km2, the Barents Sea is a marginal sea of the Arctic Ocean. It is located along the northern coasts of Norway and Russia.www.worldatlas.com
Barents Sea
Covering an area of 1,405,000 km2, the Barents Sea (which includes the White- and Pechora Seas), is part of the Arctic Ocean, located along the northern coasts of Norway and Russia. It is bounded by the Svalbard archipelago in the northwest, Franz Josef Land islands in the northeast, the Novaya Zemlya archipelago in the east, the Norwegian Sea and the Greenland Sea in the west, and by the Kola Peninsula in the south. The Barents Sea was one of the more difficult seas for the sailors and ocean rowers to cross - hence it also being called “The Devil’s Jaw” or “The Devil’s Dance Floor.”
The sea’s current name was first published in a chart in 1853, in the honor of the famous Dutch explorer, Willem Barentsz. A Dutch cartographer and navigator, Barentsz was born on the island of Terschelling and lived from about 1550 to 1597 in the region that would eventually become the Netherlands.
View attachment 271976
View attachment 271979
Dutch Explorer - Willem Barentsz
“Find a Northern Passage to China”.
This order, issued by the Town Council of Amsterdam would be Willem Barentsz’s last chance to do so. Two previous expeditions which carried with them the high hopes of the States General of the Seventeen Provinces and that of the Dutch stadtholder, Prince Maurice of Orange, respectively, both resulted in failure and left these instances disappointed and disillusioned. No longer would they subsidize such voyages. Instead, it was replaced by a reward system in which expeditions would be compensated for, only if they returned with proof of a successful navigation to China.
Barentsz though, was still determined to accomplish this and fortunately for him, the Council of Amsterdam was willing to bankroll him. It also purchased the two small ships, crewed with Dutch mariners, on which Barentsz would set sail eastwards from Amsterdam in May of 1596.
To these Dutch traders it was imperative that an alternative had to be found to the Portuguese-and Spanish controlled southern route around the Cape of Good Hope. When Barentsz left Amsterdam, he did so right in the middle of the Eighty Years' War, or Dutch Revolt (1568–1648), against the Spanish King.
View attachment 271977
Planning the voyage – Willem Barentsz and Jacob Heemskerck
View attachment 271978
Jacob Heemskerck
Navigator and later admiral, Jacob van Heemskerck (1567-1607), took part in two of Willem Barentsz’s expeditions to the far north in search of a northeast passage to Asia. He survived and would oversee the survivors’ successful return. In 1607, Admiral Van Heemskerck, engaged the Spanish armada near Gibraltar and led the Dutch fleet to a resounding victory. However, he took a shot in the leg from an enemy cannonball and died from his wounds shortly thereafter.
Why build the Willem Barentsz?
1. It attempted to establish the first contact between the Netherlands and China. (This sentence turned out prophetic for me - a South African (Dutch origin) in China.
2. I wanted to build a ship in the purest sense possible - devoid of all ornamentation and paraphernalia which could detract from its wooden construction.
3. After I had followed and read @pietsan Piet Sanders's build log of the Willem Barentsz, I was amazed at how simple could so be so beautiful - I was hooked.
4. Piet has agreed to assist me - and thus indirectly any modeler who wants to build it. To those who are not familiar with Piet, let me say that I hold his work in the highest possible esteem.
5. It is a @Kolderstok model and I know the superb back-up and support that I will receive from Hans.
In summary, enjoy these two pictures of Piet's superb build of the Willem Barentsz.
View attachment 271999
View attachment 272001
Thank you all for watching and following. In the next posting (very soon) I will start the actual build of the ship. I hope you join me as I embark on this expedition of my own.
Take care, look after yourselves and your loved ones and enjoy your model building.
H
I am enjoying your build, and reading the book 17th century Dutch Merchant Ships by A. J. Hoving, adds an extra depth to your work.
Cheers,
Stephen.
- Joined
- Jan 9, 2020
- Messages
- 10,566
- Points
- 938

Thank you for the kind view that you take of my pics Peter!My dear Heinrich.
The sway of the planks looks natural with a beautiful flowe. And the keel shows robust and is robust. So, the pictures show what you want to show. And that's what matters.
I wish I had the talent......to teach English to Chinese students. But I need a translation app, in the hopes that it will make my imaginings a little understandable. Bur I am sure it sounds sometimes as Double-Dutch.
But that’s what Dutch do: we speak every language we want to speak.
And many foreigners loved that.
Regards, Peter
And about speaking any language you want and it then sounding like Double Dutch - I know what you mean. I find it very endearing when my best efforts of writing something that resembles Dutch on Modelbouwforum, is often rewarded by the remark " I just love your Afrikaans !"

- Joined
- Jan 9, 2020
- Messages
- 10,566
- Points
- 938

Thank you for your very kind comments Johan. they take a very kind view of my work. However, I am very happy if someone can take something from the build that is useful in his own build, As to the log, being an inspiration - that makes me even happier. There are several logs on SOS and Modelbouwforum that I find inspirational - this very build was inspired, in turn, by @pietsan Piet's superb WB.An exemplary build and an inspiration for many.
Worth noting is that the Witte Swaen has the same flowing lines as the Haarlem
And on the two ships having similar lines - you are absolutely correct. Building the WB right next to the Haarlem has made me realize that on more than one occasions.
- Joined
- Jan 9, 2020
- Messages
- 10,566
- Points
- 938

Thank you so much Gennaro! You know how much I enjoyed your superb La Belle and now the Hayling Hoy, so I truly value your comments.Looking really nice, Heinrich. That little gap between planks is barely noticeable.
I could only see that little gap when I held the hull at that angle for the picture. Luckily that is no problem - a touch of PVA glue, some sawdust and a light sanding and it will be gone!
- Joined
- Jan 9, 2020
- Messages
- 10,566
- Points
- 938

Hi Stephen. I am very glad that you enjoyed the introduction and I am excited about the fact that you are also enjoying Ab's book. They are simply the best resources that you can find on Dutch shipbuilding. Does this mean we can hope for a Dutch ship coming out of your shipyard?Absolutely fantastic introduction Heinrich,
I am enjoying your build, and reading the book 17th century Dutch Merchant Ships by A. J. Hoving, adds an extra depth to your work.
Cheers,
Stephen.
Hi Heinrich,Hi Stephen. I am very glad that you enjoyed the introduction and I am excited about the fact that you are also enjoying Ab's book. They are simply the best resources that you can find on Dutch shipbuilding. Does this mean we can hope for a Dutch ship coming out of your shipyard?
I am afraid the book is on loan from a friend. I guess there is a possibility of a Dutch ship the trouble is there are several projects on the "want to do" list already. There is still a fair amount of work to be done on the Trawler before any thing else will be started.
Cheers,
Stephen.
- Joined
- Jan 9, 2020
- Messages
- 10,566
- Points
- 938

I understand perfectly, Stephen. Earlier we spoke about logs being inspirational. Yours is just such a log. What you are fabricating in terms of your metal work and artistic vision are beyond me. I can only sit back and enjoy!Hi Heinrich,
I am afraid the book is on loan from a friend. I guess there is a possibility of a Dutch ship the trouble is there are several projects on the "want to do" list already. There is still a fair amount of work to be done on the Trawler before any thing else will be started.
Cheers,
Stephen.
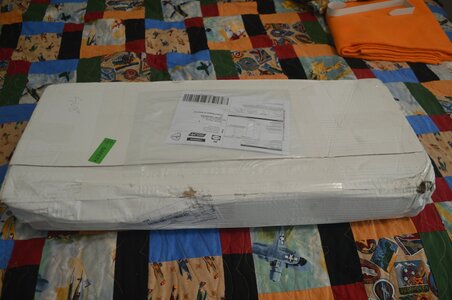
Heinrich, my ship came in, so to speak. When I saw the box, I was more than a little concerned.
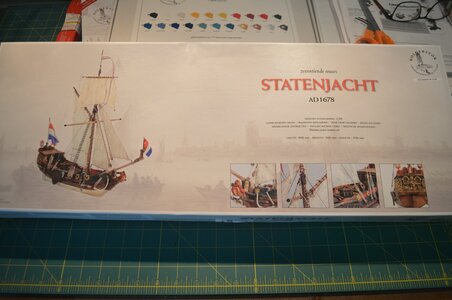
Shouldn't have worried as Hans packaging was/is the best.

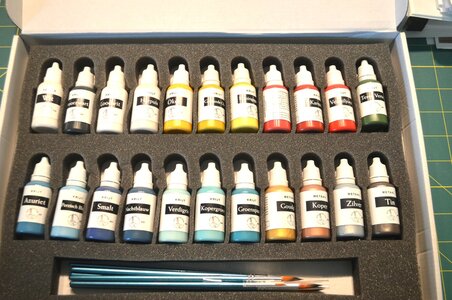
I also ordered his complete paint set even though I prefer the look of natural wood the Statenjacht will require painting of some components.
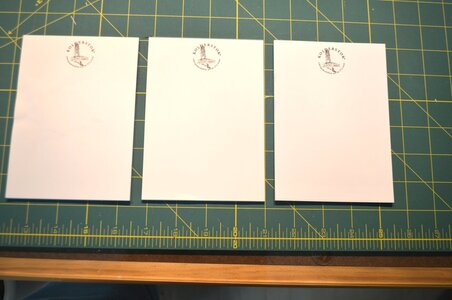
Best of all I'm getting a collection of his note pads
I will do the requisite box opening and review at a later date when I start a Statenjacht build log.
OBTW, I did peek inside and of course, the materials, plan sheets and instruction booklet are all first rate. Thank you, Hans, for producing another fine kit.
Now back to your regularly schedule channel of the WB build.
Ron
Oh, wow! This wasn't how the box left our company of course. I know shipping conditions can be a bit rough, so I try to pack a box always as sturdy as possible.
Fortunately this paid out this time.
Fortunately this paid out this time.
- Joined
- Jan 9, 2020
- Messages
- 10,566
- Points
- 938

@rtibbs Congratulations Ron !!! You are a fortunate man to receive such a beautiful kits and a comprehensive selection of note books. 

I know from our own experience with Bluenose that the shipping companies have very little respect for packages. Fortunately though, Hans's packaging is No 1 and the way that the paint is packaged is something else, altogether! I wish you the very best of luck with your building efforts and will obviously tag along!

I know from our own experience with Bluenose that the shipping companies have very little respect for packages. Fortunately though, Hans's packaging is No 1 and the way that the paint is packaged is something else, altogether! I wish you the very best of luck with your building efforts and will obviously tag along!

- Joined
- Jan 9, 2020
- Messages
- 10,566
- Points
- 938

No worries there Hans! I think the way that you brace the corners of the actual box on the outside protects the contents really well. It forms a great shock absorber between the actual inner box and the outer one.Oh, wow! This wasn't how the box left our company of course. I know shipping conditions can be a bit rough, so I try to pack a box always as sturdy as possible.
Fortunately this paid out this time.

- Joined
- Jan 9, 2020
- Messages
- 10,566
- Points
- 938

Hello Everyone
As things are moving along very nicely in this build, I do not want to lose momentum – so it’s time for the gunports. The way I see it, there are three (possibly four) options available to WB builders with regards to the gunports:
Option A: Scribe the outline of the gunports into the wood. This way the ship is displayed with closed gunports while faux hinges, eyes and ropes are added at a later stage.
Option B: Cut out the gunport lids, glue a thin piece of wood on the inside of the opening and glue back the lid into the opening. This way the ship is displayed with closed gunports while while faux hinges, eyes and ropes are added at a later stage. It is also worth mentioning that this is the method that is described in the instruction manual.
Option C: Cut out the gunport lids, fit gun carriages and cannons. This way the ship is displayed with open gunports and cannon barrels protruding from the gunport openings. NOTE: The cannons and gun carriages are optional extras and are not supplied with the kit as standard.)
Option D: A combination of the above with some gunports displayed open with cannons fully visible, while some remain closed.
So let's look a bit closer at each:
Option A:
This was the method that @pietsan Piet took and APPEARS to be the simplest and fastest solution.
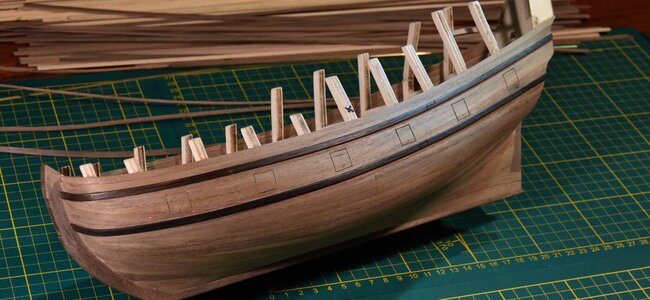
Photograph @pietsan: Piet Sanders As you can see, simple does not mean any less beautiful. Here you can see Piet has only scribed the six gunports into the hull. The lids remain closed and hinges, eyes and ropes will be added at a later stage. In this picture, Piet has already treated the hull with one coat of Danish Oil, which helps to accentuate the scribed lines.
Option B:
Option B is the first of the options where the gunports are cut open completely. The instructions are very clear in this regard: Cut out the gun port lids, glue a thin piece of wood (the cut-offs from the MDF sheet which houses the decks can be used for this), on the inside and glue back the lid. That sounds simple, but wait ...
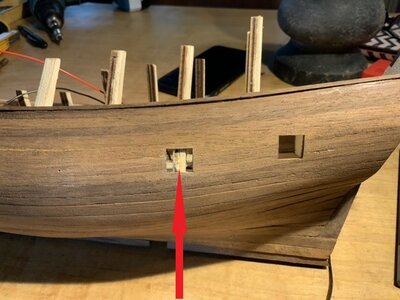
Photograph: Fred - Modelbouwforum. Yes. Your eyes do not deceive you - a bulkhead right in the centre (Mr Venter @GrantTyler just for you Grant!), of the second gunport from the rear.
NOTE: Before I go any further, let me say categorically that this was NOT an oversight on @Kolderstok Hans's part or an engineering mistake. The kit was never designed to be displayed with full armament. This topic was debated at length during the development stage of the kit and the bottom line was that if Hans had wanted an accurately shaped hull, the bulkheads had to be placed where they are placed now.
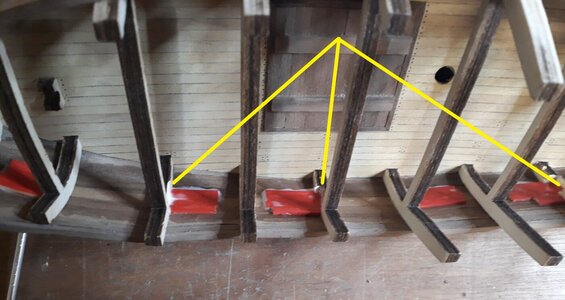
Photograph: Ton Freubelaer - Modelbouwforum. However, the challenge does not only stop at that bulkhead - from what I can see, at least three bulkheads interfere with the gunport openings. Note the material that was removed from the bulkheads to accommodate the gunports. You can also see the thin pieces of wood glued on the inside of the hull directly behind the gunport openings. Ton has painted these red so from the outside, the hull will look like this.
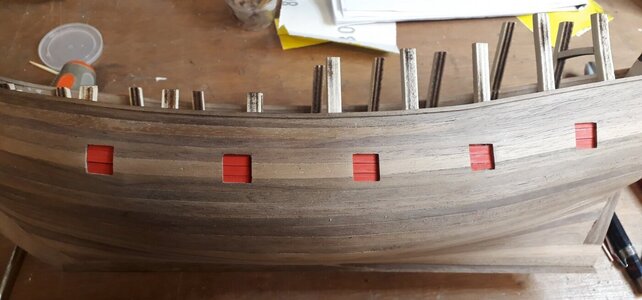
Photograph: Ton Freubelaer - Modelbouwforum NOTE: The gunport openings measure 12mm x 12mm. The instructions call for 11mm x 11mm gunport lids to be glued into the openings. Theoretically that would thus mean a 1mm red border around the gunport lids.
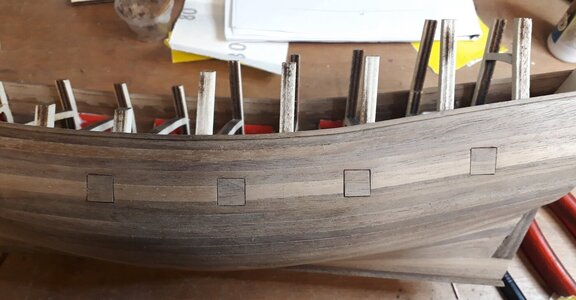
Photograph: Ton Freubelaer - Modelbouwforum Here is the finished product with the gunport lids glued back into their respective positions. In essence, the final look is thus the same as Option A - the gunport lines, however, do look crisper and clearer to me than the scribed version. The advantage of this method is that not too much material has to be taken away from the offending bulkheads by virtue of the fact that the gunport lids ultimately remain closed.
Option C:
The most radical one. Cut out the the gunports and display the armament fully.
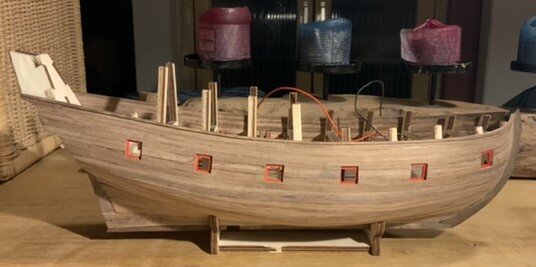
Photograph: Fred - Modelbouwforum
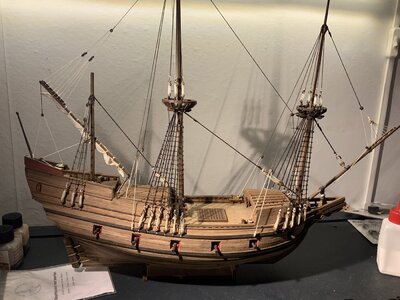
Photograph: Fred - Modelbouwforum. Here is the picture of Fred's beautiful and almost complete Willem Barentsz, showing all her teeth.
In this case though, the instructions make it very clear that it may be necessary to cut away sections of the bulkheads completely in which case additional bracing on the inside may be required.
Option D: A combination of Option B and C where some gunports remain open and cannons are displayed and some remain closed.
So this is where I am this morning. I have studied in depth all reports with regards to the gunports and have given myself today to think about what I want to do. I have 8 cannons; so four can go on each side (even though I then have to order two more from Hans for the stern). This phase however, needs to be completed now because I cannot go further with the build until the next deck is in position and that cannot happen before the gunports are placed.
Thus I am now in serious contemplation mode. Any advice, input, or suggestion from you guys will be greatly appreciated and genuinely considered.
As things are moving along very nicely in this build, I do not want to lose momentum – so it’s time for the gunports. The way I see it, there are three (possibly four) options available to WB builders with regards to the gunports:
Option A: Scribe the outline of the gunports into the wood. This way the ship is displayed with closed gunports while faux hinges, eyes and ropes are added at a later stage.
Option B: Cut out the gunport lids, glue a thin piece of wood on the inside of the opening and glue back the lid into the opening. This way the ship is displayed with closed gunports while while faux hinges, eyes and ropes are added at a later stage. It is also worth mentioning that this is the method that is described in the instruction manual.
Option C: Cut out the gunport lids, fit gun carriages and cannons. This way the ship is displayed with open gunports and cannon barrels protruding from the gunport openings. NOTE: The cannons and gun carriages are optional extras and are not supplied with the kit as standard.)
Option D: A combination of the above with some gunports displayed open with cannons fully visible, while some remain closed.
So let's look a bit closer at each:
Option A:
This was the method that @pietsan Piet took and APPEARS to be the simplest and fastest solution.

Photograph @pietsan: Piet Sanders As you can see, simple does not mean any less beautiful. Here you can see Piet has only scribed the six gunports into the hull. The lids remain closed and hinges, eyes and ropes will be added at a later stage. In this picture, Piet has already treated the hull with one coat of Danish Oil, which helps to accentuate the scribed lines.
Option B:
Option B is the first of the options where the gunports are cut open completely. The instructions are very clear in this regard: Cut out the gun port lids, glue a thin piece of wood (the cut-offs from the MDF sheet which houses the decks can be used for this), on the inside and glue back the lid. That sounds simple, but wait ...

Photograph: Fred - Modelbouwforum. Yes. Your eyes do not deceive you - a bulkhead right in the centre (Mr Venter @GrantTyler just for you Grant!), of the second gunport from the rear.
NOTE: Before I go any further, let me say categorically that this was NOT an oversight on @Kolderstok Hans's part or an engineering mistake. The kit was never designed to be displayed with full armament. This topic was debated at length during the development stage of the kit and the bottom line was that if Hans had wanted an accurately shaped hull, the bulkheads had to be placed where they are placed now.

Photograph: Ton Freubelaer - Modelbouwforum. However, the challenge does not only stop at that bulkhead - from what I can see, at least three bulkheads interfere with the gunport openings. Note the material that was removed from the bulkheads to accommodate the gunports. You can also see the thin pieces of wood glued on the inside of the hull directly behind the gunport openings. Ton has painted these red so from the outside, the hull will look like this.

Photograph: Ton Freubelaer - Modelbouwforum NOTE: The gunport openings measure 12mm x 12mm. The instructions call for 11mm x 11mm gunport lids to be glued into the openings. Theoretically that would thus mean a 1mm red border around the gunport lids.

Photograph: Ton Freubelaer - Modelbouwforum Here is the finished product with the gunport lids glued back into their respective positions. In essence, the final look is thus the same as Option A - the gunport lines, however, do look crisper and clearer to me than the scribed version. The advantage of this method is that not too much material has to be taken away from the offending bulkheads by virtue of the fact that the gunport lids ultimately remain closed.
Option C:
The most radical one. Cut out the the gunports and display the armament fully.

Photograph: Fred - Modelbouwforum

Photograph: Fred - Modelbouwforum. Here is the picture of Fred's beautiful and almost complete Willem Barentsz, showing all her teeth.
In this case though, the instructions make it very clear that it may be necessary to cut away sections of the bulkheads completely in which case additional bracing on the inside may be required.
Option D: A combination of Option B and C where some gunports remain open and cannons are displayed and some remain closed.
So this is where I am this morning. I have studied in depth all reports with regards to the gunports and have given myself today to think about what I want to do. I have 8 cannons; so four can go on each side (even though I then have to order two more from Hans for the stern). This phase however, needs to be completed now because I cannot go further with the build until the next deck is in position and that cannot happen before the gunports are placed.
Thus I am now in serious contemplation mode. Any advice, input, or suggestion from you guys will be greatly appreciated and genuinely considered.
Hi Heinrich,Hello Everyone
As things are moving along very nicely in this build, I do not want to lose momentum – so it’s time for the gunports. The way I see it, there are three (possibly four) options available to WB builders with regards to the gunports:
Option A: Scribe the outline of the gunports into the wood. This way the ship is displayed with closed gunports while faux hinges, eyes and ropes are added at a later stage.
Option B: Cut out the gunport lids, glue a thin piece of wood on the inside of the opening and glue back the lid into the opening. This way the ship is displayed with closed gunports while while faux hinges, eyes and ropes are added at a later stage. It is also worth mentioning that this is the method that is described in the instruction manual.
Option C: Cut out the gunport lids, fit gun carriages and cannons. This way the ship is displayed with open gunports and cannon barrels protruding from the gunport openings. NOTE: The cannons and gun carriages are optional extras and are not supplied with the kit as standard.)
Option D: A combination of the above with some gunports displayed open with cannons fully visible, while some remain closed.
So let's look a bit closer at each:
Option A:
This was the method that @pietsan Piet took and APPEARS to be the simplest and fastest solution.
View attachment 281494
Photograph @pietsan: Piet Sanders As you can see, simple does not mean any less beautiful. Here you can see Piet has only scribed the six gunports into the hull. The lids remain closed and hinges, eyes and ropes will be added at a later stage. In this picture, Piet has already treated the hull with one coat of Danish Oil, which helps to accentuate the scribed lines.
Option B:
Option B is the first of the options where the gunports are cut open completely. The instructions are very clear in this regard: Cut out the gun port lids, glue a thin piece of wood (the cut-offs from the MDF sheet which houses the decks can be used for this), on the inside and glue back the lid. That sounds simple, but wait ...
View attachment 281495
Photograph: Fred - Modelbouwforum. Yes. Your eyes do not deceive you - a bulkhead right in the centre (Mr Venter @GrantTyler just for you Grant!), of the second gunport from the rear.
NOTE: Before I go any further, let me say categorically that this was NOT an oversight on @Kolderstok Hans's part or an engineering mistake. The kit was never designed to be displayed with full armament. This topic was debated at length during the development stage of the kit and the bottom line was that if Hans had wanted an accurately shaped hull, the bulkheads had to be placed where they are placed now.
View attachment 281497
Photograph: Ton Freubelaer - Modelbouwforum. However, the challenge does not only stop at that bulkhead - from what I can see, at least three bulkheads interfere with the gunport openings. Note the material that was removed from the bulkheads to accommodate the gunports. You can also see the thin pieces of wood glued on the inside of the hull directly behind the gunport openings. Ton has painted these red so from the outside, the hull will look like this.
View attachment 281498
Photograph: Ton Freubelaer - Modelbouwforum NOTE: The gunport openings measure 12mm x 12mm. The instructions call for 11mm x 11mm gunport lids to be glued into the openings. Theoretically that would thus mean a 1mm red border around the gunport lids.
View attachment 281499
Photograph: Ton Freubelaer - Modelbouwforum Here is the finished product with the gunport lids glued back into their respective positions. In essence, the final look is thus the same as Option A - the gunport lines, however, do look crisper and clearer to me than the scribed version. The advantage of this method is that not too much material has to be taken away from the offending bulkheads by virtue of the fact that the gunport lids ultimately remain closed.
Option C:
The most radical one. Cut out the the gunports and display the armament fully.
View attachment 281501
Photograph: Fred - Modelbouwforum
View attachment 281502
Photograph: Fred - Modelbouwforum. Here is the picture of Fred's beautiful and almost complete Willem Barentsz, showing all her teeth.
In this case though, the instructions make it very clear that it may be necessary to cut away sections of the bulkheads completely in which case additional bracing on the inside may be required.
Option D: A combination of Option B and C where some gunports remain open and cannons are displayed and some remain closed.
So this is where I am this morning. I have studied in depth all reports with regards to the gunports and have given myself today to think about what I want to do. I have 8 cannons; so four can go on each side (even though I then have to order two more from Hans for the stern). This phase however, needs to be completed now because I cannot go further with the build until the next deck is in position and that cannot happen before the gunports are placed.
Thus I am now in serious contemplation mode. Any advice, input, or suggestion from you guys will be greatly appreciated and genuinely considered.
For what it is worth I would go for option D.
My thinking being this is not a warship it is an expedition ship, how often would all the guns be run out any way.
I guess ports might be open to allow ventilation, then again how much ventilation would you want in the areas they were exploring?
Maybe the cannon could be in a stored position behind some open ports with others closed, could be a point of interest.
This is only my largely uneducated idea.
Cheers,
Stephen.
- Joined
- Jan 9, 2020
- Messages
- 10,566
- Points
- 938

Dear Stephen, with you there is no such thing as an "uneducated idea".Hi Heinrich,
For what it is worth I would go for option D.
My thinking being this is not a warship it is an expedition ship, how often would all the guns be run out any way.
I guess ports might be open to allow ventilation, then again how much ventilation would you want in the areas they were exploring?
Maybe the cannon could be in a stored position behind some open ports with others closed, could be a point of interest.
This is only my largely uneducated idea.
Cheers,
Stephen.
I think you make an excellent point about the cannons being shown in the stored position behind some open ports. I have never thought of that!
Thank you very much for your input. It is greatly appreciated!

Hi Heinrich.Hello Everyone
As things are moving along very nicely in this build, I do not want to lose momentum – so it’s time for the gunports. The way I see it, there are three (possibly four) options available to WB builders with regards to the gunports:
Option A: Scribe the outline of the gunports into the wood. This way the ship is displayed with closed gunports while faux hinges, eyes and ropes are added at a later stage.
Option B: Cut out the gunport lids, glue a thin piece of wood on the inside of the opening and glue back the lid into the opening. This way the ship is displayed with closed gunports while while faux hinges, eyes and ropes are added at a later stage. It is also worth mentioning that this is the method that is described in the instruction manual.
Option C: Cut out the gunport lids, fit gun carriages and cannons. This way the ship is displayed with open gunports and cannon barrels protruding from the gunport openings. NOTE: The cannons and gun carriages are optional extras and are not supplied with the kit as standard.)
Option D: A combination of the above with some gunports displayed open with cannons fully visible, while some remain closed.
So let's look a bit closer at each:
Option A:
This was the method that @pietsan Piet took and APPEARS to be the simplest and fastest solution.
View attachment 281494
Photograph @pietsan: Piet Sanders As you can see, simple does not mean any less beautiful. Here you can see Piet has only scribed the six gunports into the hull. The lids remain closed and hinges, eyes and ropes will be added at a later stage. In this picture, Piet has already treated the hull with one coat of Danish Oil, which helps to accentuate the scribed lines.
Option B:
Option B is the first of the options where the gunports are cut open completely. The instructions are very clear in this regard: Cut out the gun port lids, glue a thin piece of wood (the cut-offs from the MDF sheet which houses the decks can be used for this), on the inside and glue back the lid. That sounds simple, but wait ...
View attachment 281495
Photograph: Fred - Modelbouwforum. Yes. Your eyes do not deceive you - a bulkhead right in the centre (Mr Venter @GrantTyler just for you Grant!), of the second gunport from the rear.
NOTE: Before I go any further, let me say categorically that this was NOT an oversight on @Kolderstok Hans's part or an engineering mistake. The kit was never designed to be displayed with full armament. This topic was debated at length during the development stage of the kit and the bottom line was that if Hans had wanted an accurately shaped hull, the bulkheads had to be placed where they are placed now.
View attachment 281497
Photograph: Ton Freubelaer - Modelbouwforum. However, the challenge does not only stop at that bulkhead - from what I can see, at least three bulkheads interfere with the gunport openings. Note the material that was removed from the bulkheads to accommodate the gunports. You can also see the thin pieces of wood glued on the inside of the hull directly behind the gunport openings. Ton has painted these red so from the outside, the hull will look like this.
View attachment 281498
Photograph: Ton Freubelaer - Modelbouwforum NOTE: The gunport openings measure 12mm x 12mm. The instructions call for 11mm x 11mm gunport lids to be glued into the openings. Theoretically that would thus mean a 1mm red border around the gunport lids.
View attachment 281499
Photograph: Ton Freubelaer - Modelbouwforum Here is the finished product with the gunport lids glued back into their respective positions. In essence, the final look is thus the same as Option A - the gunport lines, however, do look crisper and clearer to me than the scribed version. The advantage of this method is that not too much material has to be taken away from the offending bulkheads by virtue of the fact that the gunport lids ultimately remain closed.
Option C:
The most radical one. Cut out the the gunports and display the armament fully.
View attachment 281501
Photograph: Fred - Modelbouwforum
View attachment 281502
Photograph: Fred - Modelbouwforum. Here is the picture of Fred's beautiful and almost complete Willem Barentsz, showing all her teeth.
In this case though, the instructions make it very clear that it may be necessary to cut away sections of the bulkheads completely in which case additional bracing on the inside may be required.
Option D: A combination of Option B and C where some gunports remain open and cannons are displayed and some remain closed.
So this is where I am this morning. I have studied in depth all reports with regards to the gunports and have given myself today to think about what I want to do. I have 8 cannons; so four can go on each side (even though I then have to order two more from Hans for the stern). This phase however, needs to be completed now because I cannot go further with the build until the next deck is in position and that cannot happen before the gunports are placed.
Thus I am now in serious contemplation mode. Any advice, input, or suggestion from you guys will be greatly appreciated and genuinely considered.
My thoughts were the same as Stephen's. It's not a warship.
My option would be closed. Not for ventilation, but the arctic wind is icy cold. So close.
Then I go more for A from Piet. Then the color and drawing of the wood continues at the shutters. At B they stand out too much and distort the picture.
If you can work neatly, you can opt for A-A: sawing and putting back.
Regards, Peter
- Joined
- Jan 9, 2020
- Messages
- 10,566
- Points
- 938

Thank you very much, Peter. I agree with both you and Stephen on the fact that it was most certainly not a warship. My problem is that my previous attempt to scribe the gunports on the stern, was a mess and I ended up cutting out the ports in any case. I am just very worried that the same thing will happen again with these ports. That is why I am also considering options B, C, and D.Hi Heinrich.
My thoughts were the same as Stephen's. It's not a warship.
My option would be closed. Not for ventilation, but the arctic wind is icy cold. So close.
Then I go more for A from Piet. Then the color and drawing of the wood continues at the shutters. At B they stand out too much and distort the picture.
If you can work neatly, you can opt for A-A: sawing and putting back.
Regards, Peter
You make a great point that the inserted lids should ideally have the same color and texture as the strakes from which they have been cut!
Thank you very much for your input - we may just have a pattern starting to develop here.

- Joined
- Sep 3, 2021
- Messages
- 5,199
- Points
- 738

Hello Heinrich,Hello Everyone
As things are moving along very nicely in this build, I do not want to lose momentum – so it’s time for the gunports. The way I see it, there are three (possibly four) options available to WB builders with regards to the gunports:
Option A: Scribe the outline of the gunports into the wood. This way the ship is displayed with closed gunports while faux hinges, eyes and ropes are added at a later stage.
Option B: Cut out the gunport lids, glue a thin piece of wood on the inside of the opening and glue back the lid into the opening. This way the ship is displayed with closed gunports while while faux hinges, eyes and ropes are added at a later stage. It is also worth mentioning that this is the method that is described in the instruction manual.
Option C: Cut out the gunport lids, fit gun carriages and cannons. This way the ship is displayed with open gunports and cannon barrels protruding from the gunport openings. NOTE: The cannons and gun carriages are optional extras and are not supplied with the kit as standard.)
Option D: A combination of the above with some gunports displayed open with cannons fully visible, while some remain closed.
So let's look a bit closer at each:
Option A:
This was the method that @pietsan Piet took and APPEARS to be the simplest and fastest solution.
View attachment 281494
Photograph @pietsan: Piet Sanders As you can see, simple does not mean any less beautiful. Here you can see Piet has only scribed the six gunports into the hull. The lids remain closed and hinges, eyes and ropes will be added at a later stage. In this picture, Piet has already treated the hull with one coat of Danish Oil, which helps to accentuate the scribed lines.
Option B:
Option B is the first of the options where the gunports are cut open completely. The instructions are very clear in this regard: Cut out the gun port lids, glue a thin piece of wood (the cut-offs from the MDF sheet which houses the decks can be used for this), on the inside and glue back the lid. That sounds simple, but wait ...
View attachment 281495
Photograph: Fred - Modelbouwforum. Yes. Your eyes do not deceive you - a bulkhead right in the centre (Mr Venter @GrantTyler just for you Grant!), of the second gunport from the rear.
NOTE: Before I go any further, let me say categorically that this was NOT an oversight on @Kolderstok Hans's part or an engineering mistake. The kit was never designed to be displayed with full armament. This topic was debated at length during the development stage of the kit and the bottom line was that if Hans had wanted an accurately shaped hull, the bulkheads had to be placed where they are placed now.
View attachment 281497
Photograph: Ton Freubelaer - Modelbouwforum. However, the challenge does not only stop at that bulkhead - from what I can see, at least three bulkheads interfere with the gunport openings. Note the material that was removed from the bulkheads to accommodate the gunports. You can also see the thin pieces of wood glued on the inside of the hull directly behind the gunport openings. Ton has painted these red so from the outside, the hull will look like this.
View attachment 281498
Photograph: Ton Freubelaer - Modelbouwforum NOTE: The gunport openings measure 12mm x 12mm. The instructions call for 11mm x 11mm gunport lids to be glued into the openings. Theoretically that would thus mean a 1mm red border around the gunport lids.
View attachment 281499
Photograph: Ton Freubelaer - Modelbouwforum Here is the finished product with the gunport lids glued back into their respective positions. In essence, the final look is thus the same as Option A - the gunport lines, however, do look crisper and clearer to me than the scribed version. The advantage of this method is that not too much material has to be taken away from the offending bulkheads by virtue of the fact that the gunport lids ultimately remain closed.
Option C:
The most radical one. Cut out the the gunports and display the armament fully.
View attachment 281501
Photograph: Fred - Modelbouwforum
View attachment 281502
Photograph: Fred - Modelbouwforum. Here is the picture of Fred's beautiful and almost complete Willem Barentsz, showing all her teeth.
In this case though, the instructions make it very clear that it may be necessary to cut away sections of the bulkheads completely in which case additional bracing on the inside may be required.
Option D: A combination of Option B and C where some gunports remain open and cannons are displayed and some remain closed.
So this is where I am this morning. I have studied in depth all reports with regards to the gunports and have given myself today to think about what I want to do. I have 8 cannons; so four can go on each side (even though I then have to order two more from Hans for the stern). This phase however, needs to be completed now because I cannot go further with the build until the next deck is in position and that cannot happen before the gunports are placed.
Thus I am now in serious contemplation mode. Any advice, input, or suggestion from you guys will be greatly appreciated and genuinely considered.
For what it's worth, these are my thoughts on gunports open and/or closed, already made public a while ago.
1) My best guess is that ports would be closed, when under sail or in port, thus limiting changes of FOD or other damages, ie caused by excessive exposure to saltwater. Only when under threat, real or supposedly so, the guns would be brought into their respective ports. So this is where you have to decide to either show the model as a ship on an expedition, or as a ship defending itself against aggressors.
2) This is very personal; I love the beautiful lines of this little ship, showing the gunports in their open position would just mar those lines.
If it would be my decision, I would opt for method B, still "actual" gunports, but closed.
Enjoy your decision-making process!


Johan
The fact was that the cut-out part of the gun port was used again to make the lid - so not even the colour did match, but the structure and grain of the wood as well.Thank you very much, Peter. I agree with both you and Stephen on the fact that it was most certainly not a warship. My problem is that my previous attempt to scribe the gunports on the stern, was a mess and I ended up cutting out the ports in any case. I am just very worried that the same thing will happen again with these ports. That is why I am also considering options B, C, and D.
You make a great point that the inserted lids should ideally have the same color and texture as the strakes from which they have been cut!
Thank you very much for your input - we may just have a pattern starting to develop here.
Most probably the canons on the original ship were never used, as they sailed to areas where no enemies where to be expected.
You could go for the situation where most of the ports are closed, and only a few open with a canon sticking out.
If you mount it in a storing position you will most probably don't see anything of it.
- Joined
- Jan 9, 2020
- Messages
- 10,566
- Points
- 938

@RDN1954 Hello Johan - rest assured that your thoughts mean a lot.
With regards to your first point, it is an easy one. This was indeed never a warship - the very name of the kit in full "het expeditieschip van Willem Barentsz" would dictate that the ship has to be shown in "expedition mode".
With you regards to your second point - I couldn't agree more. After I have planked the hull I can't stop looking at the flowing lines of the hull so it would be a shame to mar those lines. Which then leaves me with Options A and B of which Option B would be the more "correct" one. That would also explain why this was the option chosen by Hans to include in the instruction manual.
Thank you very much for your contribution - it makes perfect sense!
With regards to your first point, it is an easy one. This was indeed never a warship - the very name of the kit in full "het expeditieschip van Willem Barentsz" would dictate that the ship has to be shown in "expedition mode".
With you regards to your second point - I couldn't agree more. After I have planked the hull I can't stop looking at the flowing lines of the hull
Thank you very much for your contribution - it makes perfect sense!


