-

Win a Free Custom Engraved Brass Coin!!!
As a way to introduce our brass coins to the community, we will raffle off a free coin during the month of August. Follow link ABOVE for instructions for entering.
-

PRE-ORDER SHIPS IN SCALE TODAY!
The beloved Ships in Scale Magazine is back and charting a new course for 2026!
Discover new skills, new techniques, and new inspirations in every issue.
NOTE THAT OUR FIRST ISSUE WILL BE JAN/FEB 2026
You are using an out of date browser. It may not display this or other websites correctly.
You should upgrade or use an alternative browser.
You should upgrade or use an alternative browser.
HIGH HOPES, WILD MEN AND THE DEVIL’S JAW - Willem Barentsz Kolderstok 1:50
- Joined
- Jan 9, 2020
- Messages
- 10,566
- Points
- 938

Nantong Cutting Works in progress - not for the feint-hearted. 
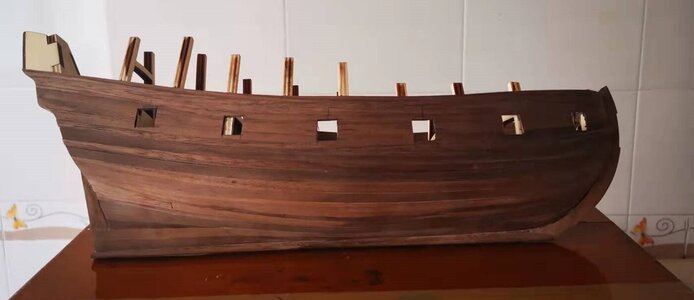
First two are done. Note the dark stain above the second gunport - the wood is still wet from having to soak it to pry the cut-out piece loose from the bulkhead. Please excuse all the pencil lines and markings - this will all be sanded away.

First two are done. Note the dark stain above the second gunport - the wood is still wet from having to soak it to pry the cut-out piece loose from the bulkhead. Please excuse all the pencil lines and markings - this will all be sanded away.
...and who says building model ships is calming....Nantong Cutting Works in progress - not for the feint-hearted.
View attachment 281671
First two are done. Note the dark stain above the second gunport - the wood is still wet from having to soak it to pry the cut-out piece loose from the bulkhead. Please excuse all the pencil lines and markings - this will all be sanded away.
 . 2 down Heinrich and looking good.
- Joined
- Jan 9, 2020
- Messages
- 10,566
- Points
- 938

Hi Heinrich,
I am guessing that is half way.
Nice progress.
Cheers,
Stephen.
I am guessing that is half way.

Nice progress.
Cheers,
Stephen.
- Joined
- Sep 3, 2021
- Messages
- 5,199
- Points
- 738

I think a Sonnema Berenburgher or two is in order...Nothing calming about this my friend!
5 Hours in total. Starboard Side cut-outs done!
View attachment 281672
This little ship has HUGE gunports - 12mm x 12mm - that is bigger than on the Haarlem!
Looking great!
- Joined
- Jan 9, 2020
- Messages
- 10,566
- Points
- 938

Hi Guys
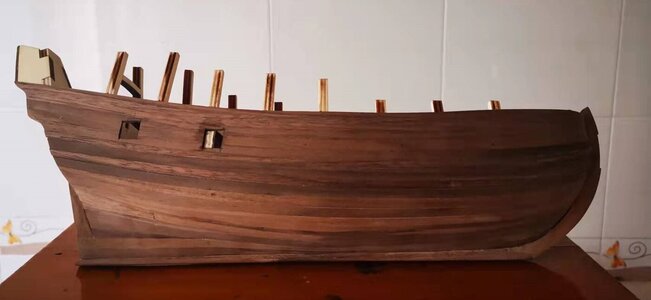
The Starboard side is finished off. Interfering bulheads filed away, gunport edges sanded, made sure they are 100% square and that all dimensions are 12mm x 12mm. Again the hull sway play optical illusions. Look at the gunport closest to the stern which looks smaller than the ones midships and towards the bow. Checked, double-checked and triple-checked - they are all 12mm square. There are still pencil lines on the hull that are visible. I am not going to worry about sanding that away now. When the gunport lids are re-installed, they have to be sanded even with the hull anyway.
By the way on my hull, I found that bulkheads two, three and eight were the ones that interfered with the ports.

- Joined
- Jan 9, 2020
- Messages
- 10,566
- Points
- 938

Hello Stephen. Thank you for the moral support! It was half way as far as the cutting out ports went, but not nearly halfway in total. At that stage I still had to file the bulkheads away and made sure that all the ports were square and even. Now I have to create the inserts that need to be glued in behind those ports. And they also need to be painted - so still some way to go before the starboard side is done.Hi Heinrich,
I am guessing that is half way.
Nice progress.
Cheers,
Stephen.
- Joined
- Jan 9, 2020
- Messages
- 10,566
- Points
- 938

Thank you Johan! But if I were to give in to that temptation, can you imagine how square my ports will be!I think a Sonnema Berenburgher or two is in order...
Looking great!
- Joined
- Sep 3, 2021
- Messages
- 5,199
- Points
- 738

I think it's the Berenburgher...Look at the gunport closest to the stern which looks smaller than the ones midships and towards the bow. Checked, double-checked and triple-checked - they are all 12mm square.
Very impressed by your courage and perseverance ánd the results.

- Joined
- Jan 9, 2020
- Messages
- 10,566
- Points
- 938

Thank you very much Johan. It is actually very simple. Yesterday, I asked everyone's opinion and the response was warm-heartening which I appreciate to no end. The overwhelming feeling was that the gunports should be closed, but not scribed. Therefore, if I took any shortcuts, I would have betrayed my friends and myself.I think it's the Berenburgher...
Very impressed by your courage and perseverance ánd the results.

Thank you very much Johan. It is actually very simple. Yesterday, I asked everyone's opinion and the response was warm-heartening which I appreciate to no end. The overwhelming feeling was that the gunports should be closed, but not scribed. Therefore, if I took any shortcuts, I would have betrayed my friends and myself.
No betraying us my friend. It’s very easy for us to make suggestions from afar no matter how difficult they may be for you to follow. After all it falls to you the shipwright who has to perform the task.
Well done.
Ron
- Joined
- Jan 9, 2020
- Messages
- 10,566
- Points
- 938

Ron - believe me - if anyone makes a suggestion that is not feasible, I will say so. The suggestions yesterday were top caliber and, in essence everyone agreed on the same thing. There was no doubt that this was the right way to go, so if I think there is a fair chance that I can do it, I will attempt it! 
Nantong Cutting Works in progress - not for the feint-hearted.
View attachment 281671
First two are done. Note the dark stain above the second gunport - the wood is still wet from having to soak it to pry the cut-out piece loose from the bulkhead. Please excuse all the pencil lines and markings - this will all be sanded away.
Nice job !!!
Can you please show how you finally did it and the tools used (pictures of the full process).
Your posted pictures on the previous page are not clear, at least for me, concerning what tools and the way you did it in you previous ship
Thank you
Daniel
- Joined
- Jan 9, 2020
- Messages
- 10,566
- Points
- 938

Thank you very much Daniel.Nice job !!!
Can you please show how you finally did it and the tools used (pictures of the full process).
Your posted pictures on the previous page are not clear, at least for me, concerning what tools and the way you did it in you previous ship
Thank you
Daniel
To start with, the method that I used on the Haarlem was different to the one I used today. On the Haarlem, I had no intention of re-using the cut-out pieces, while I tried my utmost today to keep the cut-outs intact so that I could use re-use them as the gunport lids.
Unfortunately, when I do this, I always work alone so you will appreciate that I am not taking pictures as I use both hands all the time. However, on the Haarlem, the method that I followed was based on the same one @pietsan Piet Sanders uses and he has documented it beautifully.
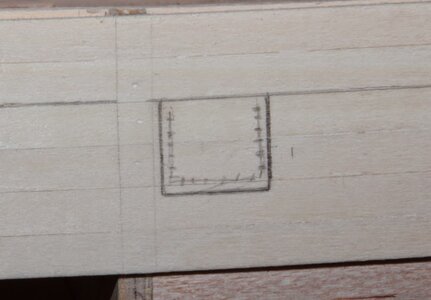
After the outline of the gunport had been marked on the hull, draw an inner line - well clear of the outer one and mark out a few dots which will serve as guidelines where to drill.
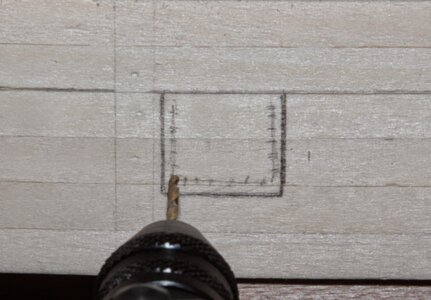
Start by drilling four holes - one in each corner. Obviously the drill bit size, must allow the hole to remain inside the outer-line.
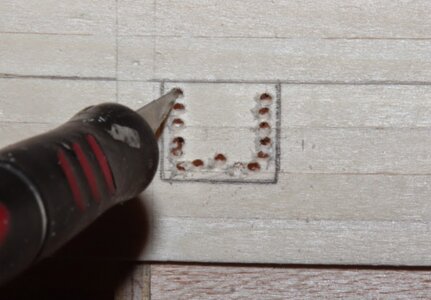
This picture though, shows multiple holes being drilled and then it is simply a case of using a very sharp knife (e.g. an X-Acto) to cut between the dots. You can drill as many holes as you are comfortable with, but I have found that four work well for me. I have found that if there are too many holes, it is difficult to cut in a straight line which requires quite a bit of filing or sanding afterwards.
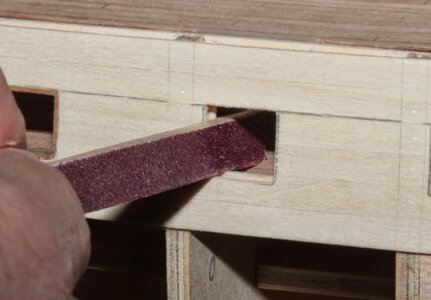
Lastly, it is just a case of filing the holes square and sanding the edges smooth.
So let me explain this picture then:
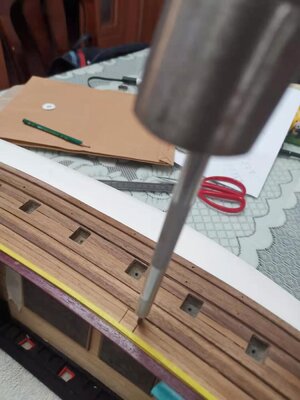
Obviously when you are busy cutting out the port from hole to hole, you have to cut repeatedly before the blade makes a clean cut and the cut-out can be removed. Here, I scored the gunport once or twice and then placed the X-acto in a vertical position on the cutout-line so that the edge of the blade faces inwards. Then I just gently tapped the knife with a normal-sized hammer. The blade (provided that it is a new and sharp blade), will follow the scored lines beautifully. This way, it is much quicker - but obviously, there is also more risk involved.
Today though, I could not use the drill, because that would mean the four corners of the cut-out piece would be destroyed. So, it was simply a case of using an X-Acto knife (with a metal ruler as guide) and - as accurately as possible - making repeated cuts until a clean-cut was eventually achieved. Afterwards, the gunport was finished with an assortment of files and a sanding stick (see picture below):
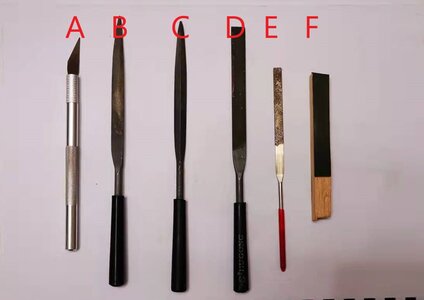
A: X-Acto knife (or rather a Chinese version of it): I used the same blade on two gunports and then changed - three blades used in total.
B: Coarse file with pointed tip: This was used to file away the interfering bulkheads until they were flush with the gunports. This file was not used in the finishing process (it is too coarse for that).
C: Triangular File with smooth sides. This was used to create sharp corners as it only has one filing surface.
D: Flat File (medium grit): Used to make sure the gunports were square.
E: Diamond File: Used when difficult to reach areas need to be filed (not used today).
F: Square sanding stich with 360 grit sandpaper only applied to one side - not all four!
There you go my friend. I trust that you find this helpful.
Thank you very much Daniel.
To start with, the method that I used on the Haarlem was different to the one I used today. On the Haarlem, I had no intention of re-using the cut-out pieces, while I tried my utmost today to keep the cut-outs intact so that I could use re-use them as the gunport lids.
Unfortunately, when I do this, I always work alone so you will appreciate that I am not taking pictures as I use both hands all the time. However, on the Haarlem, the method that I followed was based on the same one @pietsan Piet Sanders uses and he has documented it beautifully.
View attachment 281743
After the outline of the gunport had been marked on the hull, draw an inner line - well clear of the outer one and mark out a few dots which will serve as guidelines where to drill.
View attachment 281744
Start by drilling four holes - one in each corner. Obviously the drill bit size, must allow the hole to remain inside the outer-line.
View attachment 281745
This picture though, shows multiple holes being drilled and then it is simply a case of using a very sharp knife (e.g. an X-Acto) to cut between the dots. You can drill as many holes as you are comfortable with, but I have found that four work well for me. I have found that if there are too many holes, it is difficult to cut in a straight line which requires quite a bit of filing or sanding afterwards.
View attachment 281746
Lastly, it is just a case of filing the holes square and sanding the edges smooth.
So let me explain this picture then:
View attachment 281747
Obviously when you are busy cutting out the port from hole to hole, you have to cut repeatedly before the blade makes a clean cut and the cut-out can be removed. Here, I scored the gunport once or twice and then placed the X-acto in a vertical position on the cutout-line so that the edge of the blade faces inwards. Then I just gently tapped the knife with a normal-sized hammer. The blade (provided that it is a new and sharp blade), will follow the scored lines beautifully. This way, it is much quicker - but obviously, there is also more risk involved.
Today though, I could not use the drill, because that would mean the four corners of the cut-out piece would be destroyed. So, it was simply a case of using an X-Acto knife (with a metal ruler as guide) and - as accurately as possible - making repeated cuts until a clean-cut was eventually achieved. Afterwards, the gunport was finished with an assortment of files and a sanding stick (see picture below):
View attachment 281760
A: X-Acto knife (or rather a Chinese version of it): I used the same blade on two gunports and then changed - three blades used in total.
B: Coarse file with pointed tip: This was used to file away the interfering bulkheads until they were flush with the gunports. This file was not used in the finishing process (it is too coarse for that).
C: Triangular File with smooth sides. This was used to create sharp corners as it only has one filing surface.
D: Flat File (medium grit): Used to make sure the gunports were square.
E: Diamond File: Used when difficult to reach areas need to be filed (not used today).
F: Square sanding stich with 360 grit sandpaper only applied to one side - not all four!
There you go my friend. I trust that you find this helpful.
Thank you Heinrich. Yes it is helpful.
The first method is the one mostly used by all of us. Is the one I have been always using. Drill holes.
I was curious about the "knife Method" mentioned by Hans and you.
I was not able to understand the Harlem posted pictures and I read the full discussion about keeping the planks intact.
So, based on that, I wanted to understand what was the "knife method" and what was pictured on the Harlem posted pictures.
You went the extra mile explaining both methods and adding pictures, myself and many others will appreciate that.
Best !!
Daniel
- Joined
- Jan 9, 2020
- Messages
- 10,566
- Points
- 938

@Dematosdg The pleasure is all mine, Daniel! 

- Joined
- Jan 9, 2020
- Messages
- 10,566
- Points
- 938

Hello Dear Friends. Last update for the Day:
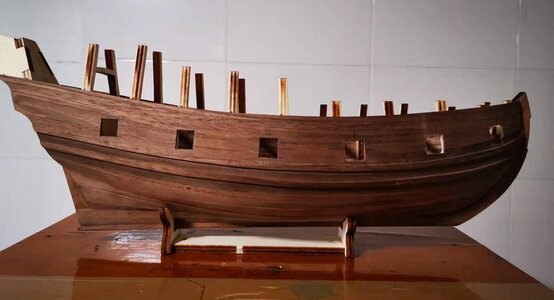
I would have loved to have shown you a completed Starboard Side tonight, but alas ... Each of the gunport coverings that is glued on the inside, has to be custom-cut and shaped to fit between the bulkheads and deck beams and it is taking some time. You will see that the ones that are awaiting me tomorrow are indeed #2, 3 and 8! In any case, this is the result of my Monday's work.
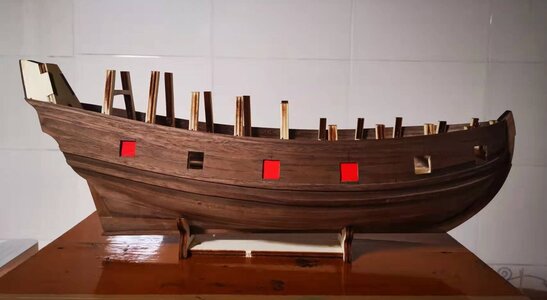
I would have loved to have shown you a completed Starboard Side tonight, but alas ... Each of the gunport coverings that is glued on the inside, has to be custom-cut and shaped to fit between the bulkheads and deck beams and it is taking some time. You will see that the ones that are awaiting me tomorrow are indeed #2, 3 and 8! In any case, this is the result of my Monday's work.

Existing exercises with a beautiful result!
Well done, Heinrich.
Regards, Peter
Well done, Heinrich.
Regards, Peter
Oh wow, late to the parade. Just caught up on two days of posting and discussion on how- where-what to do about the gun ports. Now looking at the picture you posted I’m flabbergasted. You’ve done another great job. Your explanation of the method used is another item added to my “how am I gonna do this” book.
Jan
(BTW Ron, my #80 is in a couple month)
Jan
(BTW Ron, my #80 is in a couple month)


