HIGH HOPES, WILD MEN AND THE DEVIL’S JAW - Willem Barentsz Kolderstok 1:50

Hello Everyone

The agenda for today was simple. Glue the inserts behind the gunports #2, 3 and 8 and start cutting out gunports on the Port Side - sweet and simple.

Ha! Redface Seven hours later and I have J-U-S-T (in the last rays of daylight) finished gluing the inserts behind gunports #2, 3 and 8. And when I say "finished", take that with the proverbial pinch of salt. I'll tell you why, just now.

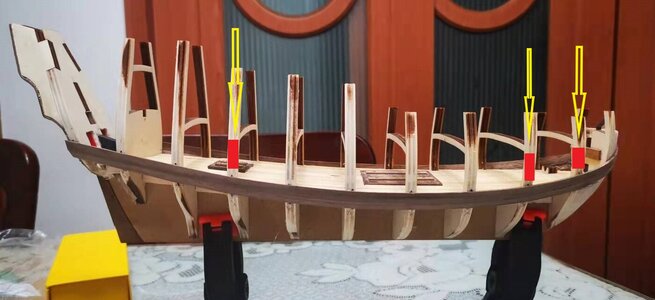
Under no circumstances could I manage to cover the full area of the gunport with the bulkheads interfering. In the end, I realized there was no other option. Those bulkhead-sections had to go.
Planking 1.jpg
The bulkhead portions marked in red at Bulkheads #2, 3 and 8, had to be removed completely which means that the upper sections of those bulkheads are now literally "floating" with no support at the bottom. That is why I said you must take the word "finished" lightly, because as soon as the glue is dry on the red filler pieces, I have to start fabricating supports for those three bulkheads. As all three those frames carry the deck beams this is vital that they are properly anchored on the starboard side before I start any work on the port side, as I will have to do the same cut-aways on that side.
微信图片_20220111162416.jpg
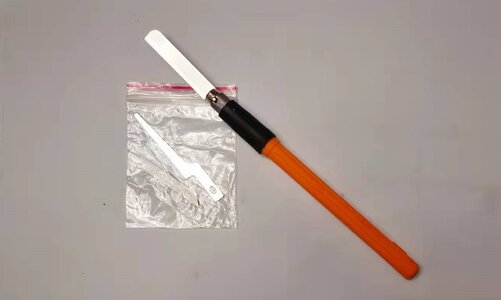
Luckily, when I ordered the WB from Hans, I also ordered this little saw with three different blades. If I didn't have this, I have no idea of how I would have sawn out or removed those portions.

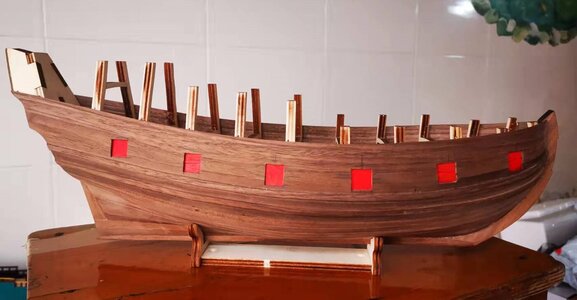
In any case, this where I am this afternoon:
微信图片_20220111162407.jpg

Tonight, I will try to brace those bulkheads and tomorrow I can hopefully start on the port side. :D
 
Good morning from Texas Heinrich! I too am playing catch up on your build. I agree 100% with your choice of port hole style and great job by the way. I am curious about the removal of the section of bulkhead that was in your way. Would you have been able to remove say half of the thickness of the vertical member allowing for some support left in place and allowing for the installation of the red backing piece? I ask this because I had the same situation in several locations on my Vasa only I had no choice but to remove only what was in my way because the bulkhead was solid all the way from port to starboard. I was thinking you might be able to save yourself the effort of reinforcing the vertical member after the fact. Just wondering.
 
Hi Daniel. This is exactly what I did at first. I only filed away the section of the bulkhead that protruded in the gunport opening. Now I am both lucky and unlucky with the way that the bulkheads work on the WB. Lucky, because the sold part of the majority of the bulkheads are underneath the existing (already-laid) deck. So above deck I only have to contend with the members of the bulkhead that protrude above the deck. But, I am unlucky in that those members support the deck beams for the second deck. So believe me, I tried everything I knew to keep at least part of those frame arms intact. I just could not get a satisfactory result - they just had to go. I checked now and it is actually just on Bulkhead #2 that reinforcement is needed.
 
Hello Everyone

The agenda for today was simple. Glue the inserts behind the gunports #2, 3 and 8 and start cutting out gunports on the Port Side - sweet and simple.

Ha! Redface Seven hours later and I have J-U-S-T (in the last rays of daylight) finished gluing the inserts behind gunports #2, 3 and 8. And when I say "finished", take that with the proverbial pinch of salt. I'll tell you why, just now.

Under no circumstances could I manage to cover the full area of the gunport with the bulkheads interfering. In the end, I realized there was no other option. Those bulkhead-sections had to go.

View attachment 281919
The bulkhead portions marked in red at Bulkheads #2, 3 and 8, had to be removed completely which means that the upper sections of those bulkheads are now literally "floating" with no support at the bottom. That is why I said you must take the word "finished" lightly, because as soon as the glue is dry on the red filler pieces, I have to start fabricating supports for those three bulkheads. As all three those frames carry the deck beams this is vital that they are properly anchored on the starboard side before I start any work on the port side, as I will have to do the same cut-aways on that side.

View attachment 281920
Luckily, when I ordered the WB from Hans, I also ordered this little saw with three different blades. If I didn't have this, I have no idea of how I would have sawn out or removed those portions.

In any case, this where I am this afternoon:

View attachment 281921

Tonight, I will try to brace those bulkheads and tomorrow I can hopefully start on the port side. :D
Nice little saw. It cuts better on the pull stroke and forcing a push can bend the blade. (Don't ask me how I know this!)
 
Hello Heinrich- excellent discussion here on the gun port cut outs the bulkhead removal and reinforcement. It has made for interesting reading and learning Thumbsup. Awesome when so many experienced members contribute to your progress. Wonderful job on getting those gun ports and red inserts looking just right.
 
Hello Heinrich- excellent discussion here on the gun port cut outs the bulkhead removal and reinforcement. It has made for interesting reading and learning Thumbsup. Awesome when so many experienced members contribute to your progress. Wonderful job on getting those gun ports and red inserts looking just right.
Thank you so much Grant - and the sad thing about getting all those inserts just right, is that they will all be covered up! You will see nothing of them. Sometimes I really wonder about our sanity! ROTF
 
First off, I have no intention whatsoever to be offensive to anyone's work or capabilities, especially so when I don't have all the facts available. Plus I truthfully admire the apparent quality of the Kolderstok models, more so since Kolderstok's kits give us a glance at the rich past of the Netherlands.
But now, here's my but... When looking at the location of the frames in relation to the gunports, I can't help but wonder why the frames haven't been given a slightly different position, more matching the positions of the gunports? If necessary, add one or two half frames, to provide the necessary support for the hull planks? I understand the need to keep tight control on the cost of the kit, but unless the modelers choose to inscribe the gunports, this frame arrangement appears to require a rather advanced experience level.
I know the frame positions have been mentioned before, but again, the gunports, open or closed, are a distinct feature of almost any seagoing vessel of that era, so my idea is that the locations of the gunports should take precedence over the locations of the frames.
I find this a good question :)
It has not so much to do with costs, but more with the whole process of developping a kit.
I started with the clear idea to make the expedition ship of Willem Barentsz, and as we know now (living somewhat later then Barentsz) they did not have to use canons. So I decided to make the model without any armament. I also had the idea of scribing the gunports instead of cutting them out and glue back. And so the complete kit came together. But then scribing didn't look as good as cutting out so I decided to cut them out and glue back in place. No cutting away of frames, as the wood would be placed back onto it.

And then there came questions if a canon set would come available, as the ship certainly would have carried some.

Ok - what to do? Change the whole design, start all over again with new frames, new photo's, new building instructions etc? The kit was almost ready to bring it on the market, and many people where already waiting for it. Once you have choosen your path it is almost impossible to change that. For me it was definitely a no go to start again from almost zero
Adding guns with having to cut away some of the frames was the much easier option. It is also more like it was in real life. Ships didn't consist of 10 frames each a few feet apart, no. A wooden ship was frames from front to aft, and you always had to cut out some of the frames for the gun ports.
So here you can practice in small how the real boat building life was :)

Hans
Hello Hans,

I love this response to our colleague's excellent question. Even as a novice builder I find myself wondering why (and why not) with regard to the kit I am building. We often only think from the builder's perspective and we forget that kit development has been a long journey. I'm an orthodontist and sometimes my patients ask me: can we do this or that. Often the answer is: yes, if you want to start all over again...
 
I have recently finished reading Volume III of J. L. Motley's History of the United Netherlands, in which Motley gives a thorough account of the 1596/7 expedition of Barents and his comrades. They were iced in and had to spend the winter in the neighborhood of Nova Zembla where they were attacked by ravenous polar bears, the meat of which enabled them to survive. Barents was a skilled navigator of the order of Cook, and his detailed observations enabled him to accurately deduce the position of the house they constructed. Barents died right at the end of their ordeal and the sea was appropriately named for him. Europeans had fantastic ideas about the inhabitants of the Northern climes and that there was a northern route to China. The expedition laid all that to rest, and the Dutch turned their attention to the spice islands north of Australia where they displaced the cruel regimes of the Portuguese and Spaniards. Their monopoly of the spice trade set them up to become one of the wealthiest nations on the planet at the time.
 
I find this a good question :)
It has not so much to do with costs, but more with the whole process of developping a kit.
I started with the clear idea to make the expedition ship of Willem Barentsz, and as we know now (living somewhat later then Barentsz) they did not have to use canons. So I decided to make the model without any armament. I also had the idea of scribing the gunports instead of cutting them out and glue back. And so the complete kit came together. But then scribing didn't look as good as cutting out so I decided to cut them out and glue back in place. No cutting away of frames, as the wood would be placed back onto it.

And then there came questions if a canon set would come available, as the ship certainly would have carried some.

Ok - what to do? Change the whole design, start all over again with new frames, new photo's, new building instructions etc? The kit was almost ready to bring it on the market, and many people where already waiting for it. Once you have choosen your path it is almost impossible to change that. For me it was definitely a no go to start again from almost zero
Adding guns with having to cut away some of the frames was the much easier option. It is also more like it was in real life. Ships didn't consist of 10 frames each a few feet apart, no. A wooden ship was frames from front to aft, and you always had to cut out some of the frames for the gun ports.
So here you can practice in small how the real boat building life was :)

Hans

Well said Hans.

Ron
 
I find this a good question :)
It has not so much to do with costs, but more with the whole process of developping a kit.
I started with the clear idea to make the expedition ship of Willem Barentsz, and as we know now (living somewhat later then Barentsz) they did not have to use canons. So I decided to make the model without any armament. I also had the idea of scribing the gunports instead of cutting them out and glue back. And so the complete kit came together. But then scribing didn't look as good as cutting out so I decided to cut them out and glue back in place. No cutting away of frames, as the wood would be placed back onto it.

And then there came questions if a canon set would come available, as the ship certainly would have carried some.

Ok - what to do? Change the whole design, start all over again with new frames, new photo's, new building instructions etc? The kit was almost ready to bring it on the market, and many people where already waiting for it. Once you have choosen your path it is almost impossible to change that. For me it was definitely a no go to start again from almost zero
Adding guns with having to cut away some of the frames was the much easier option. It is also more like it was in real life. Ships didn't consist of 10 frames each a few feet apart, no. A wooden ship was frames from front to aft, and you always had to cut out some of the frames for the gun ports.
So here you can practice in small how the real boat building life was :)

Hans
Hello Hans,

Thank you for your kind and comprehensive response to my question.
At least it helps me understand the spacing of the frames of your kit.
Unfortunately I know from experience in my engineering profession what a nightmare the rearrangement of frames brings about. Especially our manufacturing engineers went wild with frame rearrangement suggestions...
Having visited the Batavia shipyard I learned about the frames and frame placement on ships from that era, but when looking at the pains Heinrich had to endure, I could easily do without that exercise. ;)

Kind regards,

Johan
Homer Simpson once said: if something is hard to do, it isn't worth doing....
We all know this is just how we not should do it.
When the Kolderstok Batavia was just launched all the frames were made of 4 mm plywood. This was because it was an available thickness, good quality and not too expensive. It also fitted nice with all the details and gun ports.
Then the laser cutting company said: whe're skipping the 4 mm - could you please change your design into 6 mm frames? No changing of place, or number or dimensions, only the thickness was changed. This already was a h*ck of a job to do (this despite I am an engineer myself)

From experience I know that removing parts of the frames can cause some weak spots, but if the hull planking is glued to the frames in a proper way, and the hull planks are glued onto each other, the complete hull wil not loose much of its strenght.
Just changing the thickness or the width of a frame, oh, I know that one, what a nightmare...

The rigidity of a properly constructed and assembled hull is amazing.
 
Nice little saw. It cuts better on the pull stroke and forcing a push can bend the blade. (Don't ask me how I know this!)
Well - a good craftsman knows his tools :)
We call this a Japanese saw. Because it cuts on the pull stroke you can made the blade much thinner as when it would cut on the push stroke. This makes the blade more flexible and more suited for these tricky little jobs.
 
@RDN1954
@Kolderstok
@dockattner
@wmgrimball
@rtibbs

Dear Friends

I got up to go to the bathroom (too many cups of coffee during the day, you know :)), when I quickly snuck into the spare bedroom to check what is happening on SOS. What an excellent question by Johan and what excellent responses by you all, and in particular by Hans. Thank you all for this.

BUT ... it is now 05H41 in the morning in China, and the temperature is -4 Degrees Celcius. In two hours' time, I will start the day and respond to you all - but for now - the cosy, warm bed and the Admiral's back, win! ROTF
 
Back
Top